记录--如何优雅地校验后端接口数据
这里给大家分享我在网上总结出来的一些知识,希望对大家有所帮助

背景
最近新接手了一批项目,还没来得及接新需求,一大堆bug就接踵而至,仔细一看,应该返回数组的字段返回了 null,或者没有返回,甚至返回了字符串 "null"???
这我能忍?我立刻截图发到群里,用红框加大加粗重点标出。后端同学也积极响应,答应改正。
第二天,同样的事情又在其他的项目上演,我只是一个小前端,为什么什么错都找我啊!!
日子不能再这样下去,于是我决定写一个工具来解决遇到 bug 永远在找前端的困境。
TypeScript 运行时校验
如何对接口数据进行校验呢,因为我们的项目是 React+TypeScript 写的,所以第一时间就想到了使用 TypeScript 进行数据校验。但是众所周知,TypeScript 用于编译时校验,有没有办法作用到运行时呢?
我还真找到了一些运行时类型校验的库:typescript-needs-types,大部分需要使用指定格式编写代码,相当于对项目进行重构,拿其中 star 最多的 zod 举例,代码如下。
1 2 3 4 5 6 7 8 9 10 11 | import { z } from "zod";const User = z.object({ username: z.string(),});User.parse({ username: "Ludwig" });// extract the inferred typetype User = z.infer<typeof User>;// { username: string } |
我宁可查 bug 也不可能重构手里一大堆项目啊。此种方案 ❎。
此时看到了 typescript-json-schema 可以把 TypeScript 定义转为 JSON Schema ,然后再使用 JSON Schema 对数据进行校验就可以啦。这种方案比较灵活,且对代码入侵性较小。
搭建一个项目测试一下!
使用 npx create-react-app my-app --template typescript 快速创建一个 React+TS 项目。
首先安装依赖 npm install typescript-json-schema
创建类型文件 src/types/user.ts
1 2 3 4 5 | export interface IUserInfo { staffId: number name: string email: string} |
然后创建 src/types/index.ts 文件并引入刚才的类型。
1 2 3 4 5 6 7 8 9 10 11 12 | import { IUserInfo } from './user';interface ILabel { id: number; name: string; color: string; remark?: string;}type ILabelArray = ILabel[];type IUserInfoAlias = IUserInfo; |
接下来在 package.json 添加脚本
1 2 3 4 | "scripts": { // ... "json": "typescript-json-schema src/types/index.ts '*' -o src/types/index.json --id=api --required --strictNullChecks"} |
npm run json 可以看到新建了一个 src/types/index.json 文件(此步在已有项目中可能会报错报错,可以尝试在 json 命令中添加 --ignoreErrors 参数),打开文件可以看到已经成功转成了 JSON Schema 格式。1 2 3 4 5 6 7 8 9 10 11 12 13 14 15 16 17 18 19 20 21 22 23 24 25 26 27 28 29 30 31 32 33 34 35 36 37 38 39 40 41 42 43 44 45 46 47 48 49 50 51 52 53 | { "$id": "api", "$schema": "http://json-schema.org/draft-07/schema#", "definitions": { "ILabel": { "properties": { "color": { "type": "string" }, "id": { "type": "number" }, "name": { "type": "string" }, "remark": { "type": "string" } }, "required": [ "color", "id", "name" ], "type": "object" }, "ILabelArray": { "items": { "$ref": "api#/definitions/ILabel" }, "type": "array" }, "IUserInfoAlias": { "properties": { "email": { "type": "string" }, "name": { "type": "string" }, "staffId": { "type": "number" } }, "required": [ "email", "name", "staffId" ], "type": "object" } }} |
使用 JSON Schema 校验数据
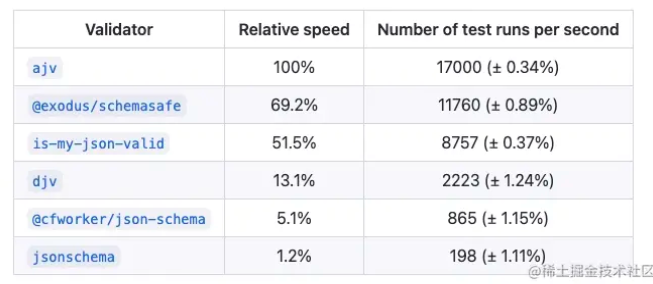
至于如何使用JSON Schema 校验数据,我找到了现成的库 ajv,至于为什么选择 ajv,主要是因为它说它很快,详见:github.com/ebdrup/json…
接下来尝试一下。我找到了中文版文档,有兴趣的可以去看下 www.febeacon.com/ajv-docs-zh…
先安装依赖 npm install ajv,然后创建文件 src/validate.ts
1 2 3 4 5 6 7 8 9 10 11 12 13 14 15 16 17 18 19 | import Ajv from 'ajv';import schema from './types/index.json';const ajv = new Ajv({ schemas: [schema] });export function validateDataByType(type: string, data: unknown) { console.log(`开始校验,类型:${type}, 数据:`, data); var validate = ajv.getSchema(`api#/definitions/${type}`); if (validate) { const valid = validate(data); if (!valid) { console.log('校验失败', validate.errors); } else { console.log('校验成功'); } }} |
接下来在 src/index.tsx 添加下面代码来测试一下。
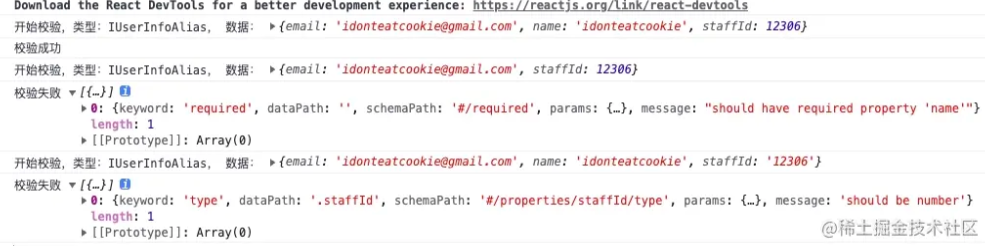
1 2 3 4 5 6 7 8 9 10 11 12 13 14 15 16 | validateDataByType('IUserInfoAlias', { email: 'idonteatcookie@gmail.com', name: 'idonteatcookie', staffId: 12306})validateDataByType('IUserInfoAlias', { email: 'idonteatcookie@gmail.com', staffId: 12306})validateDataByType('IUserInfoAlias', { email: 'idonteatcookie@gmail.com', name: 'idonteatcookie', staffId: '12306'}) |
可以在控制台看到成功打印如下信息:
拦截请求
因为项目中发送请求都是调用统一封装的函数,所以我首先想到的是在函数中增加一层校验逻辑。但是这样的话就与项目代码耦合严重,换一个项目又要再写一份。我真的有好多项目QAQ。
那干脆拦截所有请求统一处理好了。
很容易的找到了拦截所有 XMLHttpRequest 请求的库 ajax-hook,可以非常简单地对请求做处理。
首先安装依赖 npm install ajax-hook,然后创建 src/interceptTool.ts:
1 2 3 4 5 6 7 8 9 10 | import { proxy } from 'ajax-hook';export function intercept() { // 获取 XMLHttpRequest 发送的请求 proxy({ onResponse: (response: any, handler: any) => { console.log('xhr', response.response) handler.next(response); }, });} |
这样就拦截了所有的 XMLHttpRequest 发送的请求,但是我突然想到我们的项目,好像使用 fetch 发送的请求来着???
好叭,那就再拦截一遍 fetch 发送的请求。
1 2 3 4 5 6 7 8 9 10 11 12 13 | export function intercept() { // ... const { fetch: originalFetch } = window; // 获取 fetch 发送的请求 window.fetch = async (...args) => { const response = await originalFetch(...args); response.clone().json().then((data: { result: any }) => { console.log('window.fetch', args, data); return data; }); return response; };} |
为了证明拦截成功,使用 json-server 搭建一个本地 mock 服务器。首先安装 npm install json-server,然后在根目录创建文件 db.json:
1 2 3 4 5 6 7 8 9 10 11 12 13 14 15 | { "user": { "staffId": 1, "name": "cookie1", "email": "cookie@cookie.com" }, "labels": [ { "id": 1, "name": "ck", "color": "red", "remark": "blabla" }, { "id": 2, "color": "green" } ]} |
再在 package.json 添加脚本
1 2 3 | "scripts": { "serve": "json-server --watch db.json -p 8000"}, |
现在执行 npm run serve 就可以启动服务器了。在 src/index.tsx 增加调用接口的代码,并引入 src/interceptTool.ts。
1 2 3 4 5 6 7 8 9 | import { intercept } from './interceptTool';// ... other codeintercept();fetch('http://localhost:8000/user');const xhr = new XMLHttpRequest();xhr.open('GET', 'http://localhost:8000/labels');xhr.send(); |
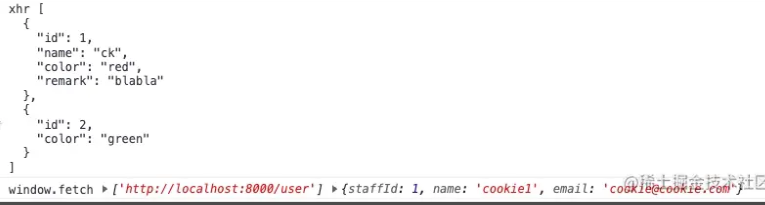
可以看到两种请求都拦截成功了。
校验接口返回数据
胜利在望,只差最后一步,校验返回数据。我们校验数据需要提供两个关键信息,数据本身和对应的类型名,为了将两者对应起来,需要再创建一个映射文件,把 url 和类型名对应起来。
创建文件 src/urlMapType.ts 然后添加内容
1 2 3 4 | export const urlMapType = { 'http://localhost:8000/user': 'IUserInfoAlias', 'http://localhost:8000/labels': 'ILabelArray',} |
我们在 src/validate.ts 新增函数 validateDataByUrl
1 2 3 4 5 6 7 8 9 10 11 | import { urlMapType } from './urlMapType';// ...export function validateDataByUrl(url: string, data: unknown) { const type = urlMapType[url as keyof typeof urlMapType]; if (!type) { // 没有定义对应格式不进行校验 return; } console.log(`==== 开始校验 === url ${url}`); validateDataByType(type, data);} |
然后在 src/interceptTool.ts 文件中引用
1 2 3 4 5 6 7 8 9 10 11 12 13 14 15 16 17 18 19 20 21 22 23 | import { proxy } from 'ajax-hook';import { validateDataByUrl } from './validate';export function intercept() { // 获取 XMLHttpRequest 发送的请求 proxy({ onResponse: (response, handler: any) => { validateDataByUrl(response.config.url, JSON.parse(response.response)); handler.next(response); }, }); const { fetch: originalFetch } = window; // 获取 fetch 发送的请求 window.fetch = async (...args) => { const response = await originalFetch(...args); response.json().then((data: any) => { validateDataByUrl(args[0] as string, data); return data; }); return response; };} |
现在可以在控制台看到接口数据校验的接口辣~ ✿✿ヽ(°▽°)ノ✿

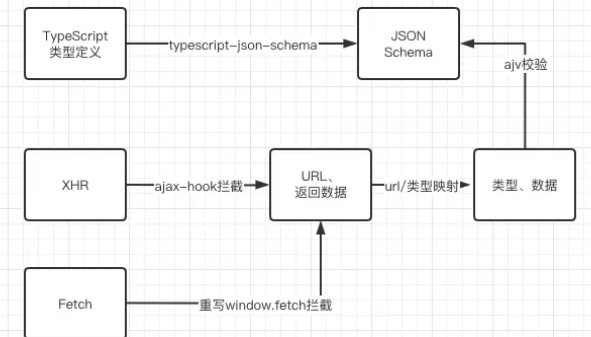
总结下流程图
后续规划
目前所做的事情,准确的说不是拦截,只是获取返回数据,然后对比打印校验结果,因为初步目标不涉及数据的处理。
后续会考虑对不合法的数据进行处理,比如应该返回数组但是返回了 null 的情况,如果能自动赋值 [],就可以防止前端页面崩溃的情况了。
本文转载于:
https://juejin.cn/post/7166061734803963917
如果对您有所帮助,欢迎您点个关注,我会定时更新技术文档,大家一起讨论学习,一起进步。


【推荐】国内首个AI IDE,深度理解中文开发场景,立即下载体验Trae
【推荐】编程新体验,更懂你的AI,立即体验豆包MarsCode编程助手
【推荐】抖音旗下AI助手豆包,你的智能百科全书,全免费不限次数
【推荐】轻量又高性能的 SSH 工具 IShell:AI 加持,快人一步
· 10年+ .NET Coder 心语 ── 封装的思维:从隐藏、稳定开始理解其本质意义
· 地球OL攻略 —— 某应届生求职总结
· 提示词工程——AI应用必不可少的技术
· Open-Sora 2.0 重磅开源!
· 周边上新:园子的第一款马克杯温暖上架