记录--微信小程序获取用户信息(附代码、流程图)
这里给大家分享我在网上总结出来的一些知识,希望对大家有所帮助
本篇文章主要总结了微信小程序开发,获取用户信息的整个流程步骤。补充了网上很多碎片化的代码,本人梳理了思路写下了这篇文章。
思路
1、在js文件中,设置userinfo、hasUserinfo、canIUseGetUserProfile数据
2、先判断本地缓存( wx.getStorageSync() )是否含有用户的数据,如果有就用缓存里的数据,没有就进行第三步
3、在界面添加登录按钮,用户点击按钮调用wx.getUserProfile()函数来提示用户授权登录,授权成功后,把用户头像数据和名称数据保存到缓存区里,并且改变全局变量的值
流程图
自己大概画了一下大概的流程,但希望对您有帮助!

考虑到一些新手,我将完整代码发给大家,大家按照代码对应写入对应位置即可!
wxml
<view class="banner">
    <view class="topContainer">
        <view catchtap="showBcgImgArea">
            <image class="userinfo-avatar" mode="aspectFill" src="{{userinfo.avatarUrl}}"></image>
        </view>
        <view>
            <text class="userinfo-nickname">{{userinfo.nickName}}</text>
        </view>
    </view>
    <button wx:if="{{!hasUserInfo && canIUseGetUserProfile}}" open-type="getUserInfo" bindtap="getUserProfile" class="userLogin">
        点击登录
    </button>
</view>
js
注意:avatarUrl:'../../images/ckbg1.png'
这行代码意思是当没有获取到用户信息时,页面展示头像的路径,自己要先准备好一张图片(放在images文件夹下),并填好头像路径!
data: {
        //用户基本信息(头像、昵称)
        userinfo: {
            avatarUrl:'../../images/ckbg1.png',
            nickName:'未授权'
        },
        //是否已经获取用户信息
        hasUserInfo: false,
        //是否可以调用获取信息得函数
        canIUseGetUserProfile: false,

    },
 //第一次获取用户信息
getUserProfile : function(e){
        wx.getUserProfile({
          desc: '获取您的微信个人信息',
          success:(res)=>{
              this.setData({
                userinfo:res.userInfo,
                hasUserInfo:true
              })
              wx.setStorageSync('userinfo', res.userInfo)
          },
          fail:function(e){
              wx.showToast({
                title: '你选择了取消',
                icon: "none",
                duration: 1500,
                mask: true
              })
          }
        })
},
 onLoad: function(n) {
    this.setData({
        canIUseGetUserProfile : true
    })

},
onShow: function() {
        //获取用户的本地缓存数据,userinfo信息是在用户授权登录时保存的
        var n = wx.getStorageSync("userinfo");
        //当本地缓存的用户名称不为""或者null时,设置userinfo信息
        if(n.nickName != '' && n.nickName != null){
            this.setData({
                userinfo: n,
                hasUserInfo:true,
                canIUseGetUserProfile:true
            })
            // 通过wx.login获取登录凭证(code),然后通过code去获取我们用户的openid
            wx.login({
              success:(res)=>{
                  console.log(res);
              },
            })
        }
        //清空缓存信息,测试使用
        // wx.removeStorage({
        //     key: 'userinfo',
        // });
},
在这里有必要讲解几处代码:
1、当页面加载完毕时(onLoad函数),我们将canIUseGetUserProfile数据设置ture,代表可以使用使用getUserProfile了,避免页面没有加载完毕就去获取用户信息!
2、当页面即将展示时(onShow函数),调用wx.getStorageSync获取本地缓存数据,来控制按钮的显示与否
wxss
.banner {
    border-radius: 10rpx;
    border: none;
    box-sizing: content-box;
    padding: 20rpx 0;
    width: 90%;
    height: 370rpx;
    margin: 20rpx auto;
    background:linear-gradient(109.6deg, rgb(204, 228, 247) 11.2%, rgb(237, 246, 250) 100.2%);
    /* background-image:image("../../images/cloudbg.jpg"); */
    text-align: center;
}

.topContainer {
    width: 100%;
    height: 260rpx;
    background-size: 100%;
    border-radius: 9px;
}
.userinfo-nickname {
    color:black;
}
.userLogin{
    width: 50%;
    box-sizing: none;
    font-size: medium;
}
.userinfo-avatar {
    width: 150rpx;
    height: 150rpx;
    margin-bottom: 10rpx;
    border-radius: 50%;
}
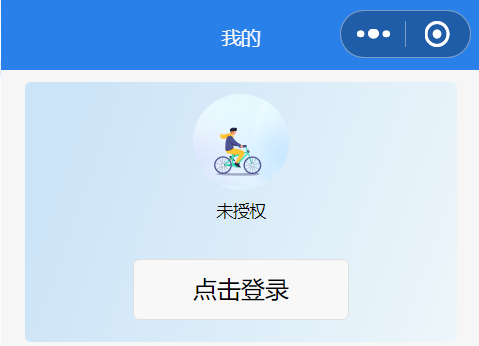
当缓存里没有记录用户信息时,显示的页面会出现登录按钮:

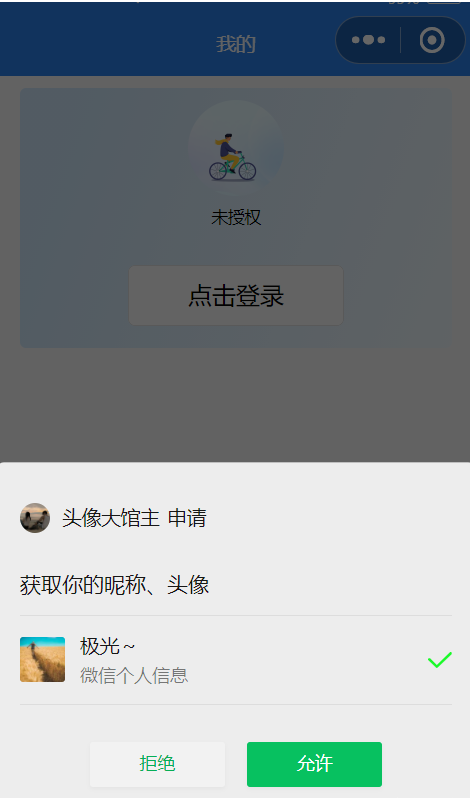
点击按钮后,弹出授权信息

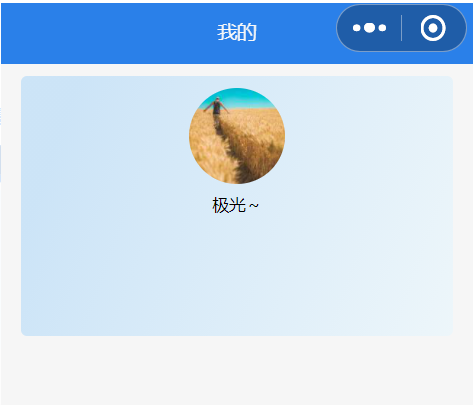
点击允许后,会出现微信头像和微信名称

效果展示:

本文转载于:
https://blog.csdn.net/calm_programmer/article/details/124207072
如果对您有所帮助,欢迎您点个关注,我会定时更新技术文档,大家一起讨论学习,一起进步。


