Python 线程
1. 线程
什么是线程:
线程是操作系统能够进行运算调度的最小单位。它被包含在进程之中,是进程中的实际运作单位。一条线程指的是进程中一个单一顺序的控制流,一个进程中可以并发多个线程,每条线程并行执行不同的任务。
python GIL全局解释器锁(仅需了解)
无论你启多少个线程,你有多少个cpu, Python在执行的时候会淡定的在同一时刻只允许一个线程运行
首先需要明确的一点是GIL并不是Python的特性,它是在实现Python解析器(CPython)时所引入的一个概念。就好比C++是一套语言(语法)标准,但是可以用不同的编译器来编译成可执行代码。有名的编译器例如GCC,INTEL C++,Visual C++等。Python也一样,同样一段代码可以通过CPython,PyPy,Psyco等不同的Python执行环境来执行。像其中的JPython就没有GIL。然而因为CPython是大部分环境下默认的Python执行环境。所以在很多人的概念里CPython就是Python,也就想当然的把GIL归结为Python语言的缺陷。所以这里要先明确一点:GIL并不是Python的特性,Python完全可以不依赖于GIL
这篇文章透彻的剖析了GIL对python多线程的影响,强烈推荐看一下:http://www.dabeaz.com/python/UnderstandingGIL.pdf
1.1 threading模块
threading模块建立在_thread 模块之上。thread模块以低级、原始的方式来处理和控制线程,而threading 模块通过对thread 进行二次封装,提供了更方便的 api来处理线程。
|
1
|
pip install --upgrade pip |
验证安装是否成功:打开cmd,进入python模式,输入import paramiko;无报错则代表成功;
直接调用:
import threading
import time

def sayhi(num): #定义每个线程要运行的函数

    print("running on number:%s" %num)

    time.sleep(3)

if __name__ == '__main__':

    t1 = threading.Thread(target=sayhi,args=(1,)) #生成一个线程实例
    t2 = threading.Thread(target=sayhi,args=(2,)) #生成另一个线程实例

    t1.start() #启动线程
    t2.start() #启动另一个线程

    print(t1.getName()) #获取线程名
    print(t2.getName())
继承调用:
import threading
import time


class MyThread(threading.Thread):
    def __init__(self,num):
        threading.Thread.__init__(self)
        self.num = num

    def run(self):#定义每个线程要运行的函数

        print("running on number:%s" %self.num)

        time.sleep(3)

if __name__ == '__main__':

    t1 = MyThread(1)
    t2 = MyThread(2)
    t1.start()
    t2.start()
Python通过两个标准库thread和threading提供对线程的支持。thread提供了低级别的、原始的线程以及一个简单的锁。
thread 模块提供的其他方法:
- threading.currentThread(): 返回当前的线程变量。
- threading.enumerate(): 返回一个包含正在运行的线程的list。正在运行指线程启动后、结束前,不包括启动前和终止后的线程。
- threading.activeCount(): 返回正在运行的线程数量,与len(threading.enumerate())有相同的结果。
除了使用方法外,线程模块同样提供了Thread类来处理线程,Thread类提供了以下方法:
- run(): 用以表示线程活动的方法。
- start():启动线程活动。
- join([time]): 等待至线程中止。这阻塞调用线程直至线程的join() 方法被调用中止-正常退出或者抛出未处理的异常-或者是可选的超时发生。
- isAlive(): 返回线程是否活动的。
- getName(): 返回线程名。
- setName(): 设置线程名。
1.2 Join & Daemon
1.2.1 join 等待
- 不加 join 主线程不会等子线程执行完毕再往下走。主线程和子线程自己执行自己的,没有依赖关系。
- 加了 join 有了依赖关系,需要等子线程执行完成后在执行主线程
join 等待,线程执行完后,等待其他线程执行。
import  threading,time

def run(n,sleep_time):
    print("test...",n)
    time.sleep(sleep_time)
    print("test...done", n)
if __name__ == '__main__':

    t1 = threading.Thread(target=run,args=("t1",2))
    t2 = threading.Thread(target=run,args=("t2",3))

    # 两个同时执行,然后等待t1执行完成后,主线程和子线程再开始执行
    t1.start()
    t2.start()
    t1.join()   # 等待t1

    print("main thread")

# 程序输出
# test... t1
# test... t2
# test...done t1
# main thread
# test...done t2
等50个线程都执行完成后在计算运行时间
- 加 join结果:cost: 2.008481502532958984
- 不加 join 结果:cost: 0.008481502532958984
import threading
import time

def run(arg):
    print(f"{arg}.....")
    time.sleep(2)   # 等待2秒

if __name__ =="__main__":
    t_objs = []
    start = time.time()
    for i in range(50):
        t = threading.Thread(target=run,args=(f"{i}",))
        t.start()
        t_objs.append(t)
    for t in t_objs:    # 循环等待
        t.join()
    print("all threads has fininshed...".center(50,"-"))
    print("cost:",time.time()-start)
1.2.2 Daemon 守护线程
- 守护线程:做为程序主线程的守护线程,当主线程退出时,守护线程也会退出不管有没有执行完毕。
- t.setDaemon() 设置为后台线程或前台线程(默认:False);通过一个布尔值设置线程是否为守护线程,必须在执行start()方法之后才可以使用。如果是后台线程,主线程执行过程中,后台线程也在进行,主线程执行完毕后,后台线程不论成功与否,均停止;如果是前台线程,主线程执行过程中,前台线程也在进行,主线程执行完毕后,等待前台线程也执行完成后,程序停止
import threading,time

def run(n):
    print('[%s]------running----\n' % n)
    time.sleep(2)
    print('--done--')


def main():
    for i in range(5):
        t = threading.Thread(target=run, args=[i, ])
        t.start()
        t.join(1)
        print('starting thread', t.getName())


m = threading.Thread(target=main, args=[])
m.setDaemon(True)  # 将main线程设置为Daemon线程,它做为程序主线程的守护线程,当主线程退出时,
                    # m线程也会退出,由m启动的其它子线程会同时退出,不管是否执行完任务
m.start()
m.join(timeout=2)
print("---main thread done----")

# 程序输出
# [0]------running----
# starting thread Thread-2
# [1]------running----
# --done--
# ---main thread done----
2.线程锁(互斥锁Mutex)
我们使用线程对数据进行操作的时候,如果多个线程同时修改某个数据,可能会出现不可预料的结果,为了保证数据的准确性,引入了锁的概念。
例:假设列表A的所有元素就为0,当一个线程从前向后打印列表的所有元素,另外一个线程则从后向前修改列表的元素为1,那么输出的时候,列表的元素就会一部分为0,一部分为1,这就导致了数据的不一致。锁的出现解决了这个问题。


import time
import threading


def addNum():
    global num  # 在每个线程中都获取这个全局变量
    print('--get num:', num)
    time.sleep(1)
    num -= 1  # 对此公共变量进行-1操作


num = 100  # 设定一个共享变量
thread_list = []
for i in range(100):
    t = threading.Thread(target=addNum)
    t.start()
    thread_list.append(t)

for t in thread_list:  # 等待所有线程执行完毕
    t.join()

print('final num:', num)
import time
import threading


def addNum(lock):
    global num  # 在每个线程中都获取这个全局变量

    time.sleep(1)
    lock.acquire()  # 修改数据前加锁
    print('--get num:', num)
    num -= 1  # 对此公共变量进行-1操作
    lock.release()  # 修改后释放


num = 100  # 设定一个共享变量
thread_list = []
lock = threading.Lock()  # 生成全局锁
for i in range(100):
    t = threading.Thread(target=addNum,args=(lock,))
    t.start()
    thread_list.append(t)

for t in thread_list:  # 等待所有线程执行完毕
    t.join()

print('final num:', num)
GIL VS LOCK
机智的同学可能会问到这个问题,就是既然你之前说过了,Python已经有一个GIL来保证同一时间只能有一个线程来执行了,为什么这里还需要lock? 注意啦,这里的lock是用户级的lock,跟那个GIL没关系 ,具体我们通过下图来看一下+配合我现场讲给大家,就明白了。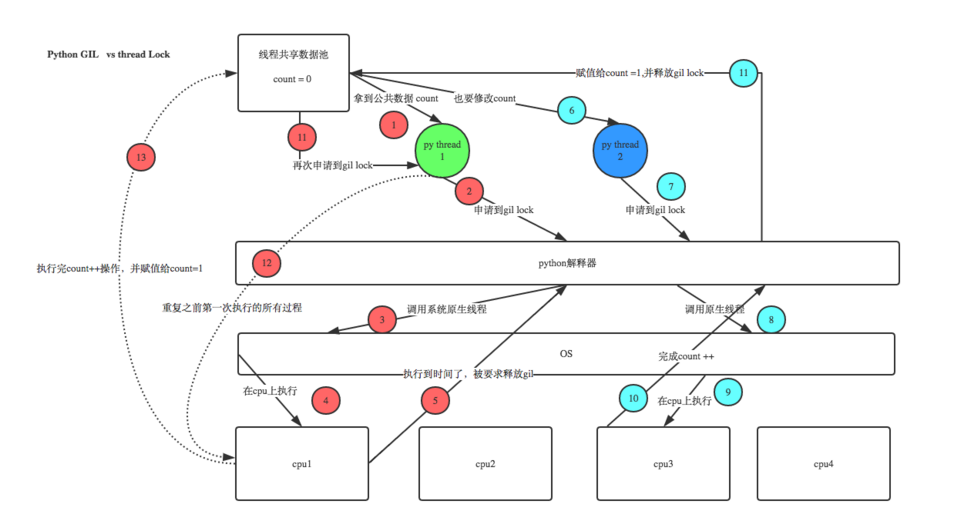
2.1 死锁
- 死锁:当张三拿到面条和筷子时,可以吃到面条,当张三拿到筷子,李四拿到面条,形成了阻塞。
import time
from threading import Lock,Thread

noodle_lock  = Lock()
fork_lock = Lock()
def eat1(name):
    noodle_lock.acquire()
    print('%s拿到面条啦'%name)
    fork_lock.acquire()
    print('%s拿到筷子了'%name)
    print('%s吃面'%name)
    fork_lock.release()
    noodle_lock.release()

def eat2(name):
    fork_lock.acquire()
    print('%s拿到筷子了'%name)
    time.sleep(1)
    noodle_lock.acquire()
    print('%s拿到面条啦'%name)
    print('%s吃面'%name)
    noodle_lock.release()
    fork_lock.release()

Thread(target=eat1,args=('张三',)).start()
Thread(target=eat2,args=('李四',)).start()
Thread(target=eat1,args=('王五',)).start()
Thread(target=eat2,args=('赵六',)).start()
2.2 递归锁
说白了就是在一个大锁中还要再包含子锁
 1 import threading, time
 2
 3
 4 def run1():
 5     print("grab the first part data")
 6     lock.acquire()
 7     global num
 8     num += 1
 9     lock.release()
10     return num
11
12
13 def run2():
14     print("grab the second part data")
15     lock.acquire()
16     global num2
17     num2 += 1
18     lock.release()
19     return num2
20
21
22 def run3():
23     lock.acquire()
24     res = run1()
25     print('--------between run1 and run2-----')
26     res2 = run2()
27     lock.release()
28     print(res, res2)
29
30
31 if __name__ == '__main__':
32
33     num, num2 = 0, 0
34     lock = threading.RLock()
35     for i in range(10):
36         t = threading.Thread(target=run3)
37         t.start()
38
39 while threading.active_count() != 1:
40     print(threading.active_count())
41 else:
42     print('----all threads done---')
43     print(num, num2)
2.2.1 threading.RLock和threading.Lock 的区别:
RLock允许在同一线程中被多次acquire。而Lock却不允许这种情况。 如果使用RLock,那么acquire和release必须成对出现,即调用了n次acquire,必须调用n次的release才能真正释放所占用的琐。
import threading
lock = threading.Lock()    #Lock对象
lock.acquire()
lock.acquire()  #产生了死琐。
lock.release()
lock.release()

import threading
rLock = threading.RLock()  #RLock对象
rLock.acquire()
rLock.acquire()    #在同一线程内,程序不会堵塞。
rLock.release()
rLock.release()
3. 信号量
- 互斥锁同时只允许一个线程更改数据,而Semaphore是同时允许一定数量的线程更改数据,比如厕所有3个坑,那最多只允许3个人上厕所,后面的人只能等里面有人出来了才能再进去。
import threading, time

def run(n):
    semaphore.acquire()
    time.sleep(1)
    print("run the thread: %s\n" % n)
    semaphore.release()


if __name__ == '__main__':

    num = 0
    # semaphore = threading.BoundedSemaphore(5)  # 最多允许5个线程同时运行
    semaphore  = threading.Semaphore(5)
    for i in range(20):
        t = threading.Thread(target=run, args=(i,))
        t.start()

    while threading.active_count() != 1:
        pass  # print threading.active_count()
    else:
        print('----all threads done---')
        print(num)
4. 事件(event)
- Event是线程间通信最间的机制之一:一个线程发送一个event信号,其他的线程则等待这个信号。用于主线程控制其他线程的执行。 Events 管理一个flag,这个flag可以使用set()设置成True或者使用clear()重置为False,wait()则用于阻塞,在flag为True之前。flag默认为False。
- 事件默认状态是 False
方法:
- Event.wait([timeout]) :堵塞线程,直到Event对象内部标识位被设为True或超时(如果提供了参数timeout)。
- Event.set() :将标识位设为Ture
- Event.clear() :将标识伴设为False。
- Event.isSet() :判断标识位是否为Ture。
当线程执行的时候,如果flag为False,则线程会阻塞,当flag为True的时候,线程不会阻塞。它提供了本地和远程的并发性。
import threading,time
import random
def light():
    if not event.isSet():
        event.set() #wait就不阻塞 #绿灯状态
    count = 0
    while True:
        if count < 10:
            print('\033[42;1m--green light on---\033[0m')
        elif count <13:
            print('\033[43;1m--yellow light on---\033[0m')
        elif count <20:
            if event.isSet():
                event.clear()
            print('\033[41;1m--red light on---\033[0m')
        else:
            count = 0
            event.set() #打开绿灯
        time.sleep(1)
        count +=1
def car(n):
    while 1:
        time.sleep(random.randrange(10))
        if  event.isSet(): #绿灯
            print("car [%s] is running.." % n)
        else:
            print("car [%s] is waiting for the red light.." %n)
if __name__ == '__main__':
    event = threading.Event()
    Light = threading.Thread(target=light)
    Light.start()
    for i in range(3):
        t = threading.Thread(target=car,args=(i,))
        t.start()
5. 条件和定时器
条件:
- Condition 条件,锁。
- 一个条件被创建时,默认有一个False状态,会影响wait一直处于等待状态。
- notify(int数据类型) 创建几把钥匙。
from threading import Condition

from threading import Thread,Condition
def func(con,i):
    con.acquire()
    con.wait() # 等钥匙
    print('在第%s个循环里'%i)
    con.release()
con = Condition()
for i in range(10):
    Thread(target=func,args = (con,i)).start()
while True:
    num = int(input('>>>'))
    con.acquire()
    con.notify(num)  # 造钥匙
    con.release()
定时器:
import time
from threading import Timer
def func():
    print('时间同步')   #1-3

while True:
    t = Timer(5,func).start()   # 非阻塞的
    time.sleep(5)
6. 队列
Python的Queue模块中提供了同步的、线程安全的队列类,包括FIFO(先入先出)队列Queue,LIFO(后入先出)队列LifoQueue,和优先级队列PriorityQueue。这些队列都实现了锁原语,能够在多线程中直接使用。可以使用队列来实现线程间的同步。
一些常用方法:
- task_done()
- 意味着之前入队的一个任务已经完成。每一个get()调用得到一个任务,接下来的task_done()调用告诉队列该任务已经处理完毕。
- 如果当前一个join()正在阻塞,它将在队列中的所有任务都处理完时恢复执行(即每一个由put()调用入队的任务都有一个对应的task_done()调用)。
- join()
- 阻塞调用线程,直到队列中的所有任务被处理掉。
- 只要有数据被加入队列,未完成的任务数就会增加。当线程调用task_done()(意味着有线程取得任务并完成任务),未完成的任务数就会减少。当未完成的任务数降到0,join()解除阻塞。
- put(item[, block[, timeout]]) 将item放入队列中。
- 如果可选的参数block为True且timeout为空对象(默认的情况,阻塞调用,无超时)。
- 如果timeout是个正整数,阻塞调用进程最多timeout秒,如果一直无空空间可用,抛出Full异常(带超时的阻塞调用)。
- 如果block为False,如果有空闲空间可用将数据放入队列,否则立即抛出Full异常
- 其非阻塞版本为
put_nowait等同于put(item, False)
- get([block[, timeout]])
- 从队列中移除并返回一个数据。block跟timeout参数同
put方法 - 其非阻塞方法为`get_nowait()`相当与
get(False)
- 从队列中移除并返回一个数据。block跟timeout参数同
- empty() 如果队列为空,返回True,反之返回False
 1 import queue
 2 q = queue.Queue()
 3 for i in range(5):
 4     q.put(i)
 5 while not q.empty():
 6     print(q.get())
 7
 8 #输出结果
 9 #0
10 #1
11 #2
12 #3
13 #4
 1 import queue
 2 q = queue.LifoQueue()
 3 for i in range(5):
 4     q.put(i)
 5 while not q.empty():
 6     print(q.get())
 7 #输出结果
 8 #4
 9 #3
10 #2
11 #1
12 #0
 1 import queue
 2
 3 q = queue.PriorityQueue()
 4
 5 q.put((-1,"aa"))
 6 q.put((3,"dd"))
 7 q.put((10,"alex"))
 8 q.put((6,"ww"))
 9
10 print(q.get())
11 print(q.get())
12 print(q.get())
13 print(q.get())
14
15 #输出结果
16 #(-1, 'aa')
17 #(3, 'dd')
18 #(6, 'ww')
19 #(10, 'alex')
7. 线程池
# 模块
    concurrent.futures    # 模块提供了高度封装的异步调用接口
    ThreadPoolExecutor   # 线程池,提供异步调用
    ProcessPoolExecutor   # 进程池,提供异步调用
    两者都实现了相同的接口,该接口由抽象的Executor类定义。


# 方法
    submit(fn, *args, **kwargs)    # 异步提交任务
    map(func, *iterables, timeout=None, chunksize=1)     # 取代for循环submit的操作
    shutdown(wait=True)
        # 相当于进程池的pool.close()+pool.join()操作
        # wait=True,等待池内所有任务执行完毕回收完资源后才继续
        # wait=False,立即返回,并不会等待池内的任务执行完毕
        # 但不管wait参数为何值,整个程序都会等到所有任务执行完毕
        # submit和map必须在shutdown之前
    result(timeout=None)    # 取得结果
    add_done_callback(fn)    # 回调函数
    done()    # 判断某一个线程是否完成
    cancle()    # 取消某个任务
#介绍
The ProcessPoolExecutor class is an Executor subclass that uses a pool of processes to execute calls asynchronously. ProcessPoolExecutor uses the multiprocessing module, which allows it to side-step the Global Interpreter Lock but also means that only picklable objects can be executed and returned.

class concurrent.futures.ProcessPoolExecutor(max_workers=None, mp_context=None)
An Executor subclass that executes calls asynchronously using a pool of at most max_workers processes. If max_workers is None or not given, it will default to the number of processors on the machine. If max_workers is lower or equal to 0, then a ValueError will be raised.


#用法
from concurrent.futures import ThreadPoolExecutor,ProcessPoolExecutor

import os,time,random
def task(n):
    print('%s is runing' %os.getpid())
    time.sleep(random.randint(1,3))
    return n**2

if __name__ == '__main__':

    executor=ProcessPoolExecutor(max_workers=3)

    futures=[]
    for i in range(11):
        future=executor.submit(task,i)
        futures.append(future)
    executor.shutdown(True)
    print('+++>')
    for future in futures:
        print(future.result())

ProcessPoolExecutor
#介绍
ThreadPoolExecutor is an Executor subclass that uses a pool of threads to execute calls asynchronously.
class concurrent.futures.ThreadPoolExecutor(max_workers=None, thread_name_prefix='')
An Executor subclass that uses a pool of at most max_workers threads to execute calls asynchronously.

Changed in version 3.5: If max_workers is None or not given, it will default to the number of processors on the machine, multiplied by 5, assuming that ThreadPoolExecutor is often used to overlap I/O instead of CPU work and the number of workers should be higher than the number of workers for ProcessPoolExecutor.

New in version 3.6: The thread_name_prefix argument was added to allow users to control the threading.Thread names for worker threads created by the pool for easier debugging.

#用法
与ProcessPoolExecutor相同

ThreadPoolExecutor
from concurrent.futures import ThreadPoolExecutor,ProcessPoolExecutor
from multiprocessing import Pool
import requests
import json
import os

def get_page(url):
    print('<进程%s> get %s' %(os.getpid(),url))
    respone=requests.get(url)
    if respone.status_code == 200:
        return {'url':url,'text':respone.text}

def parse_page(res):
    res=res.result()
    print('<进程%s> parse %s' %(os.getpid(),res['url']))
    parse_res='url:<%s> size:[%s]\n' %(res['url'],len(res['text']))
    with open('db.txt','a') as f:
        f.write(parse_res)


if __name__ == '__main__':
    urls=[
        'https://www.baidu.com',
        'https://www.python.org',
        'https://www.openstack.org',
        'https://help.github.com/',
        'http://www.sina.com.cn/'
    ]

    # p=Pool(3)
    # for url in urls:
    #     p.apply_async(get_page,args=(url,),callback=pasrse_page)
    # p.close()
    # p.join()

    p=ProcessPoolExecutor(3)
    for url in urls:
        p.submit(get_page,url).add_done_callback(parse_page) #parse_page拿到的是一个future对象obj,需要用obj.result()拿到结果

 浙公网安备 33010602011771号