05-Tom猫(UIImageView的简单运用)
ViewController.h文件中:
1 @interface ViewController : UIViewController
2
3 @property (weak, nonatomic) IBOutlet UIImageView *tomImg;
4 - (IBAction)btnClick:(UIButton *)sender;
5
6 @end
ViewController.m文件中:
#import "ViewController.h"

@interface ViewController ()
{
    NSDictionary *_dicPicResoure; // 记录图片分组的个数
}

@end

@implementation ViewController

- (void)viewDidLoad {
    [super viewDidLoad];

    // 获取tom.plist的全路径
    NSString *path = [[NSBundle mainBundle] pathForResource:@"tom" ofType:@"plist"];

    // 根据文件路径加载字典
    _dicPicResoure = [NSDictionary dictionaryWithContentsOfFile:path];
}

- (IBAction)btnClick:(UIButton *)sender {

  // 如果正在播放,直接返回
    if (_tomImg.isAnimating) {
        return;
    }

    // 取出按钮文字
    NSString *prefixName = [sender titleForState:UIControlStateNormal];

    // 获取图片数量
    int count = [_dicPicResoure[prefixName] intValue];

    // 调用播放动画方法
    [self playWithPicCount:count andPrefixName:prefixName];
}


- (void)playWithPicCount:(int)count andPrefixName:(NSString *)name
{
    // 创建可变数组 存储图片对象
    NSMutableArray *aryImg = [NSMutableArray array];

    // 添加图片
    for (int i = 0; i < count; ++i) {
        NSString *picName = [NSString stringWithFormat:@"%@_d.jpg", name, i];

        // 加载数据(缓存)
//        UIImage *img = [UIImage imageNamed:picName];

        NSString *path = [[NSBundle mainBundle] pathForResource:picName ofType:nil];
        UIImage *img = [UIImage imageWithContentsOfFile:path];

        [aryImg addObject:img];
    }

    // 设置动画图片(有顺序)
    _tomImg.animationImages = aryImg;

    // 只播放一次
    _tomImg.animationRepeatCount = 1;

    // 设置动画的持续时间
    _tomImg.animationDuration = 0.1 * count;

    // 开始动画
    [_tomImg startAnimating];
}
@end
实现思路:
1)资源图片存放按类型分文件夹存放,并按播放顺序用编号进行命名。例如:表示生气的第一帧图片名格式:angry\angry_00.jpg
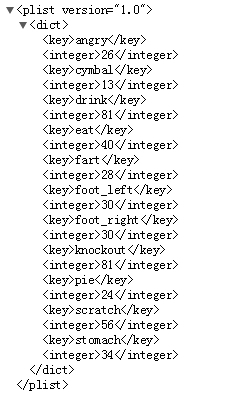
2)使用plist文件存储图片的文件夹名称以及该文件夹下的图片个数。例如:angry 26

3)UIButton的标题跟图片文件夹名称一致,例如表示生气的按钮,按钮标题设置为“angry”。并且标题的颜色设置为无。
4)用UIImageView来播放一组连续的图片
UIImageView与UIButton的简单区别:
1.显示图片
1)UIImageView只能显示一种图片(图片默认会填充整个UIImageView) image\setImage
2)UIButton能显示2种图片:
*背景 (背景会填充整个UIButton) setBackgroundImage:forState:
*前景 (覆盖在背景上面的图片,按照之前的尺寸显示) setImage:forState:
*还能显示文字(当即需要显示文件、又需要显示图片时,一般用UIButton)
2.点击事件
1)UIImageView默认是不能响应点击事件
2)UIButton能响应点击事件:addTarget:action:forControlEvents:
3.使用场合
1)UIImageView:只显示图片,不监听点击,点击图片后不做任何反应
2)UIButton:既显示图片,又监听点击
4.继承结构
1)UIButton之所以能添加监听器来监听事件,是因为它继承自UIControl
2)UIImageView之所以不能添加监听器来监听事件,是因为仅仅继承自UIView
图片加载方式:
1、缓存加载,无法释放,参数传的是文件名
UIImage *img = [UIImage imageNamed:@"图片名"];
2、无缓存加载,用完就会释放,参数传的是全路径
UIImage *img = [UIImage imageWithContentsOfFile:@"图片全路径"];
查看内存占用率工具:
product->profile->Allocations
界面效果图:


