结合中断上下文切换和进程上下文切换分析Linux内核的一般执行过程
一、实验要求
结合中断上下文切换和进程上下文切换分析Linux内核一般执行过程
-
以fork和execve系统调用为例分析中断上下文的切换
-
分析execve系统调用中断上下文的特殊之处
-
分析fork子进程启动执行时进程上下文的特殊之处
-
以系统调用作为特殊的中断,结合中断上下文切换和进程上下文切换分析Linux系统的一般执行过程
二、实验环境
发行版本:Deepin 15.11
内核版本:Linux 4.15.0-30deepin-generic x86_64
三、实验步骤
-
fork系统调用
fork系统调用用来创建子进程。首先通过一个简单的程序验证一下fork的行为。
#include <stdio.h> #include <stdlib.h> #include <unistd.h> #include <sys/types.h> #include <sys/wait.h> int main() { pid_t pid; pid = fork(); if (pid < 0) { printf("Fork failed\n"); } else if (pid == 0) { printf("This is child process\n"); } else { printf("This is parent process\n"); } return 0; }
编译并执行,可以看到两个分支下的语句都被打印了出来。这是因为两条语句是由父子两个进程分别执行的。
这正是fork系统调用的特殊之处:一处调用,两处返回。下面我们结合源码,对该系统调用的实现进行分析。

查阅arch/x86/entry/syscalls/syscall_64.tbl可知,64位下,fork库函数对应的系统调用号为57,入口地址为___x64_sys_fork。其实现位于kernel/fork.c源文件中,还有与之相关的vfork,clone系统调用也一同定义在该文件中。
SYSCALL_DEFINE0(fork) { #ifdef CONFIG_MMU struct kernel_clone_args args = { .exit_signal = SIGCHLD, }; return _do_fork(&args); #else /* can not support in nommu mode */ return -EINVAL; #endif }
可以看到,fork的具体工作交由__do_fork完成。后者代码较多,截取关键代码如下:
/* * Ok, this is the main fork-routine. * * It copies the process, and if successful kick-starts * it and waits for it to finish using the VM if required. * * args->exit_signal is expected to be checked for sanity by the caller. */ long _do_fork(struct kernel_clone_args *args) { // ... struct pid *pid; struct task_struct *p; int trace = 0; long nr; // ... p = copy_process(NULL, trace, NUMA_NO_NODE, args); // ... wake_up_new_task(p); // ... put_pid(pid); return nr; }
__do_fork函数主要完成了调用copy_process复制父进程、获得pid、调用wake_up_new_task将子进程加入就绪队列等待调度执行等。我们知道,在Linux中,除了0号进程由手工创建外,其他进程都是通过复制已有进程创建而来,而这正是fork的主要工作,具体的任务交由copy_process完成。后者又是相当繁杂的一个函数(500多行代码),这里同样只截取关键代码,很多异常检查代码被省略。
/* * This creates a new process as a copy of the old one, * but does not actually start it yet. * * It copies the registers, and all the appropriate * parts of the process environment (as per the clone * flags). The actual kick-off is left to the caller. */ static __latent_entropy struct task_struct *copy_process( struct pid *pid, int trace, int node, struct kernel_clone_args *args) { int pidfd = -1, retval; struct task_struct *p; // ... p = dup_task_struct(current, node); // ... /* copy all the process information */ shm_init_task(p); retval = copy_thread_tls(clone_flags, args->stack, args->stack_size, p, args->tls); // ... return p; // ... }
copy_process函数主要完成了调用dup_task_struct复制当前进程(父进程)描述符task_struct、信息检查、初始化、把进程状态设置为TASK_RUNNING(此时⼦进程置为就绪态)、采⽤写时复制技术逐⼀复制所有其他进程资源、调⽤copy_thread_tls初始化子进程内核栈、设置子进程pid等。
其中copy_thread_tls所做的工作是关键。我们知道执行fork系统调用之后,会由内核态返回两次:一次返回到父进程,这与一般的系统调用返回流程别无二致;而另一次则返回到子进程,为了实现这一点,就需要为子进程构造出合适的执行上下文,也就是初始化其内核栈和进程描述符的thread字段。这正是copy_thread_tls的任务。
int copy_thread_tls(unsigned long clone_flags, unsigned long sp,unsigned long arg, struct task_struct *p, unsigned long tls)
{
    // ...

    frame->ret_addr = (unsigned long) ret_from_fork;
    p->thread.sp = (unsigned long) fork_frame;
    *childregs = *current_pt_regs();
    childregs->ax = 0;

    // ...
}
struct task_struct thread字段保存了进程的部分硬件上下文信息,包括一些关键的CPU寄存器,如sp。可以看到copy_thread_tls中,将thread.sp字段设置成了fork_frame起始地址,正如下文会提到的,这将是子进程内核栈的栈顶位置。
对于子进程的内核栈,使用fork_frame进行填充,其定义在arch/x86/include/asm/switch_to.h头文件中:
struct fork_frame {
    struct inactive_task_frame frame;
    struct pt_regs regs;
};
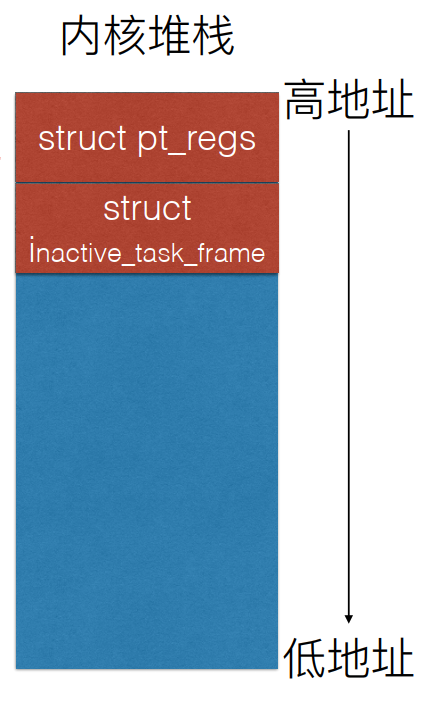
fork_frame在系统调用寄存器结构体pt_regs的基础上,增加了inactive_task_frame结构体,
struct inactive_task_frame { #ifdef CONFIG_X86_64 unsigned long r15; unsigned long r14; unsigned long r13; unsigned long r12; #else unsigned long flags; unsigned long si; unsigned long di; #endif unsigned long bx; /* * These two fields must be together. They form a stack frame header, * needed by get_frame_pointer(). */ unsigned long bp; unsigned long ret_addr; };
其中,ret_addr指定了子进程返回时的执行地址,其被设置为ret_from_fork。这样,初始化完成的子进程内核栈的布局便如下图所示。子进程被加入就绪队列后,就可以正常地参与到进程的调度切换过程中了。

-
execve系统调用
execve系统调用于为进程载入执行镜像。前述的fork主要用于创建新进程,但并没有为进程指定新任务,而这正是exec的功能。所以fork一般于execve相互配合启动一个新程序。用户态函数库提供了
该系统调用的实现位于fs/exec.c中:
SYSCALL_DEFINE3(execve,
        const char __user *, filename,
        const char __user *const __user *, argv,
        const char __user *const __user *, envp)
{
    return do_execve(getname(filename), argv, envp);
}
其调用了do_execve,后者调用了do_execveat_common,最终的工作由__do_execve_file完成。这仍然是很长的一段函数实现,我们选取关键代码:
/*
 * sys_execve() executes a new program.
 */
static int __do_execve_file(int fd, struct filename *filename,
                struct user_arg_ptr argv,
                struct user_arg_ptr envp,
                int flags, struct file *file)
{
    char *pathbuf = NULL;
    struct linux_binprm *bprm;
    struct files_struct *displaced;
    int retval;
    // ...
    bprm->file = file;
    // ...
    retval = prepare_binprm(bprm);
    // ...
    retval = copy_strings(bprm->envc, envp, bprm);
    // ...
    retval = exec_binprm(bprm);
    // ...
    return retval;
}
该函数的主要功能是从文件中载入ELF可执行文件并执行。其中exec_binprm实际执行了文件。后者的关键是调用search_binary_handler,这是真正替换进程镜像的地方。
static int exec_binprm(struct linux_binprm *bprm) { pid_t old_pid, old_vpid; int ret; /* Need to fetch pid before load_binary changes it */ old_pid = current->pid; rcu_read_lock(); old_vpid = task_pid_nr_ns(current, task_active_pid_ns(current->parent)); rcu_read_unlock(); ret = search_binary_handler(bprm); if (ret >= 0) { audit_bprm(bprm); trace_sched_process_exec(current, old_pid, bprm); ptrace_event(PTRACE_EVENT_EXEC, old_vpid); proc_exec_connector(current); } return ret; }
execve系统调用的过程总结如下:
-
execve系统调用陷入内核,并传入命令行参数和shell上下文环境
-
execve陷入内核的第一个函数:do_execve,该函数封装命令行参数和shell上下文
-
do_execve调用do_execveat_common,后者进一步调用__do_execve_file,打开ELF文件并把所有的信息一股脑的装入linux_binprm结构体
-
__do_execve_file中调用search_binary_handler,寻找解析ELF文件的函数
-
search_binary_handler找到ELF文件解析函数load_elf_binary
-
load_elf_binary解析ELF文件,把ELF文件装入内存,修改进程的用户态堆栈(主要是把命令行参数和shell上下文加入到用户态堆栈),修改进程的数据段代码段
-
load_elf_binary调用start_thread修改进程内核堆栈(特别是内核堆栈的ip指针)
-
进程从execve返回到用户态后ip指向ELF文件的main函数地址,用户态堆栈中包含了命令行参数和shell上下文环境
-
四、实验总结
附上Linux的一般执行过程以作总结:
-
-
发⽣中断(包括异常、系统调⽤等), CPU完成load cs:rip(entry of a specific ISR),即跳转到中断处理程序⼊⼝。
-
中断上下⽂切换,具体包括如下⼏点:
-
swapgs指令保存现场,可以理解CPU通过swapgs指令给当前CPU寄存器状态做了⼀个快照。
-
rsp point to kernel stack,加载当前进程内核堆栈栈顶地址到RSP寄存器。快速系统调⽤是由系统调⽤⼊⼝处的汇编代码实现⽤户堆栈和内核堆栈的切换。
-
save cs:rip/ss:rsp/rflags:将当前CPU关键上下⽂压⼊进程X的内核堆栈,快速系统调⽤是由系统调⽤⼊⼝处的汇编代码实现的。
此时完成了中断上下⽂切换,即从进程X的⽤户态到进程X的内核态。
-
-
中断处理过程中或中断返回前调⽤了schedule函数,其中完成了进程调度算法选择next进程、进程地址空间切换、以及switch_to关键的进程上下⽂切换等。
-
switch_to调⽤了__switch_to_asm汇编代码做了关键的进程上下⽂切换。将当前进程X的内核堆栈切换到进程调度算法选出来的next进程(本例假定为进程Y)的内核堆栈,并完成了进程上下⽂所需的指令指针寄存器状态切换。之后开始运⾏进程Y(这⾥进程Y曾经通过以上步骤被切换出去,因此可以从switch_to下⼀⾏代码继续执⾏)。
-
中断上下⽂恢复,与(3)中断上下⽂切换相对应。注意这⾥是进程Y的中断处理过程中,⽽(3)中断上下⽂切换是在进程X的中断处理过程中,因为内核堆栈从进程X切换到进程Y了。
-
为了对应起⻅中断上下⽂恢复的最后⼀步单独拿出来(6的最后⼀步即是7) iret - pop cs:rip/ss:rsp/rflags,从Y进程的内核堆栈中弹出(3)中对应的压栈内容。此时完成了中断上下⽂的切换,即从进程Y的内核态返回到进程Y的⽤户态。注意快速系统调⽤返回sysret与iret的处理略有不同。
-
继续运⾏⽤户态进程Y。
参考:


