

第十二篇 - 将Vue2升级成Vue3
vue3在vue2的基础上有所更新,所以从vue3开始学起吧。
参考链接:https://zhidao.baidu.com/question/2275453896941683268.html
一、升级vue
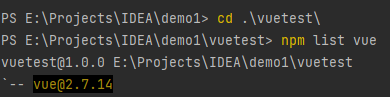
首先,查看当前vue的版本:npm list vue
接下来对npm进行升级:npm install -g npm

接着移除旧版本vue:npm uninstall vue-cli -g

最后安装新版本vue:npm install -g @vue/cli

二、检测是否升级成功
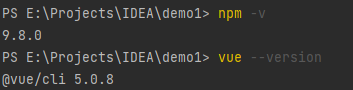
首先,检测npm和vue版本
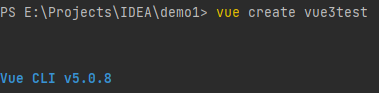
接着创建一个vue3项目:vue create vue3test
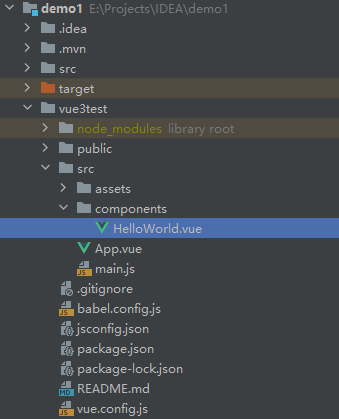
目录结构如下
启动项目试试:npm run serve

成功了。
三、将之前vuetest的内容移植到vue3test里面
第一步:新建一个views文件夹,在里面建一个Login.vue,将vuetest项目中的登录页面HelloWorld.vue内容copy进来
LoginPage.vue


/* eslint-disable */
<template>
  <div class="login_container">
    <div class="login_box">
      <div class="wai">
        <!-- 头像区域 -->
        <div class="avatar_box">
          <img src="../assets/head.png" alt="" />
        </div>
        <!-- 登录表单区域 -->
        <el-form
            ref="loginFormRef"
            :model="loginForm"
            :rules="loginFormRules"
            label-width="0px"
            class="login_form"
        >
          <!--        用户名-->
          <el-form-item prop="username">
            <el-input
                v-model="loginForm.username"
                prefix-icon="el-icon-user"
            ></el-input>
          </el-form-item>
          <!--        密码-->
          <el-form-item prop="password">
            <el-input
                v-model="loginForm.password"
                prefix-icon="el-icon-key"
                type="password"
            ></el-input>
          </el-form-item>
          <!--        按钮区域-->
          <el-form-item class="btns">
            <el-button type="primary" @click="Login">登录</el-button>
            <el-button type="info" @click="resetLoginForm">重置</el-button>
          </el-form-item>
          <div style="display:flex; justify-content:flex-start">{{loginForm.message}}</div>
        </el-form>
      </div>
    </div>
  </div>
</template>

<style lang="less" scoped>
.login_container {
  background-color: darkcyan;
  height: 100%;
}

.login_box {
  width: 350px;
  height: 300px;
  background-color: white;
  border-radius: 15px;
  /*容器内居中*/
  position: absolute;
  left: 40%;
  top: 50%;
  transform: translate(-50%, -50%);

  .avatar_box {
    height: 130px;
    width: 130px;
    border: 1px solid #eee;
    border-radius: 50%;
    padding: 10px;
    /*边框阴影*/
    box-shadow: 0 0 10px #ddd;
    position: absolute;
    left: 50%;
    transform: translate(-50%, -50%);
    background-color: #fff;

    img {
      width: 100%;
      height: 100%;
      border-radius: 50%;
      background-color: #993d3d;
    }
  }

  .login_form {
    position: absolute;
    bottom: 0;
    width: 100%;
    padding: 0 20px;
    box-sizing: border-box;
  }

  .btns {
    display: flex;
    justify-content: flex-end;
  }
  .wai {
    background-image: url("../assets/back.jpg");
    width: 577px;
    height: 300px;
    border-radius: 15px;
  }
}
</style>

<script>
import qs from 'qs'
export default {
  data () {
    return {
      // 数据绑定对象
      loginForm: {
        username: 'lili',
        password: '123',
        message: ''
      },
      loginFormRules: {
        // 验证用户
        username: [
          {required: true, message: '请输入用户名', trigger: 'blur'},
          {
            min: 3,
            max: 10,
            message: '长度在3到10个字符',
            trigger: 'blur'
          }
        ],
        password: [
          {required: true, message: '请输入登录密码', trigger: 'blur'},
          {
            min: 3,
            max: 15,
            message: '长度在3到15个字符',
            trigger: 'blur'
          }
        ]
      }
    }
  },
  methods: {
    Login () {
      /* http://localhost:8081/api/login */
      this.$axios
          .post('http://localhost:8081/api/login', qs.stringify(this.loginForm))
          .then(successResponse => {
            console.log(successResponse.data)
            if (successResponse.data.code !== 200) {
              this.loginForm.message = successResponse.data.message
            } else {
              this.$router.push('/jump1test', () => {}, () => {})
            }
          })
          .catch(failResponse => {})
    },
    // 重置登录表单
    resetLoginForm () {
      this.$refs.loginFormRef.resetFields()
    }
  }
}
</script>
将vuetest中assets文件夹的文件拷贝到vue3test,将package.json修改dependencies
{
  "name": "vue3test",
  "version": "0.1.0",
  "private": true,
  "scripts": {
    "serve": "vue-cli-service serve",
    "build": "vue-cli-service build",
    "lint": "vue-cli-service lint"
  },
  "dependencies": {
    "core-js": "^3.8.3",
    "vue": "^3.2.13",
    "vue-router": "^3.6.5",
    "axios": "^1.4.0",
    "element-plus": "^2.3.7",
    "less-loader": "^11.1.3",
    "less": "^4.1.3"
  },
  "devDependencies": {
    "@babel/core": "^7.12.16",
    "@babel/eslint-parser": "^7.12.16",
    "@vue/cli-plugin-babel": "~5.0.0",
    "@vue/cli-plugin-eslint": "~5.0.0",
    "@vue/cli-service": "~5.0.0",
    "eslint": "^7.32.0",
    "eslint-plugin-vue": "^8.0.3"
  },
  "eslintConfig": {
    "root": true,
    "env": {
      "node": true
    },
    "extends": [
      "plugin:vue/vue3-essential",
      "eslint:recommended"
    ],
    "parserOptions": {
      "parser": "@babel/eslint-parser"
    },
    "rules": {}
  },
  "browserslist": [
    "> 1%",
    "last 2 versions",
    "not dead",
    "not ie 11"
  ]
}
修改App.vue
App.vue
<template>
  <LoginPage msg="Welcome to Login"/>
</template>

<script>
import LoginPage from './views/LoginPage.vue'

export default {
  name: 'App',
  components: {
    LoginPage
  }
}
</script>

<style>
#app {
  font-family: Avenir, Helvetica, Arial, sans-serif;
  -webkit-font-smoothing: antialiased;
  -moz-osx-font-smoothing: grayscale;
  text-align: center;
  color: #2c3e50;
  margin-top: 60px;
}
</style>
其中有一个问题特别提醒一下,在vue3里面页面取名得组合取名,比如LoginPage,而不能取Login,不然会编译不通过,报错,当然也可以百度一下设置某些属性可以避免这个问题。
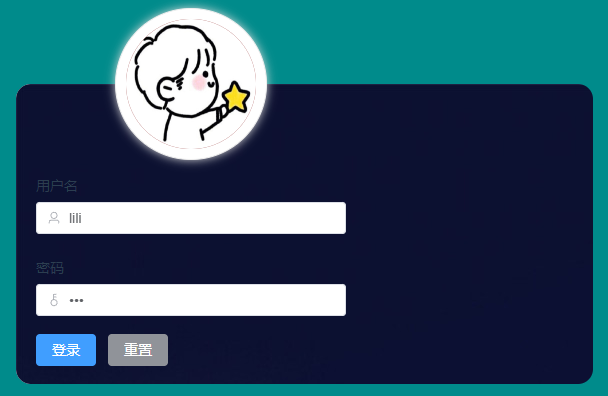
好了,现在运行程序,成功是成功了,但不是那么完美,看看样式成啥了
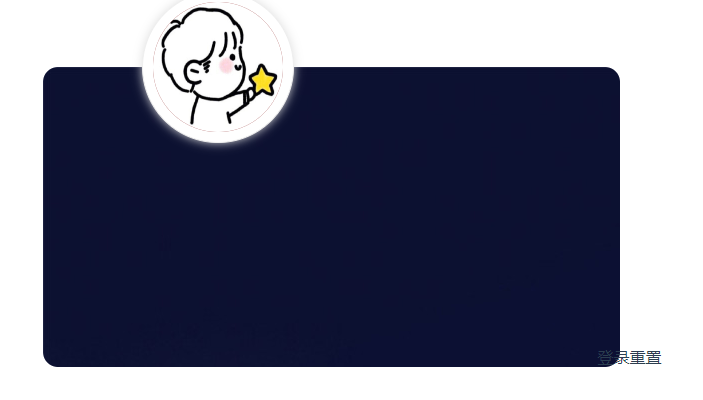
555~,一下子移植过来还是不行,那在调试下。
首先,用户名密码窗口看不见,我们需要更新main.js文件,将element-plus应用起来
main.js
import { createApp } from 'vue'
import ElementPlus from 'element-plus'
import 'element-plus/dist/index.css'
import App from './App.vue'
import './assets/css/global.css'

const app = createApp(App)

app.config.productionTip = false

app.use(ElementPlus)
app.mount('#app')
再次运行程序
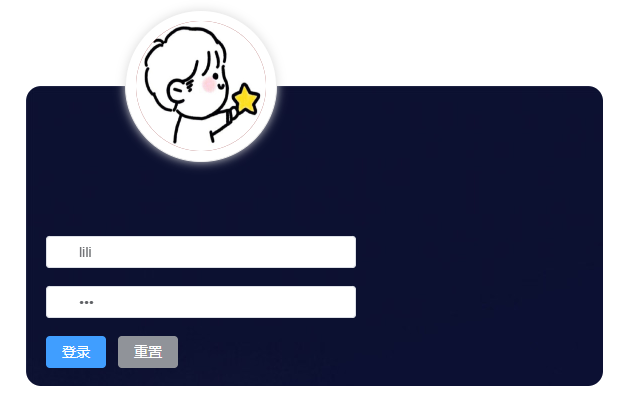
可以看到框框都出来了,重置按钮也是生效的,测试重置请把用户名密码改成和初始不一样,就可以看到重置效果。但是登录却没有跳过去,所以跨域部分还得解决。
跨域配置也在main.js中
main.js
import { createApp } from 'vue'
import ElementPlus from 'element-plus'
import 'element-plus/dist/index.css'
import App from './App.vue'
import './assets/css/global.css'
import axios from 'axios'

const app = createApp(App)

app.config.productionTip = false
app.config.globalProperties.$axios = axios

app.use(ElementPlus)
app.mount('#app')
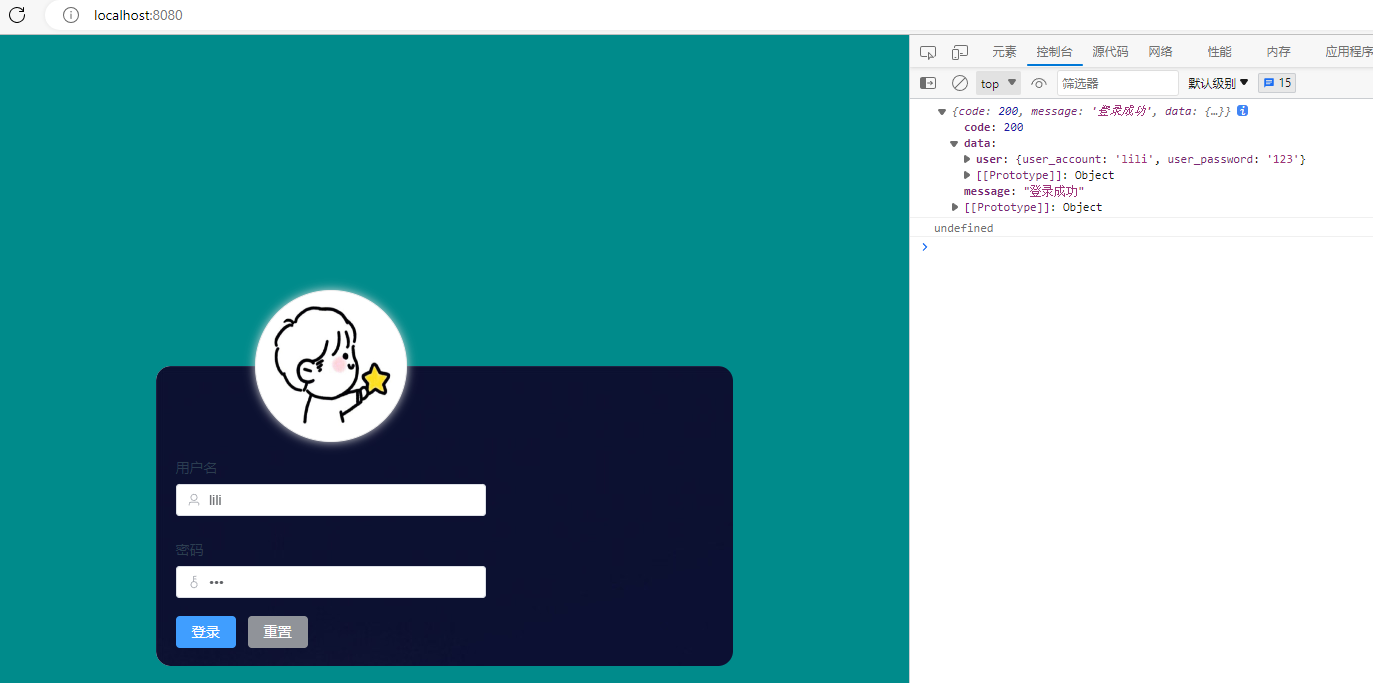
即使将跨域配置了,点击Login依然没反应,用F12在控制台中查看
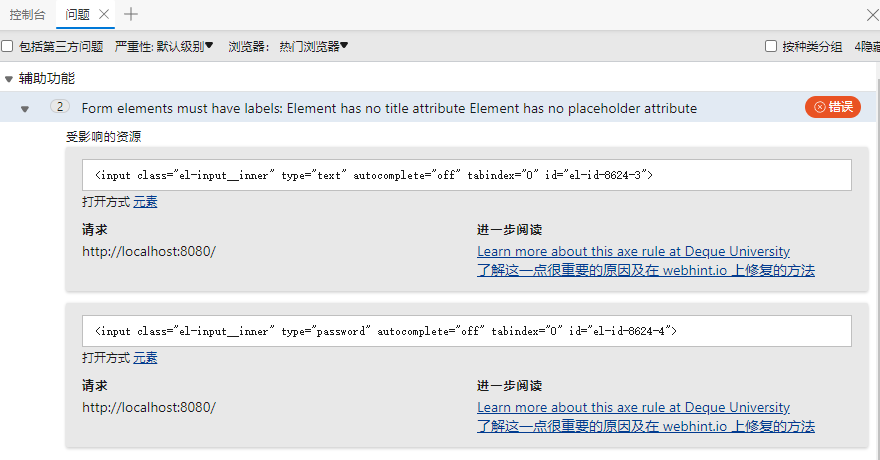
看起来是元素没有标签,仔细看图片,发现用户名密码那一栏前面的两个小图像确实没看见了。
经过分析,发现图标不见了是因为element-plus这个库的用法和之前的element-ui有所差别。element-plus设置图标参考链接:https://blog.csdn.net/m0_67403240/article/details/123303976
首先,在main.js中导入图标
main.js
import { createApp } from 'vue'
import ElementPlus from 'element-plus'
import 'element-plus/dist/index.css'
import App from './App.vue'
import './assets/css/global.css'
import axios from 'axios'
// 统一导入el-icon图标
import * as ElIconModules from '@element-plus/icons-vue'

const app = createApp(App)

app.config.productionTip = false
app.config.globalProperties.$axios = axios

for (let iconName in ElIconModules) {
    app.component(iconName, ElIconModules[iconName])
}

app.use(ElementPlus)
app.mount('#app')
其次,图标的 名称也有所变化,之前是el-icon-user,现在变成User,之前是el-icon-key,现在是Key,所以需要修改LoginPage.vue文件
LoginPage.vue
/* eslint-disable */
<template>
  <div class="login_container">
    <div class="login_box">
      <div class="wai">
        <!-- 头像区域 -->
        <div class="avatar_box">
          <img src="../assets/head.png" alt="" />
        </div>
        <!-- 登录表单区域 -->
        <el-form
            ref="loginFormRef"
            :model="loginForm"
            :rules="loginFormRules"
            label-width="0px"
            class="login_form"
        >
          <!--        用户名-->
          <el-form-item prop="username">
            <label class="form-label">用户名</label>
            <el-input
                v-model="loginForm.username"
                prefix-icon="User"
            ></el-input>
          </el-form-item>
          <!--        密码-->
          <el-form-item prop="password">
            <label class="form-label">密码</label>
            <el-input
                v-model="loginForm.password"
                prefix-icon="Key"
                type="password"
            ></el-input>
          </el-form-item>
          <!--        按钮区域-->
          <el-form-item class="btns">
            <el-button type="primary" @click="LoginPage">登录</el-button>
            <el-button type="info" @click="resetLoginForm">重置</el-button>
          </el-form-item>
          <div style="display:flex; justify-content:flex-start">{{loginForm.message}}</div>
        </el-form>
      </div>
    </div>
  </div>
</template>

<style lang="less" scoped>
.login_container {
  background-color: darkcyan;
  height: 100%;
}

.login_box {
  width: 350px;
  height: 300px;
  background-color: white;
  border-radius: 15px;
  /*容器内居中*/
  position: absolute;
  left: 40%;
  top: 50%;
  transform: translate(-50%, -50%);

  .avatar_box {
    height: 130px;
    width: 130px;
    border: 1px solid #eee;
    border-radius: 50%;
    padding: 10px;
    /*边框阴影*/
    box-shadow: 0 0 10px #ddd;
    position: absolute;
    left: 50%;
    transform: translate(-50%, -50%);
    background-color: #fff;

    img {
      width: 100%;
      height: 100%;
      border-radius: 50%;
      background-color: #993d3d;
    }
  }

  .login_form {
    position: absolute;
    bottom: 0;
    width: 100%;
    padding: 0 20px;
    box-sizing: border-box;
  }

  .btns {
    display: flex;
    justify-content: flex-end;
  }
  .wai {
    background-image: url("../assets/back.jpg");
    width: 577px;
    height: 300px;
    border-radius: 15px;
  }
}
</style>

<script>
export default {
  data () {
    return {
      // 数据绑定对象
      loginForm: {
        username: 'lili',
        password: '123',
        message: ''
      },
      loginFormRules: {
        // 验证用户
        username: [
          {required: true, message: '请输入用户名', trigger: 'blur'},
          {
            min: 3,
            max: 10,
            message: '长度在3到10个字符',
            trigger: 'blur'
          }
        ],
        password: [
          {required: true, message: '请输入登录密码', trigger: 'blur'},
          {
            min: 3,
            max: 15,
            message: '长度在3到15个字符',
            trigger: 'blur'
          }
        ]
      }
    }
  },
  methods: {
    Login () {
      /* http://localhost:8081/api/login */
      this.$axios
          .get('http://localhost:8081/api/users')
          .then(successResponse => {
            console.log(successResponse.data)
            // if (successResponse.data.code !== 200) {
            //   this.loginForm.message = successResponse.data.message
            // } else {
            //   this.$router.push('/jump1test', () => {}, () => {})
            // }
          })
          .catch(failResponse => {
            console.log(failResponse.data)
          })
    },
    // 重置登录表单
    resetLoginForm () {
      this.$refs.loginFormRef.resetFields()
    }
  }
}
</script>
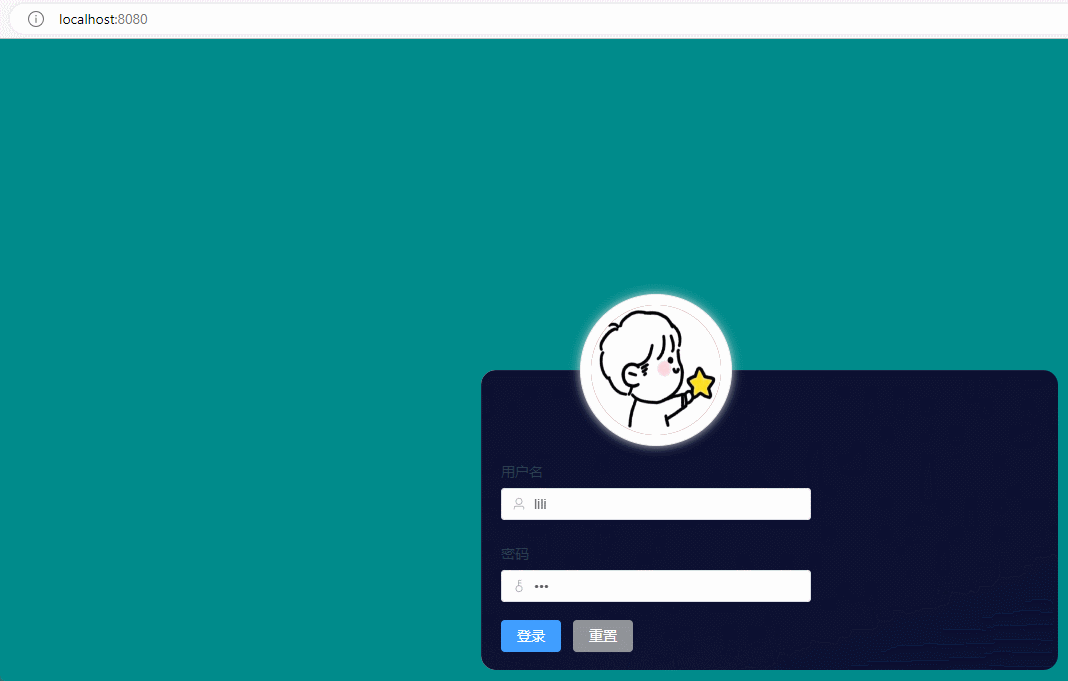
运行npm run serve
可以看到图标出来了,但是点击登录依然无法跳转,继续去看跨域。
哈哈哈,闹了个大笑话,并不是跨域没解决,而是Login函数根本没触发啊,之前修改Login.vue为LoginPage.vue时,IDE自动把登录按钮的触发事件Login函数也改成LoginPage了,所以跳转不到Login函数,因此修改LoginPage.vue就行。
LoginPage.vue
/* eslint-disable */
<template>
  <div class="login_container">
    <div class="login_box">
      <div class="wai">
        <!-- 头像区域 -->
        <div class="avatar_box">
          <img src="../assets/head.png" alt="" />
        </div>
        <!-- 登录表单区域 -->
        <el-form
            ref="loginFormRef"
            :model="loginForm"
            :rules="loginFormRules"
            label-width="0px"
            class="login_form"
        >
          <!--        用户名-->
          <el-form-item prop="username">
            <label class="form-label">用户名</label>
            <el-input
                v-model="loginForm.username"
                prefix-icon="User"
            ></el-input>
          </el-form-item>
          <!--        密码-->
          <el-form-item prop="password">
            <label class="form-label">密码</label>
            <el-input
                v-model="loginForm.password"
                prefix-icon="Key"
                type="password"
            ></el-input>
          </el-form-item>
          <!--        按钮区域-->
          <el-form-item class="btns">
            <el-button type="primary" @click="Login">登录</el-button>
            <el-button type="info" @click="resetLoginForm">重置</el-button>
          </el-form-item>
          <div style="display:flex; justify-content:flex-start">{{loginForm.message}}</div>
        </el-form>
      </div>
    </div>
  </div>
</template>

<style lang="less" scoped>
.login_container {
  background-color: darkcyan;
  height: 100%;
}

.login_box {
  width: 350px;
  height: 300px;
  background-color: white;
  border-radius: 15px;
  /*容器内居中*/
  position: absolute;
  left: 40%;
  top: 50%;
  transform: translate(-50%, -50%);

  .avatar_box {
    height: 130px;
    width: 130px;
    border: 1px solid #eee;
    border-radius: 50%;
    padding: 10px;
    /*边框阴影*/
    box-shadow: 0 0 10px #ddd;
    position: absolute;
    left: 50%;
    transform: translate(-50%, -50%);
    background-color: #fff;

    img {
      width: 100%;
      height: 100%;
      border-radius: 50%;
      background-color: #993d3d;
    }
  }

  .login_form {
    position: absolute;
    bottom: 0;
    width: 100%;
    padding: 0 20px;
    box-sizing: border-box;
  }

  .btns {
    display: flex;
    justify-content: flex-end;
  }
  .wai {
    background-image: url("../assets/back.jpg");
    width: 577px;
    height: 300px;
    border-radius: 15px;
  }
}
</style>

<script>
import qs from 'qs'
export default {
  name: 'LoginPage',
  data () {
    return {
      // 数据绑定对象
      loginForm: {
        username: 'lili',
        password: '123',
        message: ''
      },
      loginFormRules: {
        // 验证用户
        username: [
          {required: true, message: '请输入用户名', trigger: 'blur'},
          {
            min: 3,
            max: 10,
            message: '长度在3到10个字符',
            trigger: 'blur'
          }
        ],
        password: [
          {required: true, message: '请输入登录密码', trigger: 'blur'},
          {
            min: 3,
            max: 15,
            message: '长度在3到15个字符',
            trigger: 'blur'
          }
        ]
      }
    }
  },
  methods: {
    Login () {
      /* http://localhost:8081/api/login */
      this.$axios
          .post('http://localhost:8081/api/login', qs.stringify(this.loginForm))
          .then(successResponse => {
            console.log(successResponse.data)
            if (successResponse.data.code !== 200) {
              this.loginForm.message = successResponse.data.message
            } else {
              this.$router.push('/jump1test', () => {}, () => {})
            }
          })
          .catch(failResponse => {
            console.log(failResponse.data)
          })
    },
    // // 重置登录表单
    resetLoginForm () {
      this.$refs.loginFormRef.resetFields()
    }
  }
}
</script>
成功接收到Json数据了,但是我们的代码是要跳转到Jump1test页面啊,所以再来看看页面跳转这里。
首先新建一个文件JumpTest.vue,取名这样是因为vue3对取名格式有要求,然后建立路由,目录如下

JumpTest.vue
/* eslint-disable */
<template>
  <p>我是Jumptest页面</p>
</template>
<script>

export default {
  name: 'JumpTest',
}

</script>
<style scoped>

</style>
index.js
import {createRouter, createWebHistory} from 'vue-router'
import routes from './routes'    // 导入 router 目录下的 router.js

const router = createRouter({
    history: createWebHistory(process.env.BASE_URL),
    routes
})
export default router
routes.js
import LoginPage from '@/views/LoginPage.vue'
import JumpTest from '@/views/JumpTest.vue'

const routes = [
    {
        name: 'LoginPage',
        path: '/',
        component: LoginPage
    },
    {
        name: 'JumpTest',
        path: '/JumpTest',
        component: JumpTest
    }
];
export default routes
接着在main.js中配置
main.js
import { createApp } from 'vue'
import ElementPlus from 'element-plus'
import 'element-plus/dist/index.css'
import App from './App.vue'
import './assets/css/global.css'
import axios from 'axios'
// 统一导入el-icon图标
import * as ElIconModules from '@element-plus/icons-vue'
import router  from "./router/index"

const app = createApp(App)

app.config.productionTip = false
app.config.globalProperties.$axios = axios

for (let iconName in ElIconModules) {
    app.component(iconName, ElIconModules[iconName])
}

app.use(router)
app.use(ElementPlus)
app.mount('#app')
另外App.vue中也需要做相应修改
App.vue
<template>
  <router-view/>
</template>

<script>

export default {
  name: 'App',
}
</script>

<style>
#app {
  font-family: Avenir, Helvetica, Arial, sans-serif;
  -webkit-font-smoothing: antialiased;
  -moz-osx-font-smoothing: grayscale;
  text-align: center;
  color: #2c3e50;
  margin-top: 60px;
}
</style>
最后在LoginPage.vue中跳转到JumpTest.vue
LoginPage.vue
/* eslint-disable */
<template>
  <div class="login_container">
    <div class="login_box">
      <div class="wai">
        <!-- 头像区域 -->
        <div class="avatar_box">
          <img src="../assets/head.png" alt="" />
        </div>
        <!-- 登录表单区域 -->
        <el-form
            ref="loginFormRef"
            :model="loginForm"
            :rules="loginFormRules"
            label-width="0px"
            class="login_form"
        >
          <!--        用户名-->
          <el-form-item prop="username">
            <label class="form-label">用户名</label>
            <el-input
                v-model="loginForm.username"
                prefix-icon="User"
            ></el-input>
          </el-form-item>
          <!--        密码-->
          <el-form-item prop="password">
            <label class="form-label">密码</label>
            <el-input
                v-model="loginForm.password"
                prefix-icon="Key"
                type="password"
            ></el-input>
          </el-form-item>
          <!--        按钮区域-->
          <el-form-item class="btns">
            <el-button type="primary" @click="Login">登录</el-button>
            <el-button type="info" @click="resetLoginForm">重置</el-button>
          </el-form-item>
          <div style="display:flex; justify-content:flex-start">{{loginForm.message}}</div>
        </el-form>
      </div>
    </div>
  </div>
</template>

<style lang="less" scoped>
.login_container {
  background-color: darkcyan;
  height: 100%;
}

.login_box {
  width: 350px;
  height: 300px;
  background-color: white;
  border-radius: 15px;
  /*容器内居中*/
  position: absolute;
  left: 40%;
  top: 50%;
  transform: translate(-50%, -50%);

  .avatar_box {
    height: 130px;
    width: 130px;
    border: 1px solid #eee;
    border-radius: 50%;
    padding: 10px;
    /*边框阴影*/
    box-shadow: 0 0 10px #ddd;
    position: absolute;
    left: 50%;
    transform: translate(-50%, -50%);
    background-color: #fff;

    img {
      width: 100%;
      height: 100%;
      border-radius: 50%;
      background-color: #993d3d;
    }
  }

  .login_form {
    position: absolute;
    bottom: 0;
    width: 100%;
    padding: 0 20px;
    box-sizing: border-box;
  }

  .btns {
    display: flex;
    justify-content: flex-end;
  }
  .wai {
    background-image: url("../assets/back.jpg");
    width: 577px;
    height: 300px;
    border-radius: 15px;
  }
}
</style>

<script>
import qs from 'qs'

export default {
  name: 'LoginPage',
  data () {
    return {
      // 数据绑定对象
      loginForm: {
        username: 'lili',
        password: '123',
        message: ''
      },
      loginFormRules: {
        // 验证用户
        username: [
          {required: true, message: '请输入用户名', trigger: 'blur'},
          {
            min: 3,
            max: 10,
            message: '长度在3到10个字符',
            trigger: 'blur'
          }
        ],
        password: [
          {required: true, message: '请输入登录密码', trigger: 'blur'},
          {
            min: 3,
            max: 15,
            message: '长度在3到15个字符',
            trigger: 'blur'
          }
        ]
      }
    }
  },
  methods: {
    Login () {
      /* http://localhost:8081/api/login */
      this.$axios
          .post('http://localhost:8081/api/login', qs.stringify(this.loginForm))
          .then(successResponse => {
            console.log(successResponse.data)
            if (successResponse.data.code !== 200) {
              this.loginForm.message = successResponse.data.message
            } else {
              console.log('登录成功')
              this.$router.push({path: '/JumpTest'})
            }
          })
          .catch(failResponse => {
            console.log('12345566')
            console.log(failResponse)
          })
    },
    // // 重置登录表单
    resetLoginForm () {
      this.$refs.loginFormRef.resetFields()
    }
  }
}
</script>
运行项目npm run serve,此时不一定运行成功,可能会报错'createWebHistory' (imported as 'createWebHistory') was not found in 'vue-router'
参考链接:https://blog.csdn.net/yb305/article/details/121679250
解决这个问题先执行命令npm install vue-router@next --save,成功后再次运行项目,成功。

最后就是在JumpTest页面内嵌NavigationTest页面了。
新建一个NavigationTest.vue
<script setup>

</script>

<template>
<p>我是NavigationTest页面</p>
</template>

<style scoped>

</style>
修改JumpTest.vue
/* eslint-disable */
<template>
  <p>我是Jumptest页面</p>
  <NavigationTest></NavigationTest>
</template>
<script>

import NavigationTest from "@/views/NavigationTest.vue";

export default {
  name: 'JumpTest',
  components: {
    NavigationTest
  }
}

</script>
<style scoped>

</style>
运行程序,成功实现内嵌,此时,彻底完成vue2升级成vue3


【推荐】国内首个AI IDE,深度理解中文开发场景,立即下载体验Trae
【推荐】编程新体验,更懂你的AI,立即体验豆包MarsCode编程助手
【推荐】抖音旗下AI助手豆包,你的智能百科全书,全免费不限次数
【推荐】轻量又高性能的 SSH 工具 IShell:AI 加持,快人一步
· 被坑几百块钱后,我竟然真的恢复了删除的微信聊天记录!
· 没有Manus邀请码?试试免邀请码的MGX或者开源的OpenManus吧
· 【自荐】一款简洁、开源的在线白板工具 Drawnix
· 园子的第一款AI主题卫衣上架——"HELLO! HOW CAN I ASSIST YOU TODAY
· Docker 太简单,K8s 太复杂?w7panel 让容器管理更轻松!
2019-07-10 第二十一篇 -- 学习第二十天打卡20190710