基于Vuejs实现 Skeleton Loading 骨架图
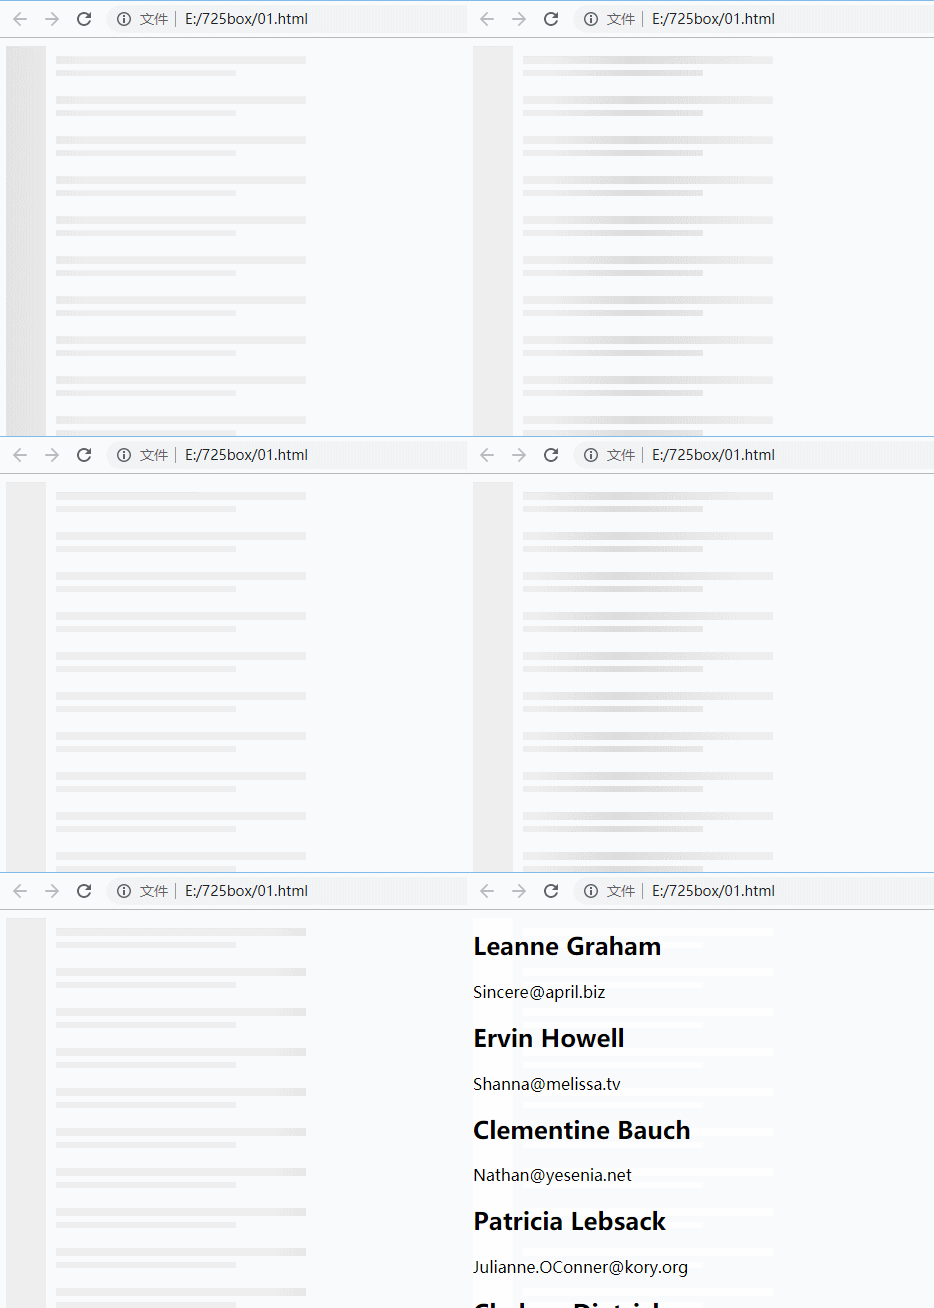
我们先看下项目的效果

项目在渲染之前是这种骨架的方式,比纯粹的loading图标更加的直观。主要是使用了loading-item这个组件。
我们看下代码
<!DOCTYPE html>
<html lang="en">
<head>
<meta charset="UTF-8">
<title>Document</title>
<script src="https://cdn.bootcss.com/vue/2.5.16/vue.min.js"></script>
<style>
.timeline-item {
   background: #fff;
   border: 1px solid;
   border-color: #e5e6e9 #dfe0e4 #d0d1d5;
   border-radius: 3px;
   padding: 12px;
   margin: 0 auto;
   max-width: 472px;
   min-height: 200px;
}


@keyframes placeHolderShimmer{
    0% {
        background-position: -468px 0
    }
    100%{
        background-position: 468px 0
    }
}

.animated-background {
    animation-duration: 1s;
    animation-fill-mode: forwards;
    animation-iteration-count: infinite;
    animation-name: placeHolderShimmer;
    animation-timing-function: linear;
    background: #f6f7f8;
    background: linear-gradient(to right, #eeeeee 8%, #dddddd 18%, #eeeeee 33%);
    background-size: 800px 104px;
    height: 40px;
    position: relative;
}


.background-masker {
    background: #fff;
    position: absolute;
}

.background-masker.header-top,
.background-masker.header-bottom,
.background-masker.subheader-bottom {
    top: 0;
    left: 40px;
    right: 0;
    height: 10px;
}

.background-masker.header-left,
.background-masker.subheader-left,
.background-masker.header-right,
.background-masker.subheader-right {
    top: 10px;
    left: 40px;
    height: 8px;
    width: 10px;
}

.background-masker.header-bottom {
    top: 18px;
    height: 6px;
}

.background-masker.subheader-left,
.background-masker.subheader-right {
    top: 24px;
    height: 6px;
}


.background-masker.header-right,
.background-masker.subheader-right {
    width: auto;
    left: 300px;
    right: 0;
}

.background-masker.subheader-right {
    left: 230px;
}

.background-masker.subheader-bottom {
    top: 30px;
    height: 10px;
}

.background-masker.content-top,
.background-masker.content-second-line,
.background-masker.content-third-line,
.background-masker.content-second-end,
.background-masker.content-third-end,
.background-masker.content-first-end {
    top: 40px;
    left: 0;
    right: 0;
    height: 6px;
}

.background-masker.content-top {
    height:20px;
}

.background-masker.content-first-end,
.background-masker.content-second-end,
.background-masker.content-third-end{
    width: auto;
    left: 380px;
    right: 0;
    top: 60px;
    height: 8px;
}

.background-masker.content-second-line  {
    top: 68px;
}

.background-masker.content-second-end {
    left: 420px;
    top: 74px;
}

.background-masker.content-third-line {
    top: 82px;
}

.background-masker.content-third-end {
    left: 300px;
    top: 88px;
}
</style>
<body>
    <div id="app">
      <div v-for="user in users" class="items" v-if="loading">
        <user-item :name="user.name" :email="user.email"></user-item>
      </div>
      <div v-for="load in loades" v-if="!loading">
        <loading-item></loading-item>
      </div>
    </div>
</body>
<script>
    // https://cloud.tencent.com/developer/article/1006169
    Vue.component('user-item', {
      props: ['email', 'name'],
      template: `<div>
          <h2 v-text="name"></h2>
          <p v-text="email"></p>
        </div>`
    })

    Vue.component('loading-item', {
      template: `<div class="animated-background">
         <div class="background-masker header-top"></div>
         <div class="background-masker header-left"></div>
         <div class="background-masker header-right"></div>
         <div class="background-masker header-bottom"></div>
         <div class="background-masker subheader-left"></div>
         <div class="background-masker subheader-right"></div>
         <div class="background-masker subheader-bottom"></div>
       </div>`
    })

    var app = new Vue({
      el: '#app',
      data: {
        users: [],
        loading: false,
        loades: 10
      },
      methods: {
        getUserDetails: function() {
          fetch('https://jsonplaceholder.typicode.com/users')
            .then(result => result.json())
            .then(result => {
              this.users = result
              this.loading = true
            });
        }
      },
      beforeMount: function() {
        setTimeout(() => {
          this.getUserDetails()
        }, 3000);
      }
    });
</script>
</html>
作者:jser_dimple
-------------------------------------------
个性签名:一个人在年轻的时候浪费自己的才华与天赋是一件非常可惜的事情
如果觉得这篇文章对你有小小的帮助的话,记得在右下角点个“推荐”哦,博主在此感谢!
万水千山总是情,打赏5毛买辣条行不行,所以如果你心情还比较高兴,也是可以扫码打赏博主,哈哈哈(っ•̀ω•́)っ✎⁾⁾!
微信

支付宝


