Vue 框架学习(八) VueRouter
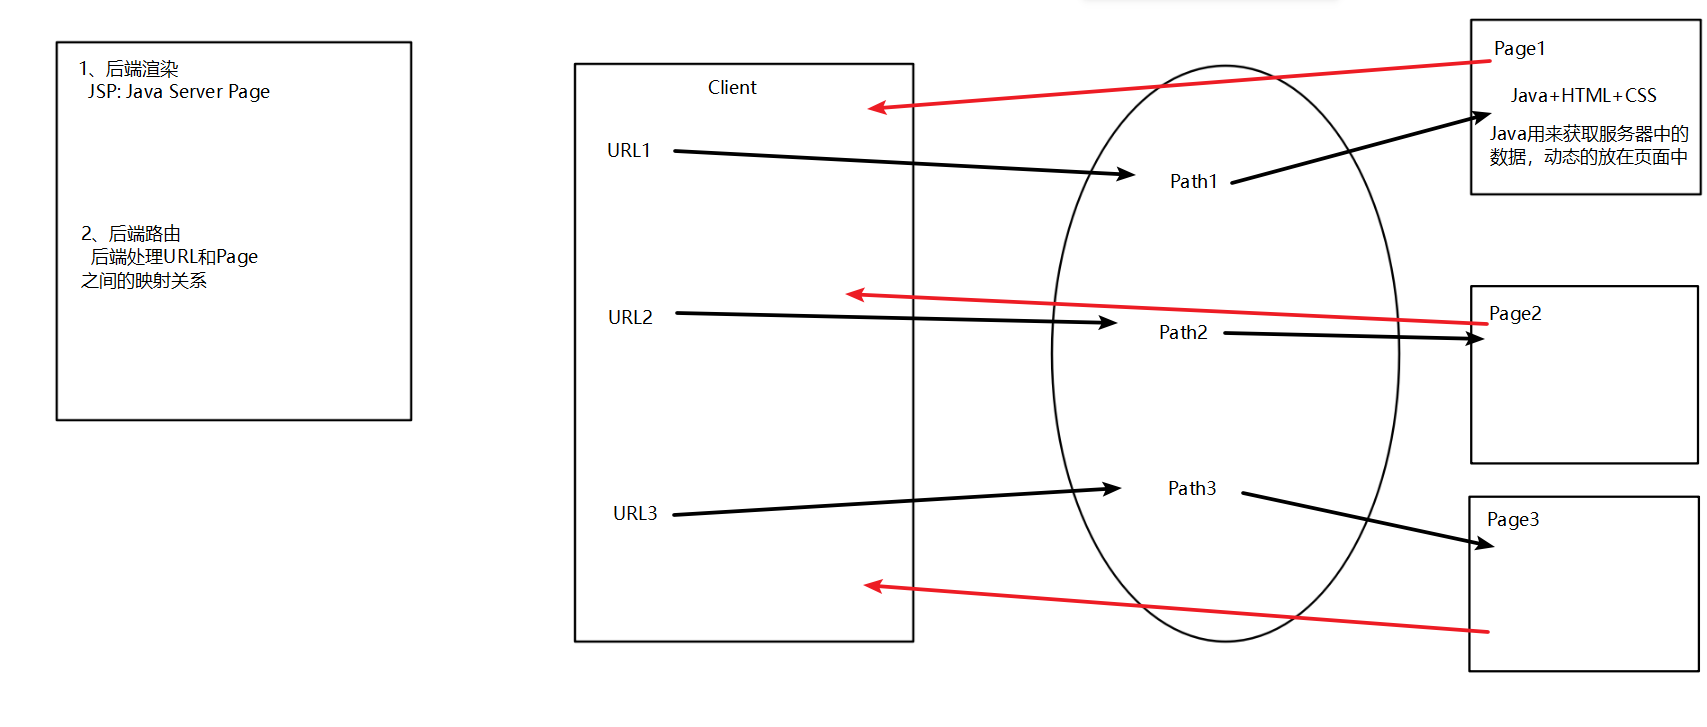
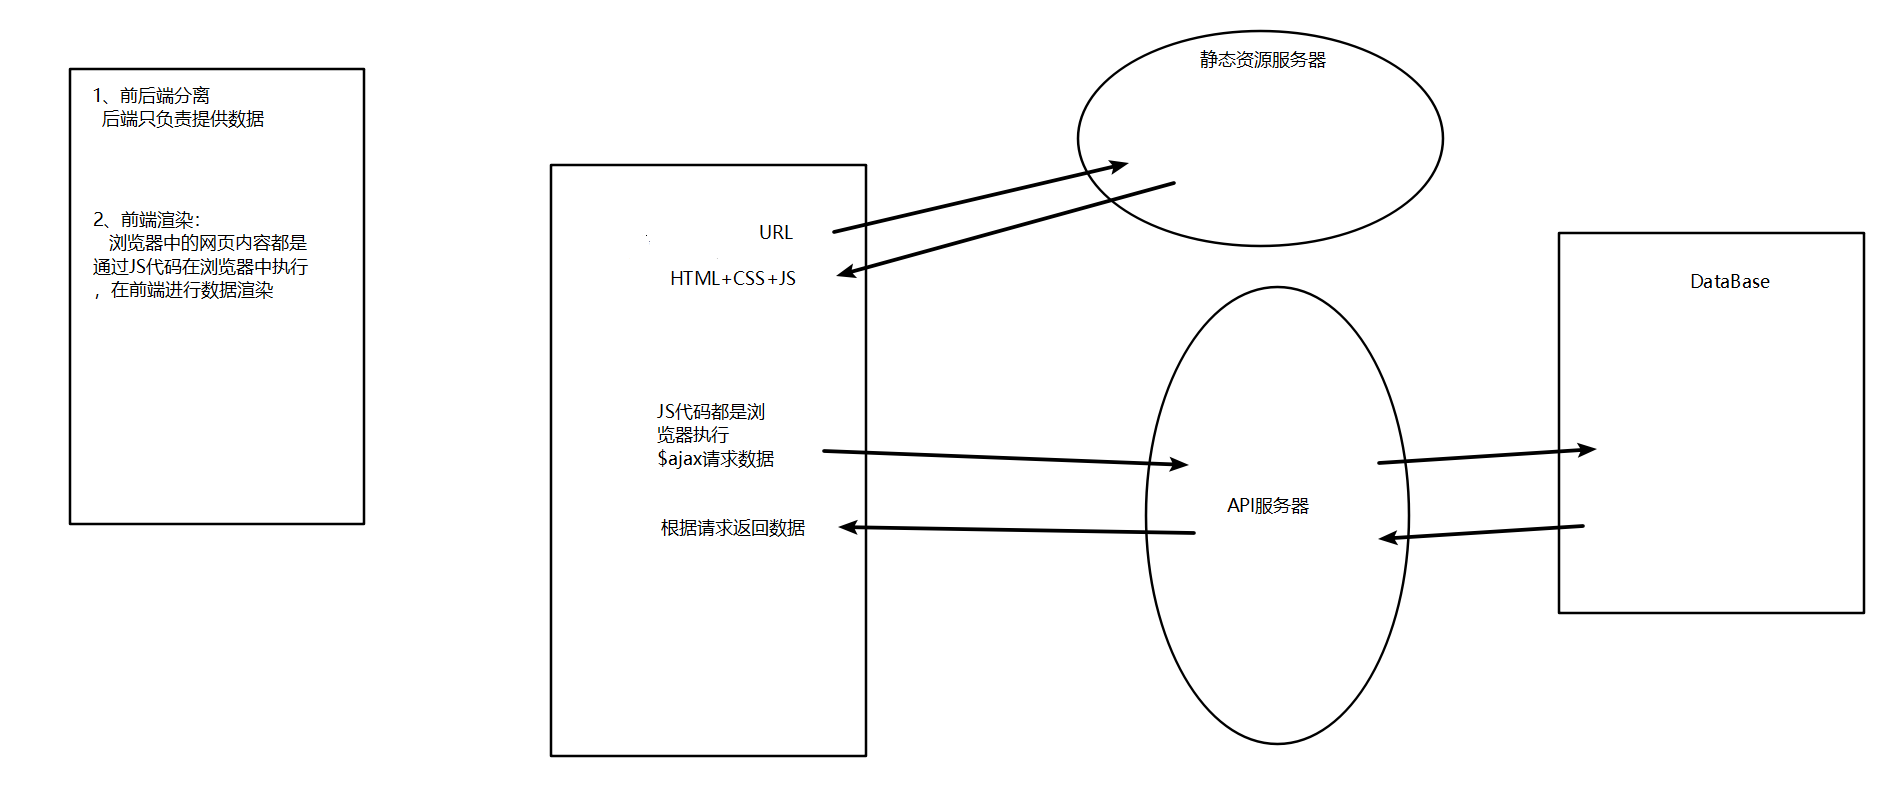
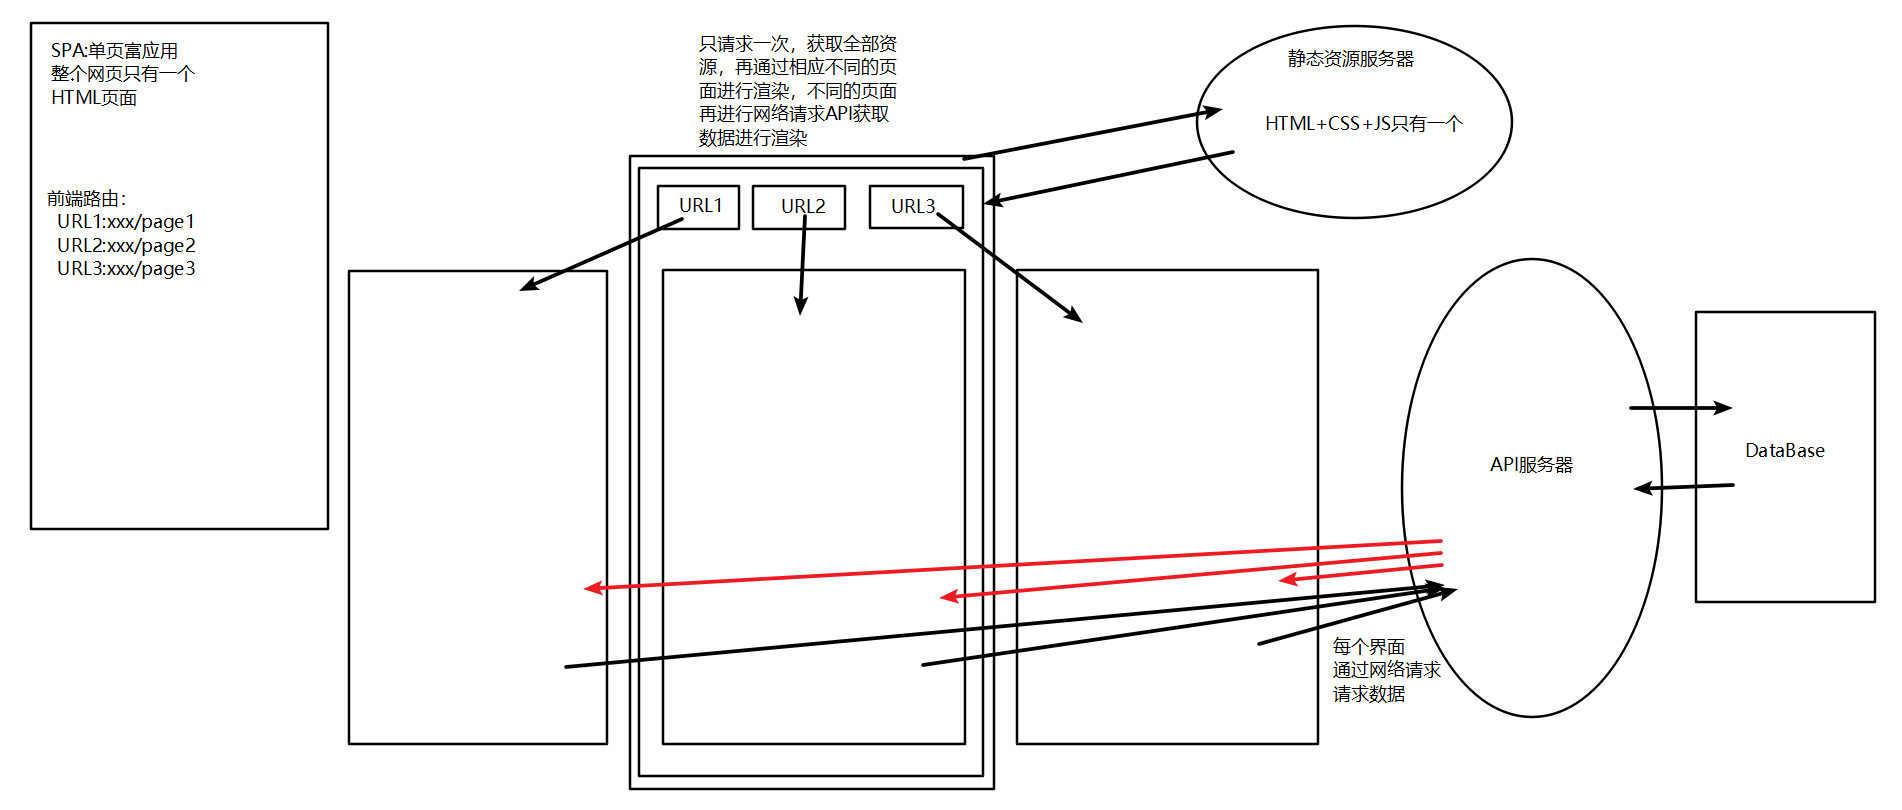
1、前端渲染后端渲染和前端路由后端路由
后端渲染和后端路由:

前端渲染:

前端路由:

2、vue-router的安装与配置
安装:npm install vue-router
配置:
1、导入路有对象,注册路由Vue.use(VueRouter)
2、创建实例并配置映射路径(new)
3、挂载路由(在Vue实例中挂载路由实例)

import Vue from "vue";
import VueRouter from "vue-router";

const Home = () => import("views/home/Home");

Vue.use(VueRouter);

const routes = [
  {
    path: "",
    redirect: "/home",
  },
  {
    path: "/home",
    component: Home,
  },
];

const router = new VueRouter({
  routes,
  mode: "history",
});

export default router;
3、路由映射配置
(1)一级路由与路由懒加载、默认路由与修改路由为history

import Vue from "vue";
import VueRouter from "vue-router";

// 路由懒加载
const Home = () => import("views/home/Home");
const Category = () => import("views/category/Category");
const ShopCart = () => import("views/shopcart/ShopCart");
const Profile = () => import("views/profile/Profile");
const Detail = () => import("views/detail/Detail");

// 安装
Vue.use(VueRouter);

// 创建
const routes = [{
    path: "",
    redirect: "/home"
  },
  {
    path: "/home",
    component: Home
  },
  {
    path: "/category",
    component: Category
  },
  {
    path: "/shopcart",
    component: ShopCart
  },
  {
    path: "/profile",
    component: Profile
  },
  {
    // 动态路由
    path: "/detail/:iid",
    component: Detail
  }
];

const router = new VueRouter({
  routes,
  mode: "history"
});

export default router;
(2)二级路由

import Home from './views/Home.vue'
import Table from './views/nav1/Table.vue'
import user from './views/nav1/user.vue'
import Page4 from './views/nav2/Page4.vue'
import Page5 from './views/nav2/Page5.vue'
import Page6 from './views/nav3/Page6.vue'

let routes = [
    {
        path: '/',
        component: Home,
        name: '数据管理',
        iconCls: 'el-icon-message', //图标样式class
        children: [
            {
                path: '/table',
                component: Table,
                name: 'Table'
            },
            {
                path: '/user',
                component: user,
                name: '列表'
            },
        ],
        redirect: '/table'
    },
    {
        path: '/',
        component: Home,
        name: '导航二',
        iconCls: 'fa fa-id-card-o',
        children: [
            {
                path: '/page4',
                component: Page4,
                name: '页面4'
            },
            {
                path: '/page5',
                component: Page5,
                name: '页面5'
            }
        ]
    },
    {
        path: '/',
        component: Home,
        name: '',
        iconCls: 'fa fa-address-card',
        leaf: true, //只有一个节点
        children: [{
            path: '/page6',
            component: Page6,
            name: '导航三'
        }]
    },
    {
        path: '*',
        hidden: true,
        redirect: {
            path: '/404'
        }
    }
];

export default routes;
4、router-link、router-view、keep-alive
router-link:路由导航,点击后可跳转相应路由

    <!-- 1.直接转换 -->
    <!-- 默认转化为a标签 tag更改类型 replace 不返回 -->
    <router-link to="/home" tag="button" replace>Home</router-link>
    <router-link to="/about">About</router-link>

    <!-- 2.使用方法更改路径 -->
    <button @click="homeClick">Home</button>
    <button @click="aboutClick">About</button>

  methods: {
    homeClick() {
      // 通过代码修改路径
      // this.$router.push('/home')
      this.$router.replace("/home");
    },
    aboutClick() {
      // this.$router.push('/about')
      this.$router.replace("/about");
    },
  }
router-view:渲染匹配到的组件

      <!-- 路径匹配到的视图组件不会被缓存,比如默认点击新闻再点击消息,切换后回来还是 新闻,数据会被重新加载,重新刷新视图-->
      <router-view></router-view>
keep-alive:缓存视图(使用后可使用 activated、deactivated 两个状态函数)

    <!-- exclude表示不需要被缓存,','添加多个且不能加空格 -->
    <!-- include表示哪些需要缓存,','添加多个且不能加空格 -->
    <keep-alive exclude="About">
      <!-- 所有路径匹配到的视图组件会被缓存,比如先点击消息,切换后回来还是消息 -->
      <router-view></router-view>
    </keep-alive>
5、路由传参
URL组成:scheme://host:port/path?query#fragment
(1)params
- 配置路由: /router/:id
- 在path上传对应值
- 通过params取值
- 路径为: /router/123, /router/abc

// 路由配置
{
  path: '/user/:userId',
  component: User,
  meta: {
    title: '用户'
  },
},

// router-link传值
<router-link :to="'/user/' +userId" tag="button">User</router-link>

// 取值
<h2>{{$route.params.userId}}</h2>
(2)query
- 普通路由配置
- 使用query作为key传值
- 通过query取值
- 路径为: /router?id=123, /router?id=abc

// 普通配置
{
  path: '/profile',
  component: Profile,
  meta: {
    title: '档案'
  },
},

// query传值(对象方式)
<router-link
  :to="{path:'/profile', query:{name:'Smallstars',age:'18',height:'1.83'}}"
  tag="button"
>档案</router-link>

// 取值
<h2>{{$route.query.name}}</h2>
<h2>{{$route.query.age}}</h2>
<h2>{{$route.query.height}}</h2>
(3)button等监听点击事件跳转路由传参

userClick() {
  this.$router.push("/user/" + this.userId);
},
profileClick() {
  this.$router.push({
    path: "/profile",
    query: {
      name: "BlackAngel",
      age: 19,
      height: 1.85,
    },
  });
},
6、$router和$route的区别
router为整个new的VueRouter

const router = new VueRouter({
  // 配置路由和组件的关系
  routes,
  // 默认hash值路径
  mode: 'history',
  // 处于活跃状态时属性改为active
  linkActiveClass: 'active'
})
route为当前活跃的路由

{
  path: '/profile',
  component: Profile,
  meta: {
    title: '档案'
  },
},
7、导航守卫(详见案例5)
全局守卫(动态修改标题)

// 全局守卫
// 前置守卫(guard) next必须调用,不然不会被 resolved
router.beforeEach((to, from, next) => {
  // 从from跳转到to
  // 此处如果有子页面这会是undefined,需要到matched[0]当中去找
  document.title = to.matched[0].meta.title
  next()
})

// 后置钩子(hook)
router.afterEach((to, from) => {
  console.log("All afterEach");
})
局部守卫(beforeEnter ==> canActivate)

  {
    path: '/about',
    component: About,
    meta: {
      title: '关于'
    },
    // 局部守卫 一定要写next
    beforeEnter: (to, from, next) => {
      next()
      console.log("About beforeEnter");
    }
  },
参考:https://cn.vuejs.org/v2/guide/migration-vue-router.html#%E8%B7%AF%E7%94%B1%E6%8C%82%E9%92%A9
组件内守卫(
beforeRouteEnter ==> activate
beforeRouteUpdate
beforeRouteLeave ==> canDeactivage
)

beforeRouteLeave(to, from, next) {
  this.path = this.$route.path;
  next();
}
每天进步一点点


