


ubuntu-docker入门到放弃(二)docker初探(基本用法及命令)
一、使用公共镜像
docker有一个开源的镜像管理系统,上面有很多常见的images,如mysql,nginx,tomcat等,可以直接根据自己的需求下载下来用,还有系统images,如redhat,ubuntu,unix,windows等
先下载一个mysql来玩玩:
1、查询跟mysql有关的镜像:
#docker search mysql
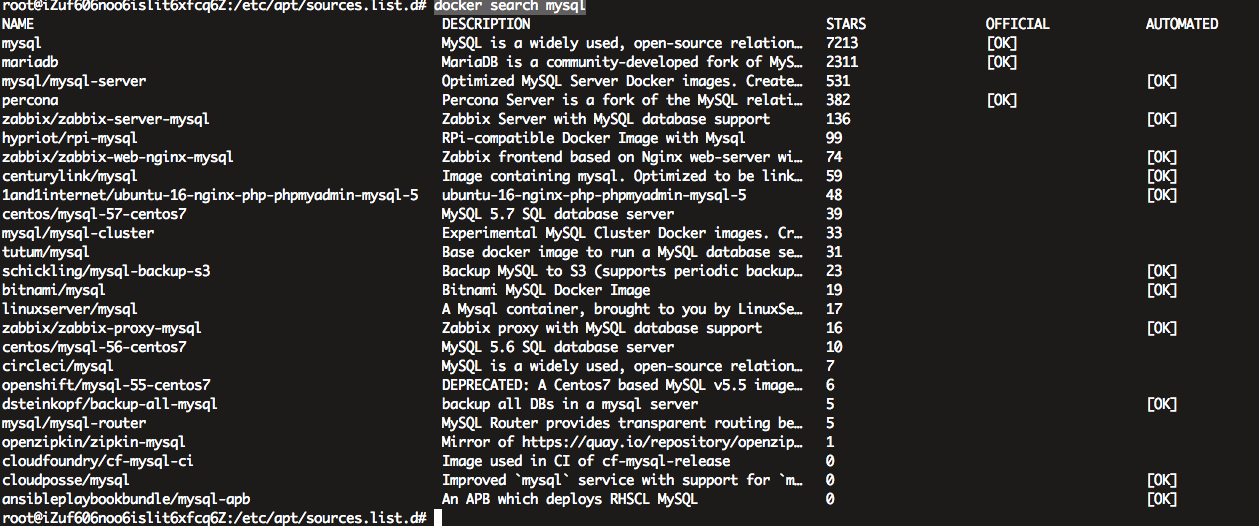
这里我们使用第一个mysql镜像,镜像是可以指定版本来下载的:
2、下载mysql镜像:
#docker pull mysql:5.6
3、查看已有的镜像资源:
#docker images
4、查看已经运行的docker实例,这里有一个-a选项,不加这个参数只显示当前运行的实例,加上这个选项是查看所有状态的实例:
#docker ps

#docker ps -a

5、使用我们刚刚下载的image启动一个mysql实例:
# docker run -dit --restart=always --name mysql5.7 -p 3306:3306 -e MYSQL_ROOT_PASSWORD=linkface mysql:5.7
解释一下上面的参数:
-t:在新容器内指定一个伪终端或终端。
-i:允许你对容器内的标准输入 (STDIN) 进行交互。
-p <HOT_PORT>:<CONTAINER_PORT>:指定端口。
-d:允许容器在后台运行,并返回id。
--name:指定一个别名。
-e:设置环境变量
如果在生产使用docker搭建mysql,建议将数据目录、日志目录等常用目录映射出来,这个在后续的学习中,会逐步补充。
#docker ps

这个就是我们刚刚启动的镜像啦,让我们进去看看,docker exec
# docker exec -it 8619863675ee /bin/bash

这样我们就进入了我们刚刚启动的容器了,这个就是基于我们自身宿主机的操作系统的,进去后可以使用系统命令来操作,先看看端口:
# netstat -lntp
bash: netstat: command not found
因为docker是最小化安装的,所以大多数命令都是没有,需要自己安装:
#apt-get update
#apt-get install net-tools
#netstat -lntp
Active Internet connections (only servers)
Proto Recv-Q Send-Q Local Address           Foreign Address         State       PID/Program name
tcp6       0      0 :::3306                 :::*                    LISTEN      -
看到mysql已经在运行了,我们登录mysql看看:
#mysql -uroot -p   #密码就是刚刚我们在运行容器时候使用-e指定的变量值:linkface
Enter password:
Welcome to the MySQL monitor.  Commands end with ; or \g.
Your MySQL connection id is 3
Server version: 5.7.24 MySQL Community Server (GPL)

Copyright (c) 2000, 2018, Oracle and/or its affiliates. All rights reserved.

Oracle is a registered trademark of Oracle Corporation and/or its
affiliates. Other names may be trademarks of their respective
owners.

Type 'help;' or '\h' for help. Type '\c' to clear the current input statement.

mysql> show databases;
+--------------------+
| Database           |
+--------------------+
| information_schema |
| mysql              |
| performance_schema |
| sys                |
+--------------------+
4 rows in set (0.00 sec)
下面我们来创建一个用户并授权:
mysql> create user 'linkface'@'%' identified by 'linkface';
Query OK, 0 rows affected (0.00 sec)

mysql> grant all privileges on *.* to 'linkface'@'%';
Query OK, 0 rows affected (0.00 sec)

mysql> flush privileges;
Query OK, 0 rows affected (0.00 sec)

mysql> quit
Bye
现在我们退出容器,从宿主机访问mysql试试:
退出容器使用exit。(如果启动未使用-d参数启用守护进程,则直接退出并stop容器)
#exit
# mysql -uroot -h192.168.1.1 -p
Enter password:
Welcome to the MySQL monitor.  Commands end with ; or \g.
Your MySQL connection id is 4
Server version: 5.7.24 MySQL Community Server (GPL)

Copyright (c) 2000, 2016, Oracle and/or its affiliates. All rights reserved.

Oracle is a registered trademark of Oracle Corporation and/or its
affiliates. Other names may be trademarks of their respective
owners.

Type 'help;' or '\h' for help. Type '\c' to clear the current input statement.

mysql> show databases;
+--------------------+
| Database           |
+--------------------+
| information_schema |
| mysql              |
| performance_schema |
| sys                |
+--------------------+
4 rows in set (0.00 sec)
基本命令中,有一个删除容器的命令:
#docker rm <id>
该命令会删除指定的终止状态的容器,可以配合以下参数来使用:
-f , --force=false 强行终止并删除一个运行中的容器,等同于docker stop+docker rm
-l , --link=false 删除容器的链接,但是保留容器。
-v, --volumes=false 删除容器挂载的数据卷。
至此,我们一个简单mysql就搭建完成了。
