实战项目-09(oss上传头像以及配置nginx,使用EasyExcel读取excel内容添加数据)
oss头像上传的步骤
1. aliyun的配置
- 注册,实名认证,开启对象存储oss,创建bucket
注意以下的设置:
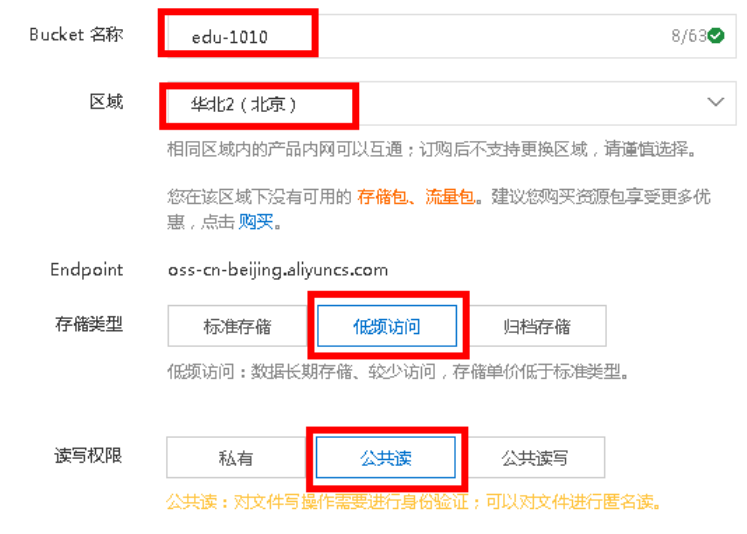
- java操作阿里云oss以及上传文件到上面需要准备创建aliyunoss许可证

后端
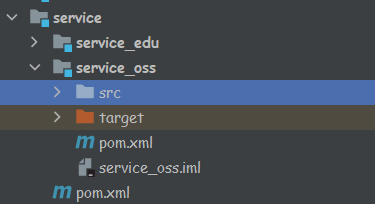
1.在service创建子模块service_oss
2.在service_oss的pom.xml中引入相关的oss依赖
  <dependencies>
        <dependency>
            <groupId>com.aliyun.oss</groupId>
            <artifactId>aliyun-sdk-oss</artifactId>
        </dependency>

        <dependency>
            <groupId>joda-time</groupId>
            <artifactId>joda-time</artifactId>
        </dependency>
    </dependencies>
3. 创建配置文件application.properties
#服务端口
server.port=8002
#服务名
spring.application.name=service-oss
#环境设置:dev、test、prod
spring.profiles.active=dev
#阿里云 OSS
#不同的服务器,地址不同
aliyun.oss.file.endpoint=xxxxxxxx
aliyun.oss.file.keyid=xxxxxxxx
aliyun.oss.file.keysecret=xxxxxxxxxx
#bucket可以在控制台创建,也可以使用java代码创建
aliyun.oss.file.bucketname=edu-sli
4. 创建主启动类OssApplication.java
import org.springframework.boot.SpringApplication;
import org.springframework.boot.autoconfigure.SpringBootApplication;
import org.springframework.boot.autoconfigure.jdbc.DataSourceAutoConfiguration;
import org.springframework.context.annotation.ComponentScan;

/**
 * @author 1_f_
 * @create 2021-10-20 9:20
 */
//不去加载数据库配置
@SpringBootApplication
@ComponentScan(basePackages = {"com.sli"})
public class OssApplication {
    public static void main(String[] args) {
        SpringApplication.run(OssApplication.class,args);
    }
}
5. 启动测试发现报错
启动的时候,会默认找数据库的配置,但是现在的模块不需要数据库,只是做上传到oss的功能.
解决方式:
- 添加数据库配置
- 在启动类上面添加默认不去加载数据库的配置
@SpringBootApplication(exclude = DataSourceAutoConfiguration.class)//不去加载数据库配置
6. 创建工具类,读取配置文件中的内容
@value可以给属性赋值,可以读取到配置文件中的内容
package com.sli.oss.utils;

import org.springframework.beans.factory.InitializingBean;
import org.springframework.beans.factory.annotation.Value;
import org.springframework.stereotype.Component;

/**
 * @author 1_f_
 * @create 2021-10-20 9:26
 */

//当项目启动之后,spring接口:spring加载之后,执行接口中的方法
@Component
public class ConstantPropertiesUtils implements InitializingBean {//在初始化的时候会做操作,类似于created

    //读取配置文件中的内容
    @Value("${aliyun.oss.file.endpoint}")
    private String endpoint;

    @Value("${aliyun.oss.file.keyid}")
    private String keyId;

    @Value("${aliyun.oss.file.keysecret}")
    private String keySecret;

    @Value("${aliyun.oss.file.bucketname}")
    private String bucketName;

    //定义公开静态常量为了外面可以使用

    public static String END_POINT;
    public static String ACCESS_KRY_ID;
    public static String ACCESS_KEY_SECRET;
    public static String BUCKET_NAME;

    @Override
    public void afterPropertiesSet() throws Exception {
        END_POINT = endpoint;
        ACCESS_KRY_ID = keyId;
        ACCESS_KEY_SECRET = keySecret;
        BUCKET_NAME = bucketName;
    }
}
7. 创建controller,创建service
controller
package com.sli.oss.controller;
import com.sli.commonutils.R;
import com.sli.oss.service.OssService;
import org.springframework.beans.factory.annotation.Autowired;
import org.springframework.web.bind.annotation.CrossOrigin;
import org.springframework.web.bind.annotation.PostMapping;
import org.springframework.web.bind.annotation.RequestMapping;
import org.springframework.web.bind.annotation.RestController;
import org.springframework.web.multipart.MultipartFile;
/**
* @author 1_f_
* @create 2021-10-20 9:35
*/
@RestController
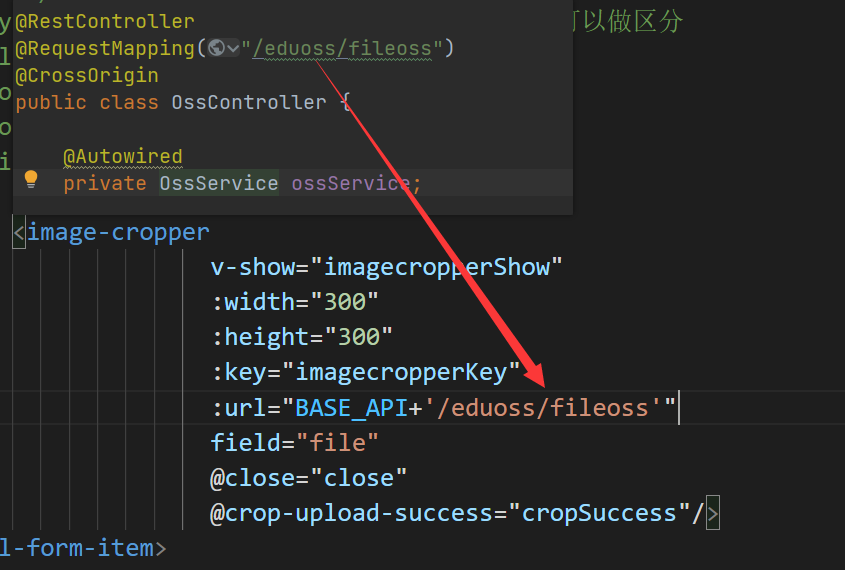
@RequestMapping("/eduoss/fileoss")
@CrossOrigin
public class OssController {
@Autowired
private OssService ossService;
//上传头像的方法
@PostMapping
public R uploadOssFile(MultipartFile file){//获取上传文件 MultipartFile
//返回到上传到oss的路径
String url = ossService.uploadFileAvatar(file);
return R.ok().data("url",url);
}
}
service
package com.sli.oss.service;
import org.springframework.web.multipart.MultipartFile;
/**
 * @author 1_f_
 * @create 2021-10-20 9:36
 */
public interface OssService {
    //上传头像到oss中
    String uploadFileAvatar(MultipartFile file);
}
8. 在serviceimpl中写上传的方法
package com.sli.oss.service.impl;

import com.aliyun.oss.OSS;
import com.aliyun.oss.OSSClientBuilder;
import com.sli.oss.service.OssService;
import com.sli.oss.utils.ConstantPropertiesUtils;
import org.joda.time.DateTime;
import org.springframework.stereotype.Service;
import org.springframework.web.multipart.MultipartFile;

import java.io.InputStream;
import java.util.UUID;

/**
 * @author 1_f_
 * @create 2021-10-20 9:36
 */
@Service
public class OssServiceImpl implements OssService {
    //上传文件到oss
    @Override
    public String uploadFileAvatar(MultipartFile file) {

        String endpoint = ConstantPropertiesUtils.END_POINT;
        String accessKeyId = ConstantPropertiesUtils.ACCESS_KRY_ID;
        String accessKeySecret = ConstantPropertiesUtils.ACCESS_KEY_SECRET;
        String bucketName = ConstantPropertiesUtils.BUCKET_NAME;

        try {
            // 创建OSSClient实例。
            OSS ossClient = new OSSClientBuilder().build(endpoint, accessKeyId, accessKeySecret);

            //获取上传文件流
            InputStream inputStream = file.getInputStream();

            //putObject中需要传递三个参数1. bucket名称 2. 上传到oss文件路径或者文件名称 3. 上传文件的输入流
            //如何获取文件名称
            String fileName = file.getOriginalFilename();

            ossClient.putObject(bucketName,fileName,inputStream);

            //关闭OSSClient。
            ossClient.shutdown();

            //上传之后的文件路径返回
            //需要把上传到aliyun oss的路径手动拼接,方便数据库中保存
            String url = "https://" + bucketName + "." + endpoint + "/" + fileName;
            return url;

        }catch (Exception e){
			e.printStackTrace();
            return null;
        }
    }
}
9. 解决问题
- 多次上传相同名称的文件会造成最后一次上传的将前面的覆盖
解决:在文件名字前面加一个随机值,让每个文件的名字不同
还可以让文件按照年月日分类
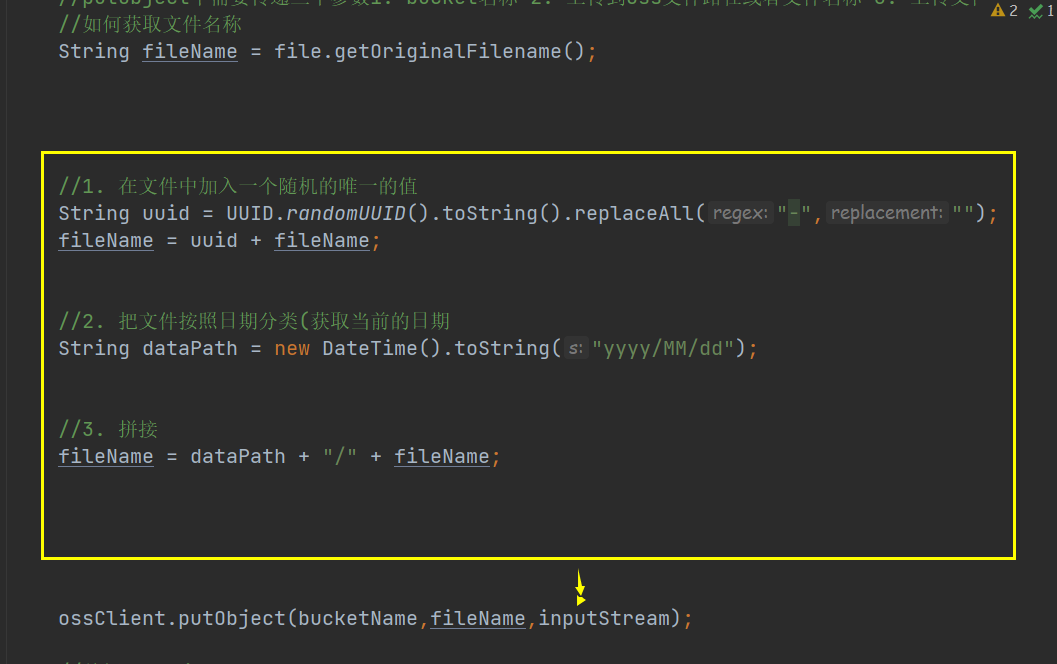
在实现类中加上入上的代码即可
10. 在swagger-ui中测试上传
记得是在8002端口
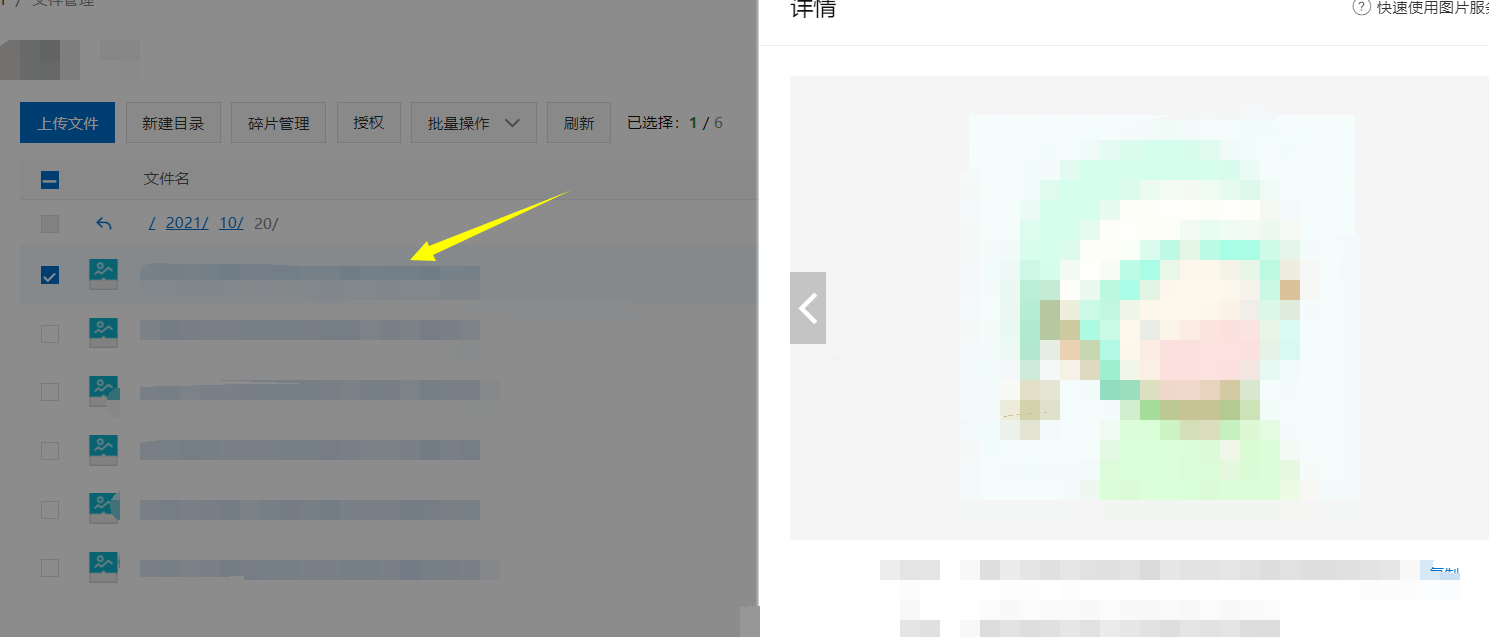
上传成功
nginx 反向代理服务器
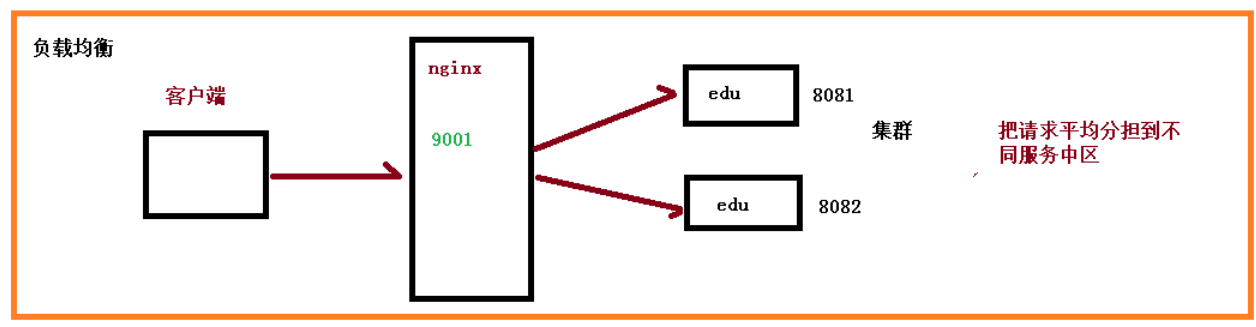
功能
- 请求转发
- 负载均衡(类似于ribbon和feign)
- 动静分离
启动关闭要使用指令
nginx.exe
nginx -s stop
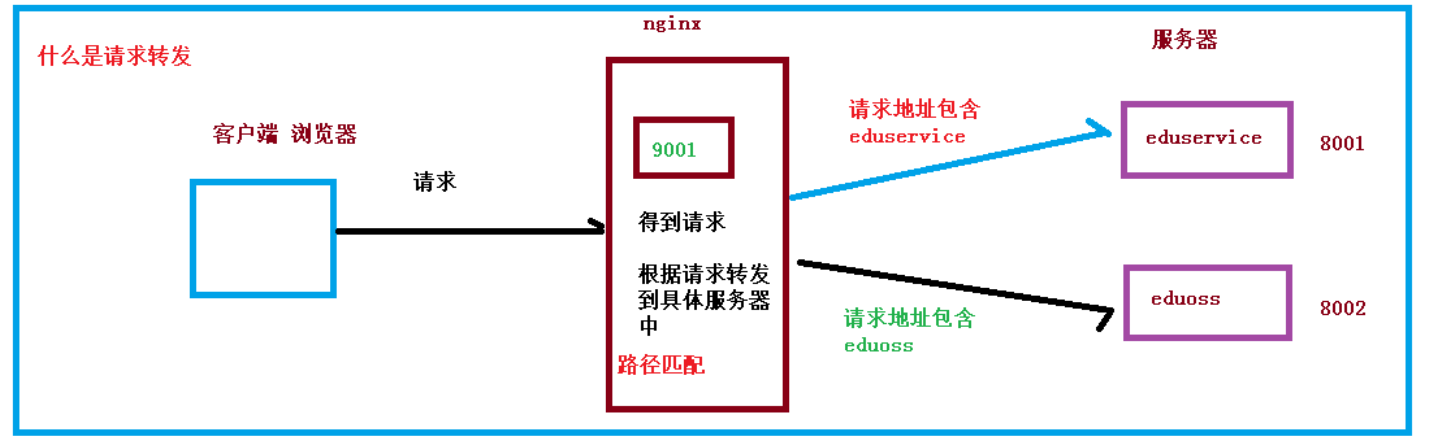
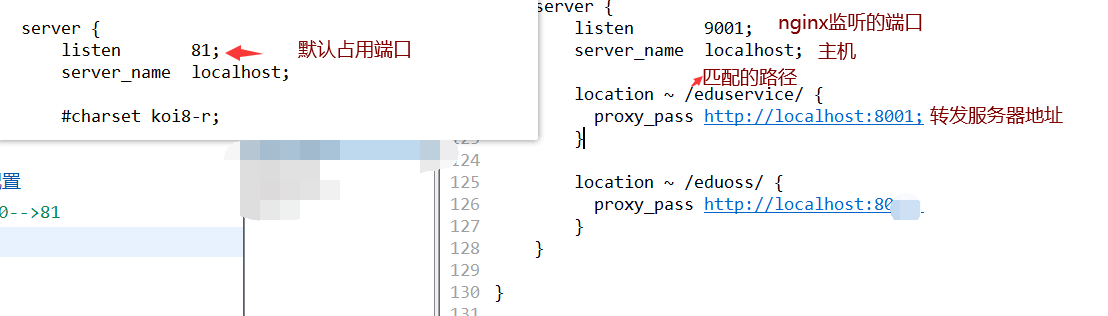
配置nginx实现请求转发的功能
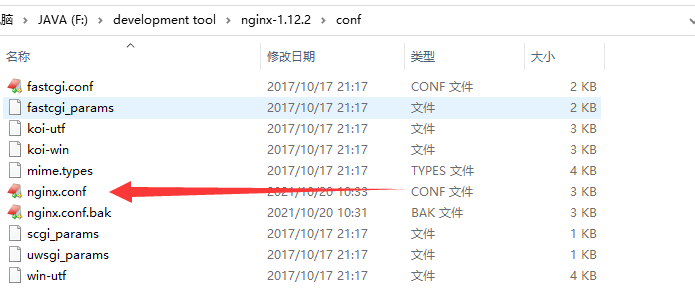
-
找到配置文件
-
在nginx.conf中进行配置
- 修改默认端口,将80-->81
- 配置转发规则
进入前端,将config中的dev.env.js中的BASE_API改为请求9001端口

前端整合讲师上传头像代码
1. 在添加讲师页面,创建上传组件,实现上传

2. 在添加讲师页面使用这个复制上传组件
 <!-- 讲师头像:TODO -->

      <el-form-item label="讲师头像">

          <!-- 头衔缩略图 -->
          <pan-thumb :image="String(teacher.avatar)"/>
          <!-- 文件上传按钮 -->
          <el-button type="primary" icon="el-icon-upload" @click="imagecropperShow=true">更换头像
          </el-button>

          <!--
      v-show:是否显示上传组件
      :key:类似于id,如果一个页面多个图片上传控件,可以做区分
      :url:后台上传的url地址
      @close:关闭上传组件
      @crop-upload-success:上传成功后的回调
        <input type="file" name="file"/>
      -->
          <image-cropper
                        v-show="imagecropperShow"
                        :width="300"
                        :height="300"
                        :key="imagecropperKey"
                        :url="BASE_API+'/eduoss/fileoss'"
                        field="file"
                        @close="close"
                        @crop-upload-success="cropSuccess"/>
      </el-form-item>
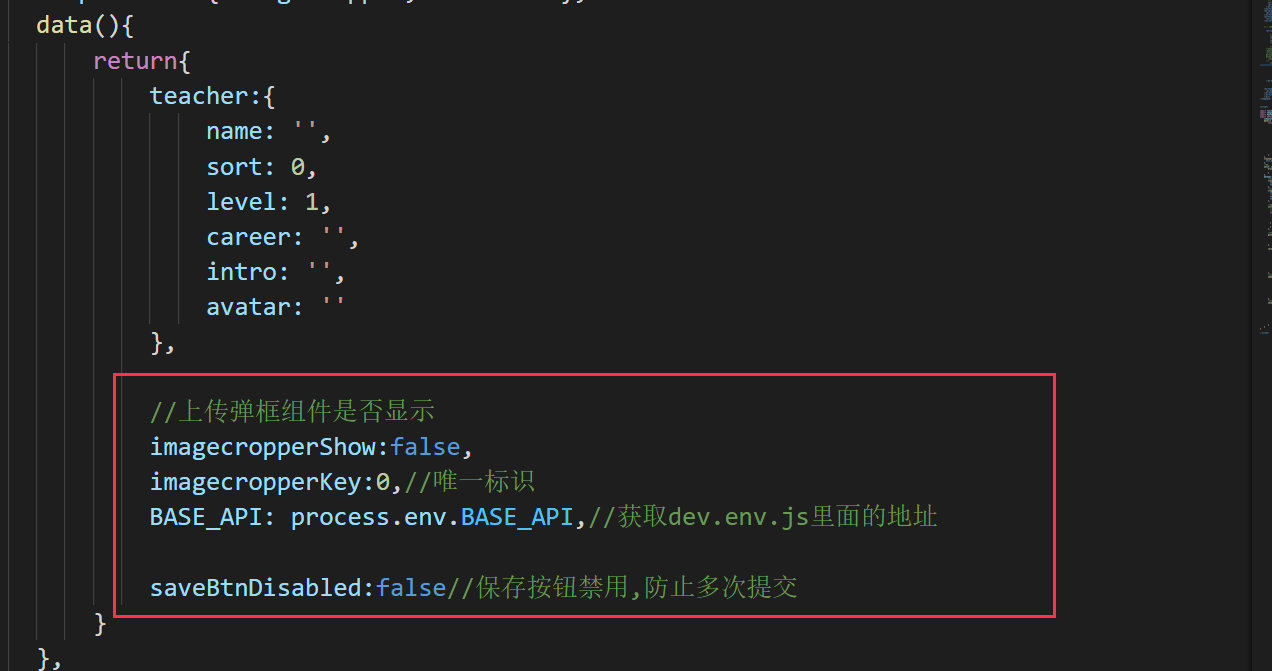
3. 使用组件,data定义变量和初始值
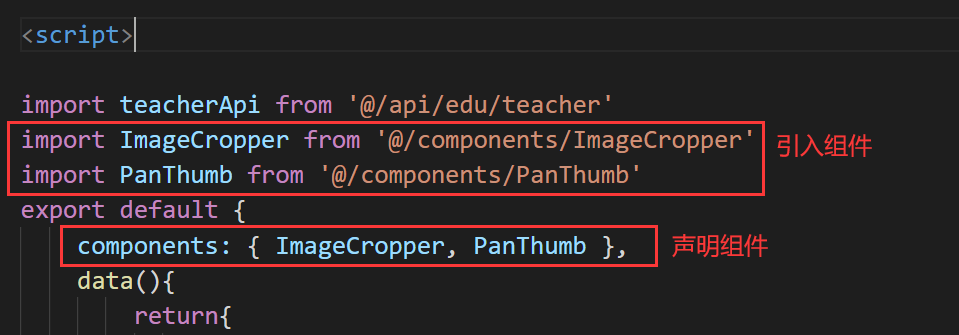
4. 引入组件和声明组件
5. 修改上传接口地址
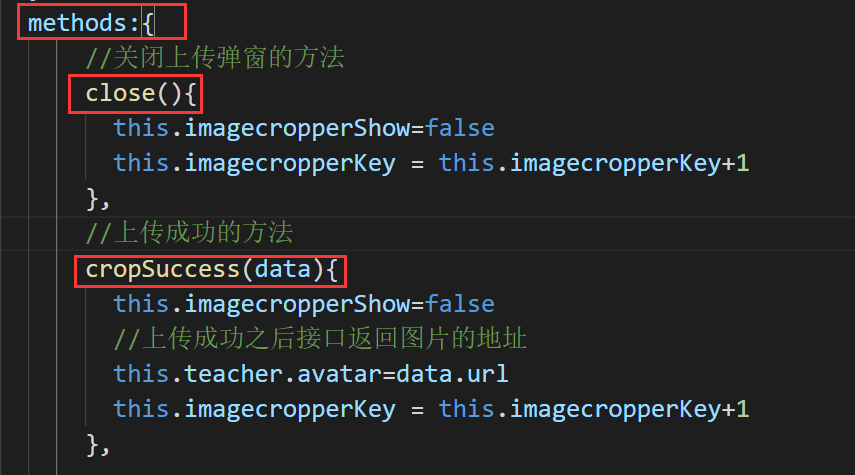
6. 编写close方法和上传成功方法
课程分类管理
例如:
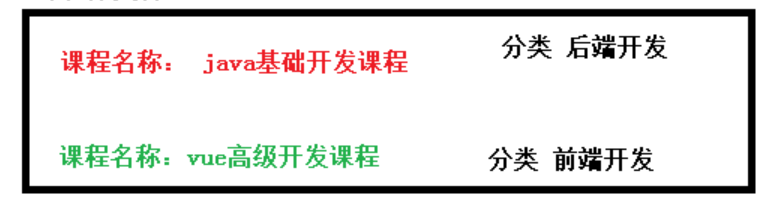
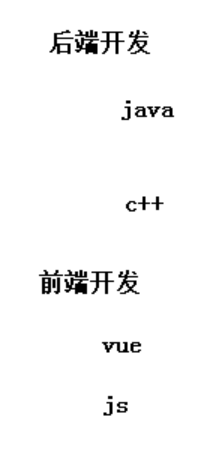
二级分类
表中如何存储二级分类
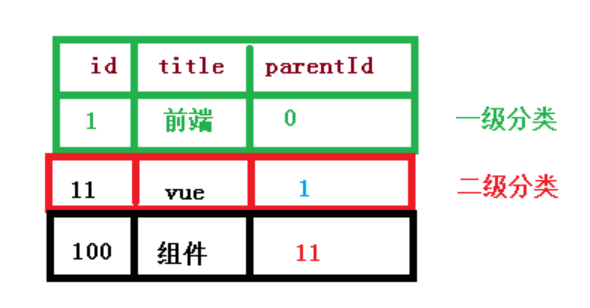
parentId:就是告诉这个分类是一级还是二级,0就是一级,带id就是二级,而parentId就是对应id中的.详见表
EasyExcel操作excel进行写(test)
1. 引入easyexcel依赖
<dependency>
            <groupId>com.alibaba</groupId>
            <artifactId>easyexcel</artifactId>
            <version>2.1.1</version>
</dependency>
<!--需要poi依赖(因为父依赖service中以及引入了此处不需要引入)-->
2. 创建实体类,和excel数据对应(此处为测试写入excel数据)
package com.sli.excel;

import com.alibaba.excel.annotation.ExcelProperty;
import lombok.Data;

/**
 * @author 1_f_
 * @create 2021-10-20 14:33
 */
@Data
public class DemoData {
    //设置excel表头名称
    @ExcelProperty(value = "学生编号")
    private Integer sno;

    @ExcelProperty(value = "学生姓名")
    private String sname;
}
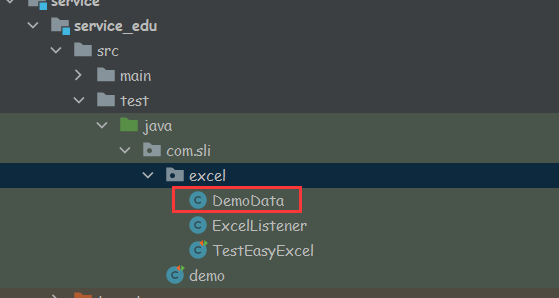
3. 创建测试类TestEasyExcel
public class TestEasyExcel {
        @Test
        public void test(){
             //实现Excel写到电脑的操作
             //1. 设置写入的文件夹的地址和excel的名字
             String filename = "F:\\Test\\write.xlsx";

             //2. 调用方法实现写的操作(参数一:文件名称,参数二:参数实体类.class)
             EasyExcel.write(filename,DemoData.class).sheet("学生列表").doWrite(getData());

        }

	 //创建一个方法,使其返回一个list集合
    private static List<DemoData> getData(){
        List<DemoData> list = new ArrayList<>();
        for (int i = 0 ; i < 10 ; i++){
            DemoData data = new DemoData();
            data.setSno(i);
            data.setSname("lucy" + i);
            list.add(data);
        }
        return list;
    }
}
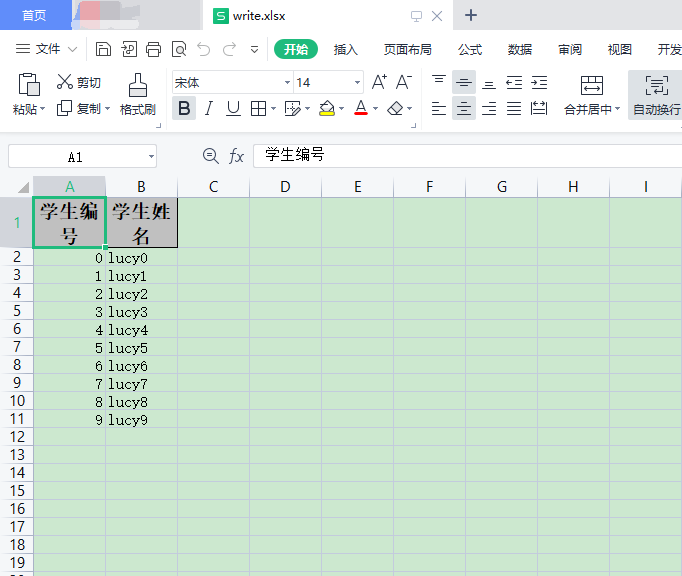
测试:完成之后如下
EasyExcel操作excel进行读(test)
1. 创建和excel对应的实体类,标记对应的列关系
index=0代表第一列的表头,1代表第二列的表头
package com.sli.excel;

import com.alibaba.excel.annotation.ExcelProperty;
import lombok.Data;

/**
 * @author 1_f_
 * @create 2021-10-20 14:33
 */
@Data
public class DemoData {

    //设置excel表头名称
    @ExcelProperty(value = "学生编号",index = 0)
    private Integer sno;

    @ExcelProperty(value = "学生姓名",index = 1)
    private String sname;
}
2. 创建监听进行excel文件读取
需要实现类:AnalysisEventListener<DemoData>泛型中需要写读取的文件对应的实体类entity
package com.sli.excel;

import com.alibaba.excel.context.AnalysisContext;
import com.alibaba.excel.event.AnalysisEventListener;

import java.util.Map;

/**
 * @author 1_f_
 * @create 2021-10-20 14:44
 */
public class ExcelListener extends AnalysisEventListener<DemoData> {

    //一行一行的读取excel中的内容
    @Override
    public void invoke(DemoData data, AnalysisContext analysisContext) {
        System.out.println("******" + data);
    }
    //读取表头
    public void invokeHeadMap(Map<Integer , String> headMap, AnalysisContext context){
        System.out.println("表头" + headMap);
    }

    //读取完成之后...
    @Override
    public void doAfterAllAnalysed(AnalysisContext analysisContext) {

    }
}
3. 创建测试方法
@Test
        public void test1(){
            String filename = "F:\\Test\\write.xlsx";
            //实现excel读取的操作(参数一:文件路径名称,...)
            EasyExcel.read(filename,DemoData.class,new ExcelListener()).sheet().doRead();
        }
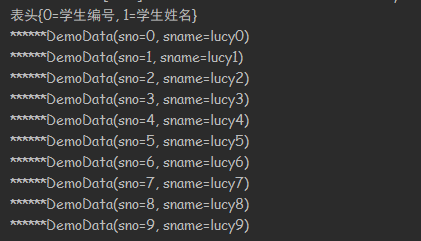
执行之后返回的数据如下
课程分类添加功能后端接口的实现
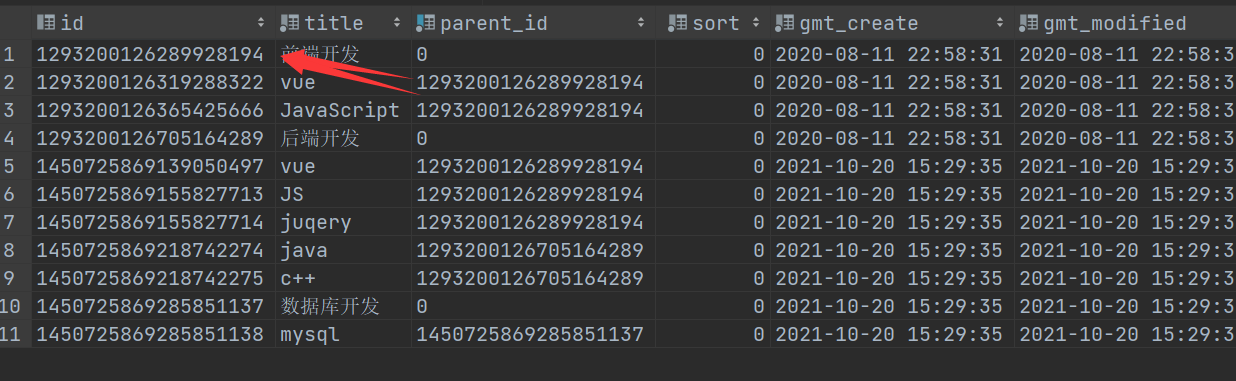
创建表edu_subject,自动生成代码
记得修改主键生成策略@TableId(value = "id", type = IdType.ID_WORKER_STR)
和创建修改时间@TableField(fill = FieldFill.INSERT) @TableField(fill = FieldFill.INSERT_UPDATE)
1. 引入依赖
2. 创建实体类和excel对应关系
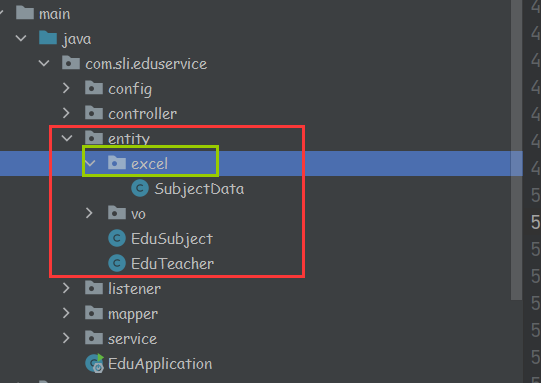
package com.sli.eduservice.entity.excel;

import com.alibaba.excel.annotation.ExcelProperty;
import lombok.Data;

/**
 * @author 1_f_
 * @create 2021-10-20 14:58
 */
@Data
public class SubjectData {


    @ExcelProperty(index = 0)
    private String oneSubjectName;

    @ExcelProperty(index = 1)
    private String twoSubjectName;

}
3. 创建课程添加的controller接口
package com.sli.eduservice.controller;


import com.sli.commonutils.R;
import com.sli.eduservice.service.EduSubjectService;
import org.springframework.beans.factory.annotation.Autowired;
import org.springframework.web.bind.annotation.CrossOrigin;
import org.springframework.web.bind.annotation.PostMapping;
import org.springframework.web.bind.annotation.RequestMapping;

import org.springframework.web.bind.annotation.RestController;
import org.springframework.web.multipart.MultipartFile;

/**
 * <p>
 * 课程科目 前端控制器
 * </p>
 *
 * @author sli
 * @since 2021-10-20
 */
@RestController
@RequestMapping("/eduservice/subject")
@CrossOrigin
public class EduSubjectController {
    @Autowired
    private EduSubjectService subjectService;

    //添加课程分类
    //获取上传的文件,把文件的内容读取

    @PostMapping("addSuject")
    public R addSubject(MultipartFile file){
        //上传excel文件
        subjectService.saveSubject(file,subjectService);
        return R.ok();
    }
}
4. 在service中创建对应的controller注入的方法
package com.sli.eduservice.service;

import com.sli.eduservice.entity.EduSubject;
import com.baomidou.mybatisplus.extension.service.IService;
import org.springframework.web.multipart.MultipartFile;

/**
 * <p>
 * 课程科目 服务类
 * </p>
 *
 * @author sli
 * @since 2021-10-20
 */
public interface EduSubjectService extends IService<EduSubject> {
    //添加课程分类
    void saveSubject(MultipartFile file,EduSubjectService subjectService);
}
5. 在service的实现类中创建方法
package com.sli.eduservice.service.impl;

import com.alibaba.excel.EasyExcel;
import com.sli.eduservice.entity.EduSubject;
import com.sli.eduservice.entity.excel.SubjectData;
import com.sli.eduservice.listener.SubjectExcelListener;
import com.sli.eduservice.mapper.EduSubjectMapper;
import com.sli.eduservice.service.EduSubjectService;
import com.baomidou.mybatisplus.extension.service.impl.ServiceImpl;
import org.springframework.stereotype.Service;
import org.springframework.web.multipart.MultipartFile;

import java.io.InputStream;

/**
 * <p>
 * 课程科目 服务实现类
 * </p>
 *
 * @author sli
 * @since 2021-10-20
 */
@Service
public class EduSubjectServiceImpl extends ServiceImpl<EduSubjectMapper, EduSubject> implements EduSubjectService {

    //添加课程分类
    @Override
    public void saveSubject(MultipartFile file,EduSubjectService subjectService) {
        try {
            InputStream in = file.getInputStream();
            EasyExcel.read(in, SubjectData.class,new SubjectExcelListener(subjectService)).sheet().doRead();
        }catch (Exception e){
            e.printStackTrace();
        }
    }
}
6. 创建监听器(重点)
package com.sli.eduservice.listener;

import com.alibaba.excel.context.AnalysisContext;
import com.alibaba.excel.event.AnalysisEventListener;
import com.baomidou.mybatisplus.core.conditions.query.QueryWrapper;
import com.sli.eduservice.entity.EduSubject;
import com.sli.eduservice.entity.excel.SubjectData;
import com.sli.eduservice.service.EduSubjectService;
import com.sli.servicebase.exceptionhandler.GuliException;

/**
 * @author 1_f_
 * @create 2021-10-20 15:02
 */
public class SubjectExcelListener extends AnalysisEventListener<SubjectData> {
    //因为SubjectExcelListener不能交给sprig管理,需要自己new对象,所以不能注入其他对象
    //不能实现数据库操作(需要自己生成构造)
    public EduSubjectService subjectService;
    public SubjectExcelListener() {
    }
    public SubjectExcelListener(EduSubjectService subjectService) {
        this.subjectService = subjectService;
    }

    //读取数据(一行一行的去读取)
    @Override
    public void invoke(SubjectData subjectData, AnalysisContext analysisContext) {
        if (subjectData == null){
            throw new GuliException(20001,"文件数据为空");
        }
        //一行一行读取,每次两个值
        //判断一级分类是否重复
        EduSubject existOneSubject = this.existOneSubject(subjectService, subjectData.getOneSubjectName());
        if (existOneSubject == null){//没有相同的一级分类,进行添加
            existOneSubject = new EduSubject();
            existOneSubject.setParentId("0");
            existOneSubject.setTitle(subjectData.getOneSubjectName());
            subjectService.save(existOneSubject);
        }

        //获取一级分类的id值
        String pid = existOneSubject.getId();
        //添加二级分类
        //判断是否重复
        EduSubject existTwoSubject = this.existTwoSubject(subjectService, subjectData.getTwoSubjectName(), pid);
        if (existTwoSubject == null){
            existTwoSubject = new EduSubject();
            existTwoSubject.setParentId(pid);
            existTwoSubject.setTitle(subjectData.getTwoSubjectName());
            subjectService.save(existTwoSubject);
        }
    }

    //判断一级分类不能重复添加,二级也不能
    private EduSubject existOneSubject(EduSubjectService subjectService,String name){
        QueryWrapper<EduSubject> wrapper = new QueryWrapper<>();
        wrapper.eq("title",name);
        wrapper.eq("parent_id","0");
        EduSubject oneSubject = subjectService.getOne(wrapper);
        return oneSubject;
    }

    //判断二级分类不能重复添加
    private EduSubject existTwoSubject(EduSubjectService subjectService,String name,String pid){
        QueryWrapper<EduSubject> wrapper = new QueryWrapper<>();
        wrapper.eq("title",name);
        wrapper.eq("parent_id","pid");
        EduSubject twoSubject = subjectService.getOne(wrapper);
        return twoSubject;
    }

	//读取完成之后执行
    @Override
    public void doAfterAllAnalysed(AnalysisContext analysisContext) {

    }
}

 浙公网安备 33010602011771号