OpenCV探索之路(二十八):Bag of Features(BoF)图像分类实践
在深度学习在图像识别任务上大放异彩之前,词袋模型Bag of Features一直是各类比赛的首选方法。首先我们先来回顾一下PASCAL VOC竞赛历年来的最好成绩来介绍物体分类算法的发展。

从上表我们可以发现,在2012年之前,词袋模型是VOC竞赛分类算法的基本框架,几乎所有算法都是基于词袋模型的,可以这么说,词袋模型在图像分类中统治了很多年。虽然现在深度学习在图像识别任务中的效果更胜一筹,但是我们也不要忘记在10年前,Bag of Features的框架曾经也引领过一个时代。那这篇文章就是要重温BoF这个经典框架,并从实践上看看它在图像物体分类中效果到底如何。
Bag of Features理论浅谈
其实Bag of Features 是Bag of Words在图像识别领域的延伸,Bag of Words最初产生于自然处理领域,通过建模文档中单词出现的频率来对文档进行描述与表达。

词包模型还有一个起源就是纹理检测(texture recognition),有些图像是由一些重复的基础纹理元素图案所组成,所以我们也可以将这些图案做成频率直方图,形成词包模型。
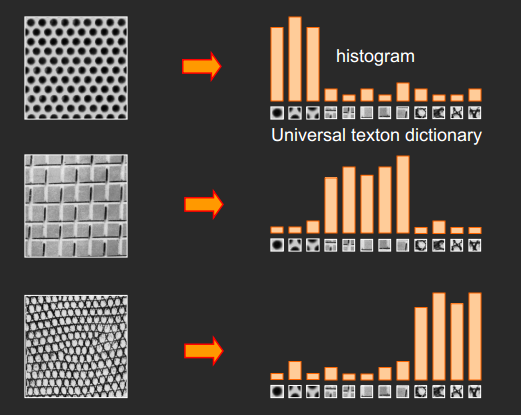
词包模型于2004年首次被引入计算机视觉领域,由此开始大量集中于词包模型的研究,在各类图像识别比赛中也大放异彩,逐渐形成了由下面4部分组成的标准物体分类框架:
- 底层特征提取
- 特征编码
- 特征汇聚
- 使用SVM等分类器进行分类
2005年第一届PASCAL VOC竞赛 数据库包含了4类物体:摩托车、自行车、人、汽车,训练集加验证集一共684张图像,测试集包含689张图像,数据规模相对较少。从方法上说,采用“兴趣点-SIFT地城特征描述-向量量化编码直方图-支持向量机”得到了最好的物体分类性能,这种方法也就是我们今天所讲的Bag of Features方法。
为什么要用BOF模型描述图像?
SIFT特征虽然也能描述一幅图像,但是每个SIFT矢量都是128维的,而且一幅图像通常都包含成百上千个SIFT矢量,在进行相似度计算时,这个计算量是非常大的,更重要的是,每一幅图提取到的SIFT特征点数目都不一样,所以我们要将这些特征量化(比如生成统计直方图),这样才能进行相似度计算。通行的做法是用聚类算法对这些矢量数据进行聚类,然后用聚类中的一个簇代表BOF中的一个视觉词,将同一幅图像的SIFT矢量映射到视觉词序列生成码本,这样每一幅图像只用一个码本矢量来描述,这样计算相似度时效率就大大提高了。
搭建Bag-of-Features的步骤:
- 特征提取(在这里我们使用很稳定的SIFT算子)
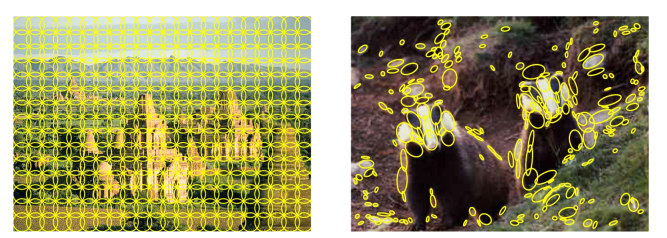
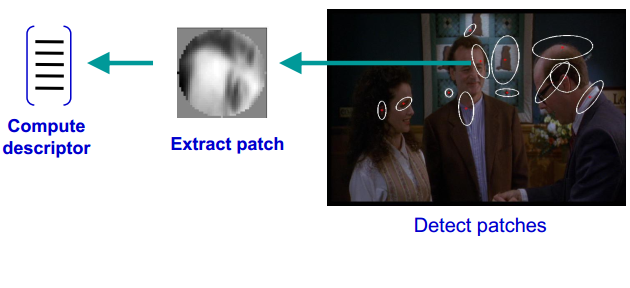
- K-means聚类。将第一步提取到的特征向量及进行聚类,得出N个类心。

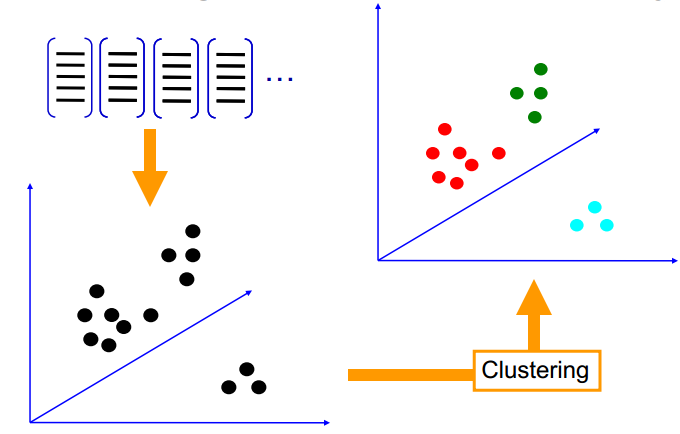
- 量化特征,形成词袋
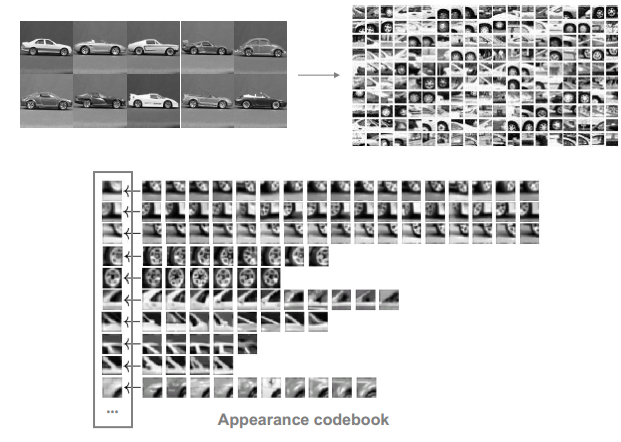
- 统计每一类别的视觉单词出现频率,形成视觉单词直方图
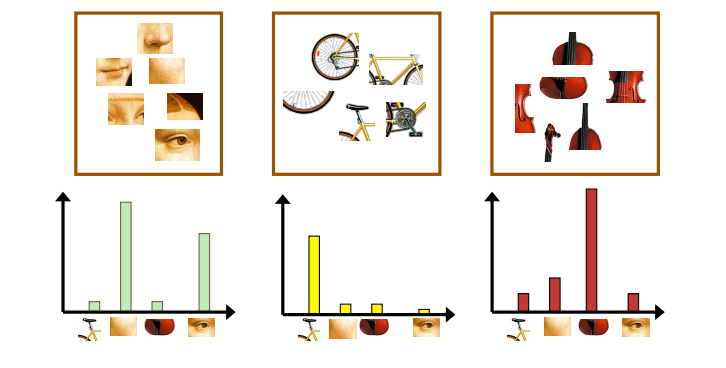
5.训练SVM分类器
实践篇
要编码实现BoF,其实只需严格按照上述讲的步骤进行就可以了,而且OpenCV给我们准备了关于BoF的相关API,所以实现起来的难度进一步降低。现在我们要思考的的是,怎么把opencv所提供的的这些API重新整合在一起,来构成一个分类能力还不错的图像分类器。
今天还是以票据分类任务为例子讲解BoF模型。
先观察数据集,我们已经分出了训练集和测试集

每一类图片放在不同的文件夹下面,文件夹的名字就是这个类别的label
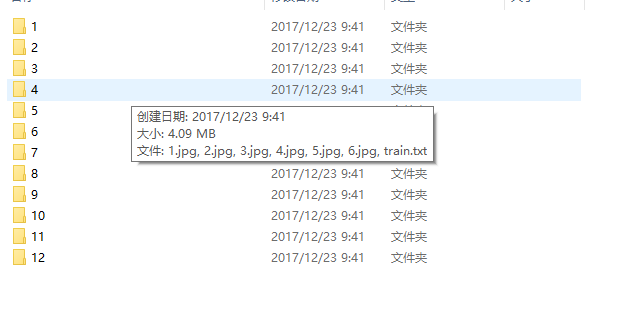
这是我们要分类的12种票据

一、特征提取
对底层特征,我们选择的还是最为经典的SIFT特征,用opencv做SIFT特征提取只需要用到几个API就可以了。
我们还是老套路,先准备好一些提取SIFT特征的数据结构和描述SIFT的一些类。
//create Sift feature point extracter
static Ptr<FeatureDetector> detector1(new SiftFeatureDetector());
//create Sift descriptor extractor
static Ptr<DescriptorExtractor> extractor(new SiftDescriptorExtractor);


//To store the keypoints that will be extracted by SIFT
vector<KeyPoint> keypoints;
//To store the SIFT descriptor of current image
Mat descriptor;
//To store all the descriptors that are extracted from all the images
Mat featuresUnclustered;
//The SIFT feature extractor and descriptor
SiftDescriptorExtractor detector;
然后我们对我们的训练样本进行遍历,对每一类的训练图片进行SIFT特征提取,并将提取出来的特征存进featuresUnclustered里,用于接下来的k-means聚类。
/*第一步,计算目录下所有训练图片的features,放进featuresUnclustered*/
printf("step1:sift features extracting...\n");
for (int num = 1; num < MAX_TRAINING_NUM; num++)
{

    sprintf(filename, ".\\training\\%d\\train.txt", num);
    //首先先检查一下该类文件夹下有没有用于train的特征文件,有的话就不需要提取特征点了
    if (_access(filename, 0) == -1)
    {
        printf("extracting features %d class\n", num);
        for (int i = 1; i <= MAX_TRAINING_NUM; i++)
        {
            sprintf(filename, ".\\training\\%d\\%d.jpg", num, i);
            //create the file name of an image
            //open the file
            input = imread(filename, CV_LOAD_IMAGE_GRAYSCALE); //Load as grayscale
            if (input.empty())
            {
                break;
            }
            //resize:reduce keypoints numbers to accerlate
            resize(input, input, Size(), 0.5, 0.5);
            //detect feature points
            detector.detect(input, keypoints);
            printf("keypoints:%d\n", keypoints.size());
            //compute the descriptors for each keypoint
            detector.compute(input, keypoints, descriptor);
            //save descriptor to file
            char train_name[32] = { 0 };
            sprintf(train_name, ".\\training\\%d\\train.txt", num);
            WriteFeatures2File(train_name, descriptor);
            //put the all feature descriptors in a single Mat object
            featuresUnclustered.push_back(descriptor);
            //train_features[num][i].push_back(descriptor);

        }
    }
    else
    {
        Mat descriptor;
        load_features_from_file(filename, descriptor);
        featuresUnclustered.push_back(descriptor);
    }


}
需要注意的是,我在特征提取阶段把每一类提取到的特征都写进了txt文件中,只是为了以后增加类别时,我们不再需要再次遍历提取特征,而只需读入我们原先存有特征向量的txt文件就可以了,这将大大加快训练速度。
static int load_features_from_file(const string& file_name,Mat& features)
{
    FILE* fp = fopen(file_name.c_str(), "r");
    if (fp == NULL)
    {
        printf("fail to open %s\n", file_name.c_str());
        return -1;
    }
    printf("loading file %s\n", file_name.c_str());

    vector<float> inData;
    while (!feof(fp))
    {
        float tmp;
        fscanf(fp, "%f", &tmp);
        inData.push_back(tmp);
    }

    //vector to Mat
    int mat_cols = 128;
    int mat_rows = inData.size() / 128;
    features = Mat::zeros(mat_rows, mat_cols, CV_32FC1);
    int count = 0;
    for (int i = 0; i < mat_rows; i++)
    {
        for (int j = 0; j < mat_cols; j++)
        {
            features.at<float>(i, j) = inData[count++];
        }
    }

    return 0;
}

static int WriteFeatures2File(const string& file_name,const Mat& features)
{
    FILE* fp = fopen(file_name.c_str(), "a+");
    if (fp == NULL)
    {
        printf("fail to open %s\n", file_name.c_str());
        return -1;
    }

    for (int i = 0; i < features.rows; i++)
    {
        for (int j = 0; j < features.cols; j++)
        {
            int data = features.at<float>(i, j);
            fprintf(fp, "%d\t", data);
        }
        fprintf(fp,"\n");
    }

    fclose(fp);

    return 0;
}
二、特征聚类
我们将上一步得到的训练集的所有特征进行聚类,聚类初始化方式选择means++,类心数量选择1000。这里需要说明一下,聚类的类心数量是一个超参数,是一个需要反复调整的参数,如果类心过少,那就表示BOF模型的视觉单词数目很少,即该模型的表达能力很低,很可能在分类任务中不能区分出每一类物体(有点像Deep Learning中说的欠拟合);但类心过多,就会造成视觉单词过于分散,很可能导致模型在泛化效果不佳(过拟合)。所以,选择一个合理的类心数目很重要。
/*第二步,定义好聚类的中心数目,进行聚类,并得到词典dictionary*/
printf("step2:clusting...\n");
int dictionarySize = 1000;  //类心数目,即codebook num
//define Term Criteria
TermCriteria tc(CV_TERMCRIT_ITER, 1000, 0.001);  //最大迭代1000次
//retries number
int retries = 1;
//necessary flags
int flags = KMEANS_PP_CENTERS;  //kmeans++初始化
//Create the BoW (or BoF) trainer
BOWKMeansTrainer bowTrainer(dictionarySize, tc, retries, flags);
//cluster the feature vectors
Mat dictionary = bowTrainer.cluster(featuresUnclustered);  //聚类
//store the vocabulary
FileStorage fs(".\\dictionary1.yml", FileStorage::WRITE); //将聚类后的结果写入文件
fs << "vocabulary" << dictionary;
fs.release();
cout << "Saving BoW dictionary\n";
这个聚类时间还是比较长的,大概需要20分钟。
三、量化特征,形成词典直方图
/*第三步,计算每个类别的词典直方图*/
printf("step3:generating dic histogram...\n");
//create a nearest neighbor matcher
Ptr<DescriptorMatcher> matcher(new FlannBasedMatcher);
//create Sift feature point extracter
Ptr<FeatureDetector> detector1(new SiftFeatureDetector());
//create Sift descriptor extractor
Ptr<DescriptorExtractor> extractor(new SiftDescriptorExtractor);
//create BoF (or BoW) descriptor extractor
BOWImgDescriptorExtractor bowDE(extractor, matcher);
//Set the dictionary with the vocabulary we created in the first step
bowDE.setVocabulary(dictionary);

cout << "extracting histograms in the form of BOW for each image " << endl;
Mat labels(0, 1, CV_32FC1);
Mat trainingData(0, dictionarySize, CV_32FC1);
int k = 0;
vector<KeyPoint> keypoint1;
Mat bowDescriptor1;
Mat img2;
//extracting histogram in the form of bow for each image
for (int num = 1; num <= MAX_TRAINING_NUM; num++)
{
    for (int i = 1; i <= MAX_TRAINING_NUM; i++)
    {
        sprintf(filename, ".\\training\\%d\\%d.jpg", num,i);

        //sprintf(filename, "%d%s%d%s", j, " (", i, ").jpg");
        img2 = cvLoadImage(filename, 0);

        if (img2.empty())
        {
            break;
        }

        resize(img2, img2, Size(), 0.5, 0.5);

        detector.detect(img2, keypoint1);

        bowDE.compute(img2, keypoint1, bowDescriptor1);

        trainingData.push_back(bowDescriptor1);

        labels.push_back((float)num);
    }
}
四、训练SVM
我们使用SVM作为分类器进行训练,训练好的数据以文件的形式存储下来,以后预测时直接读文件就可以还原模型了。
/*第四步,训练SVM得到分类模型*/
printf("SVM training...\n");
CvSVMParams params;
params.kernel_type = CvSVM::RBF;
params.svm_type = CvSVM::C_SVC;
params.gamma = 0.50625000000000009;
params.C = 312.50000000000000;
params.term_crit = cvTermCriteria(CV_TERMCRIT_ITER, 1000, 0.000001);
CvSVM svm;

bool res = svm.train(trainingData, labels, cv::Mat(), cv::Mat(), params);

svm.save(".\\svm-classifier1.xml");

delete[] filename;
printf("bag-of-features training done!\n");
六、预测
首先我们需要载入我们训练好的数据(svm-classifier1.xml和dictionary1.yml)
//字典文件、SVM训练文件读入内存
void TrainingDataInit()
{
	FileStorage fs(".\\dictionary1.yml", FileStorage::READ);
	Mat dictionary;
	fs["vocabulary"] >> dictionary;
	fs.release();

	bowDE.setVocabulary(dictionary);

	svm.load(".\\svm-classifier1.xml");

}
然后再写一个预测函数,用SVM实现线上分类。
//实现发票图像的分类,返回值即预测的分类结果
int invoice_classify(Mat& img)
{
    Mat img2 = img.clone();
	resize(img2, img2, Size(), 0.5, 0.5);
    cvtColor(img2, img2, CV_RGB2GRAY);
	SiftDescriptorExtractor detector;
	vector<KeyPoint> keypoint2;
	Mat bowDescriptor2;

	Mat img_keypoints_2;

	detector.detect(img2, keypoint2);

	bowDE.compute(img2, keypoint2, bowDescriptor2);

	int it = svm.predict(bowDescriptor2);

	return it;
}
现在开始测试,写一个测试函数,读入测试集进行预测,计算其准确率
void TestClassify()
{
    int total_count = 0;
    int right_count = 0;
    string tag;
    for (int num = 1; num < 30; num++)
    {
        for (int i = 1; i < 30; i++)
        {
            char path[128] = { 0 };
            sprintf(path, ".\\test\\%d\\%d.jpg", num, i);
            Mat img = imread(path,0);
            if (img.empty())
            {
                continue;
            }
            int type = invoice_classify(img);
            if (type == -1)
            {
                printf("reject image %s\n", path);
                continue;
            }

            total_count++;

            if (num == type)
            {
                tag = "CORRECT";
                right_count++;
            }
            else
            {
                tag = "WRRONG";
            }
            printf("[%s]  label: %d   predict: %d, %s\n", path, num, type, tag.c_str());
        }
    }

    printf("total image:%d  acc:%.2f\n", total_count,(float)right_count/total_count);

}
完整的流程如下:先建立BoF模型,然后更新训练数据,将训练参数保存至文件。当线上预测时,先将训练参数读入内存,再利用模型对图片进行分类。模拟测试代码如下:
#include "bof.h"


int main()
{
    BuildDictionary(12,6);

    TrainingDataInit();
    TestClassify();

    return 0;
}
训练:

预测结果:
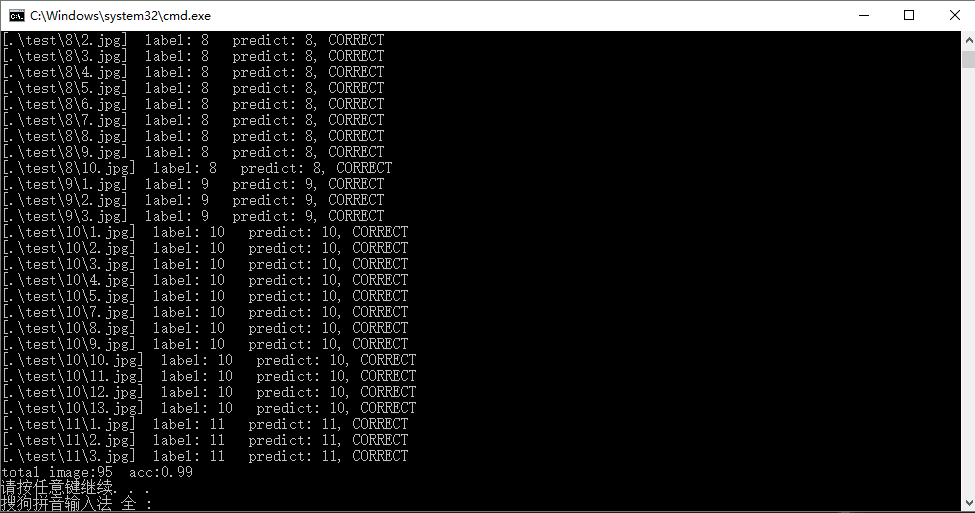
可以看出,BoF模型在这种简单分类任务的效果还可以,更重要的是我每一类只用了6张训练样本(小样本集)就可以有这个效果了,如果是采用深度学习做分类,这个估计不行了。
再优化
总体而言,2005年提出来的Bag-of-Features的分类效果并不是很好,尤其是一些比较像的类别,它的区分能力还是不足的。那能不能可以做哪些优化进一步提升分类准确率呢?我觉得可以从以下几点入手试一试:
- kmeans类心数目调整
- 增加每一类训练图片的数目
- 可以加入颜色特征,比如颜色直方图。个人认为这个措施会有较大效果,因为SIFT特征点提取时,图片已经是灰度图了,所以颜色这个很重要的特征并没有用上。
- 加入一些全局特征做特征融合,因为SIFT是局部特征,所以如果有一些全局特征作为补充的话,效果会有比较好的提升。
- 空间域金字塔思路(CVPR2006)
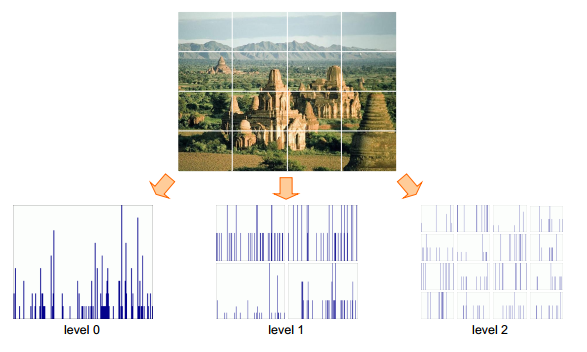
完整的代码可以在我的github上获取。
总结
在今天看来,曾经引领过一个时代的Bag-of-Features在普通分类任务上并没有取得让人满意的效果,但我估计它在场景分类或图像检索上还是会比较出色(比如地标)。现在已经全面进入深度学习的时代了,BoF的概念越来越淡出人们的视野,但BoF模型在某些应用场景还是很有潜力的。


【推荐】国内首个AI IDE,深度理解中文开发场景,立即下载体验Trae
【推荐】编程新体验,更懂你的AI,立即体验豆包MarsCode编程助手
【推荐】抖音旗下AI助手豆包,你的智能百科全书,全免费不限次数
【推荐】轻量又高性能的 SSH 工具 IShell:AI 加持,快人一步
· 如何编写易于单元测试的代码
· 10年+ .NET Coder 心语,封装的思维:从隐藏、稳定开始理解其本质意义
· .NET Core 中如何实现缓存的预热?
· 从 HTTP 原因短语缺失研究 HTTP/2 和 HTTP/3 的设计差异
· AI与.NET技术实操系列:向量存储与相似性搜索在 .NET 中的实现
· 周边上新:园子的第一款马克杯温暖上架
· Open-Sora 2.0 重磅开源!
· 分享 3 个 .NET 开源的文件压缩处理库,助力快速实现文件压缩解压功能!
· Ollama——大语言模型本地部署的极速利器
· DeepSeek如何颠覆传统软件测试?测试工程师会被淘汰吗?