JavaScript快速入门-实战(例子)
1、模拟bootstrap中的模态框
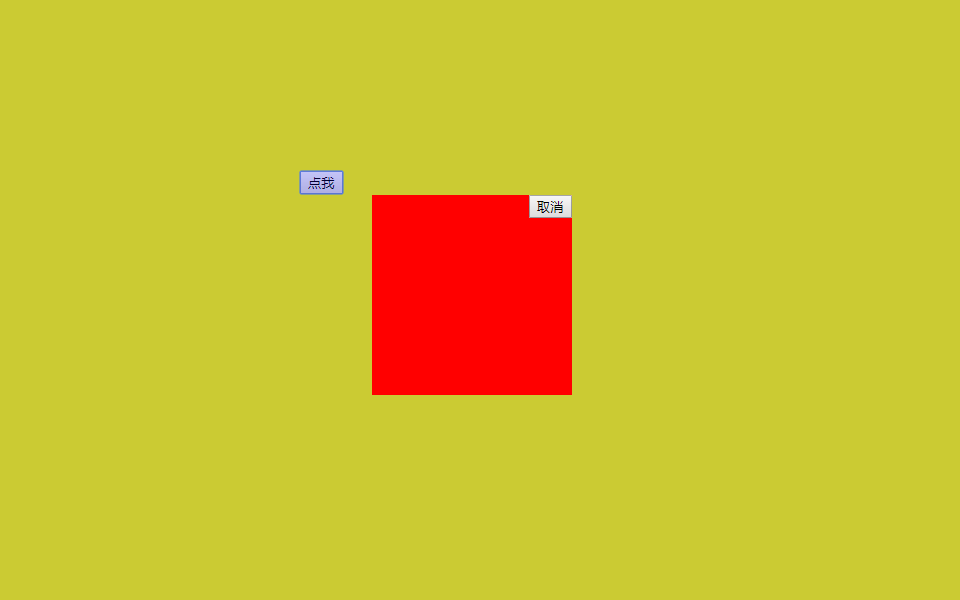
效果图:(点我后,弹出对话框,最下面的内容可以看到,但是有一定的透明度。)
思路分析:
整体分为三层,最底层(点我),中间透明层(实现透明效果),最顶层(最新内容展示)
很明显,三个div就可以实现,正常情况上面2层div隐藏起来,通过点击“点我”后,上面2层div浮现出来,这样就实现了动画效果。
代码如下:
<!DOCTYPE html>
<html>
<head>
<meta http-equiv="Content-Type" content="text/html; charset=gb2312">
<title>小白教程</title>
</head>
<body>
<!DOCTYPE html>
<html lang="en">
<head>
    <meta charset="UTF-8">
    <title>Title</title>
    <style>
	body{
	   margin:0;
	}
        .back{
            background-color:yellow;
            height: 2000px;
        }

        .shade{
            position: fixed;
            top: 0;
            bottom: 0;
            left:0;
            right: 0;
            background-color: blue;
            opacity: 0.2;
        }

        .hide{
            display: none;
        }

        .models{
            position: fixed;
            top: 50%;
            left: 50%;
            margin-left: -100px;
            margin-top: -100px;
            height: 200px;
            width: 200px;
            background-color: red;

        }
	#ID1{
		margin-left:500px;
		margin-top:200px;
	}
	#ID2{
		float:right;
	}
    </style>
</head>
<body>
<div class="back">
    <input id="ID1" type="button" value="点我" onclick="action('show')">
</div>

<div class="shade hide"></div>
<div class="models hide">
    <input id="ID2" type="button" value="取消" onclick="action('hide')">
</div>

<script>

    function action(act){
		//获取遮罩层节点、最外层节点
        var shadeNode=document.getElementsByClassName("shade")[0];
        var topNode=document.getElementsByClassName("models")[0];

		//点我后,如果参数为show,则遮罩层和最外层展示出来;如果参数为hide,则遮罩层和最外层隐藏起来。
        if(act=="show"){
              shadeNode.classList.remove("hide");
              topNode.classList.remove("hide");
        }else {
              shadeNode.classList.add("hide");
              topNode.classList.add("hide");
        }

    }
</script>
</body>
</html>

</body>

</html>
知识点分析:
1、body设置margin为0.保证html页面置顶。
2、遮罩层和最外层的position为fixed;
3、遮罩层铺满屏幕,top、right、bottom、left都设为0;
4、最外层位置居中,这个重点说一下:
一般情况下,我们设置最外层div的距离top为50%,left为50%。
但是,这个和我们预想的有些差距,因为div本身有高度和宽度,所以看上去不是居中的位置,这时候我们需要把div整体向上、向左移动50%(height和width)。
            top: 50%;
            left: 50%;
            margin-left: -100px;
            margin-top: -100px;
            height: 200px;
            width: 200px;
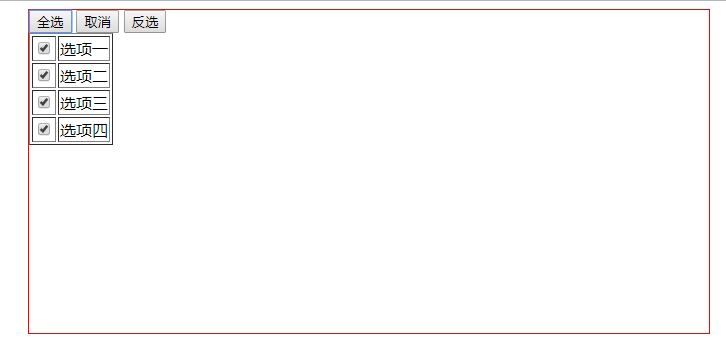
2、全选、反选
实现效果:
代码如下:
<!DOCTYPE html>
<html>
<head>
<meta http-equiv="Content-Type" content="text/html; charset=gb2312">
<title>小白教程</title>
<style>
 #selected{
	position:fixed;
	width:50%;
	height:50%;
	margin-left:300px;
	border:1px solid red;
 }

</style>
</head>
<body>
<div id='selected'>
	<button onclick="select('all');">全选</button>
     <button onclick="select('cancel');">取消</button>
     <button onclick="select('reverse');">反选</button>

     <table border="1" id="Table">
         <tr>
             <td><input type="checkbox"></td>
             <td>选项一</td>
         </tr>
         <tr>
             <td><input type="checkbox"></td>
             <td>选项二</td>
         </tr>
         <tr>
             <td><input type="checkbox"></td>
             <td>选项三</td>
         </tr>
         <tr>
             <td><input type="checkbox"></td>
             <td>选项四</td>
         </tr>
     </table>

</div>
</body>
<script>
    function select(choice){
		//获取table元素
        var table=document.getElementById("Table");
		//获取table下面的所有input标签
        var inputs=table.getElementsByTagName("input");
		//循环input标签
        for (var i=0;i<inputs.length;i=i+1){
			//针对每个input
            var element_input=inputs[i];
			//如果为全选,则每个input都为true
            if (choice=="all"){
                element_input.checked=true;
			//如果为取消,则每个input都为false
            }else if(choice=="cancel"){
                element_input.checked=false;
            }
			//如果为反选,则将selected的取消即可。
            else {

                if (element_input.checked){
                    element_input.checked=false;
                }else {
                    element_input.checked=true;
                }
            }

            }
    }
</script>
</html>
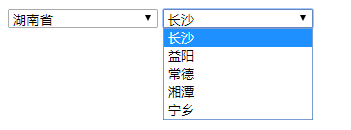
3、多级联动
实现效果:
代码:
<!DOCTYPE html>
<html>
<head>
<meta http-equiv="Content-Type" content="text/html; charset=gb2312">
<title>小白教程</title>
<style>
   select{
		width:150px;
   }
</style>
</head>
<body>
<select id="province"></select>
<select id="city"></select>
</body>

<script>
//定义数据
    data={"请选择省":["请选择市"],"湖南省":["长沙","益阳","常德","湘潭","宁乡"],"珠海":["香洲区","金湾区","斗门区"]};

//获取省、市标签
      var p=document.getElementById("province");
      var c=document.getElementById("city");
 //创建option
    for(var i in data){
        var option_pro=document.createElement("option");

        option_pro.innerHTML=i;

        p.appendChild(option_pro);
    }
//省的option有变化,则创建市的option
     p.onchange=function(){

            pro=(this.options[this.selectedIndex]).innerHTML;
            citys=data[pro];

         c.options.length=0;

         for (var i in citys){
             var option_city=document.createElement("option");
             option_city.innerHTML=citys[i];
             c.appendChild(option_city);
         }

        }
</script>
</html>
4、模拟随机码

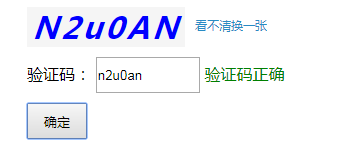

代码如下:
<!doctype html>
<html>
<head>
<meta charset="gb2312">
<title>小白教程</title>
<style>
.v_code {
  width: 600px;
  margin: 0 auto;
}
.v_code > input {
  width: 60px;
  height: 36px;
  margin-top: 10px;
}
.code_show {
  overflow: hidden;
}
.code_show span {
  display: block;
  float: left;
  margin-bottom: 10px;
}
.code_show a {
  display: block;
  float: left;
  margin-top: 10px;
  margin-left: 10px;
}
.code {
  font-style: italic;
  background-color: #f5f5f5;
  color: blue;
  font-size: 30px;
  letter-spacing: 3px;
  font-weight: bolder;
  float: left;
  cursor: pointer;
  padding: 0 5px;
  text-align: center;
}
#inputCode {
  width: 100px;
  height: 30px;
}
a {
  text-decoration: none;
  font-size: 12px;
  color: #288bc4;
  cursor: pointer;
}
a:hover {
  text-decoration: underline;
}
</style>
<script>
var code;
function createCode() {
  code = "";
  var codeLength = 6; //验证码的长度
  var checkCode = document.getElementById("checkCode");
  var codeChars = new Array(0, 1, 2, 3, 4, 5, 6, 7, 8, 9,
       'a','b','c','d','e','f','g','h','i','j','k','l','m','n','o','p','q','r','s','t','u','v','w','x','y','z',
       'A','B','C','D','E','F','G','H','I','J','K','L','M','N','O','P','Q','R','S','T','U','V','W','X','Y','Z');
  for (var index = 0; index < codeLength; index++) {
    var charNum = Math.floor(Math.random() * 52);
    code += codeChars[charNum];
  }
  if (checkCode) {
    checkCode.className = "code";
    checkCode.innerHTML = code;
  }
}
function validateCode() {
  var inputCode = document.getElementById("inputCode").value;
  var textShow = document.getElementById("text_show")
  if (inputCode.length <= 0) {
    textShow.innerHTML = "请输入验证码";
    textShow.style.color = "red";
  } else if (inputCode.toUpperCase() != code.toUpperCase()) {
    textShow.innerHTML = "您输入的验证码有误";
    textShow.style.color = "red";
    createCode();
  } else {
    textShow.innerHTML = "验证码正确";
    textShow.style.color = "green";
  }
}
function checkCode(){
  var btn = document.getElementById("Button1");
  btn.onclick=function(){
    validateCode();
  }
}
window.onload = function () {
  checkCode();
  createCode();
  document.getElementById("checkCode").onclick = function () { createCode() }
  linkbt.onclick = function () { createCode() }
  inputCode.onclick = function () { validateCode(); }
}
</script>
</head>
<body>
  <div class="v_code">
    <div class="code_show">
      <span class="code" id="checkCode"></span>
      <a id="linkbt">看不清换一张</a>
    </div>
    <div class="input_code">
      <label for="inputCode">验证码:</label>
      <input type="text" id="inputCode"/>
      <span id="text_show"></span>
    </div>
    <input id="Button1" type="button" value="确定" />
  </div>
</body>
</html>
5、选项转移

实现代码:
<!doctype html>
<html>
<head>
<meta charset="gb2312">
<title>小白教程</title>
<style>
 #left{
	float:left;
	margin-top:50px;
	margin-left:50px;
 }
 #choice{
	float:left;
	margin-top:50px;
 }
 #right{
	float:left;
	margin-top:50px;
 }
 #outer{
	width:300px;
	height:300px;
	border:1px solid red;
	margin-left:100px;
}
</style>
</head>
<body>
<div id='outer'>
 <div id="box1">
    <select multiple="multiple" size="10" id="left">
        <option>user01</option>
        <option>user02</option>
        <option>user03</option>
        <option>user04</option>
        <option>user05</option>
        <option>user06</option>
    </select>
</div>


<div id="choice">
    <input class="add" type="button" value="-添加-->" onclick="add('right','left',false)"><br>
    <input class="remove" type="button" value="<-反加--" onclick="add('left','right',false)"><br>
    <input class="addall" type="button" value="=添加所有==>" onclick="add('right','left',true)"><br>
    <input class="removeall" type="button" value="<==反添加所有=" onclick="add('left','right',true)">
</div>


<div>
    <select multiple="multiple" size="10" id="right">
        <option>user001</option>
		<option>user002</option>
		<option>user003</option>
		<option>user004</option>
		<option>user005</option>
		<option>user006</option>
    </select>
</div>
</div>

</body>
<script>

function add(arg1,arg2,arg3=false){
	var arg1=document.getElementById(arg1);
	var options=document.getElementById(arg2).getElementsByTagName("option");
	for (var i=0; i<options.length;i++){
		var option=options[i];
		if(arg3==false){
			if(option.selected==true){
				arg1.appendChild(option);
				i--;
			}
		}else{
			arg1.appendChild(option);
			i--;
		}
	 }
 }
</script>
</html>

 浙公网安备 33010602011771号