Zabbix实战-简易教程--大型分布式监控系统实现Agent批量快速接入
一、分布式架构
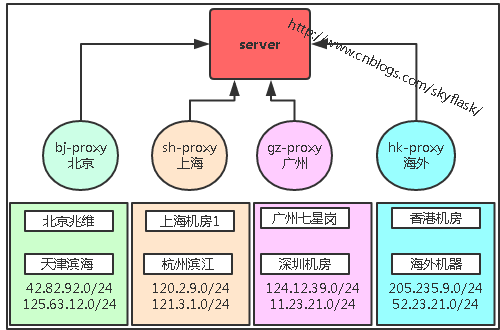
相信使用zabbix的大神都熟悉他的分布式架构,分布式的优势相当明显,分而治之。比如目前我的架构图如下:
那么,对将要接入监控系统的任何一个agent如何快速定位,并进行接入呢?
问题分析:
1、目标IP定位
2、目标IP定位后,可能有些是纯内网环境(比如DB机器)
3、proxy管辖范围
4、被管辖目标和管辖者范围确定后,具体用什么方法实现?
解决办法:
1、目标IP基本上是可控的,因为我们自己有哪些IP网段,在CMDB里面一查便知;
2、对于纯内网环境,由于机器无法直接出外网,而只能通过内网IP进行通信,我们可以使用Nginx的反向代理来解决。(重要)
3、proxy的管辖范围也是可控的,因为我们自己清楚自己有哪些proxy,proxy到哪些区域速度更快;
4、目标IP和所要接入的proxy都已经可控,最后就是实现手段:shell脚本。
实现图如下:
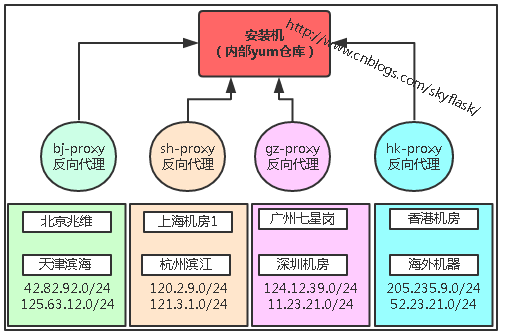
前提:proxy必须和安装机能够通过外网通讯。
已经知道解决问题的办法,那么实现起来的话就不是那么难了。方法千千万万种,就看你喜欢哪一种了。
我这里用最简单的,shell脚本方法。
二、Agent定位
1、通过本机解析方式
#!/bin/bash

ipaddr_shhb=`ip a| grep -E -o "(25[0-5]|2[0-4][0-9]|[01]?[0-9][0-9]?)\.(25[0-5]|2[0-4][0-9]|[01]?[0-9][0-9]?)\.(25[0-5]|2[0-4][0-9]|[01]?[0-9][0-9]?)\.(25[0-5]|2[0-4][0-9]|[01]?[0-9][0-9]?)"|grep -E "42.82.92\.|125.63.12\."|wc -l`
ipaddr_shhb_proxy='42.82.92.22'

ipaddr_gzqxg=`ip a| grep -E -o "(25[0-5]|2[0-4][0-9]|[01]?[0-9][0-9]?)\.(25[0-5]|2[0-4][0-9]|[01]?[0-9][0-9]?)\.(25[0-5]|2[0-4][0-9]|[01]?[0-9][0-9]?)\.(25[0-5]|2[0-4][0-9]|[01]?[0-9][0-9]?)"|grep -E "120.2.9\.|121.13.1\."|wc -l`
ipaddr_gzqxg_proxy='121.114.30.25'


ipaddr_hk=`ip a| grep -E -o "(25[0-5]|2[0-4][0-9]|[01]?[0-9][0-9]?)\.(25[0-5]|2[0-4][0-9]|[01]?[0-9][0-9]?)\.(25[0-5]|2[0-4][0-9]|[01]?[0-9][0-9]?)\.(25[0-5]|2[0-4][0-9]|[01]?[0-9][0-9]?)"|grep -E "124.12.39\.|11.23.21\."|wc -l`
ipaddr_hk_proxy='124.12.39.33'

function install_agent() {

  wget http://安装机:端口/zabbix/zabbix-2.2.4-agent.sh
  /bin/bash zabbix-2.2.4-agent.sh uninstall $1
  /bin/bash zabbix-2.2.4-agent.sh install_proxy_agent  $1
  rm -rf zabbix-2.2.4-agent.sh


}

if [ ${ipaddr_shhb} -ge 1 ];then

    install_agent ${ipaddr_shhb_proxy}

elif [ ${ipaddr_gzqxg} -ge 1 ];then

    install_agent ${ipaddr_gzqxg_proxy}
else
    install_agent ${ipaddr_hk_proxy}

fi
2、通过外部解析方式
由于有些云主机通过上面的方式可能不行,因为内网可能重复(不同VPS内网IP可相同)。
#!/bin/bash
pubip=`curl -s http://ipinfo.io|grep ip|awk -F[\"] '{print $4}'`
ipaddr_shhb=`echo $pubip|grep -E "42.82.92\.|125.63.12\."|wc -l`
ipaddr_shhb_proxy='42.82.92.22'

ipaddr_gzqxg=`echo $pubip|grep -E "120.2.9\.|121.13.1\."|wc -l`
ipaddr_gzqxg_proxy='121.114.30.25'


ipaddr_hk=`echo $pubip|grep -E "124.12.39\.|11.23.21\."|wc -l`
ipaddr_hk_proxy='124.12.39.33'

function install_agent() {

  wget http://安装机:端口/zabbix/zabbix-2.2.4-agent.sh
  /bin/bash zabbix-2.2.4-agent.sh uninstall $1
  /bin/bash zabbix-2.2.4-agent.sh install_proxy_agent  $1
  rm -rf zabbix-2.2.4-agent.sh


}

if [ ${ipaddr_shhb} -ge 1 ];then

    install_agent ${ipaddr_shhb_proxy}

elif [ ${ipaddr_gzqxg} -ge 1 ];then

    install_agent ${ipaddr_gzqxg_proxy}
else
    install_agent ${ipaddr_hk_proxy}

fi
通过以上2种方式,就可以定位AgentIP和PorxyIP的对应关系,同时,将proxyIP作为参数传入脚本,这样,在安装的时候proxyIP地址就可以动态选定了。
三、实现接入
正式安装时,将proxy的ip作为安装脚本的传入参数即可。其他可以定制化你所需要安装的一切!
#!/bin/bash
#author qunxue
#version 0.1
#update logs:
#1.add install/uninstall function at 2015/3/27
#2.change zabbix_agent_ip get method(CentOS7's ifconfig cmd is not worked! at 2015/3/30
#3.add install for CentOS7 Version at 2015/3/30
#4.add web、DB for base at 2015/09/08
#5.add zabbix_agent_ip check as pubilic
#6.add login ssh monitor
#7.modify zabbix_agent_ip get method
#8.add gpu monitor

###set variables
zabbix_agent_hostname=$(hostname)
zabbix_server_port='10051'
zabbix_server_ip='zabbixseverip'
zabbix_proxy_server_ip=$2
zabbix_agent_ip=$(/sbin/ip addr|grep -w "inet"|grep -v 127.0.0.1|awk -F/ '{print $1}'|awk '{print $2}'|head -n 1)


#############Check selinux status#############
function check_selinux() {
if [[ $(getenforce|grep -w "Enforcing"|wc -l) = 1 ]];then
     echo -e "\033[1;31mYour system's Selinux is enforced!Now must be disabled....\033[0m"
     setenforce 0
     sed -i 's/SELINUX=enforcing/SELINUX=disabled/g' /etc/selinux/config
     echo -e "\033[1;32mSelinux is disabled Now!\033[0m"
   else
     echo -e "\033[1;32mSelinux had been disabled,there is no need to be modified!\033[0m"
fi
}

#############Check OS version and change dash for Ubuntu##################
function modify_dash() {
if [[ $(uname -a|grep -E "el6|el5|el7|debian"|wc -l) = 1 ]];then
     echo "OK.bash is default!"
   else
     echo "Ubuntu system must modify dash!"
     ln -s /bin/bash /bin/sh 2>/dev/null
     echo "link created success!"
fi
}

#############Check if running script's user is root######################
function install_zabbix_proxy_agent() {
if [ $(id -u) != "0" ]; then
    echo -e "\033[1;31m Error: You must be root to run this script!\033[0m"
    exit 1
fi
system_version=$(uname -m)

if [[ $(grep -i -E -c -w "Red|CentOS" /etc/issue) = 1 ]] && [[ $(grep -i -c "release 6" /etc/issue) = 1 ]];then
   if [ $system_version == 'x86_64' ];then
      rpm -ivh http://PorxyIP:8888/base/rpm/zabbix-2.2.4-1.el6.x86_64.rpm
      rpm -ivh http://PorxyIP:8888/base/rpm/zabbix-agent-2.2.4-1.el6.x86_64.rpm
      rm -rf zabbix-2.2.4-1.el6.x86_64.rpm
      rm -rf zabbix-agent-2.2.4-1.el6.x86_64.rpm
      chkconfig zabbix-agent on
   else
      rpm -ivh http://PorxyIP:8888/base/rpm/zabbix-2.2.4-1.el6.i386.rpm
      rpm -ivh http://PorxyIP:8888/base/rpm/zabbix-agent-2.2.4-1.el6.i386.rpm
      rm -rf zabbix-2.2.4-1.el6.i386.rpm
      rm -rf zabbix-agent-2.2.4-1.el6.i386.rpm
      chkconfig zabbix-agent on
   fi

elif [[ $(grep -i -E -c -w "Red|CentOS" /etc/issue) = 1 ]] && [[ $(grep -i -c "release 5" /etc/issue) = 1 ]];then
    if [ $system_version == 'x86_64' ];then
      rpm -ivh http://PorxyIP:8888/base/rpm/zabbix-2.2.4-1.el5.x86_64.rpm
      rpm -ivh http://PorxyIP:8888/base/rpm/zabbix-agent-2.2.4-1.el5.x86_64.rpm
      rm -rf zabbix-2.2.4-1.el5.x86_64.rpm
      rm -rf zabbix-agent-2.2.4-1.el5.x86_64.rpm
      chkconfig zabbix-agent on
    else
      rpm -ivh http://PorxyIP:8888/base/rpm/zabbix-2.2.4-1.el5.i386.rpm
      rpm -ivh http://PorxyIP:8888/base/rpm/zabbix-agent-2.2.4-1.el5.i386.rpm
      rm -rf zabbix-2.2.4-1.el5.i386.rpm
      rm -rf zabbix-agent-2.2.4-1.el5.i386.rpm
      chkconfig zabbix-agent on
    fi
elif [[ $(grep -i -E -c -w "Red|CentOS"  /etc/redhat-release) = 1 ]] && [[ $(grep -i -c "release 7" /etc/redhat-release) = 1 ]];then
    if [ $system_version == 'x86_64' ];then
      rpm -ivh http://PorxyIP:8888/base/rpm/zabbix-2.2.7-2.el7.x86_64.rpm
      rpm -ivh http://PorxyIP:8888/base/rpm/zabbix-agent-2.2.7-2.el7.x86_64.rpm
      rm -rf zabbix-2.2.7-2.el7.x86_64.rpm
      rm -rf zabbix-agent-2.2.7-2.el7.x86_64.rpm
      chkconfig zabbix-agent on
    fi
elif [[ $(grep -i -c "ubuntu" /etc/issue) = 1 ]];then
     if [ $(grep -i -c "ubuntu 12" /etc/issue) == 1 ];then
       wget http://PorxyIP:8888/base/rpm/zabbix-release_2.2-1+precise_all.deb
       dpkg -i zabbix-release_2.2-1+precise_all.deb
       #apt-get update
       apt-get install zabbix-agent
       rm -rf zabbix-release_2.2-1+precise_all.deb
     else
       wget http://PorxyIP:8888/base/rpm/zabbix-release_2.2-1+trusty_all.deb
       dpkg -i zabbix-release_2.2-1+trusty_all.deb
       #apt-get update
       apt-get install zabbix-agent
       rm -rf zabbix-release_2.2-1+trusty_all.deb
     fi
else
      if [ $(grep -i -c "Debian GNU/Linux 6" /etc/issue) == 1 ];then
        wget http://PorxyIP:8888/base/rpm/zabbix-release_2.2-1+squeeze_all.deb
        dpkg -i zabbix-release_2.2-1+squeeze_all.deb
        #apt-get update
        apt-get install zabbix-agent
        rm -rf zabbix-release_2.2-1+squeeze_all.deb
      else
        wget http://PorxyIP:8888/base/rpm/zabbix-release_2.2-1+wheezy_all.deb
        dpkg -i zabbix-release_2.2-1+wheezy_all.deb
        #apt-get update
        apt-get install zabbix-agent
        rm -rf zabbix-release_2.2-1+wheezy_all.deb
      fi
fi

################mondiy zabbix agent conf###################
sed -i 's/LogFileSize=0/LogFileSize=1/g' /etc/zabbix/zabbix_agentd.conf
sed -i 's/Server=127.0.0.1/Server='${zabbix_server_ip}'/g' /etc/zabbix/zabbix_agentd.conf
sed -i 's/ServerActive=127.0.0.1/ServerActive='${zabbix_server_ip}:10051'/g' /etc/zabbix/zabbix_agentd.conf
sed -i '/\# Timeout=3/a Timeout=30' /etc/zabbix/zabbix_agentd.conf
sed -i '/\# UnsafeUserParameters=0/a UnsafeUserParameters=1' /etc/zabbix/zabbix_agentd.conf
sed -i 's#Hostname=Zabbix server#Hostname='$zabbix_agent_hostname'#' /etc/zabbix/zabbix_agentd.conf
sed -i 's@# SourceIP=@SourceIP='$zabbix_agent_ip'@' /etc/zabbix/zabbix_agentd.conf

###############set discovery disk io########################
cat >>/etc/zabbix/zabbix_agentd.conf<<EOF
UserParameter=custom.vfs.dev.discovery,/bin/sh /etc/zabbix/externalscripts/disk.sh
# reads completed successfully
UserParameter=custom.vfs.dev.read.ops[*],cat /proc/diskstats | egrep \$1 | head -1 | awk '{print \$\$4}'
# sectors read
UserParameter=custom.vfs.dev.read.sectors[*],cat /proc/diskstats | egrep \$1 | head -1 | awk '{print \$\$6}'
# time spent reading (ms)
UserParameter=custom.vfs.dev.read.ms[*],cat /proc/diskstats | egrep \$1 | head -1 | awk '{print \$\$7}'
# writes completed
UserParameter=custom.vfs.dev.write.ops[*],cat /proc/diskstats | egrep \$1 | head -1 | awk '{print \$\$8}'
# sectors written
UserParameter=custom.vfs.dev.write.sectors[*],cat /proc/diskstats | egrep \$1 | head -1 | awk '{print \$\$10}'
# time spent writing (ms)
UserParameter=custom.vfs.dev.write.ms[*],cat /proc/diskstats | egrep \$1 | head -1 | awk '{print \$\$11}'
# I/Os currently in progress
UserParameter=custom.vfs.dev.io.active[*],cat /proc/diskstats | egrep \$1 | head -1 | awk '{print \$\$12}'
# time spent doing I/Os (ms)
UserParameter=custom.vfs.dev.io.ms[*],cat /proc/diskstats | egrep \$1 | head -1 | awk '{print \$\$13}'
UserParameter=custom.vfs.dev.util[*],iostat -x -d  1 1|egrep \$1|awk '{print \$NF}'

EOF

mkdir -p /etc/zabbix/externalscripts/

cat >/etc/zabbix/externalscripts/disk.sh <<EOF
#!/bin/bash
diskarray=(\`cat /proc/diskstats |grep -E "\bvd[a-z]\b|\bhd[a-z]\b|\bsd[a-z]\b|\bc0d0p[0-9]\b"|grep -i "\b\$1\b"|awk '{print \$3}'|sort|uniq   2>/dev/null\`)
length2=\${#diskarray[@]}
printf "{\n"
printf  '\t'"\"data\":["
for ((i=0;i<\$length2;i++))
do
    printf '\n\t\t{'
    printf "\"{#DISK}\":\"\${diskarray[\$i]}\"}"
    if [ \$i -lt \$[\$length2-1] ];then
            printf ','
    fi
done
printf  "\n\t]\n"
printf "}\n"
EOF

#########Disk monitor############
chown -R zabbix:zabbix /etc/zabbix/externalscripts/disk.sh
chmod 755 /etc/zabbix/externalscripts/disk.sh

########################add iptables for zabbix server/proxy###############
iptable_num=`iptables-save |grep ${zabbix_server_ip}|wc -l`

if [ ${iptable_num} -ge 1 ];then
echo -e "\033[1;31miptables had been added!\033[0m"
else
iptables -I INPUT 3 -s ${zabbix_server_ip}/32 -j ACCEPT
iptables-save >/etc/sysconfig/iptables
fi
echo -e "\033[1;31mCongratulations on you successful installation!\033[0m"
service zabbix-agent restart

}

function uninstall_zabbix_agent() {

################uninstall zabbix##############
if [ $(id -u) != "0" ]; then
    echo -e "\033[1;31m Error: You must be root to run this script!\033[0m"
    exit 1
fi
system_version=$(uname -m)

if [[ $(grep -i -E -c "CentOS|Oracle|Red" /etc/redhat-release) = 1 ]];then
      rpm -e zabbix-agent
      rpm -e zabbix
else [[ $(grep -E -c "Ubuntu|Debian" /etc/issue) = 1 ]]
       dpkg -P zabbix-agent
fi

      iptables -D INPUT -s ${zabbix_server_ip}/32 -j ACCEPT
      iptables -D INPUT -s ${zabbix_proxy_server_ip}/32 -j ACCEPT
}

case $1 in
 install_proxy_agent)

        check_selinux
        modify_dash
        install_zabbix_proxy_agent
		    ;;

 uninstall)
        uninstall_zabbix_agent
            ;;
  *)
        echo "                                                    "
		echo "Usage:$0(install_agent|install_proxy_agent|uninstall)"
		echo "NAME"
		echo "          used to install zabbix agent"
		echo "DESCRIPTION"
		echo "           install_agent:install zabbix agent"
		echo "           install_proxy_agent:install zabbix proxy agent"
		echo "           uninstall:unintall agent"
        ;;
esac
以上脚本中需要修改的变量和注意事项:
1、zabbix_server_ip='zabbixseverip' #更换成你自己的ServerIP
2、PorxyIP #更换成你自己的安装代理机IP(纯内网环境需要通过反向代理到安装机器下载脚本安装)
3、我上面是通过安装机上下载Agent安装需要的所有包的方式来安装的,你可以通过自己做yum仓库的方式。
四、更快、批量执行
以上是通过脚本,在服务器初始化的时候进行agent安装。
安装方式:
wget -qO- http://安装机:端口/zabbix/agent-install-2.2.4.sh |/bin/bash
当然,你也可以更快、批量执行。怎么实现?
推荐几种方法:
Ansible
saltstack
都支持高并发,甚至是异步方式。
骚年们,赶紧搞起来。

 浙公网安备 33010602011771号