
1. 看看项目结构图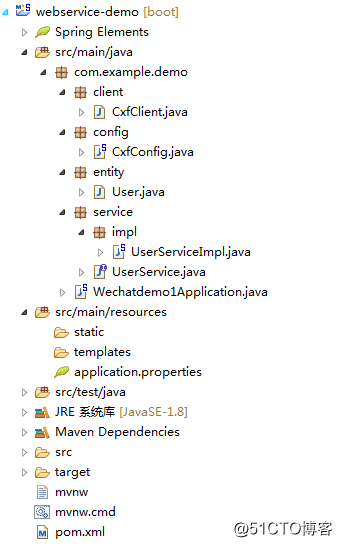
2. cxf的pom依赖
1 <dependency>
2 <groupId>org.apache.cxf</groupId>
3 <artifactId>cxf-spring-boot-starter-jaxws</artifactId>
4 <version>3.2.4</version>
5 </dependency>
3. 开始编写webService服务端
3.1 实体类entity
1 package com.example.demo.entity;
2
3 import java.io.Serializable;
4 /
5 @ClassName:User
6 @Description:测试实体
7 @author Jerry
8 @date:2018年4月10日下午3:57:38
9 */
10 public class User implements Serializable{
11
12 private static final long serialVersionUID = -3628469724795296287L;
13
14 private String userId;
15 private String userName;
16 private String email;
17 public String getUserId() {
18 return userId;
19 }
20 public void setUserId(String userId) {
21 this.userId = userId;
22 }
23 public String getUserName() {
24 return userName;
25 }
26 public void setUserName(String userName) {
27 this.userName = userName;
28 }
29 public String getEmail() {
30 return email;
31 }
32 public void setEmail(String email) {
33 this.email = email;
34 }
35 @Override
36 public String toString() {
37 return "User [userId=" + userId + ", userName=" + userName + ", email=" + email + "]";
38 }
39
40 }**
3.2 服务接口
package com.example.demo.service;
import javax.jws.WebMethod;
import javax.jws.WebParam;
import javax.jws.WebResult;
import javax.jws.WebService;import com.example.demo.entity.User;
/
- @ClassName:UserService
- @Description:测试服务接口类
- include:两个测试方法
- @author Jerry
@date:2018年4月10日下午3:58:10br/>*/
//@WebService(targetNamespace="http://service.demo.example.com")如果不添加的话,动态调用invoke的时候,会报找不到接口内的方法,具体原因未知.
@WebService(targetNamespace="http://service.demo.example.com")
public interface UserService {@WebMethod//标注该方法为webservice暴露的方法,用于向外公布,它修饰的方法是webservice方法,去掉也没影响的,类似一个注释信息。
public User getUser(@WebParam(name = "userId") String userId);}**
3.3 服务接口的实现类
package com.example.demo.service.impl;
import java.util.HashMap;
import java.util.Map;
import java.util.UUID;import javax.jws.WebService;
import org.springframework.stereotype.Component;
import com.example.demo.entity.User;
import com.example.demo.service.UserService;
/
- @ClassName:UserServiceImpl
- @Description:测试服务接口实现类
- @author Jerry
@date:2018年4月10日下午3:58:58br/>*/
@WebService(serviceName="UserService",//对外发布的服务名
targetNamespace="http://service.demo.example.com",//指定你想要的名称空间,通常使用使用包名反转
endpointInterface="com.example.demo.service.UserService")//服务接口全路径, 指定做SEI(Service EndPoint Interface)服务端点接口br/>@Component
public class UserServiceImpl implements UserService{private Map<String, User> userMap = new HashMap<String, User>();
public UserServiceImpl() {
System.out.println("向实体类插入数据");
User user = new User();
user.setUserId(UUID.randomUUID().toString().replace("-", ""));user.setEmail("Jerry@163.xom");<br "="" rel="nofollow">br/>user.setUserName("test1");
user.setEmail("Jerry@163.xom");
userMap.put(user.getUserId(), user);user = new User(); user.setUserId(UUID.randomUUID().toString().replace("-", "")); user.setUserName("test2"); user.setEmail("Jerryfix@163.xom"); userMap.put(user.getUserId(), user); user = new User(); user.setUserId(UUID.randomUUID().toString().replace("-", "")); user.setUserName("test3"); user.setEmail("Jerryfix@163.xom"); userMap.put(user.getUserId(), user);}br/>@Override
public String getUserName(String userId) {
return "userId为:" + userId;br/>}
@Override
public User getUser(String userId) {
System.out.println("userMap是:"+userMap);
return userMap.get(userId);
}}****
3.4 发布webService的配置
package com.example.demo.config;
import javax.xml.ws.Endpoint;
import org.apache.cxf.Bus;
import org.apache.cxf.jaxws.EndpointImpl;
import org.apache.cxf.transport.servlet.CXFServlet;
import org.springframework.beans.factory.annotation.Autowired;
import org.springframework.boot.web.servlet.ServletRegistrationBean;
import org.springframework.context.annotation.Bean;
import org.springframework.context.annotation.Configuration;import com.example.demo.service.UserService;
/**
- @ClassName:CxfConfig
- @Description:cxf发布webservice配置
- @author Jerry
@date:2018年4月10日下午4:12:24br/>*/
@Configuration
public class CxfConfig {br/>@Autowired
private Bus bus;@Autowired
UserService userService;/**
- 此方法作用是改变项目中服务名的前缀名,此处127.0.0.1或者localhost不能访问时,请使用ipconfig查看本机ip来访问
- 此方法被注释后:wsdl访问地址为http://127.0.0.1:8080/services/user?wsdl
- 去掉注释后:wsdl访问地址为:http://127.0.0.1:8080/soap/user?wsdl
- @returnbr/>*/
@SuppressWarnings("all")
@Bean
public ServletRegistrationBean dispatcherServlet() {
return new ServletRegistrationBean(new CXFServlet(), "/soap/*");
}/** JAX-WS
- 站点服务
}
4. 项目启动后的wsdl信息
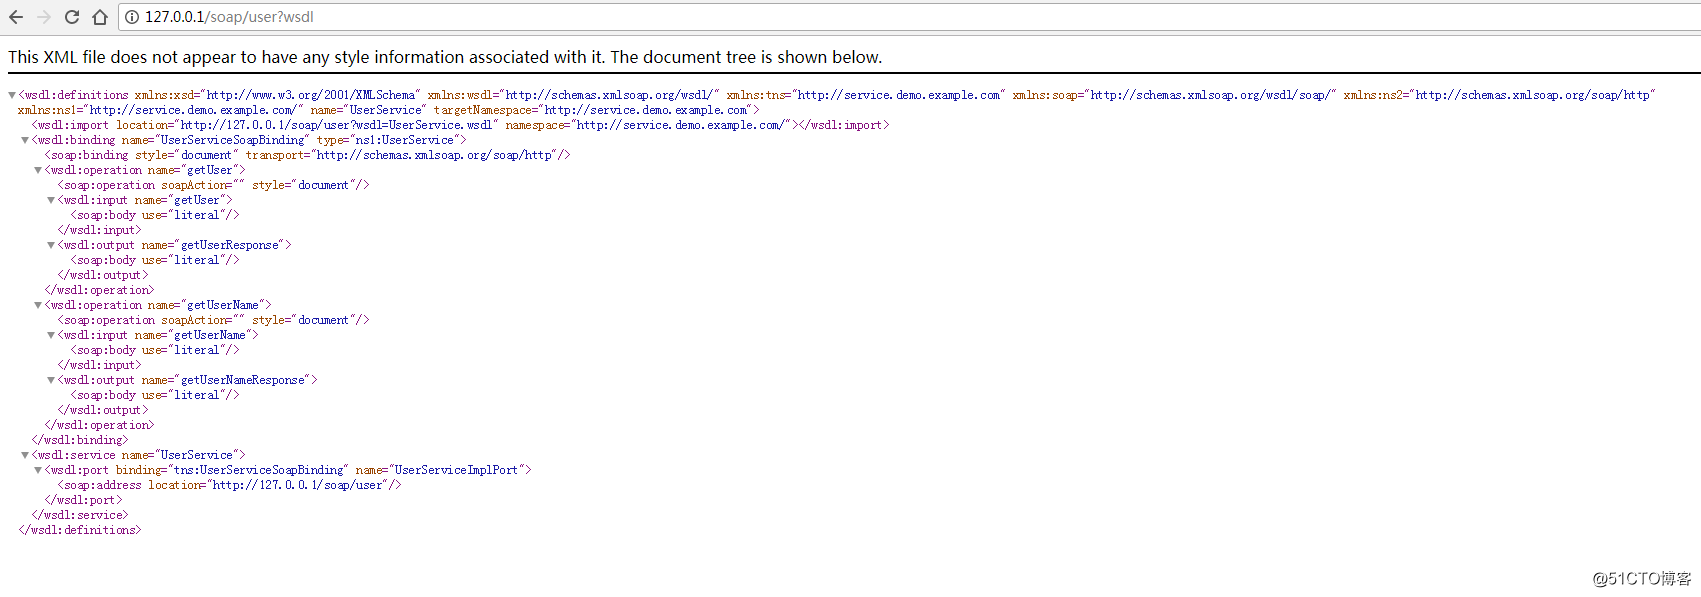
由于图省事,我将项目的服务端口改为了80,这样就省去了IP后面写端口号的麻烦。
5. 两种调用方式
package com.example.demo.client;
import org.apache.cxf.endpoint.Client;
import org.apache.cxf.jaxws.JaxWsProxyFactoryBean;
import org.apache.cxf.jaxws.endpoint.dynamic.JaxWsDynamicClientFactory;import com.example.demo.service.UserService;
/**
- @ClassName:CxfClient
- @Description:webservice客户端:
- 该类提供两种不同的方式来调用webservice服务
- 1:代理工厂方式
- 2:动态调用webservice
- @author Jerry
@date:2018年4月10日下午4:14:07
*/
public class CxfClient {public static void main(String[] args) {
CxfClient.main1();
CxfClient.main2();
}/**
- 1.代理类工厂的方式,需要拿到对方的接口地址
*/
public static void main1() {
try {
// 接口地址
String address = "http://127.0.0.1/soap/user?wsdl";
// 代理工厂
JaxWsProxyFactoryBean jaxWsProxyFactoryBean = new JaxWsProxyFactoryBean();
// 设置代理地址
jaxWsProxyFactoryBean.setAddress(address);
// 设置接口类型
jaxWsProxyFactoryBean.setServiceClass(UserService.class);
// 创建一个代理接口实现
UserService us = (UserService) jaxWsProxyFactoryBean.create();
// 数据准备
String userId = "maple";
// 调用代理接口的方法调用并返回结果
String result = us.getUserName(userId);
System.out.println("返回结果:" + result);
} catch (Exception e) {
e.printStackTrace();
}
}/**
- 2:动态调用
*/
public static void main2() {
// 创建动态客户端
JaxWsDynamicClientFactory dcf = JaxWsDynamicClientFactory.newInstance();
Client client = dcf.createClient("http://127.0.0.1/soap/user?wsdl");
// 需要密码的情况需要加上用户名和密码
// client.getOutInterceptors().add(new ClientLoginInterceptor(USER_NAME, PASS_WORD));
Object[] objects = new Object[0];
try {
// invoke("方法名",参数1,参数2,参数3....);
objects = client.invoke("getUserName", "maple");
System.out.println("返回数据:" + objects[0]);
} catch (java.lang.Exception e) {
e.printStackTrace();
}
}
}
6. 注意点.
诚如之前所说,如果接口的注解上不加targetNamespace的话,动态调用的时候,会报如下的错误。

