
android apk瘦身(1) 使用矢量图 和 webp,去掉多余cpu架构的库文件
1.官方文档
https://developer.android.com/studio/write/vector-asset-studio
https://developer.android.com/studio/write/convert-webp
https://developer.android.com/ndk/guides/abis.html
2.使用svg
2.1 导入svg图片

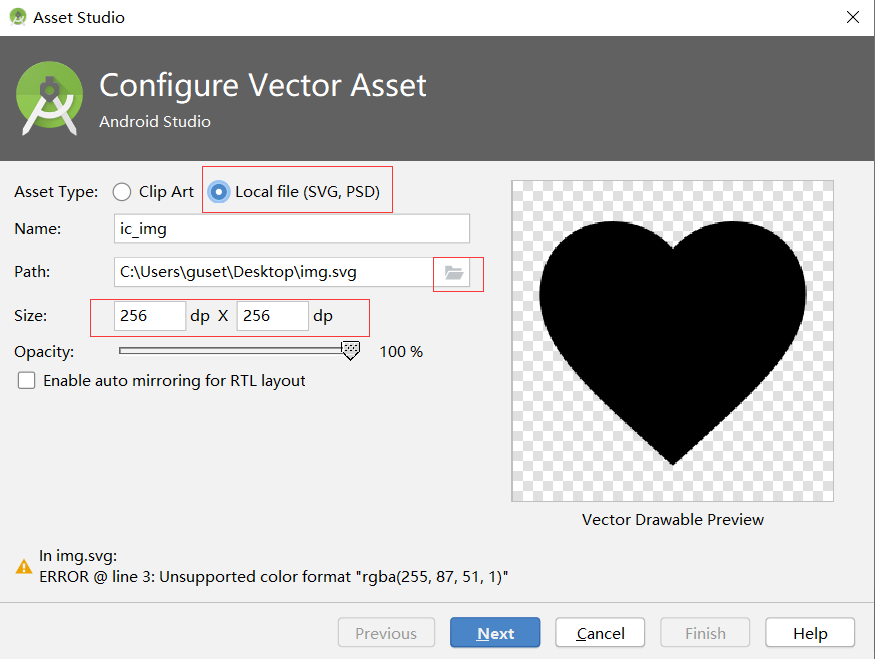
导入成功后会在drawable目录下生成对应的xml文件。
2.2 矢量图中主要字段的含义
下面是一个矢量图的源文件:
1 <vector xmlns:android="http://schemas.android.com/apk/res/android"
2     android:width="18dp"
3     android:height="18dp"
4     android:viewportWidth="1024"
5     android:viewportHeight="1024">
6   <path
7       android:pathData="M260.4,312.77L260.4,703.78L131.24,703.78c-35.61,0 -64.48,-29.39 -64.48,-64.56L66.76,377.34c0,-35.66 28.57,-64.57 64.48,-64.57h129.16zM466.96,156.36c28.51,-21.59 51.63,-9.4 51.63,26.23v651.36c0,36.08 -22.91,47.98 -51.63,26.23L260.4,703.78L260.4,312.77L466.96,156.36zM830.57,819.33c170.15,-171.79 170.15,-450.31 0,-622.09 -18.9,-19.09 -49.56,-19.09 -68.46,0 -18.9,19.09 -18.9,50.03 0,69.12 132.34,133.61 132.34,350.24 0,483.85 -18.9,19.09 -18.9,50.04 0,69.12 18.9,19.09 49.56,19.09 68.46,0zM693.65,681.08c94.53,-95.44 94.53,-250.17 0,-345.61 -18.91,-19.09 -49.56,-19.09 -68.46,0 -18.9,19.09 -18.9,50.03 0,69.12 56.72,57.26 56.72,150.1 0,207.36 -18.9,19.09 -18.9,50.04 0,69.12 18.91,19.09 49.56,19.09 68.46,0z"
8       android:fillColor="#ffffff"/>
9 </vector>
其中:path 表示一条绘制路径 ,android:pathData 表示路径绘制方法 ,参考:https://www.w3.org/TR/SVG11/paths.html#PathData
| 命令 | 含义 |
| M(x,y) | 移动到x,y |
| L(x,y) | 直线连到x,y |
| H(x) | 水平连接 |
| V(y) | 垂直连接 |
|
C(x1 y1 x2 y2 x y) |
三阶贝塞尔曲线 |
|
Q(x1 y1 x y) |
二阶贝塞尔曲线 |
|
Z 没有参数 |
闭合路径 |
|
... |
... |
- 每个绘制命令都有大小写形式,大写代表后面的参数是绝对坐标,小写表示相对坐标。
- 参数之间用空格或逗号隔
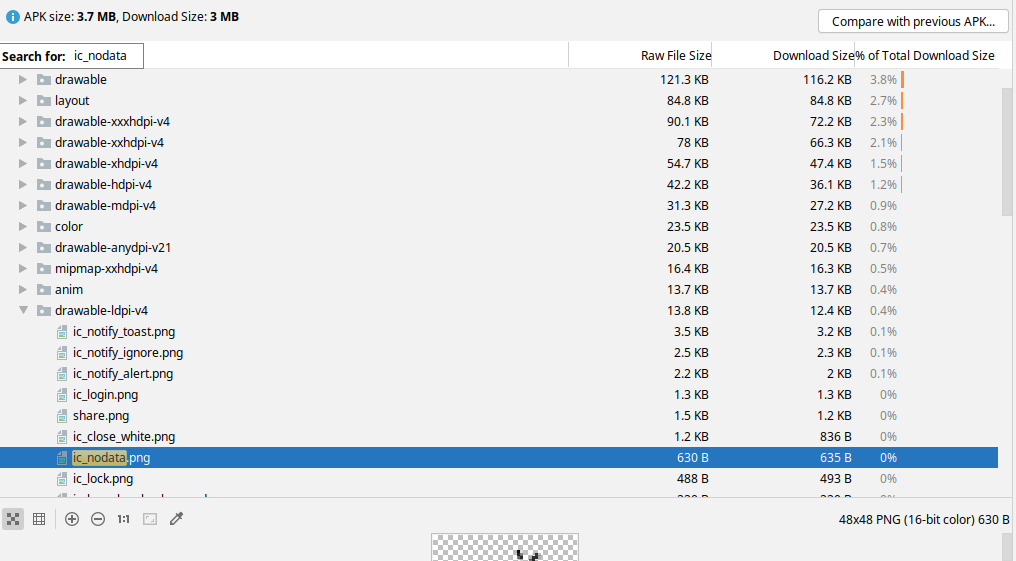
2.2 去除多余图片
生成apk后,在drawable-dpi 系列目录中分别生成了对应的png图片。并不是想象中 apk内只有 1张矢量图。
在module.gradle中添加 : useSupportLibrary
 1 android {
 2     compileSdkVersion 30
 3     buildToolsVersion '30.0.2'
 4     defaultConfig {
 5         //...
 6         vectorDrawables.useSupportLibrary = true
 7
 8         //...
 9     }
10
11     //...
12
13 }
2.3 设置矢量图的颜色
打开drawable目录下的矢量图push.xml文件,找到颜色属性,可以修改它。
1 <vector android:height="18dp" android:viewportHeight="1024"
2     android:viewportWidth="1024" android:width="18dp" xmlns:android="http://schemas.android.com/apk/res/android"
3     android:tint="@color/colorWhite">
4     <path android:fillColor="#ff000000" android:pathData="M952,128L64,481.92a24.64,24.64 0,0 0,-4.8 41.6L192,624l602.4,-350.56L284.8,692.8v169.92a13.28,13.28 0,0 0,20.64 12.16l112,-82.08L528,875.84a20.48,20.48 0,0 0,30.56 -7.2L960,139.36c3.36,-5.92 -2.08,-13.28 -8,-11.36z"/>
5 </vector>
android:fillColor
Specifies the color used to fill the path. May be a color or, for SDK 24+, a color state list or a gradient color (See R.styleable.GradientColor and R.styleable.GradientColorItem). If this property is animated, any value set by the animation will override the original value. No path fill is drawn if this property is not specified.
最好使用这个属性将图标颜色设置为黑色。
android:tint
The color to apply to the drawable as a tint. By default, no tint is applied.
这个属性只是把单张图片给上色了。
如果此图片多处使用,可以在这里把这个属性去掉,然后使用View、TextView等类的android:tint属性
2.3.1 矢量图+ tint 属性
使用1张矢量图 + View 的 tint属性也可以实现前面提到的功能:
生成一个基本颜色的xml,然后使用View、ImageView 、TextView 的相关 tint 属性 着色就可以。如下 :
 1 <androidx.constraintlayout.widget.ConstraintLayout
 2         ...
 3         android:backgroundTint="@color/colorPrimary"
 4         >
 5
 6         <ImageView
 7             ...
 8             app:tint="@color/colorPrimary"
 9             app:srcCompat="@drawable/ic_nodata" />
10
11         <TextView
12
13             app:drawableTint="@color/colorPrimary"
14             .../>
15 </androidx.constraintlayout.widget.ConstraintLayout>
2.3.2 矢量图 + 颜色选择器
有的view在不同状态下,图片的颜色不同,用1张矢量图 + 颜色选择器可实现它。
- 在res目录上 右键 New --> Directory --> 输入名字为color
- 在color目录 右键 New --> Color Resource File --> 输入一个名字
- 在新建的xml文件中指定状态和相关颜色,之后就可以在使用颜色资源的位置使用它了。
1 <?xml version="1.0" encoding="utf-8"?>
2 <selector xmlns:android="http://schemas.android.com/apk/res/android">
3     <item android:color="@color/textFocus" android:state_selected="true" />
4     <item android:color="@color/textNoFocus" />
5 </selector>
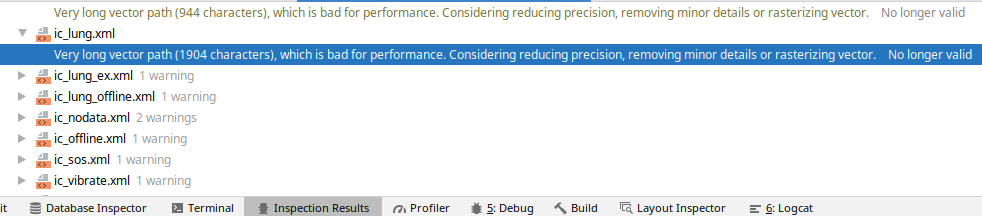
2.4 设置矢量图片的大小
- 一般不要超过200dp,加载会变慢。
- android:pathData 数据不要过多,越多绘制时间越长,如下警告:
2.5 相同图片矢量图与位图对比
下图是同一张图片,矢量图和位图inflate时间及绘制对比:
2.5.1 inflate对比

2.5.2 绘制对比
矢量图:
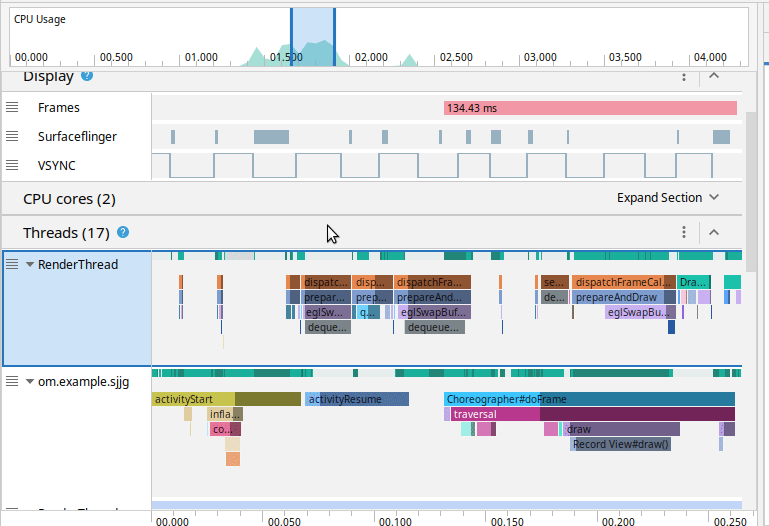
位图:
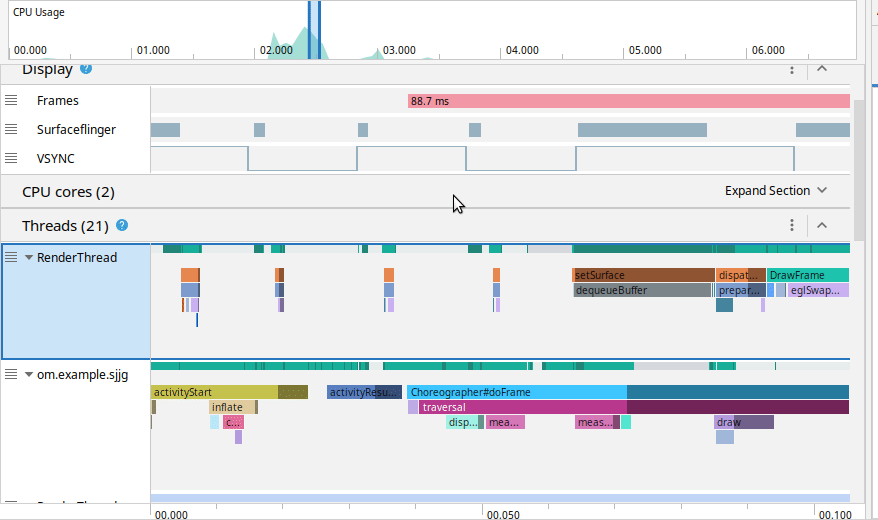
不是所有图片都要转成矢量图,大的、复杂的矢量图虽然体积小了,但是加载、绘制的时间变长了。
2.6 使用矢量图遇到的一个问题
在android 4.4 上,checkbox的 指定的selector是如果使用了矢量图的话会崩溃。如下:
 1 <CheckBox
 2         android:id="@+id/agree"
 3         android:layout_width="wrap_content"
 4         android:layout_height="wrap_content"
 5         android:layout_marginTop="16dp"
 6         android:button="@drawable/checkbox"
 7         android:text=" 已阅读"
 8         app:layout_constraintEnd_toStartOf="@+id/privacy_page"
 9         app:layout_constraintHorizontal_chainStyle="packed"
10         app:layout_constraintStart_toStartOf="@+id/app_enter"
11         app:layout_constraintTop_toBottomOf="@+id/app_enter" />
selector如下:
1 <?xml version="1.0" encoding="utf-8"?>
2 <selector xmlns:android="http://schemas.android.com/apk/res/android">
3     <item android:drawable="@drawable/ic_checked" android:state_checked="true" />
4     <item android:drawable="@drawable/ic_uncheck" />
5 </selector>
其中的ic_checked,ic_uncheck是矢量图,换成位图就可以了。
3. 使用webp
- WebP lossless images are 26% smaller in size compared to PNGs.
- WebP lossy images are 25-34% smaller than comparable JPEG images at equivalent SSIM quality index.
- Lossless WebP supports transparency (also known as alpha channel) at a cost of just 22% additional bytes. For cases when lossy RGB compression is acceptable, lossy WebP also supports transparency, typically providing 3× smaller file sizes compared to PNG.
webp官网 : https://developers.google.cn/speed/webp/
3.1 使用现成的webp图片
- 把wep图片放到mipmap中
- 在布局文件中直接使用
 1 <?xml version="1.0" encoding="utf-8"?>
 2 <androidx.constraintlayout.widget.ConstraintLayout xmlns:android="http://schemas.android.com/apk/res/android"
 3     xmlns:app="http://schemas.android.com/apk/res-auto"
 4     xmlns:tools="http://schemas.android.com/tools"
 5     android:layout_width="match_parent"
 6     android:layout_height="match_parent"
 7     android:background="@mipmap/earth"
 8     tools:context=".MainActivity">
 9
10     <TextView
11         android:id="@+id/textView"
12         android:layout_width="wrap_content"
13         android:layout_height="wrap_content"
14         android:text="Hello webp!"
15         android:layout_marginTop="8dp"
16         android:background="@mipmap/earth"
17         app:layout_constraintLeft_toLeftOf="parent"
18         app:layout_constraintRight_toRightOf="parent"
19         app:layout_constraintTop_toTopOf="parent" />
20
21     <ImageView
22         android:id="@+id/imageView"
23         android:layout_width="0dp"
24         android:layout_height="0dp"
25         app:layout_constraintBottom_toBottomOf="parent"
26         app:layout_constraintEnd_toEndOf="parent"
27         app:layout_constraintStart_toStartOf="parent"
28         app:layout_constraintTop_toTopOf="parent"
29         app:srcCompat="@mipmap/earth" />
30
31 </androidx.constraintlayout.widget.ConstraintLayout>
3.2 把项目中的png、jpg转成web图片
- 要求minSdkVersion > 17
- 右键项目中的图片 -> Convert to WebP...
- 支持无损和有损转换
- 支持ctrl + z 取消转换
- 支持webp图片转成png : 目标图片 -> 右键 -> Convert to PNG...
- 支持通过shift、control 多选进行批量转换。
转换前:

转换后:

4.去掉多余cpu架构的库
abi 架构 官方文档(有哪些架构及它们的详细介绍)
https://developer.android.com/ndk/guides/abis.html
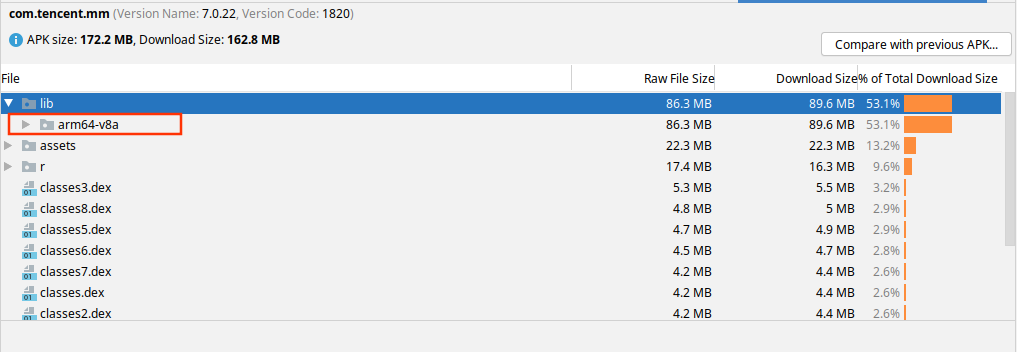
如果项目中使用了本地库, 通常情况下,只保留 "armeabi-v7a", "arm64-v8a" 架构的就够用了,前者32位,后者64位,
微信中只有arm64-v8a 在早期32位arm架构的手机上无法安装。

 浙公网安备 33010602011771号