

用小程序来实现扫码登录
小程序扫码登录的优点
-
不需要企业资质,个人用户就可以注册小程序;
-
不需要认证,每年可以省 300 元;
-
打通小程序端的用户数据,可以让 PC 网站往移动端引流,用户不流失;
流程图
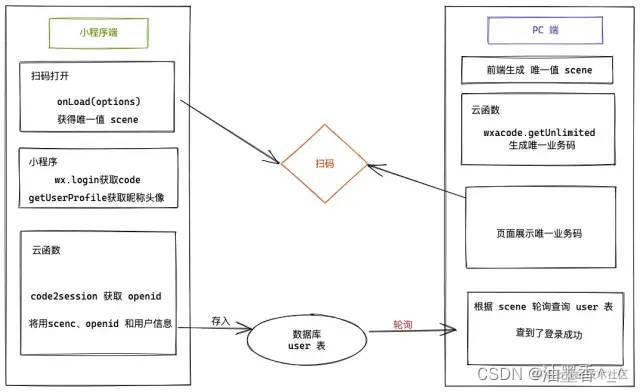
小程序来实现扫码登录流程图
小程序用户系统实现
首先需要有小程序的用户系统
第一步:获取用户登录凭证
通过 wx.login 获取用户登录凭证 res.code
wx.login({
  success:(res)=>{
    //res.code
  }
});
在 uniapp 中,可以使用统一封装的登录方法

export default {
  data() {
    return {
      user:null
    };
  },
  onLoad() {
    //第一步 login 获取 code
    uni.login({
      provider: "weixin",
      success: (res) => {
        this.wxlogin(res.code); //第二步调用云函数
      },
    });
  },
  methods: {
    async wxlogin(wxcode) {
      // code 获取 openid 存入数据库中
      this.user = await uniCloud.callFunction({
        name: "user_authorize",
        data: {
          code: wxcode,
        },
      });
    },
  },
};

user 是数据库中的用户信息,用于展示在页面上,这一步用户登录无感知的,我们也无法获得用户的头像昵称等信息,若要在 pc 上展示用户信息,可使用 uni.getUserProfile 方法。
实现代码如下:
export default {
  data() {
    return {
      user: null,
    };
  },
  onLoad() {},
  methods: {
    async getUserProfile() {
      //第一步 login 获取 code
      uni.login({
        provider: "weixin",
        success: function (loginRes) {
          console.log(loginRes.code);
          // 获取用户信息
          uni.getUserProfile({
            desc: "个人登录,记录数据", // 声明获取用户个人信息后的用途,后续会展示在弹窗中,请谨慎填写
            success: function (infoRes) {
              console.log("用户昵称为:" + infoRes.userInfo.nickName); //昵称
              console.log("用户昵称为:" + infoRes.userInfo.avatarUrl); //头像
              this.wxlogin(loginRes.code, infoRes.userInfo);
            },
          });
        },
      });
    },
    async wxlogin(wxcode) {
      // code 获取 openid 存入数据库中
      this.user = await uniCloud.callFunction({
        name: "user_authorize",
        data: {
          ...infoRes.userInfo,
          code: wxcode,
        },
      });
    },
  },
};
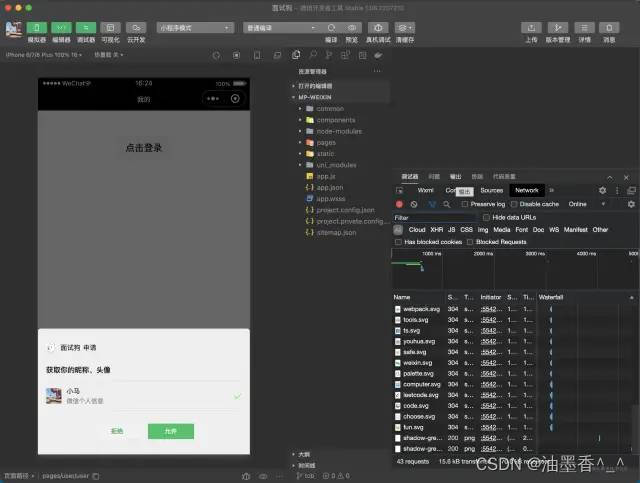
getUserProfile 方法不能主动调用,必须通过按钮,用户点击授权获得,所以我们需要在页面中加入以下代码:
<template>
  <view>
    <button class="login-btn" v-if="!user" open-type="getUserProfile" @click="getUserProfile">点击登录</button>
    <view v-if="user">
      <text>{{ user.nickName }}</text>
    <view>
  </view>
</template>
第二步:code 获取 openid 存入数据库中
请求服务端,服务端通过微信提供的code2session接口获取 openid ,这个 openid 就是小程序与微信的唯一 id 了,这里我以 uniapp 云函数为例,说明下实现代码。
async function code2Session(appId, secret, code) {
  const res = await uniCloud.httpclient.request(
    `https: //api.weixin.qq.com/sns/jscode2session?appid=${appId}&secret=${secret}&js_code=${code}&grant_type=authorization_code`,
    {
      dataType: "json",
    }
  );
  return res.data;
}
用 uniCloud.httpclient.request请求 code2Session接口获取 openid
const db = uniCloud.database();

exports.main = async (event, context) => {
  let appId = "小程序appid";
  let appSecret = "小程序秘钥";
  let res = await code2Session(appId, appSecret, event.code);

  let wx_user = await db
    .collection("wx_user")
    .where({
      openid: res.openid,
    })
    .get()
    .then((res) => res.data[0]);
  // 判断用户是否存在
  if (!wx_user) {
    let createTime = new Date().getTime();
    let user_new = await db.collection("wx_user").add({
      ...event,
      code: undefined,
      openid: res.openid,
      createTime,
    });
    // 查询最新的数据
    wx_user = await db
      .collection("wx_user")
      .where({
        openid: res.openid,
      })
      .get()
      .then((res) => res.data[0]);
  }
  return {
    success: true,
    data: chrrentUser,
  };
};
判断用户是否存在,若不存在就新建一条数据,若存在,就直接返回数据库中的数据,这样就可以建立用户系统。
PC 端扫码登录
PC 端扫码登录,依赖微信提供的wxacode.getUnlimited接口, 该接口获取的小程序码,适用于需要的码数量极多的业务场景。通过该接口生成的小程序码,永久有效,数量暂无限制。我们可以通过业务码来实现登录。 下面代码是云函数,用于获取 PC 端的二维码。
//封装获取access_token的方法 1分钟1w次
async function getAccessToken(appId, appSecret) {
  const res = await uniCloud.httpclient.request(
    `https://api.weixin.qq.com/cgi-bin/token?grant_type=client_credential&appid=${appId}&secret=${appSecret}`,
    {
      dataType: "json",
    }
  );
  return res.data.access_token;
}

exports.main = async (event, context) => {
  const data = JSON.parse(data.body);
  let appId = "小程序appid";
  let appSecret = "小程序秘钥";
  const access_token = await getAccessToken(appId, appSecret);

  const res = await uniCloud.httpclient.request(
    "https://api.weixin.qq.com/wxa/getwxacodeunlimit?access_token=" +
      access_token,
    {
      method: "POST",
      headers: {
        "Content-Type": "application/json",
      },
      data: {
        scene: data.scene,
        page: data.page,
        env_version: "release", //扫描后打开的小程序的版本,正式版release,体验版trial,开发版develop
        width: "430", //生成的小程序码图片的宽度
        //小程序码线条的颜色
        line_color: {
          r: 0,
          g: 0,
          b: 0,
        },
      },
    }
  );
  return "data:image/png;base64," + res.data.toString("base64");
};
然后,需要在小程序 onLoad 时候,获取扫码登录的唯一值,并且保存到全局中。
onLoad(options) {
this.scene = options.scene;
}
登录授权的时候,将 scene 和用户信息保存到用户表
async wxlogin(wxcode) {
      // code 获取 openid 存入数据库中
  this.user = await uniCloud.callFunction({
    name: "user_authorize",
    data: {
      ...infoRes.userInfo,
      scene:this.scene,
      code: wxcode,
    },
  });
},
接下来 pc 端,就可以根据 scene 轮询查询 user 表,获取登录信息了。
PC 扫码登录步骤
-
PC 端点击登录时生成并显示小程序码,此时开启轮询,每 3 秒查询一次数据库;
-
在三分钟内如果查询不到匹配的用户信息,结束轮询,并让二维码失效;
-
若查询到匹配用户,可以将用户信息通过 JsonWebToken 保存,同 PC 登录原理一致。
小程序端优化
可以先通过 wx.login 实现免提示登录,此时 PC 端二维码显示扫码成功。
再通过 wx.getUserProfile 授权获取用户头像等信息,实现同步。
备注: 自 2022 年 10 月 25 日 24 时后,小程序 wx.getUserProfile 接口将被收回,通过 wx.login 与 wx.getUserInfo 接口获取 openId、unionId 能力不受影响, 详情请看小程序用户头像昵称获取规则调整公告官方[1]
小程序用户头像昵称获取规则调整公告官方: https://developers.weixin.qq.com/community/develop/doc/00022c683e8a80b29bed2142b56c01
Github 地址: https://github.com/maqi1520/runjs.cool


【推荐】国内首个AI IDE,深度理解中文开发场景,立即下载体验Trae
【推荐】编程新体验,更懂你的AI,立即体验豆包MarsCode编程助手
【推荐】抖音旗下AI助手豆包,你的智能百科全书,全免费不限次数
【推荐】轻量又高性能的 SSH 工具 IShell:AI 加持,快人一步
· 震惊!C++程序真的从main开始吗?99%的程序员都答错了
· 单元测试从入门到精通
· 【硬核科普】Trae如何「偷看」你的代码?零基础破解AI编程运行原理
· 上周热点回顾(3.3-3.9)
· winform 绘制太阳,地球,月球 运作规律