zsh oh-my-zsh powerlevel10k
VS CODE 字体异常
https://github.com/romkatv/powerlevel10k/issues/671
https://github.com/romkatv/powerlevel10k/blob/master/font.md
- Visual Studio Code: Open File → Preferences → Settings (PC) or Code → Preferences → Settings (Mac), enter
terminal.integrated.fontFamilyin the search box at the top of Settings tab and set the value below toMesloLGS NF. Consult this screenshot to see how it should look like or see this issue for extra information.
-
Download these four ttf files:
-
Double-click on each file and click "Install". This will make
MesloLGS NFfont available to all applications on your system. -
Open Settings in Visual Studio Code.
- On PC: press Ctrl+, or click File → Preferences → Settings.
- On Mac: press ⌘ , or click Code → Preferences → Settings.
-
Enter
terminal.integrated.fontFamilyin the search box at the top of Settings tab and set the value below toMesloLGS NF.
zsh oh-my-zsh powerlevel10k
# Enable Powerlevel10k instant prompt. Should stay close to the top of ~/.zshrc.
# Initialization code that may require console input (password prompts, [y/n]
# confirmations, etc.) must go above this block; everything else may go below.
if [[ -r "${XDG_CACHE_HOME:-$HOME/.cache}/p10k-instant-prompt-${(%):-%n}.zsh" ]]; then
  source "${XDG_CACHE_HOME:-$HOME/.cache}/p10k-instant-prompt-${(%):-%n}.zsh"
fi

# If you come from bash you might have to change your $PATH.
# export PATH=$HOME/bin:/usr/local/bin:$PATH

# Path to your oh-my-zsh installation.
export ZSH="/home/rocky/.oh-my-zsh"

# Set name of the theme to load --- if set to "random", it will
# load a random theme each time oh-my-zsh is loaded, in which case,
# to know which specific one was loaded, run: echo $RANDOM_THEME
# See https://github.com/ohmyzsh/ohmyzsh/wiki/Themes
ZSH_THEME="powerlevel10k/powerlevel10k"

# Set list of themes to pick from when loading at random
# Setting this variable when ZSH_THEME=random will cause zsh to load
# a theme from this variable instead of looking in $ZSH/themes/
# If set to an empty array, this variable will have no effect.
# ZSH_THEME_RANDOM_CANDIDATES=( "robbyrussell" "agnoster" )

# Uncomment the following line to use case-sensitive completion.
# CASE_SENSITIVE="true"

# Uncomment the following line to use hyphen-insensitive completion.
# Case-sensitive completion must be off. _ and - will be interchangeable.
# HYPHEN_INSENSITIVE="true"

# Uncomment one of the following lines to change the auto-update behavior
# zstyle ':omz:update' mode disabled  # disable automatic updates
# zstyle ':omz:update' mode auto      # update automatically without asking
# zstyle ':omz:update' mode reminder  # just remind me to update when it's time

# Uncomment the following line to change how often to auto-update (in days).
# zstyle ':omz:update' frequency 13

# Uncomment the following line if pasting URLs and other text is messed up.
# DISABLE_MAGIC_FUNCTIONS="true"

# Uncomment the following line to disable colors in ls.
# DISABLE_LS_COLORS="true"

# Uncomment the following line to disable auto-setting terminal title.
# DISABLE_AUTO_TITLE="true"

# Uncomment the following line to enable command auto-correction.
# ENABLE_CORRECTION="true"

# Uncomment the following line to display red dots whilst waiting for completion.
# You can also set it to another string to have that shown instead of the default red dots.
# e.g. COMPLETION_WAITING_DOTS="%F{yellow}waiting...%f"
# Caution: this setting can cause issues with multiline prompts in zsh < 5.7.1 (see #5765)
# COMPLETION_WAITING_DOTS="true"

# Uncomment the following line if you want to disable marking untracked files
# under VCS as dirty. This makes repository status check for large repositories
# much, much faster.
# DISABLE_UNTRACKED_FILES_DIRTY="true"

# Uncomment the following line if you want to change the command execution time
# stamp shown in the history command output.
# You can set one of the optional three formats:
# "mm/dd/yyyy"|"dd.mm.yyyy"|"yyyy-mm-dd"
# or set a custom format using the strftime function format specifications,
# see 'man strftime' for details.
# HIST_STAMPS="mm/dd/yyyy"

# Would you like to use another custom folder than $ZSH/custom?
# ZSH_CUSTOM=/path/to/new-custom-folder

# Which plugins would you like to load?
# Standard plugins can be found in $ZSH/plugins/
# Custom plugins may be added to $ZSH_CUSTOM/plugins/
# Example format: plugins=(rails git textmate ruby lighthouse)
# Add wisely, as too many plugins slow down shell startup.
plugins=(
    git
    zsh-z
   fzf
    zsh-syntax-highlighting
    zsh-autosuggestions
    zsh-completions
    zsh-history-substring-search
    # zsh-vi-mode
)

source $ZSH/oh-my-zsh.sh


autoload -U compinit && compinit

bindkey "$terminfo[kcuu1]" history-substring-search-up
bindkey "$terminfo[kcud1]" history-substring-search-down
# Keypad
# 0 . Enter
bindkey -s "^[Op" "0"
bindkey -s "^[On" "."
bindkey -s "^[OM" "^M"
# 1 2 3
bindkey -s "^[Oq" "1"
bindkey -s "^[Or" "2"
bindkey -s "^[Os" "3"
# 4 5 6
bindkey -s "^[Ot" "4"
bindkey -s "^[Ou" "5"
bindkey -s "^[Ov" "6"
# 7 8 9
bindkey -s "^[Ow" "7"
bindkey -s "^[Ox" "8"
bindkey -s "^[Oy" "9"
# + -  * / =
bindkey -s "^[Ok" "+"
bindkey -s "^[Om" "-"
bindkey -s "^[Oj" "*"
bindkey -s "^[Oo" "/"
bindkey -s "^[OX" "="
# User configuration # export MANPATH="/usr/local/man:$MANPATH" # You may need to manually set your language environment # export LANG=en_US.UTF-8 # Preferred editor for local and remote sessions # if [[ -n $SSH_CONNECTION ]]; then # export EDITOR='vim' # else # export EDITOR='mvim' # fi # Compilation flags # export ARCHFLAGS="-arch x86_64" # Set personal aliases, overriding those provided by oh-my-zsh libs, # plugins, and themes. Aliases can be placed here, though oh-my-zsh # users are encouraged to define aliases within the ZSH_CUSTOM folder. # For a full list of active aliases, run `alias`. # # Example aliases # alias zshconfig="mate ~/.zshrc" # alias ohmyzsh="mate ~/.oh-my-zsh" # To customize prompt, run `p10k configure` or edit ~/.p10k.zsh. [[ ! -f ~/.p10k.zsh ]] || source ~/.p10k.zsh

alias fzf-preview="fzf --preview='bat --style=numbers --color=always --line-range :500 {}' --preview-window=wrap"
alias fzf-preview="fzf --preview='bat --style=numbers --color=always --line-range :500 {}' --preview-window=wrap"
https://github.com/ohmyzsh/ohmyzsh/issues/2537
zsh禁用共享命令记录
在~/.oh-my-zsh/lib/history.zsh中注释屏蔽掉 #setopt share_history 与 #setopt inc_append_history
vim ~/.oh-my-zsh/lib/history.zsh
remove command
setopt inc_append_history
setopt share_history
or in .zshrc file add command
unsetopt inc_append_history
unsetopt share_history
https://github.com/ohmyzsh/ohmyzsh/issues/2537
https://github.com/ohmyzsh/ohmyzsh/blob/master/lib/history.zsh
## History command configuration
setopt extended_history       # record timestamp of command in HISTFILE
setopt hist_expire_dups_first # delete duplicates first when HISTFILE size exceeds HISTSIZE
setopt hist_ignore_dups       # ignore duplicated commands history list
setopt hist_ignore_space      # ignore commands that start with space
setopt hist_verify            # show command with history expansion to user before running it
setopt share_history          # share command history data
https://zhuanlan.zhihu.com/p/28719373
工具:
tig
fzf
https://github.com/ohmyzsh/ohmyzsh/tree/master/plugins/fzf
https://github.com/junegunn/fzf
alias fzf.p="fzf --preview 'bat --style=numbers --color=always --line-range :500 {}'"
fzf预览代码需要安装bat
https://github.com/sharkdp/bat
https://juejin.cn/post/6886469309648879623
ripgrep
https://github.com/BurntSushi/ripgrep
fd
vim-plug
https://github.com/junegunn/vim-plug
I'm getting `Cannot find color scheme '...'. Does vim-plug support color schemes?
Yes, color schemes are not any different from other plugins. A common mistake is to put :colorscheme NAME before call plug#end(). Plugins are not activated before plug#end(), so make sure to load your color scheme after it.
CCache
https://github.com/ccache/ccache
dnf install samba samba-common samba-client -y

rpm -qa | grep samba

cp etc/samba/smb.conf etc/samba/smb.conf.bak

mkdir -p /home/Public/share

chmod -R 0755 /home/Public/share

chown -R nobody:nobody /home/Public/share

vim /etc/samba/smb.conf
testparm

firewall-cmd --add-service=samba --zone=public --permanent

firewall-cmd --reload

systemctl start firewalld.service
systemctl enable firewalld.service

systemctl status firewalld.service


systemctl start smb
systemctl enable smb

systemctl status smb


systemctl start nmb
systemctl enable nmb

systemctl status nmb
开机自动启动
chkconfig smb on
# See smb.conf.example for a more detailed config file or
# read the smb.conf manpage.
# Run 'testparm' to verify the config is correct after
# you modified it.

[global]
    workgroup = SAMBA
    security = user
    map to guest = Bad User

    passdb backend = tdbsam

    printing = cups
    printcap name = cups
    load printers = yes
    cups options = raw

[homes]
    comment = Home Directories
    valid users = %S, %D%w%S
    browseable = No
    read only = No
    inherit acls = Yes

[printers]
    comment = All Printers
    path = /var/tmp
    printable = Yes
    create mask = 0600
    browseable = No

[print$]
    comment = Printer Drivers
    path = /var/lib/samba/drivers
    write list = @printadmin root
    force group = @printadmin
    create mask = 0664
    directory mask = 0775

[share]
    path = /home/Public/share
    browsable =yes
    writable = yes
    guest ok = yes
    read only = no
    create mask = 0777
    directory mask = 0777
samba
https://www.cnblogs.com/CooCoChoco/p/14274690.html
path = /home/Public/share
path不能位于用户目录下 如 path = /home/user_name/share
Job for httpd.service failed because the control process exited with error code. See "systemctl status httpd.service" and "journalctl -xe" for details
journalctl -xe

setsebool -P samba_export_all_rw 1
https://linuxize.com/post/how-to-install-visual-studio-code-on-centos-8/
Installing Visual Studio Code on CentOS
The easiest and recommended way to install Visual Studio Code on CentOS 8 systems is to enable the VS Code repository and install the VS Code package through the command line:
-
Import the Microsoft GPG key:
sudo rpm --import https://packages.microsoft.com/keys/microsoft.asc
Open your text editor and create the repository file:
sudo nano /etc/yum.repos.d/vscode.repoPaste the following content to enable the VS Code repository:
[code]
name=Visual Studio Code
baseurl=https://packages.microsoft.com/yumrepos/vscode
enabled=1
gpgcheck=1
gpgkey=https://packages.microsoft.com/keys/microsoft.asc
That’s it. Visual Studio Code has been installed on your CentOS machine, and you can start using it.
-
Save the file and close your text editor.
-
Install the latest version of Visual Studio Code by typing:
sudo dnf install code

 浙公网安备 33010602011771号
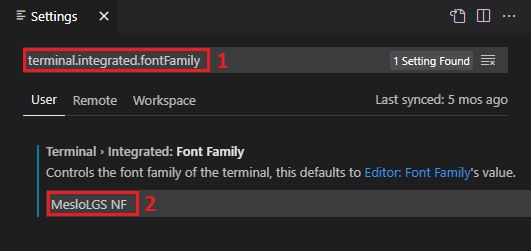