
Programming Finite State Machines
Programming Finite State Machines
http://www.mathertel.de/Arduino/FiniteStateMachine.aspx
Have you ever had to implement a solution that had to fullfill multiple tasks at (almost) the same time?
Have you find out that the delay() function ist not a good idea for starting an action or behavior "some time in the future"?
Have you ever had to implement a program that reacts on some kind of events triggered by hardware or timing conditions ?
... so here is a short introduction into the art of writing state machines, a software pattern for solving problems like those above.
Download the project files:
Finite-State Machines Definition
In addition to the definition by wikipedia a Finite-state machine (FSM) can be understood as a program
- that knows about the current situation (the state),
- reacts according to the rules (the programing or graph),
- to the things that happen (input information, events),
- triggers the required activities (transition methods)and finally
- recognizes that the current situation has changed.
So every program might do this in general, but there is a software pattern that helps structuring your program into this direction and helps with a clear code pattern to make a readable and easy verificable solution for your problem.
The design of the machine
A good idea is to start with a diagram that you can sketch on a paper or use a tool like visio.
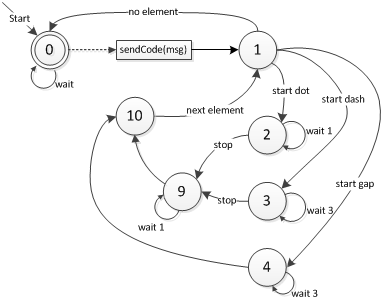
Here is a diagram for implementing a morse machine:
There is a good article on wikipedia about the Morse code where all the characters and the timing is explained.
The implementation here doesn’t include all the codes for the supported letters but accepts “words” in the form of combinations dots, dashes and spaces like
".- .-. -.. ..- .. -. ---".
In the graph you can see how the machine should work:
- The start is on the '0' circle. This is the state where the machine starts to work. The possible things that may happen is that the function sendCode is called or that the machine has to wait. No other options are possible, because there are only these 2 arrows (transitions with possible activities) leaving this state.
- When the function sendCode is called this function has to check if the current state is "0" and then has to change the state to "1". You will see that it is not always the main FSM function that modifies the state, but also other functions (events) may assist.
- In state "1" there are three ways to move forward and it depends on the next character that will be sent. If you want for example send a dot the machine moves forward to state "2" and starts sending a dot (swith the light on).
- In state "2" there are two ways to go. The first is to wait until the time for one dot duration is over the other is to move forward to state "3" and stop sending the signal. For this kind of state I recommend to remember the time when the state started and when you have to check if the time is over you can compare to the current time. See "using the Arduino timer" below.
- State "9" is very similar with the exception that nothing has to be done when moving forward to state "10".
- State "10" is designed to check for the next character and moves the machine forwards to state "1".
- In State "1", when no next character is present the machine forwards to state "0".
- There is no "end" state in this sample.
The implementing pattern
All we have to do is to write a litte code for every state we designed above. The pattern we use is:
if (state == [n]) { // let's see what to do if the state is "n"

  if ([condition of the first transition is true]) {
    [take the action of the first transition]
    state = [next state];

  } else if ([condition of the 2. transition is true]) {
    [take the action of the 2. transition];
    state = [next state];

  // here add all the possible transitions

  } else  {
    // you should never get here !
  } // if
} // if
You can see this pattern all over the implementation within the main FSM function and within the additional event functions.
Before you check the state and the inner conditions it is advantageous to initialize some local variables like:
int buttonLevel = digitalRead(_pin); // current button signal.
Using the Arduino timer
For implementing wait transitions a local and short living now variable with the current time and a global or instance variable startTime with the time of the start of a state are reasonable. now is initialized by using:
unsigned long now = millis(); // current (relative) time in msecs.
The startTime variable has to be set within all the actions of the transitions that start a state with a timing condition.
Also the time when a state was started is
The code for a state with a timing condition then looks like this:
} if (state == 2) { // wait for end of a dot.
  if (now > startTime + 1 * unitTicks) {
    // stop sending the signal
    digitalWrite(_pin, LOW);
    // advance to the state "9"
    state = 9;
    startTime = now; // The current time has to be assigned to startTime, because state "9" uses it !
  } // if
Global variables
Global or instance variables are needed when information has to be persisted between the one check and a following. The information that always needs to be persisted is the current state. You can use global variables if there is only one machine of a kind, but be carefull not to use the same variables in multiple machines. Using instance variables like in libraries is a better solution and gives you the flexibility to use the same machine multiple times running concurrently.
In the morse sample you can see how to put everything into a library. The Arduino Library Tutorial that implements a morse functionality too explains how to design a class with member variables that can be used to store the state information.
The main FSM function
The requirement for FSM implementations is that it is possible to run multiple of them at the same time independently. So the design of the main FSM function only implements those transitions that are not triggered by an external event.
The most important feature of this function is that there are no loops inside ! The good about this kind opf implementation is that this function doesn't use a lot of CPU cycles in the case no action is needed so it is no harm to call it often.
If the machine has to act on it's own independent from external events the main FSM function has to be called from time to time for example evers time the main program goes idle.
Using event functions
A typical event function in the sample is the sendCode(msg) function:
void sendCode(char *msg)
{
  if (_state == 0) {
    _nextCode = msg;
    _state = 1;
  }
}
Here you can see that the same pattern is reused.
Another approach to implement events is to store the information from the event into another global variable and check it within the main FSM function.
Running multiple machines at the same time
If you like to run multiple machines at the same time you have to call all the existing main functions from time to time and call the event functions if needed.
Flexible actions
If you like to implement machines on an abstract level the actions that need to be called cannot be hardcoded like in the morse sample. For this case it is possible to have instance variables in your class that can hold function pointers. All you need is to put a function reference into these variables and call the attached function on the corresponding transition. The OneButton Library shows how to do this by providing attach functions.
Links
- Another implementation of a finite state machine in the form of a library can be found at:
http://www.arduino.cc/playground/Code/FiniteStateMachine.
In contrary to my approach by using a software pattern this is a library where you plug-in State objects and functions. - The Arduino Library Tutorial can be found at:
http://arduino.cc/en/Hacking/LibraryTutorial - Definition of a Finite State Machine at wikipedia:
http://en.wikipedia.org/wiki/Finite-state_machine - More on state machine definitions by using a standardized UML notation:
http://en.wikipedia.org/wiki/UML_state_machine - Another tutorial using UML:
http://www.objectmentor.com/resources/articles/umlfsm.pdf
/*
 Morse.cpp
 Sample for the FiniteStateMachine Tutorial at http://www.mathertel.de/Arduino/FiniteStateMachine.aspx

 Copyright (c) by Matthias Hertel, http://www.mathertel.de
 This work is licensed under a BSD style license. See http://www.mathertel.de/License.aspx
 More information on: http://www.mathertel.de/Arduino

 * 03.03.2011 created by Matthias Hertel
 * 01.12.2011 include file changed to work with the Arduino 1.0 environment
*/

#include "Morse.h"

// ----- Initialization -----

Morse::Morse(int pin)
{
  _pin = pin;
  _unitTicks = DefaultUnitTicks;        // # millisec after single click is assumed.

  pinMode(pin, OUTPUT);      // sets the MenuPin as input
  digitalWrite(pin, LOW);   // turn on pulldown resistor

  _state = 0; // starting with state 0: waiting for a code to be sent.
} // Morse


void Morse::setUnitTicks(int ticks) {
  _unitTicks = ticks;
} // setUnitTicks


void Morse::sendCode(char *msg)
{
  if (_state == 0) {
    _nextCode = msg;
    _state = 1;
  }
}

void Morse::tick(void)
{
  // Detect the input information
  int buttonLevel = digitalRead(_pin); // current button signal.
  unsigned long now = millis(); // current (relative) time in msecs.

  // Implementation of the state machine
  if (_state == 0) { // waiting for menu pin being pressed.

  } else if (_state == 1) { // check next character
    if ((_nextCode == 0L) || (*_nextCode == '\0')) {
      _state = 0;

    } else if (*_nextCode == '.') {
      // start sending a dot.
      _state = 2;
      _startTime = now;
      digitalWrite(_pin, HIGH);

    } else if (*_nextCode == '-') {
      // start sending a dash.
      _state = 3;
      _startTime = now;
      digitalWrite(_pin, HIGH);

    } else if (*_nextCode == ' ') {
      // start sending a gap.
      _state = 4;
      _startTime = now;
    } // if

  } else if (_state == 2) { // wait for end of a dot.
    if (now > _startTime + 1 * _unitTicks) {
      // stop
      _state = 9;
      _startTime = now;
      digitalWrite(_pin, LOW);
    } // if

  } else if (_state == 3) { // wait for end of a dash.
    if (now > _startTime + 3 * _unitTicks) {
      // stop
      _state = 9;
      _startTime = now;
      digitalWrite(_pin, LOW);
    } // if

  } else if (_state == 4) { // wait for end of a gap.
    if (now > _startTime + 3 * _unitTicks)
      _state = 10;

  } else if (_state == 9) { // wait a single gap.
    if (now > _startTime + 1 * _unitTicks) {
      _state = 10;
    } // if

  } else if (_state == 10) { // next element.
    _nextCode += 1;
    _state = 1;

  } // if
} // Morse.tick()


// end.

 浙公网安备 33010602011771号