ubuntu20下通过apt安装mysql8
1、切换到root用户
ubuntu@test:~$ su - root
2、更新系统软件库
root@test:~# apt-get update
3、安装mysql-server
root@test:~# apt-get install mysql-server -y
4、修改my.cnf配置文件
root@test:~# vim /etc/mysql/mysql.conf.d/mysqld.cnf
将bind-address修改为:0.0.0.0
5、数据库初始化
先匿名登录mysql,直接在root账号下执行:mysql,
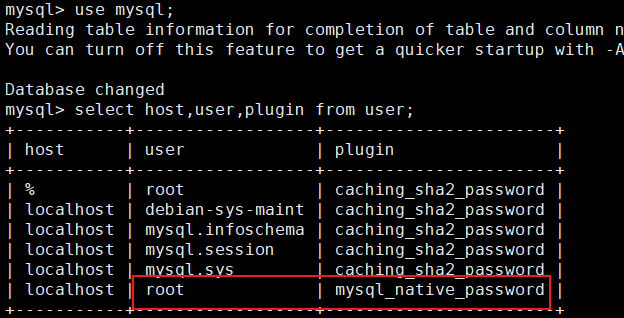
mysql8.0 引入了新特性 caching_sha2_password;这种密码加密方式客户端不支持;客户端支持的是mysql_native_password 这种加密方式;我们可可以查看mysql 数据库中user表的 plugin字段:
mysql> select host,user,plugin from user;

默认情况下root采用caching_sha2_password加密方式,可以使用命令将他修改成mysql_native_password加密模式:
updates user set plugin='mysql_native_password' where user='root';
在mysql下执行:
mysql> ALTER USER 'root'@'localhost' IDENTIFIED WITH mysql_native_password by '111111';

修改完成后继续执行:
mysql> select host,user,plugin from user;

此步是为了防止下面选择设置root口令时,无论怎么设置都会出现如下错误:
... Failed! Error: SET PASSWORD has no significance for user 'root'@'localhost' as the authentication method used doesn't store authentication data in the MySQL server. Please consider using ALTER USER instead if you want to change authentication parameters.
执行完毕后回到root用户,执行
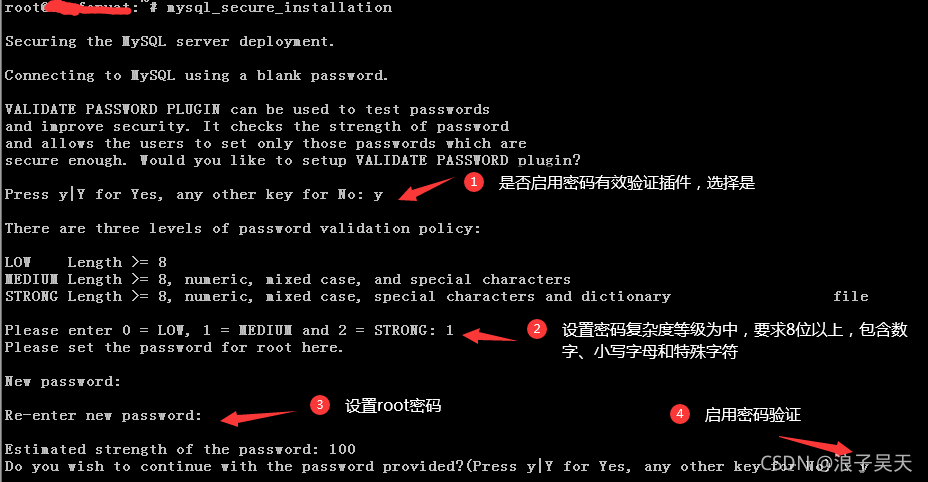
root@test:~# mysql_secure_installation
在第2步尽量选择0就行

6、查看本地数据
root@test:~# mysql
mysql> show databases;
7、重启mysql服务
root@test:~# systemctl restart mysql
8、创建远程访问账号,用mysql的root账号登录
create user 'dba'@'%' identified by '111111';
grant all on *.* to 'dba'@'%';或grant all privileges on *.* to 'dba'@'%';
flush privileges;
alter user 'dba'@'%' identified by '111111' password expire never;
alter user 'dba'@'%' identified with mysql_native_password by '111111';
flush privileges;
补充:
mysql8.0的默认密码验证不再是password。所以在创建用户时,create user 'username'@'%' identified by 'password'; 客户端是无法连接服务的。
方法一:
登录MySQL后输入:
ALTER USER 'username'@'localhost' IDENTIFIED WITH mysql_native_password BY 'password';
FLUSH PRIVILEGES;
方法二:
编辑my.cnf文件,更改默认的身份认证插件。比如说:
vim /data/mysql/mysql_3306/my_3306.cnf
# 在[mysqld]中添加下边的代码
default_authentication_plugin=mysql_native_password
这个需要重启服务才生效。
mysql> select user,host,plugin from mysql.user;


