Qt on Android 蓝牙通信开发
版权声明:本文为MULTIBEANS ORG研发跟随文章,未经MLT ORG允许不得转载。
最近做项目,需要开发安卓应用,实现串口的收发,目测CH340G在安卓手机上非常麻烦,而且驱动都是Java版本的, 就没选择,博主在大二的时候学习过Java SE基本的语法,写过一些小程序就放弃了Java的道路。最后选择了蓝牙无线透传模块,实现串口通信。现在Qt跨平台支持安卓,是在是令人欣喜。在网上找资料,用Qt on Android做蓝牙驱动的几乎没有,也没有相关例程,所以准备撰写此文,献给广大嵌入式程序员们
2018/6/27更新:
增加Java版本的蓝牙通信,文章地址:https://www.cnblogs.com/sigma0/p/9234478.html
一、软硬件平台
1.1 硬件平台
1. 蓝牙:HC-05,(淘宝上有卖),它的接口就是跟串口一样的,我们用到了TX,RX,GND,VCC四个引脚。跟下位机或者用CH340G TTL转USB模块接到PC机上。蓝牙工作在串口模式可以通过AT指令调节。具体参考蓝牙配套的说明文档,最主要的就是请将蓝牙设定为从机模式,否则安卓手机搜寻链接不上。
2.安卓手机:我这里测试用了2台安卓手机,一台是小米4移动版,安卓版本6.0.1;一台是MOTO MT887,安卓版本4.1.2。
1.2 软件平台
本项目Qt版本是5.7,系统是windows 8.1 x64
二、软件基本介绍
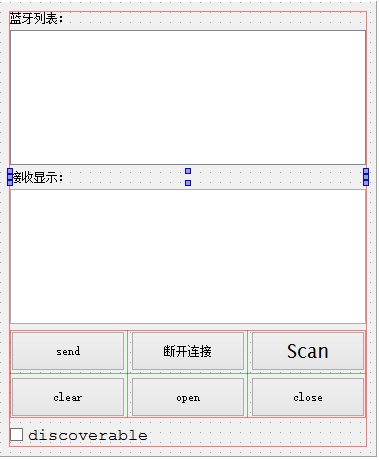
因为第一次做蓝牙,就做一个非常简单的雏形,实现蓝牙状态检测、蓝牙的开关、蓝牙的扫描和蓝牙配对链接,并且能像串口助手一样完成数据收发。如图,就是本一开始做的最简单的软件界面,本软件基于QWidget控件制作,当然你可以选择mainwinodw,更可以自己定义类。

软件界面
我不用介绍每个部位是什么了,都会明白吧?蓝牙打开后通过扫描,会将蓝牙的MAC地址还有名字显示在List中,我们双击List列表中的蓝牙,就会进入actived信号连接的槽函数,执行蓝牙的配对连接。建立连接之后,就类似串口一样可以进行数据通信了。另外,点击send按钮之后会发送一堆字符串。
三、 蓝牙开发
3.1 项目文件准备
需要用到蓝牙就需要在.pro文件中引入库,我没有用Qt quick,用的是纯C++写的代码,你需要在.pro文件中加入这句话:
QT += bluetooth
#include <QtBluetooth/qbluetoothglobal.h>
#include <QtBluetooth/qbluetoothlocaldevice.h>
#include <qbluetoothaddress.h>
#include <qbluetoothdevicediscoveryagent.h>
#include <qbluetoothlocaldevice.h>
#include <qbluetoothsocket.h>
QBluetoothDeviceDiscoveryAgent *discoveryAgent;
QBluetoothLocalDevice *localDevice;
QBluetoothSocket *socket;
3.2 蓝牙开关和可见性设定
localDevice = new QBluetoothLocalDevice();
1) 蓝牙开关
if( localDevice->hostMode() == QBluetoothLocalDevice::HostPoweredOff )  {
        ui->pushButton_openBluetooth->setEnabled(true);
        ui->pushButton_closeDevice->setEnabled(false);
}else {
        ui->pushButton_openBluetooth->setEnabled(false);
        ui->pushButton_closeDevice->setEnabled(true);
}
在构造函数中
那么,我们如何来对蓝牙进行打开和关闭呢?我在open按钮和close按钮的槽函数中对蓝牙进行开关操作。
open按钮的槽函数:
void Widget::on_pushButton_openBluetooth_clicked()
{
    localDevice->powerOn();
    ui->pushButton_closeDevice->setEnabled(true);
    ui->pushButton_openBluetooth->setEnabled(false);
    ui->pushButton_scan->setEnabled(true);
}
void Widget::on_pushButton_closeDevice_clicked()
{
    localDevice->setHostMode(QBluetoothLocalDevice::HostPoweredOff);
    ui->pushButton_closeDevice->setEnabled(false);
    ui->pushButton_openBluetooth->setEnabled(true);
    ui->pushButton_scan->setEnabled(false);
}
2) 蓝牙可见性
if( localDevice->hostMode() == QBluetoothLocalDevice::HostDiscoverable ) {
        ui->checkBox_discoverable->setChecked(true);
}else {
        ui->checkBox_discoverable->setChecked(false);
}
localDevice->setHostMode( QBluetoothLocalDevice::HostDiscoverable);
3.3 蓝牙设备的查找
    connect(discoveryAgent,
            SIGNAL(deviceDiscovered(QBluetoothDeviceInfo)),
            this,
            SLOT(addBlueToothDevicesToList(QBluetoothDeviceInfo))
            );
void Widget::addBlueToothDevicesToList( const QBluetoothDeviceInfo &info )
{
    QString label = QString("%1 %2").arg(info.address().toString()).arg(info.name());

    QList<QListWidgetItem *> items = ui->list->findItems(label, Qt::MatchExactly);

    if (items.empty()) {
        QListWidgetItem *item = new QListWidgetItem(label);
        QBluetoothLocalDevice::Pairing pairingStatus = localDevice->pairingStatus(info.address());
        if (pairingStatus == QBluetoothLocalDevice::Paired || pairingStatus == QBluetoothLocalDevice::AuthorizedPaired )
            item->setTextColor(QColor(Qt::green));
        else
            item->setTextColor(QColor(Qt::black));
        ui->list->addItem(item);
    }

}
3.4 蓝牙设备的建立连接
在Linux下你用一个命令uuidgen -t可以生成一个UUID值;在Windows下则执行命令uuidgen 。UUID看起来就像如下的这个形式:2d266186-01fb-47c2-8d9f-10b8ec891363。当使用生成的UUID去创建一个UUID对象,你可以去掉连字符。
static const QLatin1String serviceUuid("00001101-0000-1000-8000-00805F9B34FB");
socket = new QBluetoothSocket(QBluetoothServiceInfo::RfcommProtocol);
void Widget::itemActivated(QListWidgetItem *item)
{
    QString text = item->text();

    int index = text.indexOf(' ');

    if (index == -1)
        return;

    QBluetoothAddress address(text.left(index));
    QString name(text.mid(index + 1));
    qDebug() << "You has choice the bluetooth address is " << address;
    qDebug() << "The device is connneting.... ";
    QMessageBox::information(this,tr("Info"),tr("The device is connecting..."));
    socket->connectToService(address, QBluetoothUuid(serviceUuid) ,QIODevice::ReadWrite);

}
我们通过对字符串的处理,将得到address信息。通过socket->connectToService(....),把地址,Uuid,和蓝牙模式传递进去,当执行完这句话的时候,安卓手机开始和你
选择的蓝牙设备进行链接。
同样在socket中也提供了丰富的槽函数,比如成功建立连接信号,成功断开信号,这里在槽函数中可以做一些例子,这里给出例子:
    connect(socket,
            SIGNAL(connected()),
            this,
            SLOT(bluetoothConnectedEvent())
            );
    connect(socket,
            SIGNAL(disconnected()),
            this,
            SLOT(bluetoothDisconnectedEvent())
            );
void Widget::bluetoothConnectedEvent()
{
  // 2017/10/8 更新一下,请在这里插入关闭蓝牙查找服务,否则数据会断。
   // 具体语句是什么我忘记了,反正使用discoveryAgent的一个什么close,或者stop的方法

    qDebug() << "The android device has been connected successfully!";
    QMessageBox::information(this,tr("Info"),tr("successful connection!"));
}

void Widget::bluetoothDisconnectedEvent()
{
    qDebug() << "The android device has been disconnected successfully!";
    QMessageBox::information(this,tr("Info"),tr("successful disconnection!"));
}
最后,还有一个断开连接函数。通过断开连接按钮的槽函数实现。
void Widget::on_pushButton_disconnect_clicked()
{
    socket->disconnectFromService();

}
3.5 发送和接收数据
void Widget::on_pushButton_send_clicked()
{
    QByteArray arrayData;
    QString s("Hello Windows!!!\nThis message is sended via bluetooth of android device!\n");
    arrayData = s.toUtf8();
    socket->write(arrayData);
}
    connect(socket,
            SIGNAL(readyRead()),
            this,
            SLOT(readBluetoothDataEvent())
            );
readyRead()信号触发,跳进readBluetoothDataEvent中。
void Widget::readBluetoothDataEvent()
{

    QByteArray line = socket->readAll();
    QString strData = line.toHex();
    comStr.append(strData);
    qDebug() <<"rec data is: "<< comStr;
    qDebug() <<"The comStr length is: " << comStr.length();
    if(comStr.length() >= 30) {

        ui->textBrowser_info->append(comStr + "\n");
        comStr.clear();
    }

}
我这里是这样处理的,当然了,你有你自己的处理方法,意思就是那么个意思。


