(一)shiro简介和用户登录demo及角色管理
一、shiro简介
-
Apache Shiro是Java的一个安全框架。Shiro可以非常容易的开发出足够好的应用,其不仅可以用在JavaSE环境,也可以用在JavaEE环境。Shiro可以帮助我们完成:认证、授权、加密、会话管理、与Web集成、缓存等
-
Authentication:身份认证/登录,验证用户是不是拥有相应的身份;
Authorization:授权,即权限验证,验证某个已认证的用户是否拥有某个权限;即判断用户是否能做事情,常见的如:验证某个用户是否拥有某个角色。或者细粒度的验证某个用户对某个资源是否具有某个权限;
Session Manager:会话管理,即用户登录后就是一次会话,在没有退出之前,它的所有信息都在会话中;会话可以是普通JavaSE环境的,也可以是如Web环境的;
Cryptography:加密,保护数据的安全性,如密码加密存储到数据库,而不是明文存储;
Web Support:Web支持,可以非常容易的集成到Web环境;
Caching:缓存,比如用户登录后,其用户信息、拥有的角色/权限不必每次去查,这样可以提高效率;
Concurrency:shiro支持多线程应用的并发验证,即如在一个线程中开启另一个线程,能把权限自动传播过去;
Testing:提供测试支持;
Run As:允许一个用户假装为另一个用户(如果他们允许)的身份进行访问;
Remember Me:记住我,这个是非常常见的功能,即一次登录后,下次再来的话不用登录了。
二、shiro是如何工作的?
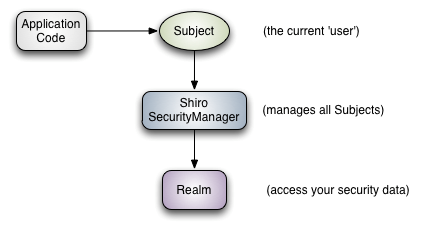
Subject:主体,代表了当前“用户”,这个用户不一定是一个具体的人,与当前应用交互的任何东西都是Subject,如网络爬虫,机器人等;即一个抽象概念;所有Subject都绑定到SecurityManager,与Subject的所有交互都会委托给SecurityManager;可以把Subject认为是一个门面;SecurityManager才是实际的执行者;
SecurityManager:安全管理器;即所有与安全有关的操作都会与SecurityManager交互;且它管理着所有Subject;可以看出它是Shiro的核心,它负责与后边介绍的其他组件进行交互,如果学习过SpringMVC,你可以把它看成DispatcherServlet前端控制器;
Realm:域,Shiro从从Realm获取安全数据(如用户、角色、权限),就是说SecurityManager要验证用户身份,那么它需要从Realm获取相应的用户进行比较以确定用户身份是否合法;也需要从Realm得到用户相应的角色/权限进行验证用户是否能进行操作;可以把Realm看成DataSource,即安全数据源。
二、创建maven的web工程,引入shiro依赖
<project xmlns="http://maven.apache.org/POM/4.0.0" xmlns:xsi="http://www.w3.org/2001/XMLSchema-instance"
    xsi:schemaLocation="http://maven.apache.org/POM/4.0.0 http://maven.apache.org/maven-v4_0_0.xsd">
    <modelVersion>4.0.0</modelVersion>
    <groupId>com.shyroke.www</groupId>
    <artifactId>firstShiro</artifactId>
    <packaging>war</packaging>
    <version>0.0.1-SNAPSHOT</version>
    <name>firstShiro Maven Webapp</name>
    <url>http://maven.apache.org</url>

    <properties>
        <shiro.version>1.3.2</shiro.version>
    </properties>

    <dependencies>
        <dependency>
            <groupId>javax.servlet</groupId>
            <artifactId>servlet-api</artifactId>
            <version>2.5</version>
            <scope>provided</scope>
        </dependency>

        <dependency>
            <groupId>org.slf4j</groupId>
            <artifactId>slf4j-api</artifactId>
            <version>1.7.21</version>
        </dependency>
        <dependency>
            <groupId>org.slf4j</groupId>
            <artifactId>jcl-over-slf4j</artifactId>
            <version>1.7.21</version>
            <scope>runtime</scope>
        </dependency>
        <dependency>
            <groupId>ch.qos.logback</groupId>
            <artifactId>logback-classic</artifactId>
            <version>1.1.7</version>
            <scope>runtime</scope>
        </dependency>


        <!-- Shiro dependencies: -->
        <dependency>
            <groupId>org.apache.shiro</groupId>
            <artifactId>shiro-core</artifactId>
            <version>${shiro.version}</version>
        </dependency>
        <dependency>
            <groupId>org.apache.shiro</groupId>
            <artifactId>shiro-web</artifactId>
            <version>${shiro.version}</version>
        </dependency>


    </dependencies>
    <build>
        <finalName>firstShiro</finalName>
    </build>
</project>
三、web.xml中配置shiro监听器
<?xml version="1.0" encoding="UTF-8"?>
<web-app xmlns:xsi="http://www.w3.org/2001/XMLSchema-instance" xmlns="http://java.sun.com/xml/ns/javaee" xsi:schemaLocation="http://java.sun.com/xml/ns/javaee http://java.sun.com/xml/ns/javaee/web-app_2_5.xsd" version="2.5">
  <welcome-file-list>
    <welcome-file>/index.jsp</welcome-file>
  </welcome-file-list>
  <listener>
    <listener-class>org.apache.shiro.web.env.EnvironmentLoaderListener</listener-class>
  </listener>
  <filter>
    <filter-name>ShiroFilter</filter-name>
    <filter-class>org.apache.shiro.web.servlet.ShiroFilter</filter-class>
  </filter>
  <filter-mapping>
    <filter-name>ShiroFilter</filter-name>
    <url-pattern>/*</url-pattern>
    <dispatcher>REQUEST</dispatcher>
    <dispatcher>FORWARD</dispatcher>
    <dispatcher>INCLUDE</dispatcher>
    <dispatcher>ERROR</dispatcher>
  </filter-mapping>
  <servlet>
    <description></description>
    <display-name>LoginServlet</display-name>
    <servlet-name>LoginServlet</servlet-name>
    <servlet-class>servlet.LoginServlet</servlet-class>
  </servlet>
  <servlet-mapping>
    <servlet-name>LoginServlet</servlet-name>
    <url-pattern>/login</url-pattern>
  </servlet-mapping>
</web-app>
四、创建shiro配置文件shiro.ini
- shiro默认配置文件名为shiro.ini且位于WEB-INFO目录下
[main]
authc.loginUrl = /login

[users]
admin=123
user1=456

[urls]
/admin/** =    authc
/index.jsp = authc
/=authc
/login.jsp = anon
-
[users]下注册的是用户名和密码用等号隔开。 -
/admin/** = authc 和 /index.jsp = authc 表示在admin目录下的资源和index.jsp被访问时都需要验证(用户名和密码)
-
/=authc 和 /login.jsp = anon 表示访问url为“/”的路径和/login.jsp不需要验证即可访问,/=authc 一定要加,因为“/”路径
默认访问index.jsp,这样 /login.jsp = anon 没有效果了。
五、创建登录页面
login.jsp
<%@ page language="java" contentType="text/html; charset=UTF-8"
    pageEncoding="UTF-8"%>
<!DOCTYPE html PUBLIC "-//W3C//DTD HTML 4.01 Transitional//EN" "http://www.w3.org/TR/html4/loose.dtd">
<%String path=request.getContextPath(); %>
<html>
<head>
<meta http-equiv="Content-Type" content="text/html; charset=UTF-8">
<title>Insert title here</title>
</head>
<body>
<h2>${emsg}</h2>
    <form  method="post">
        username:<input type="text" name="username"><br>
        password:<input type="password" name="password"><br>
        <input type="submit" value="登录">
    </form>
</body>
</html>
六、编写LoginServlet
package servlet;

import java.io.IOException;

import javax.servlet.ServletException;
import javax.servlet.http.HttpServlet;
import javax.servlet.http.HttpServletRequest;
import javax.servlet.http.HttpServletResponse;

import org.apache.shiro.SecurityUtils;
import org.apache.shiro.authc.AuthenticationException;
import org.apache.shiro.authc.IncorrectCredentialsException;
import org.apache.shiro.authc.UnknownAccountException;
import org.apache.shiro.authc.UsernamePasswordToken;
import org.apache.shiro.subject.Subject;

/**
 * Servlet implementation class LoginServlet
 */
public class LoginServlet extends HttpServlet {
    private static final long serialVersionUID = 1L;

    /**
     * @see HttpServlet#doGet(HttpServletRequest request, HttpServletResponse
     *      response)
     */
    protected void doGet(HttpServletRequest request, HttpServletResponse response)
            throws ServletException, IOException {
        request.getRequestDispatcher("/commons/login.jsp").forward(request, response);
    }

    /**
     * @see HttpServlet#doPost(HttpServletRequest request, HttpServletResponse
     *      response)
     */
    protected void doPost(HttpServletRequest request, HttpServletResponse response)
            throws ServletException, IOException {

        String userName = request.getParameter("username");
        String passWord = request.getParameter("password");

        Subject subject = SecurityUtils.getSubject();

        UsernamePasswordToken token = new UsernamePasswordToken(userName, passWord);
        String emsg = null;
        try {

            subject.login(token);

        } catch (UnknownAccountException e) {
            emsg = "用户名错误";
        } catch (IncorrectCredentialsException e) {
            emsg = "密码错误";
        } catch (AuthenticationException e) {
            emsg = "其他异常=" + e.getMessage();
        }

        if (emsg != null) {
            // 说明有异常
            request.setAttribute("emsg", emsg);
            request.getRequestDispatcher("/commons/login.jsp").forward(request, response);
        }else{
            request.getRequestDispatcher("/index.jsp").forward(request, response);
        }
    }

}
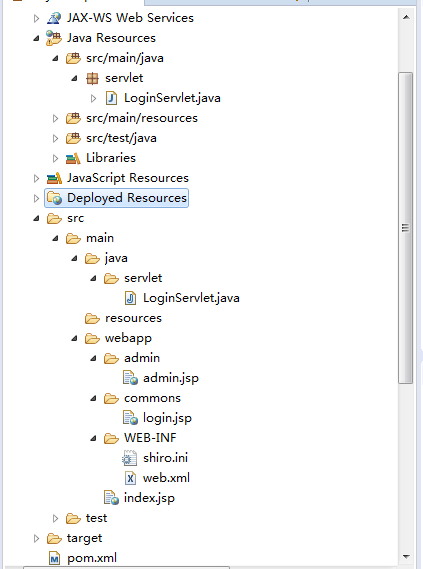
七、目录结构
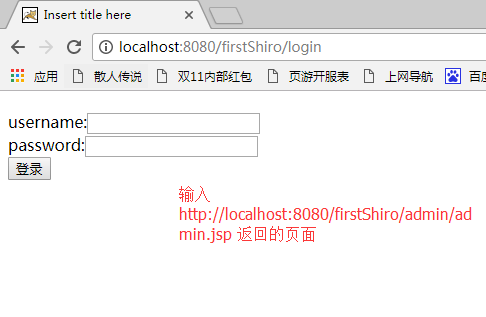
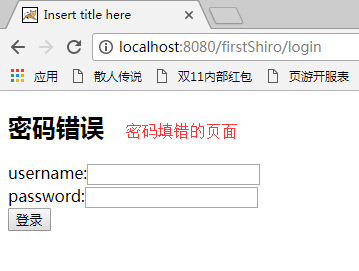
八、结果

二、角色管理
- 配置和java代码跟上例一,shiro.ini修改为
[main]
authc.loginUrl = /login

[users]
admin=123,admin
user1=456,user
zs=159

[roles]
admin=admin:*,users:*
user=users:*

[urls]
/admin/** =    authc,roles[admin]
/users/list.jsp=authc,perms[users:list]
/users/**=authc
/index.jsp = authc
/login.jsp = anon
/=authc
/logout=logout
-
admin=admin:*,users:* : admin角色有admin和users中所有权限 -
/admin/** = authc,roles[admin] :左边等号表示admin目录下所有资源,右边等号指需要登陆验证且拥有admin角色 -
/users/list.jsp=authc,perms[users:list] :右边等号指需要登陆验证且拥有users:list权限
- 目录结构
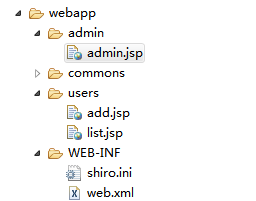
结果:
登陆后的admin用户可以访问admin目录和users目录中所有页面
登陆后的user1用户可以访问users目录中的所有页面
登陆后的zs用户可以访问users中的add.jsp 但是不能访问list.jsp 因为没有赋给zs用户users:list权限


