jira全家桶安装纪实
jira全家桶安装纪实
转载请注明 来源:http://www.eword.name/
Author:eword
Email:eword@eword.name
一、安装准备
1.1、安装包
1.2、服务器环境及网络环境
| 序号 | 服务奇名称 | ip | 程序名称 | 备注 |
|---|---|---|---|---|
| 1 | 数据库服务器(jira-db-svr) | 10.14.48.12 | MySQL5.7 | nano、lrzsz、 |
| 2 | 业务服务器(jira-apps-svr) | 10.14.48.13 | jira(V8.20.0) | nano、lrzsz、java1.8 |
1.2.1、修改服务器名称
## 将10.14.48.13服务器名称设置成jira-apps-svr
> hostnamectl set-hostname jira-apps-svr
## 将10.14.48.12服务器名称设置成jira-db-svr
> hostnamectl set-hostname jira-db-svr
二、数据库服务器安装
2.1、基础环境安装
2.1.1、关闭防火墙和SELinux
重启、关闭、开启firewalld.service服务
## 重启
systemctl  restart firewalld
## 开启
systemctl  start firewalld
## 关闭
systemctl  stop firewalld
## 开启开机启动
systemctl enable firewalld
## 关闭开机启动
systemctl disable firewalld
## 查看防火墙状态
systemctl status firewall
关闭 SELinux
## 查询 SELinux 状态
getenforce

## 设置 SELinux 状态 (临时生效)
setenforce [ Enforcing | Permissive | 1 | 0 ]

## 临时关闭 SELinux
##设置SELinux 成为permissive模式
setenforce 0
如果要永久关闭 SELinux,需要修改/etc/selinux/config并重启机器:
## /etc/selinux/config
## 将SELINUX=enforcing改为SELINUX=disabled
SELINUX=disabled
2.1.2、安装 nano
> yum -y install nano
2.1.3、安装 lrzsz
> yum -y install lrzsz
2.2、安装 Mysql 数据库
2.2.1、安装yum源
2.2.1.1、下载mysql源安装包
wget http://dev.mysql.com/get/mysql57-community-release-el7-8.noarch.rpm
2.2.2、安装mysql源
> yum localinstall mysql57-community-release-el7-8.noarch.rpm -y
2.2.3、检查mysql源是否安装成功
> yum repolist enabled | grep "mysql.*-community.*" -y
成功将返回
mysql-connectors-community/x86_64      MySQL Connectors Community            221
mysql-tools-community/x86_64           MySQL Tools Community                 135
mysql57-community/x86_64               MySQL 5.7 Community Server            544
2.2.4、配置源
可选修改nano /etc/yum.repos.d/mysql-community.repo源
改变默认安装的mysql版本。比如要安装5.6版本,将5.7源的enabled=1改成enabled=0。然后再将5.6源的enabled=0改成enabled=1即可。改完之后的效果如下所示:
[mysql-connectors-community]
name=MySQL Connectors Community
baseurl=http://repo.mysql.com/yum/mysql-connectors-community/el/7/$basearch/
enabled=1
gpgcheck=1
gpgkey=file:///etc/pki/rpm-gpg/RPM-GPG-KEY-mysql

[mysql-tools-community]
name=MySQL Tools Community
baseurl=http://repo.mysql.com/yum/mysql-tools-community/el/7/$basearch/
enabled=1
gpgcheck=1
gpgkey=file:///etc/pki/rpm-gpg/RPM-GPG-KEY-mysql

# Enable to use MySQL 5.5
[mysql55-community]
name=MySQL 5.5 Community Server
baseurl=http://repo.mysql.com/yum/mysql-5.5-community/el/7/$basearch/
enabled=0
gpgcheck=1
gpgkey=file:///etc/pki/rpm-gpg/RPM-GPG-KEY-mysql

# Enable to use MySQL 5.6
[mysql56-community]
name=MySQL 5.6 Community Server
baseurl=http://repo.mysql.com/yum/mysql-5.6-community/el/7/$basearch/
enabled=0              ## 注意这里这里
gpgcheck=1
gpgkey=file:///etc/pki/rpm-gpg/RPM-GPG-KEY-mysql

[mysql57-community]
name=MySQL 5.7 Community Server
baseurl=http://repo.mysql.com/yum/mysql-5.7-community/el/7/$basearch/
enabled=1             ## 注意这里这里
gpgcheck=1
gpgkey=file:///etc/pki/rpm-gpg/RPM-GPG-KEY-mysql

[mysql-tools-preview]
name=MySQL Tools Preview
baseurl=http://repo.mysql.com/yum/mysql-tools-preview/el/7/$basearch/
enabled=0
gpgcheck=1
gpgkey=file:///etc/pki/rpm-gpg/RPM-GPG-KEY-mysql
2.2.5、安装mysql
> yum install mysql-community-server -y
等待安装完成
2.3、配置mysql
2.3.1、启动mysql
> systemctl start mysqld
2.3.2、查看MySQL的启动状态
> systemctl status mysqld
● mysqld.service - MySQL Server
   Loaded: loaded (/usr/lib/systemd/system/mysqld.service; disabled; vendor preset: disabled)
   Active: active (running) since 五 2016-06-24 04:37:37 CST; 35min ago
 Main PID: 2888 (mysqld)
   CGroup: /system.slice/mysqld.service
           └─2888 /usr/sbin/mysqld --daemonize --pid-file=/var/run/mysqld/mysqld.pid

6月 24 04:37:36 localhost.localdomain systemd[1]: Starting MySQL Server...
6月 24 04:37:37 localhost.localdomain systemd[1]: Started MySQL Server.
2.3.3、设置开机启动
> systemctl enable mysqld
> systemctl daemon-reload
2.3.4、修改root本地登录密码
2.3.4.1、查询初始密码
mysql安装完成之后,在/var/log/mysqld.log文件中给root生成了一个默认密码。通过下面的方式找到root默认密码,然后登录mysql进行修改:
## /etc/my.cnf  配置文件已经将日志目录配置到 /opt/data/logs/mysql/mysqld.log
> grep 'temporary password' /opt/data/logs/mysql/mysqld.log
2021-10-27T12:44:48.643548Z 1 [Note] A temporary password is generated for root@localhost: :)hmags2ed0X
2.3.4.2、修改密码
> mysql -uroot -p mysql
>:)hmags2ed0X
mysql> ALTER USER 'root'@'localhost' IDENTIFIED BY 'Abc@12345678';
或者
mysql> set password for 'root'@'localhost'=password('Abc@12345678');
2.3.4.3、创建远程登入帐号
GRANT ALL PRIVILEGES ON *.* TO 'application'@'%' IDENTIFIED BY 'aBc!@#123' WITH GRANT OPTION;
**注意:**mysql5.7默认安装了密码安全检查插件(validate_password),默认密码检查策略要求密码必须包含:大小写字母、数字和特殊符号,并且长度不能少于8位。否则会提示ERROR 1819 (HY000): Your password does not satisfy the current policy requirements错误,如下所示:s
mysql> set password for 'root'@'localhost'=password('12345678');
ERROR 1819 (HY000): Your password does not satisfy the current policy requirements
2.3.4.4、修改密码策略
通过msyql环境变量可以查看密码策略的相关信息:
> show variables like '%password%';
+----------------------------------------+-----------------+
| Variable_name                          | Value           |
+----------------------------------------+-----------------+
| default_password_lifetime              | 0               |
| disconnect_on_expired_password         | ON              |
| log_builtin_as_identified_by_password  | OFF             |
| mysql_native_password_proxy_users      | OFF             |
| old_passwords                          | 0               |
| report_password                        |                 |
| sha256_password_auto_generate_rsa_keys | ON              |
| sha256_password_private_key_path       | private_key.pem |
| sha256_password_proxy_users            | OFF             |
| sha256_password_public_key_path        | public_key.pem  |
| validate_password_check_user_name      | OFF             |
| validate_password_dictionary_file      |                 | <--密码策略文件,策略为STRONG才需要
| validate_password_length               | 8               | <--密码最少长度
| validate_password_mixed_case_count     | 1               | <--大小写字符长度,至少1个
| validate_password_number_count         | 1               | <--数字至少1个
| validate_password_policy               | MEDIUM          | <--密码策略,默认为MEDIUM策略
| validate_password_special_char_count   | 1               | <--特殊字符至少1个
+----------------------------------------+-----------------+
17 rows in set (0.01 sec)
上述参数是默认策略MEDIUM的密码检查规则。
共有以下几种密码策略:
| 策略 | 检查规则 |
|---|---|
| 0 or LOW | Length |
| 1 or MEDIUM | Length; numeric, lowercase/uppercase, and special characters |
| 2 or STRONG | Length; numeric, lowercase/uppercase, and special characters; dictionary file |
修改密码策略
在/etc/my.cnf文件添加validate_password_policy配置,指定密码策略
# 选择0(LOW),1(MEDIUM),2(STRONG)其中一种,选择2需要提供密码字典文件
validate_password_policy=0
如果不需要密码策略,添加my.cnf文件中添加如下配置禁用即可:
validate_password = off
重新启动mysql服务使配置生效:
>systemctl restart mysqld
2.3.4.5、配置默认编码为utf8mb4
修改/etc/my.cnf配置文件,在[mysqld]下添加编码配置,如下所示:
[mysqld]
character_set_server=utf8mb4
init_connect='SET NAMES utf8mb4'
重新启动mysql服务,查看数据库默认编码如下所示:
mysql> show variables like '%character%';
+--------------------------+----------------------------+
| Variable_name            | Value                      |
+--------------------------+----------------------------+
| character_set_client     | utf8                       |
| character_set_connection | utf8                       |
| character_set_database   | utf8mb4                    |
| character_set_filesystem | binary                     |
| character_set_results    | utf8                       |
| character_set_server     | utf8mb4                    |
| character_set_system     | utf8                       |
| character_sets_dir       | /usr/share/mysql/charsets/ |
+--------------------------+----------------------------+
8 rows in set (0.00 sec)
2.3.4.6、修改默认配置
## 默认配置文件路径:
## 配置文件:/etc/my.cnf
## 日志文件:/var/log/mysqld.log  修改为
log-error = /opt/data/logs/mysql/mysqld.log
## 服务启动脚本:/usr/lib/systemd/system/mysqld.service
## socket文件:/var/run/mysqld/mysqld.pid 修改为
pid-file = /opt/data/var/run/mysqld/mysqld.pid
## 默认端口 3306 修改为
port = 13306
## 不绑定 ip
bind-address = 0.0.0.0
2.3.4.6.1、修改后的最终配置文件如下:
[mysqld]
bind-address = 0.0.0.0
port = 13306
datadir = /opt/data/mysql
socket = /opt/data/mysql/mysql.sock
skip-external-locking
#忘记密码
#skip-grant-tables
# 关闭 SSL
skip-ssl
# Disabling symbolic-links is recommended to prevent assorted security risks
symbolic-links = 0

log-error = /opt/data/logs/mysql/mysqld.log
pid-file = /opt/data/var/run/mysqld/mysqld.pid

# jira需要的配置
default-storage-engine = INNODB
character_set_server = utf8mb4
collation-server = utf8mb4_bin
innodb_default_row_format = DYNAMIC
innodb_large_prefix = ON
innodb_file_format = Barracuda
innodb_log_file_size = 2G
max_allowed_packet = 256M
innodb_log_file_size = 512M
transaction-isolation = READ-COMMITTED
# remove this if it exists
# sql_mode = NO_AUTO_VALUE_ON_ZERO
optimizer_switch = derived_merge=off
binlog_format=row
log-bin-trust-function-creators = 1


[client]
port = 13306
socket = /opt/data/mysql/mysql.sock
注意:datadir 和 log 路径,需要创建相应的文件夹 并 变更文件夹权限
> mkdir /opt/data
> mkdir /opt/data/mysql
> mkdir /opt/data/logs
> mkdir /opt/data/var
> mkdir /opt/data/logs/mysql
> mkdir /opt/data/var/run
> chmod -R 777 /opt/data/
安装 tree 工具查看目录结构
## 安装 tree 工具
> yum -y inistall tree
> tree
## 最终目录结构
.
└── data
    ├── logs
    │   └── mysql
    ├── mysql
    └── var
        └── run
重新启动mysql服务使配置生效:
> systemctl restart mysqld
三、应用服务器环境安装
3.1、安装 java
下载 java tar.gz 压缩包解压到/opt/java,修改 /etc/profile文件,加入系统环境配置,本文已安装 java(V1.8.151)为例
>nano /etc/profile
## 末端加入一下内容
export JAVA_HOME=/opt/java/jdk1.8.0_151
export JRE_HOME=$JAVA_HOME/jre
export CLASSPATH=.:$JAVA_HOME/lib/dt.jar:$JAVA_HOME/lib/tools.jar:$JRE_HOME/lib
export PATH=$PATH:$JAVA_HOME:$JAVA_HOME/bin:$JRE_HOME/bin:$CLASSPATH
## 重新加载使配置生效
> source /etc/profile
查看安装情况
> java -version
java version "1.8.0_151"
Java(TM) SE Runtime Environment (build 1.8.0_151-b12)
Java HotSpot(TM) 64-Bit Server VM (build 25.151-b12, mixed mode)
3.2、安装 tomcat所需基础环境
yum -y install gcc gcc-c++ pcre pcre-devel zlib zlib-devel openssl openssl-devel
四、部署破解程序
破解程序使用的是
atlassian-agent-v1.3.1.zip可以在百度中找到
将破解程序解压到/opt/atlassian-agent目录下
## 修改权限
> chmod -R 777 /opt/atlassian-agent/
修改环境变量 /etc/profile,末端加入
## jira 破解文件
export JAVA_OPTS="-javaagent:/opt/atlassian-agent/atlassian-agent.jar ${JAVA_OPTS}"
五、安装 jira
本文已安装
atlassian-jira-software-8.20.0-x64.bin为例
5.1、准备安装包
## 通过断点续传下载安装包
>  wget -c https://product-downloads.atlassian.com/software/jira/downloads/atlassian-jira-software-8.20.0-x64.bin
## 添加执行权限
> chmod +x ./atlassian-jira-software-8.20.0-x64.bin
5.2、开始安装 jira
./atlassian-jira-software-8.20.0-x64.bin
Starting Installer ...

This will install Jira Software 8.20.0 on your computer.
OK [o, Enter], Cancel [c]
o                <<--此处选 o 或 直接回车
Click Next to continue, or Cancel to exit Setup.

Choose the appropriate installation or upgrade option.
Please choose one of the following:
Express Install (use default settings) [1], Custom Install (recommended for advanced users) [2, Enter], Upgrade an existing Jira installation [3]
1                 <<--此处选 1 回车

Details on where Jira Software will be installed and the settings that will be used.
Installation Directory: /opt/atlassian/jira
Home Directory: /var/atlassian/application-data/jira
HTTP Port: 8080
RMI Port: 8005
Install as service: Yes
Install [i, Enter], Exit [e]
i                 <<--此处选 i或 直接回车

Extracting files ...


Please wait a few moments while Jira Software is configured.


Installation of Jira Software 8.20.0 is complete
Start Jira Software 8.20.0 now?
Yes [y, Enter], No [n]
y                 <<--此处选 y或 直接回车

Please wait a few moments while Jira Software starts up.
Launching Jira Software ...

Installation of Jira Software 8.20.0 is complete
Your installation of Jira Software 8.20.0 is now ready and can be accessed
via your browser.
Jira Software 8.20.0 can be accessed at http://localhost:8080
Finishing installation ...
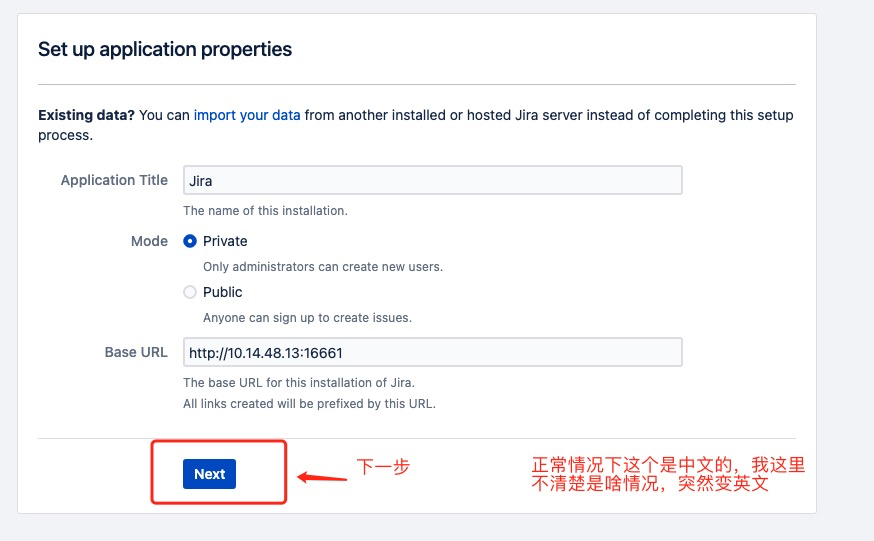
默认安装路径为/opt/atlassian/jira,默认端口为8080
5.3、修改服务端口
将默认端口8080修改为16661
## 修改配置文件
> nano /opt/atlassian/jira/conf/server.xml
查找到8080修改为16661
重启生效
> /etc/init.d/jira stop
> /etc/init.d/jira start
5.4、修改jira 的 Home 目录(数据存储目录)
## 修改配置文件
> nano /opt/atlassian/jira/atlassian-jira/WEB-INF/classes/jira-application.properties
## jira.home = /var/atlassian/application-data/jira
jira.home = /opt/data/var/atlassian/application-data/jira
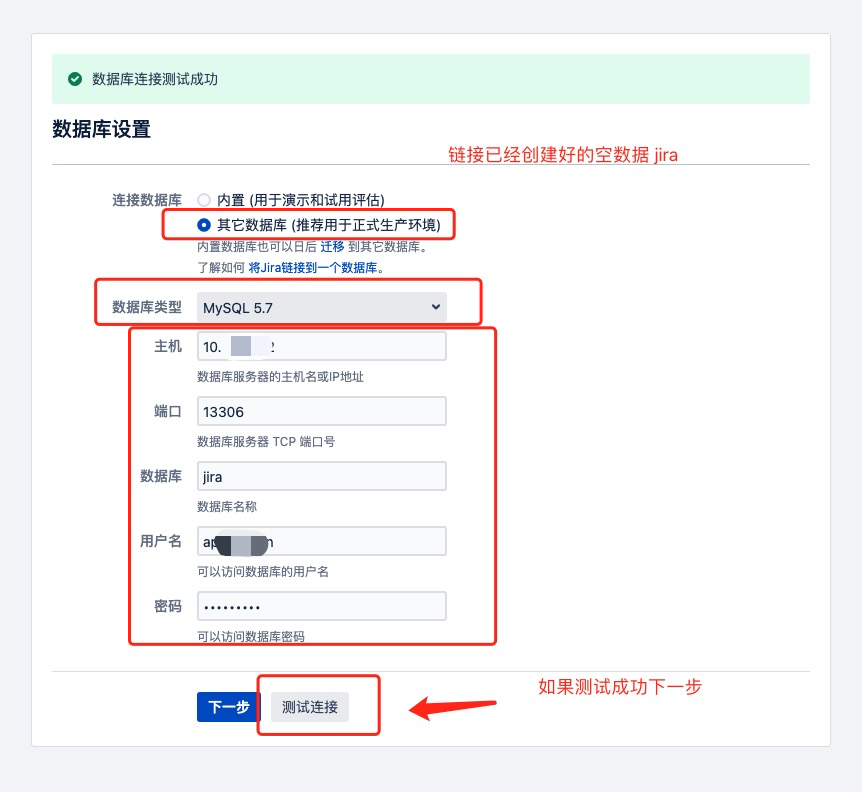
5.5、添加 MySQL 数据库驱动
这里使用的是mysql-connector-java-5.1.46.jar
## 将数据库驱动jar包复制到 jira 安装目录
> cp ./mysql-connector-java-5.1.46/*  /opt/atlassian/jira/atlassian-jira/WEB-INF/lib
5.6、创建数据库
登入10.14.48.12 MySQL数据库
> mysql -u root -p
Enter password:
Welcome to the MySQL monitor.  Commands end with ; or \g.
Your MySQL connection id is 4
Server version: 5.7.36 MySQL Community Server (GPL)

Copyright (c) 2000, 2021, Oracle and/or its affiliates.

Oracle is a registered trademark of Oracle Corporation and/or its
affiliates. Other names may be trademarks of their respective
owners.

Type 'help;' or '\h' for help. Type '\c' to clear the current input statement.

mysql>
创建 jira 数据库
## 创建数据库
mysql> create database jira character set utf8mb4 collate utf8mb4_bin;
Query OK, 1 row affected (0.00 sec)

mysql>
数据库授权(之前已经授权了一个全局账号 application)
GRANT ALL PRIVILEGES ON *.* TO 'application'@'%' IDENTIFIED BY 'aBc!@#123' WITH GRANT OPTION;
5.7、配置 jira
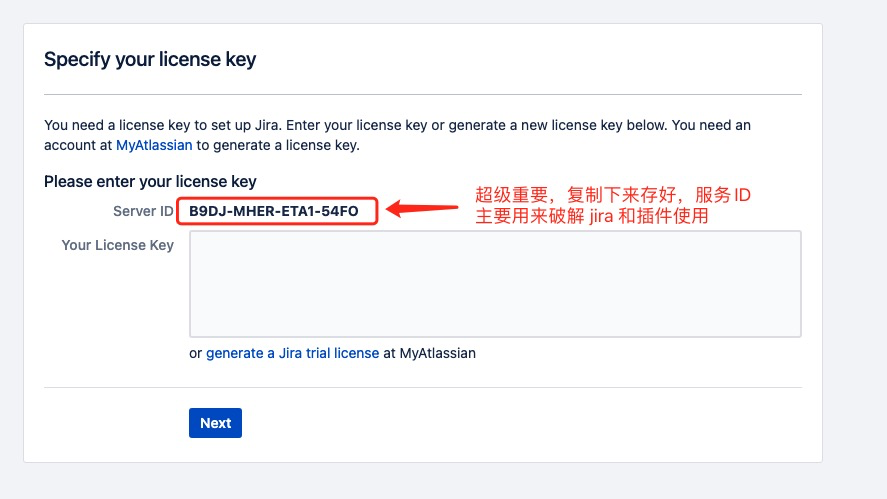
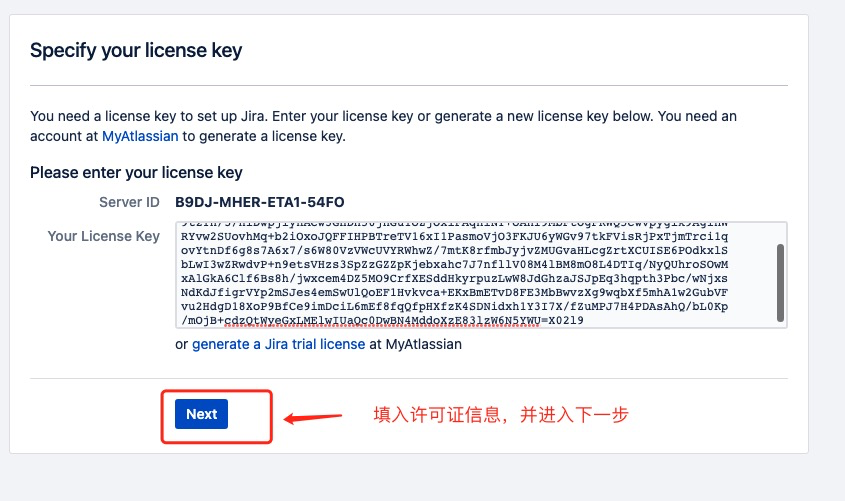
5.7.1、破解 jira
得到服务器 id B9DJ-MHER-ETA1-54FO 后通过破解程序atlassian-agent.jar获取许可证信息
## 查看一下 破解程序 命令说明
>  java -jar /opt/atlassian-agent/atlassian-agent.jar
====================================================
=======     Atlassian Crack Agent v1.3.1     =======
=======           https://zhile.io           =======
=======          QQ Group: 30347511          =======
====================================================

KeyGen usage: java -jar /opt/atlassian-agent/atlassian-agent.jar [-d] [-h] -m
       <arg> [-n <arg>] -o <arg> -p <arg> -s <arg>
 -d,--datacenter           Data center license[default: false]
 -h,--help                 Print help message
 -m,--mail <arg>           License email
 -n,--name <arg>           License name[default: <license email>]
 -o,--organisation <arg>   License organisation
 -p,--product <arg>        License product, support:
                           [crowd: Crowd]
                           [jsm: JIRA Service Management]
                           [questions: Questions plugin for Confluence]
                           [crucible: Crucible]
                           [capture: Capture plugin for JIRA]
                           [conf: Confluence]
                           [training: Training plugin for JIRA]
                           [*: Third party plugin key, looks like:
                           com.foo.bar]
                           [bitbucket: Bitbucket]
                           [tc: Team Calendars plugin for Confluence]
                           [bamboo: Bamboo]
                           [fisheye: FishEye]
                           [portfolio: Portfolio plugin for JIRA]
                           [jc: JIRA Core]
                           [jsd: JIRA Service Desk]
                           [jira: JIRA Software(common jira)]
 -s,--serverid <arg>       License server ID

================================================================================

# Crack agent usage: append -javaagent arg to system environment: JAVA_OPTS.
# Example(execute this command or append it to setenv.sh/setenv.bat file):

  export JAVA_OPTS="-javaagent:/opt/atlassian-agent/atlassian-agent.jar ${JAVA_OPTS}"

# Then start your confluence/jira server.
开始破解获取许可证信息
java -jar /opt/atlassian-agent/atlassian-agent.jar -m admin@bolangit.cn -n bolangit.cn -p jc -o http://10.14.48.13:16661 -s B9DJ-MHER-ETA1-54FO
得到如下信息
====================================================
=======     Atlassian Crack Agent v1.3.1     =======
=======           https://zhile.io           =======
=======          QQ Group: 30347511          =======
====================================================

Your license code(Don't copy this line!!!):

AAABvA0ODAoPeJx1kl+PojAUxd/7KUj2GaQg4Jg0WQeYFQP+H+e5wnWoYjFtccb99FuFSWZ3NelLe
9tzTn/3/niDwpjlynACw3GHDh56jhGu1oZjOxiFAqhiNY+oAnI9MbFtOgFKWQ5cwvpygik9AglnW
RYvw2SUovhMq+b2iOxoJQFFIHPBTreTV16xI1PasmoVjO3FKJU6yWGv97tkFVisRjPxTjmTrci1q
ovYtnDf6g8s7A6x7/s6W80VzVWcUVYRWhwZ/7mtK8rfmbJyjvZMUGvaHLcgZrtXCUISE6POdkxlS
bLwI3wZRwdvP+n9etsVHzs3SpZzGZZpKjebxahc7J7nfllV08M4lBM8mO8L4DTIq/NyQUhroSOwM
xAlGkA6Clf6Bs8h/jwxcem4DZ5MO9CrfXESddHkyrpuzLwW8JdGhzaJSJpEq3hqpth3Pbc/wNjxs
NdKdJfigrVYp2mSJes4emSwUlQoEF1Hvkvca+EKxBmETvD8FE3MbBwvzXg9wqbXf5mhA1w2GubVF
vu2HdgD18XoP9BfCe9imDciL6mEf8fqQfpHXfzK4SDNidxh1Y3I7X/fZuMPJ7H4PDAsAhQ/bL0Kp
/mOjB+cdzQtWyeGxLMElwIUaQc0DwBN4MddoXzE83lzW6N5YWU=X02l9

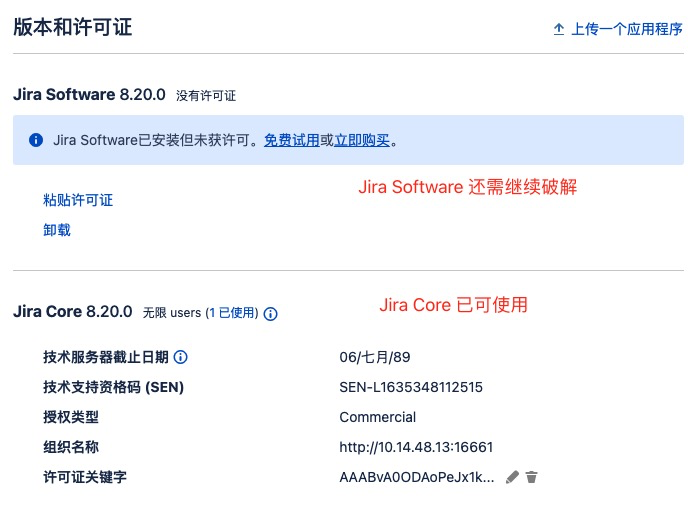
5.7.2、验证破解情况
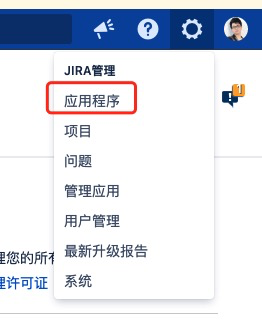
配置完后在页面右上角找到配置图标进入应用程序配置页面
我们会发现 Jira Core 已经破解成功可以使用,Jira Software 还需继续破解获取许可证
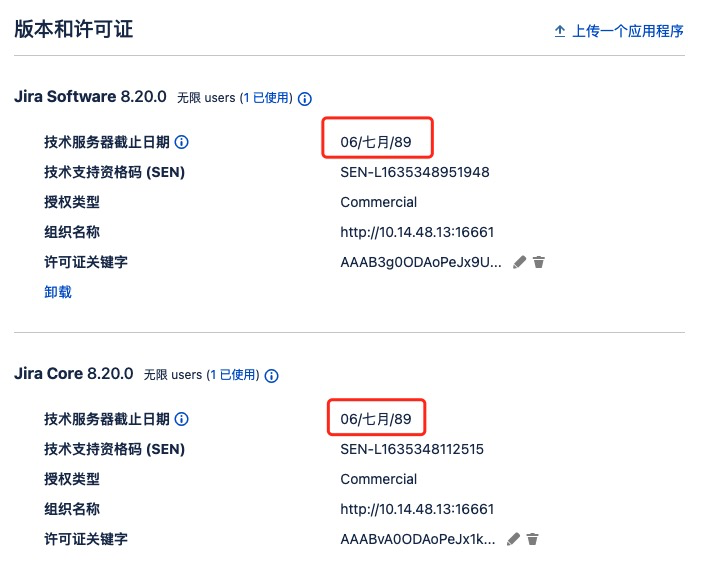
5.7.3、破解 jira software
> java -jar /opt/atlassian-agent/atlassian-agent.jar -m admin@bolangit.cn -n bolangit.cn -p jira -o http://10.14.48.13:16661 -s B9DJ-MHER-ETA1-54FO
注意 -c 后面的参数 从 jc 改成 jira
====================================================
=======     Atlassian Crack Agent v1.3.1     =======
=======           https://zhile.io           =======
=======          QQ Group: 30347511          =======
====================================================

Your license code(Don't copy this line!!!):

AAAB3g0ODAoPeJx9UlGPojAYfOdXkNzjBqSAiCZN1oNu5CKyu6Cb9a3ip3QPC2mLd+6vP1wxcU9j0
pc2nflm5psfb7DWk1zp9kC3nZHTH/WRHqSZbls20rYCgBdVXYMwpywHLiE71DCjO8BBEsfkNYjGU
y0QQBWreEgV4CPQQJZhD7Q7kBBkLlh9ROE5L9mOqVZIeQLoq4NeKFXLUa/3WbASTFZpMWVcAac8B
/K3ZuLQTfOHhjVoj/bBBD2rJGt2op5NozjKSKjNmt0KRLKZSxASG+gs7g5XLap1kyvzeDFktVF/q
ADziujOX5ortgesRAPfsrx87zwvWrajYlsje1o2X3niDS0laInYUs7k6emYSxsLskzkmq5vImeEP
M9DWlBx1fKSNqcS0/WO8cdVVVK+ZcrM+UnllfZu+ITKAseBFTy9BHEZLhdzmb43no+K3nudZItmu
XnbP4+jebp4iBIUb3uEbFL342VZB2uRVp+TbIxPIy6t3UkmVVQoEJ3DbhdRiKdRmJKZMUWe03dcf
9hHQ9f/ttpbbUpB7EG08J/D8JcRT8irQbIxMvruU6L9hsM5XORZ1sDyHedmta9L89yIvKAS/i/2J
RjaVopaMNmZbuXjGxa69Xwpv9jLP9MbLKYwLQIVAIV4+d0NAe0BvUntF02vzFTU7J6fAhQFp1wHW
1myVERVkk0j+JIJ9RBDFg==X02mq
点击页面上的“粘贴许可证”,更新许可证信息
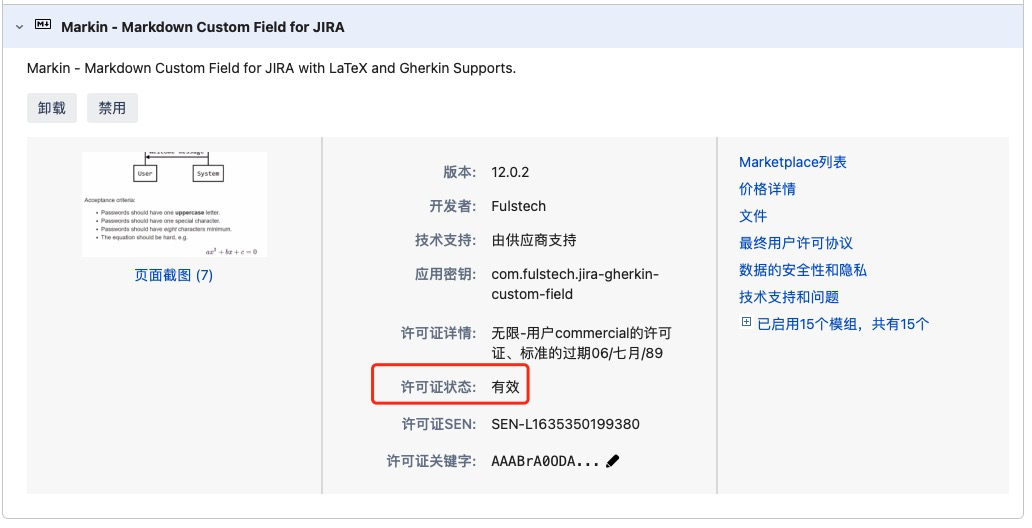
5.7.4、插件破解
破解插件的要点在于点【立即购买】进行安装而不是【免费使用】
5.7.4.1、获取应用密钥
在应用管理页面获取【应用密钥】com.fulstech.jira-gherkin-custom-field
5.7.4.2、获取许可证信息
> java -jar /opt/atlassian-agent/atlassian-agent.jar -m admin@bolangit.cn -n bolangit.cn -p com.fulstech.jira-gherkin-custom-field -o http://10.14.48.13:16661 -s B9DJ-MHER-ETA1-54FO
注意-p 后面的参数改成了应用密钥
com.fulstech.jira-gherkin-custom-field
====================================================
=======     Atlassian Crack Agent v1.3.1     =======
=======           https://zhile.io           =======
=======          QQ Group: 30347511          =======
====================================================

Your license code(Don't copy this line!!!):

AAABrA0ODAoPeJyNUlFv2jAYfPeviLTHyWkcQwJIlgYhrHSQdISWvRrzhZgmTmY7dOzXL1CQqmoPl
ewXn7677+78ZQM7JxXW8UPHp6N+MKJDJ8rWju/5BIm6cvO2NBZE4R6k5nhfgH6RCovW2LrCuYRy5
3Jh5RGY1S2gSAO3slZTboGdSTDxsB+ihRSgDKxPDSS8Ahaly2W8iubjBYqPvGwvQyznpQE0BSO0b
C4vT6qUlbTdluUbg7M9OYW1jRnd3f0tZAmurFGq91xJ80ZyRjuQeC7pub2BS+iIBEHwaTugLOhGS
3OzVCvbWYyXXJaM7yqpvm3rkqu9tK5Q6LrXPTcFW0av0Wy2mezzr99ttmpFEj6LkwgbSX9PiBHjY
vVI4kOZ04Ov282v5AF+2AnN5unY1j8ZQ51Gp664EhD/aaQ+XXMcDLEXdgdloI+g51M2GU4f8PI+X
uF4PSa435ul6AVOz6DNOQQSeF7oDSglKGmrLeg0fzIdxjC5dfF/gcdWi4Ib+Fjg1eaN3/9smpnlu
svzWm0WJ6y7eEEC2qd9jwyHdODdIr78jHfZ/gOi2t+qMCwCFHNg++lzyV1dph8ARHOTUhyU/or+A
hRME7aipUt+bYz2lQxfq87UhYKtnw==X02kk
更新插件许可证信息
完美破解
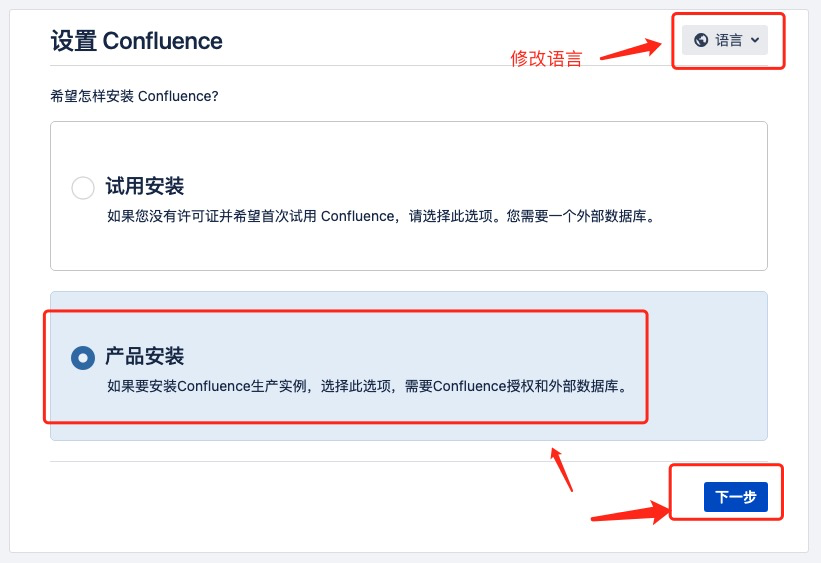
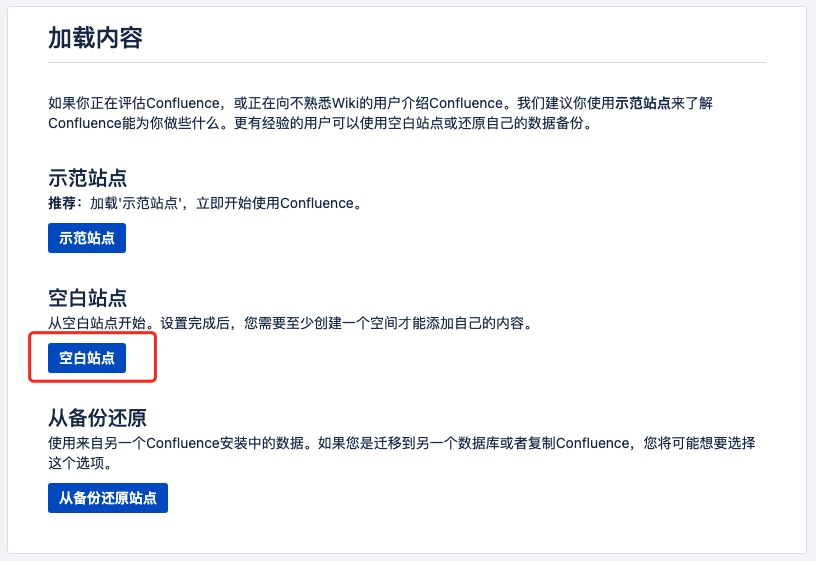
六、安装Confluence
本文已安装
atlassian-confluence-7.13.1-x64.bin为例
6.1、准备安装包
## 通过断点续传下载安装包
>  wget -c https://product-downloads.atlassian.com/software/confluence/downloads/atlassian-confluence-7.13.1-x64.bin
## 添加执行权限
> chmod +x ./atlassian-confluence-7.13.1-x64.bin
6.2、开始安装Confluence
> ./atlassian-confluence-7.13.1-x64.bin
Starting Installer ...

This will install Confluence 7.13.1 on your computer.
OK [o, Enter], Cancel [c]
o                        <<--此处选 o 或 直接回车
Click Next to continue, or Cancel to exit Setup.

Choose the appropriate installation or upgrade option.
Please choose one of the following:
Express Install (uses default settings) [1],
Custom Install (recommended for advanced users) [2, Enter],
Upgrade an existing Confluence installation [3]
1                         <<--此处选 1 回车

See where Confluence will be installed and the settings that will be used.
Installation Directory: /opt/atlassian/confluence
Home Directory: /var/atlassian/application-data/confluence
HTTP Port: 8090
RMI Port: 8000
Install as service: Yes
Install [i, Enter], Exit [e]
i                    <<--此处选 i 或 直接回车

Extracting files ...


Please wait a few moments while we configure Confluence.

Installation of Confluence 7.13.1 is complete
Start Confluence now?
Yes [y, Enter], No [n]
y                    <<--此处选 y 或 直接回车

Please wait a few moments while Confluence starts up.
Launching Confluence ...

Installation of Confluence 7.13.1 is complete
Your installation of Confluence 7.13.1 is now ready and can be accessed via
your browser.
Confluence 7.13.1 can be accessed at http://localhost:8090
Finishing installation ...
默认安装路径为/opt/atlassian/confluence,默认端口为8090
6.3、修改服务端口
将默认端口8090修改为16662
## 修配置文件
> nano /opt/atlassian/confluence/conf/server.xml
查找到8090修改为16662
重启生效
> /etc/init.d/confluence restart
###6.4、修改confluence的 Home 目录(数据存储目录)
## 修改配置文件
> nano /opt/atlassian/confluence/confluence/WEB-INF/classes/confluence-init.properties
## confluence.home = /var/atlassian/application-data/confluence
confluence.home = /opt/data/var/atlassian/application-data/confluence
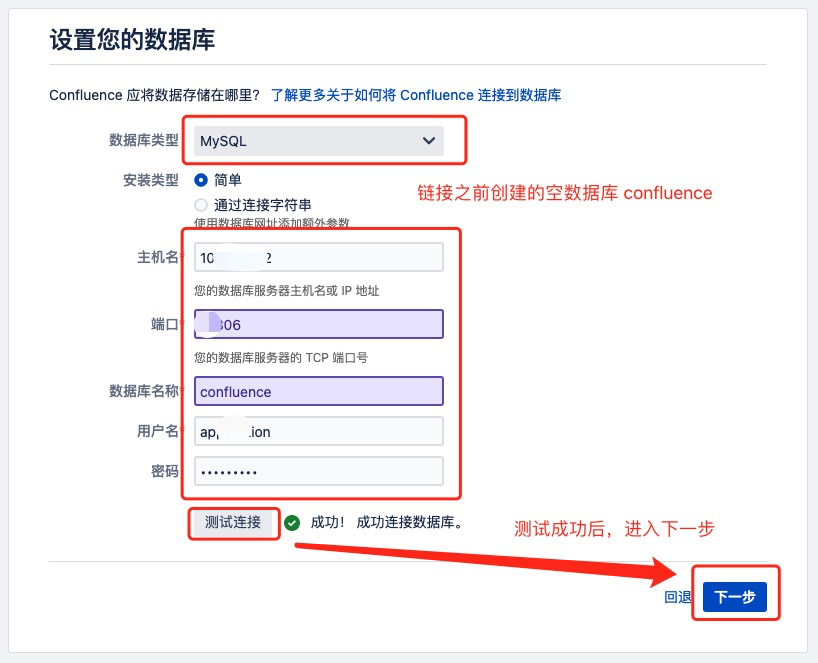
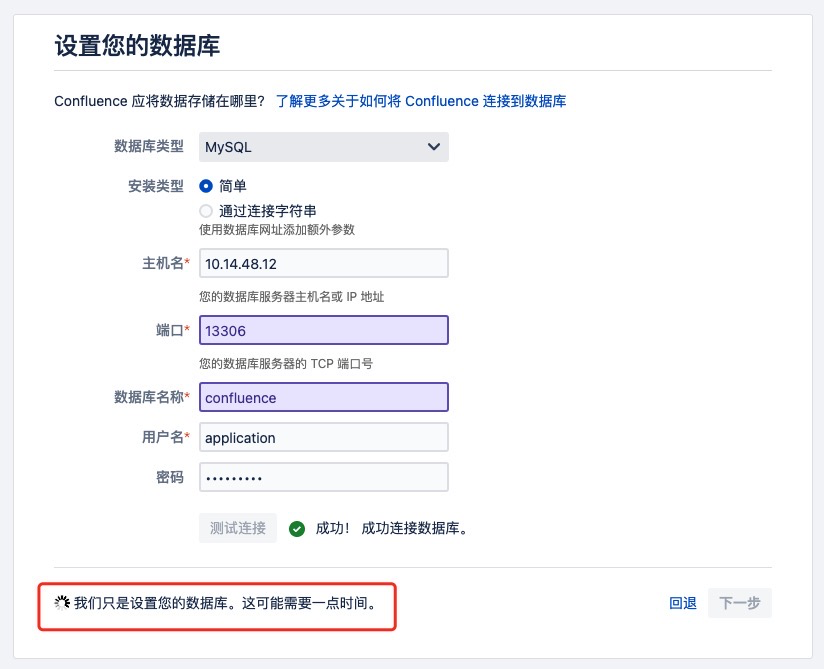
6.5、添加 MySQL 数据库驱动
这里使用的是mysql-connector-java-5.1.46.jar
## 将数据库驱动jar包复制到 confluence 安装目录
> cp ./mysql-connector-java-5.1.46/* /opt/atlassian/confluence/confluence/WEB-INF/lib/
6.6、创建数据库
登入10.14.48.12 MySQL数据库
> mysql -u root -p
Enter password:
Welcome to the MySQL monitor.  Commands end with ; or \g.
Your MySQL connection id is 3943
Server version: 5.7.36 MySQL Community Server (GPL)

Copyright (c) 2000, 2021, Oracle and/or its affiliates.

Oracle is a registered trademark of Oracle Corporation and/or its
affiliates. Other names may be trademarks of their respective
owners.

Type 'help;' or '\h' for help. Type '\c' to clear the current input statement.

mysql>
创建 confluence数据库
## 创建数据库
mysql> create database confluence character set utf8mb4 collate utf8mb4_bin;
Query OK, 1 row affected (0.00 sec)

mysql>
数据库授权(之前已经授权了一个全局账号 application)
GRANT ALL PRIVILEGES ON *.* TO 'application'@'%' IDENTIFIED BY 'aBc!@#123' WITH GRANT OPTION;
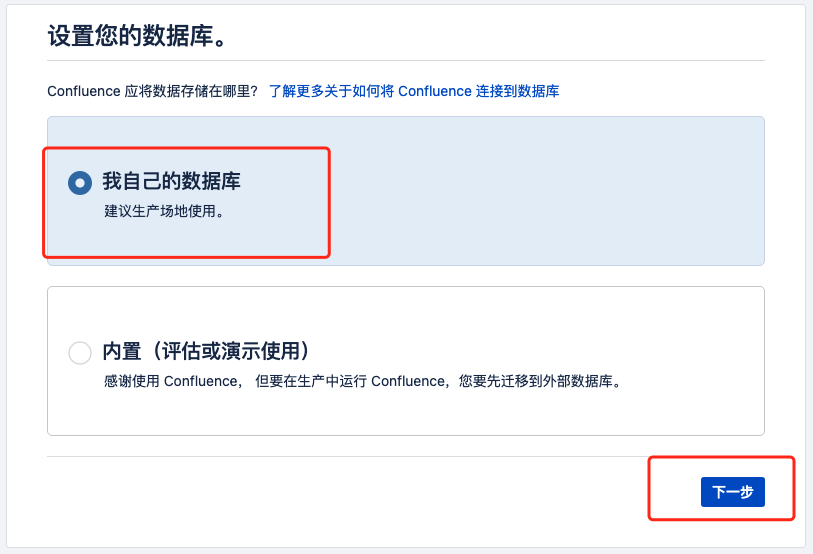
6.7、配置 confluence
、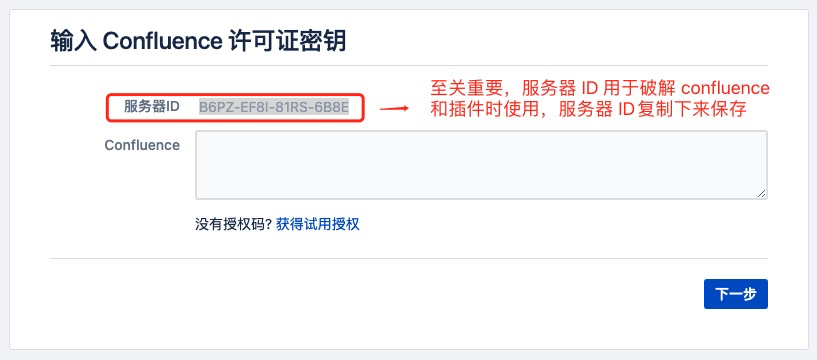
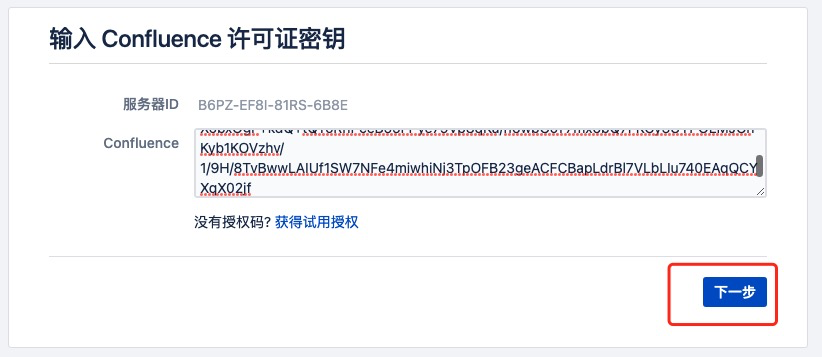
6.7.1、破解 confluence
得到服务器 id B6PZ-EF8I-81RS-6B8E 后通过破解程序atlassian-agent.jar获取许可证信息
开始破解获取许可证信息
> java -jar /opt/atlassian-agent/atlassian-agent.jar -m admin@bolangit.cn -n bolangit.cn -p conf -o http://10.14.48.13:16662 -s B6PZ-EF8I-81RS-6B8E
得到如下信息
====================================================
=======     Atlassian Crack Agent v1.3.1     =======
=======           https://zhile.io           =======
=======          QQ Group: 30347511          =======
====================================================

Your license code(Don't copy this line!!!):

AAABkw0ODAoPeJxtUcFuozAUvPsrkPZYQWxgHRLJUlugu6kCZEvSVfZm6EtwSwyyTVr69SUJlVZVJ
V88ozczb96PpJFW2hwtTCzizj089z0rzNeWi12CQgXciEZG3AA7ITYhNiYoPvK6OzNsx2sNKAJdK
tGekY2sxUEYeLJqUYLUYBW9VRnT6vlk8l6JGhzRoEztuRT6InJiB5Jgh/iOHzjEmxNKqYvKRu4cX
hpxBGZUByhspBn+ccJFzfjTQcjroqm53AvjlBKNjr+5rlgSvoZ38Ta8h/tu+zfPRDWrn9/cKnZJ2
/wqVzfVn1ZHu9nELzawfoyu+ncabTdXOEsLuWfsYp4brgyocc8ztLyYrPsWUn4AFmZJEj+Ei5slG
mJJA5LLEuK3Vqh+bC6Y2Xg6PDTOLiK2XER5nNpLQr2fU59g36MzinJQR1ADfUtX/+z4LljYAXnIb
XobxOgF+kdQ+tQYoRhPceB55FPye79Vp8qKa/h6wbGoT7mx6bQ7FKCy3UYPOLMJGhKyb1KOVzhv/
1/9H/8TvBwwLAIUf1SW7NFe4miwhiNj3TpOFB23geACFCBapLdrBl7VLbLIu740EAqQCYXqX02jf

6.7.2、验证破解情况
路径:右上角-设置-一般配置-管理-授权细节
6.7.3、插件破解
插件破解方式参见5.7.4,主要要注意一下 -p 参数、-o 参数和- s 参数,要和插件、confluence的服务地址以及服务器 ID 相匹配。
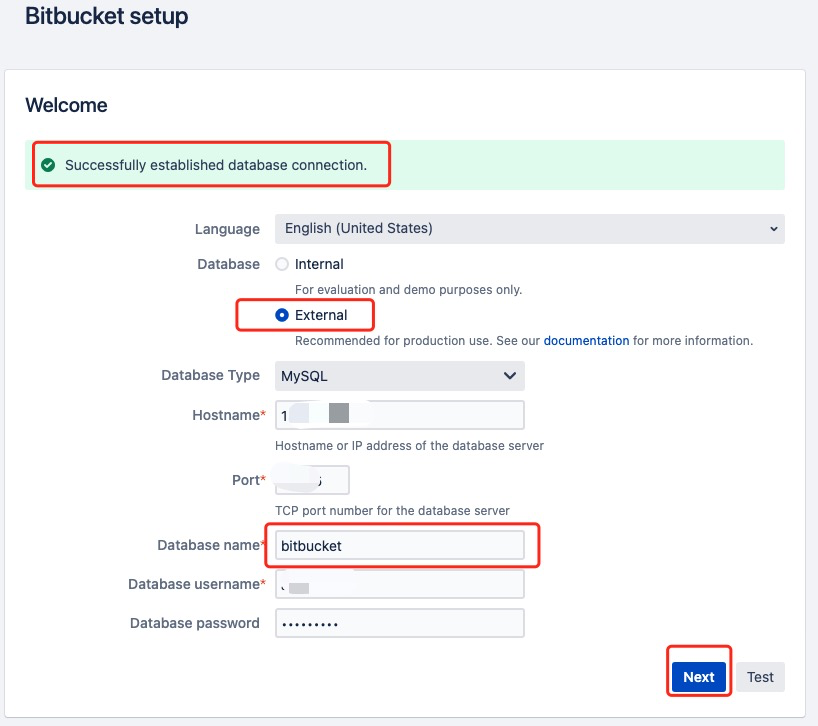
七、安装Bitbucket
本文已安装
atlassian-bitbucket-7.17.0-x64.bin为例
7.1、准备安装包
## 通过断点续传下载安装包
> wget -c https://product-downloads.atlassian.com/software/stash/downloads/atlassian-bitbucket-7.17.0-x64.bin
## 添加执行权限
> chmod +x ./atlassian-bitbucket-7.17.0-x64.bin
7.2、开始安装 Bitbucket
> ./atlassian-bitbucket-7.17.0-x64.bin
Starting Installer ...


Unsatisfied requirement: git

Unable to find Git! Please install Git before installing Bitbucket.
For more information please visit: https://go.atlassian.com/installgit
NOTE: If you proceed without a working Git, Bitbucket won't be able to start
after installation until a working Git is found.
If you proceed without a working Git, Bitbucket won't be able to start after installation.
Are you sure you want to continue?
Yes [y, Enter], No [n]
y                       <<--此处选 y 或 直接回车

Bitbucket 7.17.0 installation wizard
Would you like to install or upgrade an instance?
Install a new instance [1, Enter], Upgrade an existing instance [2]
1                      <<--此处选 1 或 直接回车

Install Bitbucket 7.17.0
What type of instance are you looking to install?
Install a Server instance [1, Enter], Install a Data Center instance [2], Install a Smart Mirroring instance [3]
1                      <<--此处选 1 或 直接回车
Where should Bitbucket be installed?

Select the folder where you would like Bitbucket 7.17.0 to be installed,
then click Next.
[/opt/atlassian/bitbucket/7.17.0]                                 <<--此处直接回车

Default location for Bitbucket home directory

The location for Bitbucket data.
This will be the default location for repositories, plugins, and other data.

Ensure that this location is not used by another Bitbucket installation.
[/var/atlassian/application-data/bitbucket]                      <<--此处直接回车

Configure which ports Bitbucket will use.


Configure TCP Ports
Bitbucket requires a TCP port that isn't being used by other applications.

The HTTP port is where users access Bitbucket through their browsers.

Bitbucket also requires ports 7992 and 7993 are available to run an embedded
Elasticsearch instance that provides search functionality to Bitbucket.
HTTP Port Number
[7990]                      <<--此处直接回车


Run as a service
For a production server we recommend that you run Bitbucket as a
Windows/Linux service because Bitbucket will restart automatically when the
computer restarts.
Install Bitbucket as a service?
Yes [y, Enter], No [n]
y                      <<--此处选 y 或 直接回车
Please review your Bitbucket installation settings


Installation Summary
Installation Directory: /opt/atlassian/bitbucket/7.17.0
Home Directory: /var/atlassian/application-data/bitbucket
HTTP Port: 7990
Install as a service: Yes

Install [i, Enter], Exit [e]
i                      <<--此处选 i 或 直接回车
Git is missing. If you proceed Bitbucket won't be able to start after installation.
Are you sure you want to continue?
Yes [y, Enter], No [n]
y                      <<--此处选 y 或 直接回车


Extracting files ...


Installation of Bitbucket is complete
Would you like to launch Bitbucket?
Yes [y, Enter], No [n]
y                      <<--此处选 y 或 直接回车

Please wait a few moments while Bitbucket starts up.
Launching Bitbucket ...

Installation of Bitbucket 7.17.0 is complete
Your installation of Bitbucket 7.17.0 is now ready and can be accessed via
your browser.
Bitbucket 7.17.0 can be accessed at http://localhost:7990
Launch Bitbucket 7.17.0 in browser?
Yes [y, Enter], No [n]
y                      <<--此处选 y 或 直接回车
Finishing installation ...
7.3、安装 git环境
## 查看是否已经安装了 git
> git --version
-bash: git: command not found
## yum 安装 git
> yum -y install git-core
## 验证 git 安装情况
> git --version
git version 1.8.3.1
7.3.1、升级 git
Bitbucket 7.17.0 只支持 2.11.0+以上版本的 git,所以需要对git进行升级。
7.3.1.1、配置存储库
## 添加 /etc/yum.repos.d/wandisco-git.repo 文件
> nano /etc/yum.repos.d/wandisco-git.repo
## 添加如下信息
[wandisco-git]
name=Wandisco GIT Repository
baseurl=http://opensource.wandisco.com/centos/7/git/$basearch/
enabled=1
gpgcheck=1
gpgkey=http://opensource.wandisco.com/RPM-GPG-KEY-WANdisco
7.3.1.2、导入存储库GPG密钥
> sudo rpm --import http://opensource.wandisco.com/RPM-GPG-KEY-WANdisco
7.3.1.3、更新 git
> yum install git -y
7.3.1.4、验证 git 版本
> git --version
git version 2.31.1
7.4、添加 MySQL 数据库驱动
这里使用的是mysql-connector-java-5.1.46.jar
## 将数据库驱动jar包复制到 bitbucket 安装目录
> cp ./mysql-connector-java-5.1.46/* /opt/atlassian/bitbucket/7.17.0/app/WEB-INF/lib/
7.5、修改 Bitbucket 的 Home 目录(数据存储目录)
## 修改配置文件
> nano /opt/atlassian/bitbucket/7.17.0/bin/set-bitbucket-home.sh
## BITBUCKET_HOME="/var/atlassian/application-data/bitbucket"
if [ -z "$BITBUCKET_HOME" ]; then
    BITBUCKET_HOME="/opt/data/var/atlassian/application-data/bitbucket"
fi
7.6、修改服务端口
## 在配置文件 /opt/data/var/atlassian/application-data/bitbucket/shared/bitbucket.properties 末端插入端口配置
> echo "server.port=16663" >> /opt/data/var/atlassian/application-data/bitbucket/shared/bitbucket.properties
重启生效
> /etc/init.d/atlbitbucket restart
7.7、创建数据
登入10.14.48.12 MySQL数据库
> mysql -u root -p
Enter password:
Welcome to the MySQL monitor.  Commands end with ; or \g.
Your MySQL connection id is 3943
Server version: 5.7.36 MySQL Community Server (GPL)

Copyright (c) 2000, 2021, Oracle and/or its affiliates.

Oracle is a registered trademark of Oracle Corporation and/or its
affiliates. Other names may be trademarks of their respective
owners.

Type 'help;' or '\h' for help. Type '\c' to clear the current input statement.

mysql>
创建 bitbucket数据库
## 创建数据库   bitbucket  需要支持 UTF-8 的数据库
mysql> create database bitbucket character set utf8 collate utf8_bin;
Query OK, 1 row affected (0.00 sec)

mysql>
数据库授权(之前已经授权了一个全局账号 application)
GRANT ALL PRIVILEGES ON *.* TO 'application'@'%' IDENTIFIED BY 'aBc!@#123' WITH GRANT OPTION;
7.8、配置 bitbucket
浏览器访问:http://10.14.48.13:7990/
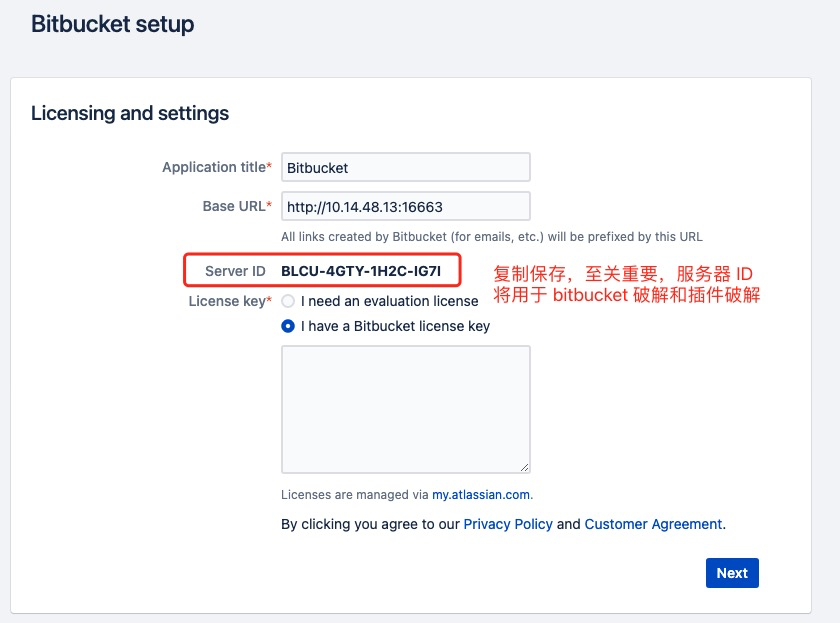
7.8.1、破解 Bitbucket
得到服务器 id BLCU-4GTY-1H2C-IG7I 后通过破解程序atlassian-agent.jar获取许可证信息
开始破解获取许可证信息
> java -jar /opt/atlassian-agent/atlassian-agent.jar -m admin@bolangit.cn -n bolangit.cn -p bitbucket -o http://10.14.48.13:16663 -s BLCU-4GTY-1H2C-IG7I
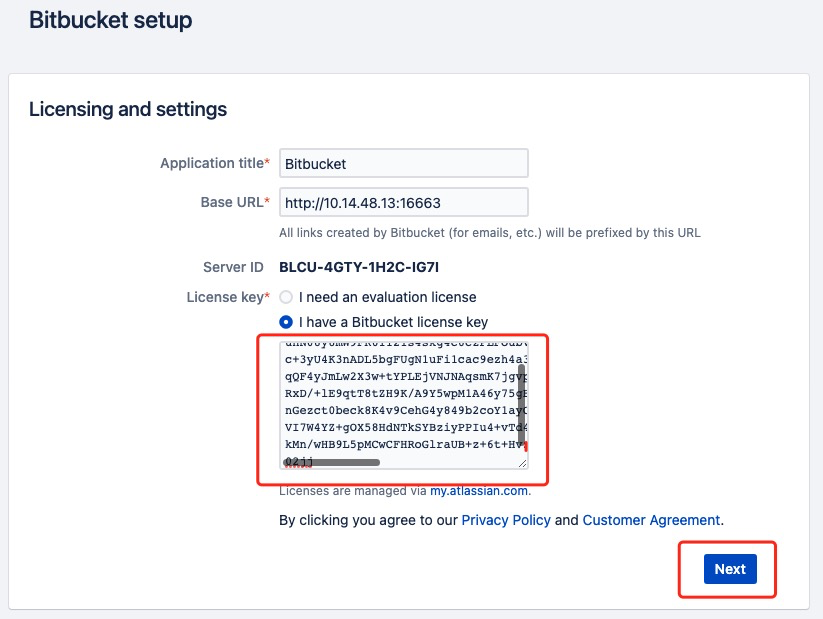
得到如下信息
====================================================
=======     Atlassian Crack Agent v1.3.1     =======
=======           https://zhile.io           =======
=======          QQ Group: 30347511          =======
====================================================

Your license code(Don't copy this line!!!):

AAABlA0ODAoPeJxtUcFuozAUvPsrkPYMtYEAiYS0rEMSKki6S1Ipe3PoS7DWmKxt6KZfvyShUlVV9
unN08y8mW9FK61121s4skg4c6czPLFoubVc7BJEFTDDWzlnBuLrxCbExhFKeya6GxIfmdCA5qArx
c+3yU4K3nADL5bgFUgN1uFi1cac9ezh4a3mAhzeoo06Mcn1neSKDiDBDvEdP3KINyNBEHiIttKwy
qQF4yJmLw2X3w+tYPLEjVNJNAqsmK7jgvp08ZOu5GPnd4nwf9ev28fJUrSvTbdISr1PsuckE960X
RxD/+lE9qtT8tZH9K/A9Y5wpM1A46y75gBqc9xpUDq2CRqkpQHJZAXpvzNXlzGMaGrjcPgov5vI5
nGezct0beck8K4v9CehG4y849b2coY1ayCmm6JIf9EsyceF0jBlQI2BlqB6UAPnj5zubH+53dtk5
VI7W4YZ+gOX58HdNTkSYBziyPPIu4+vTd41hih5D7FRHaCnTlU10/C52zHTdwEXDSfFX5w1VnM75
kMn/wHB9L5pMCwCFHRoGlraUB+z+6t+HvzYznh0dgZUAhQikalqJ73FnXx2utQFaeeyidp6yA==X
02jj
7.6.2、验证破解情况

7.9.3、(破解插件)安装中文语言包
插件破解方式参见5.7.4,主要要注意一下 -p 参数、-o 参数和- s 参数,要和插件、confluence的服务地址以及服务器 ID 相匹配。

7.9.3.1、获取应用密钥
在应用管理页面获取【应用密钥】csdn.bitbucket.languagepack.zh_CN
7.9.3.2、获取许可证信息
> java -jar /opt/atlassian-agent/atlassian-agent.jar -m admin@bolangit.cn -n bolangit.cn -p csdn.bitbucket.languagepack.zh_CN -o http://10.14.48.13:16663 -s BLCU-4GTY-1H2C-IG7I
====================================================
=======     Atlassian Crack Agent v1.3.1     =======
=======           https://zhile.io           =======
=======          QQ Group: 30347511          =======
====================================================

Your license code(Don't copy this line!!!):

AAABqg0ODAoPeJyNUl1vmzAUffevQNozFAcCJBJSV4elTHykJWm0vUyG3IITYpBtUOmvH0mJNE2TO
vnjwUfn3HvO9Ze44VrS9JrpadhdzudLy9FIttVm5gyjQh64kTOVd8UJlFFTXna0hJYWJ+O9+kUSg
xaK9eAr0QEiAqhiDV9RBf6Fr2Osmx6KWAFcwnZoIaFn8Ekax8EzCb9GKOhp3V1J/iutJaAVyEKw9
vqy4zU7MwUHrf5Q0PJBq5Rq5fLu7r1iNRisQakoKWfyQ+SCjiA2DWwbtmdga4kdx7H+wwlwBaIVT
E5uPmdkioqRM3VOGq7GNIKYstqnhzPj93lzYTFlFBxNFh6prPyYmOTbE9nswze7747R/CeIdaAWW
Rgfj3Grnstwt/m+f3qITqvUy+qhbEUUkoX3kgb23vTRWGPsllNeQPDWMjFMkXsL3XTHjTIQPYhw5
T9EZKfb6+0PHT/OiB6u3RCdYHgBIS95Ycc0XdOzLIyS7pyDSF93csR8Hd/G9u8Cm04UFZXw96wnm
zf9GcqCxB+PHmHHGtfcGm/s3tK6/oc/YvoNuxzZQTAuAhUAgEyIWWhFLAQ1mtdgOvphE3/rMMICF
QCLHU+cW2CLtZhkwxK0d1a6p402Aw==X02kk
注意-p 后面的参数改成了应用密钥
csdn.bitbucket.languagepack.zh_CN
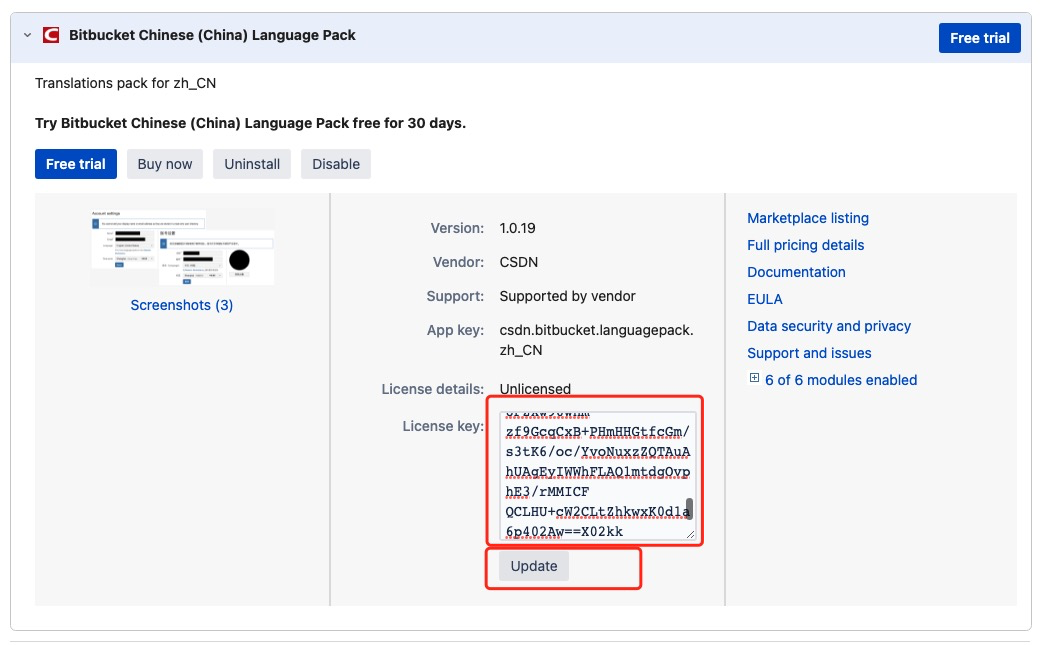
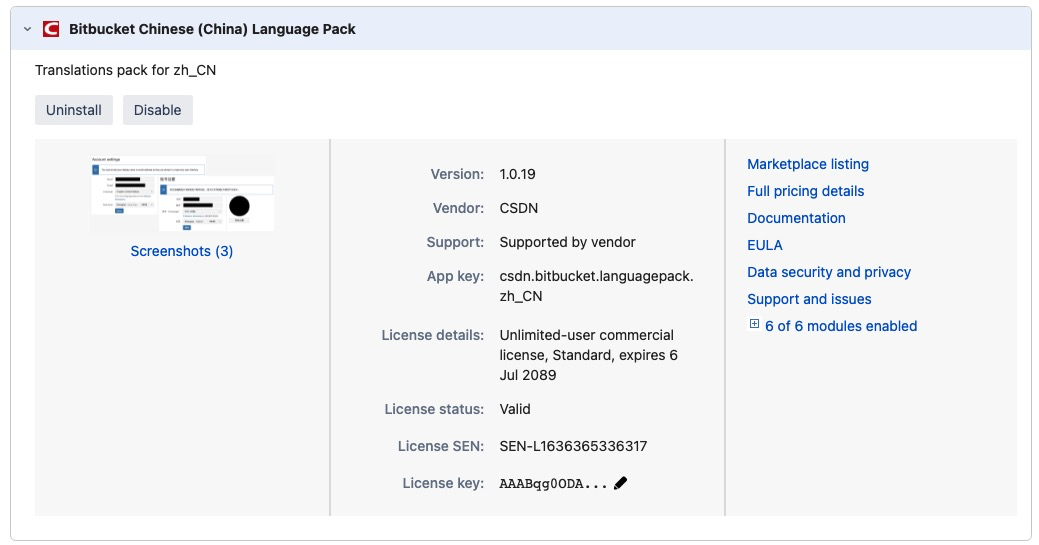
完美破解
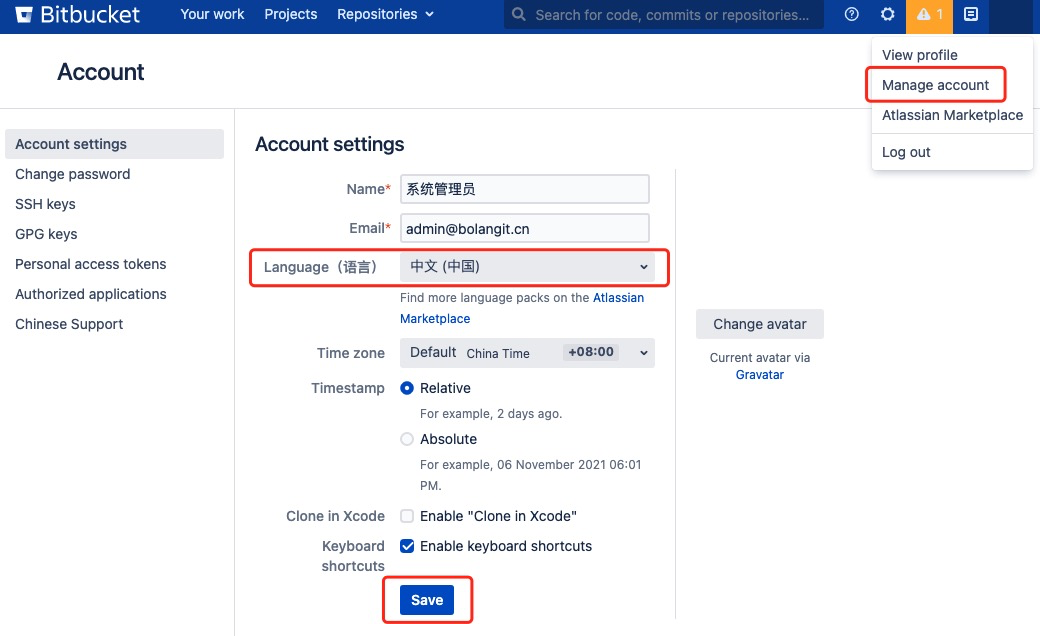
7.9.3.4、设置使用中文语言
配置路径:右上角-管理账号-账号设置
八、安装Bamboo
本文已安装
atlassian-bamboo-8.0.4.tar.gz为例
8.1、准备安装包
## 通过断点续传下载安装包
> wget -c https://product-downloads.atlassian.com/software/bamboo/downloads/atlassian-bamboo-8.0.4.tar.gz
## 解压安装包
> tar -zxvf atlassian-bamboo-8.0.4.tar.gz
> mv atlassian-bamboo-8.0.4/ /opt/atlassian/bamboo
# 创建独立安装账号
> useradd bamboo
> passwd bamboo
## 密码:968856.Xx
> su - bamboo
## 修改所有者为 bamboo 账号,并修改账号权限为775
> chown -R bamboo:root /opt/atlassian/bamboo/
> chmod -R 775 /opt/atlassian/bamboo/
8.2、修改服务端口
将默认端口8085修改为16664
## 修改配置文件
>  nano /opt/atlassian/bamboo/conf/server.xml
查找到8085修改为16664
重启生效
## 关闭 bamboo 服务
su bamboo /opt/atlassian/bamboo/bin/stop-bamboo.sh
## 启动 bamboo 服务
su bamboo /opt/atlassian/bamboo/bin/start-bamboo.sh
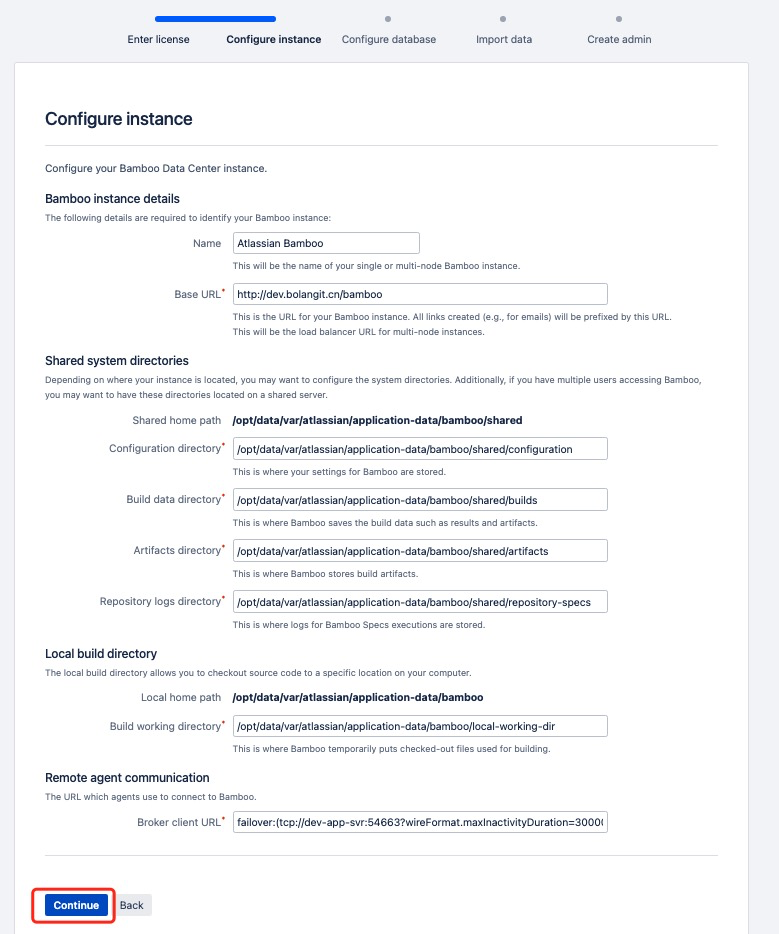
8.3、修改 Bamboo 的 Home 目录(数据存储目录)
## 修改配置文件
> nano /opt/atlassian/bamboo/atlassian-bamboo/WEB-INF/classes/bamboo-init.properties
## 添加如下信息
bamboo.home=/opt/data/var/atlassian/application-data/bamboo
重启生效
8.4、添加 MySQL 数据库驱动
这里使用的是mysql-connector-java-5.1.46.jar
## 将数据库驱动jar包复制到 bamboo 安装目录
> cp ./mysql-connector-java-5.1.46/*  /opt/atlassian/bamboo/atlassian-bamboo/WEB-INF/lib/
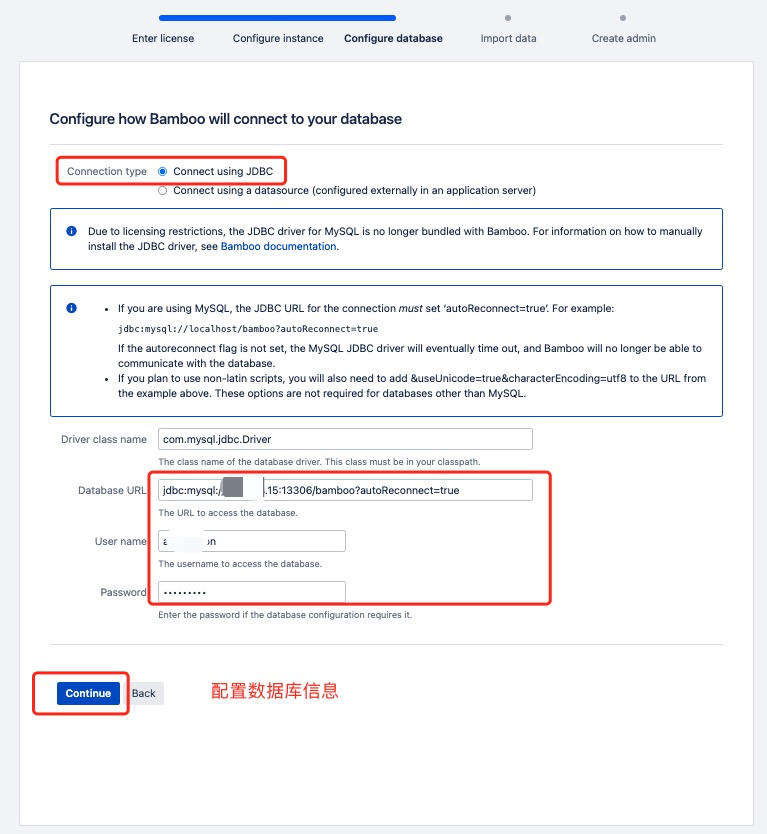
8.5、创建数据库
登入10.14.48.12 MySQL数据库
> mysql -u root -p
Enter password:
Welcome to the MySQL monitor.  Commands end with ; or \g.
Your MySQL connection id is 3943
Server version: 5.7.36 MySQL Community Server (GPL)

Copyright (c) 2000, 2021, Oracle and/or its affiliates.

Oracle is a registered trademark of Oracle Corporation and/or its
affiliates. Other names may be trademarks of their respective
owners.

Type 'help;' or '\h' for help. Type '\c' to clear the current input statement.

mysql>
创建 bamboo数据库
## 创建数据库
mysql> create database bamboo character set utf8 collate utf8_bin;
Query OK, 1 row affected (0.00 sec)

mysql>
数据库授权(之前已经授权了一个全局账号 application)
GRANT ALL PRIVILEGES ON *.* TO 'application'@'%' IDENTIFIED BY 'aBc!@#123' WITH GRANT OPTION;
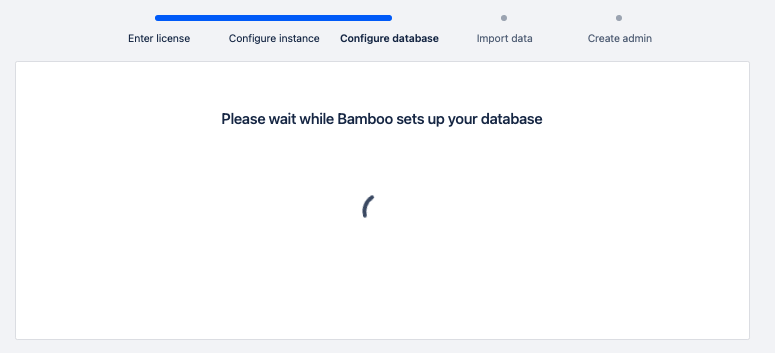
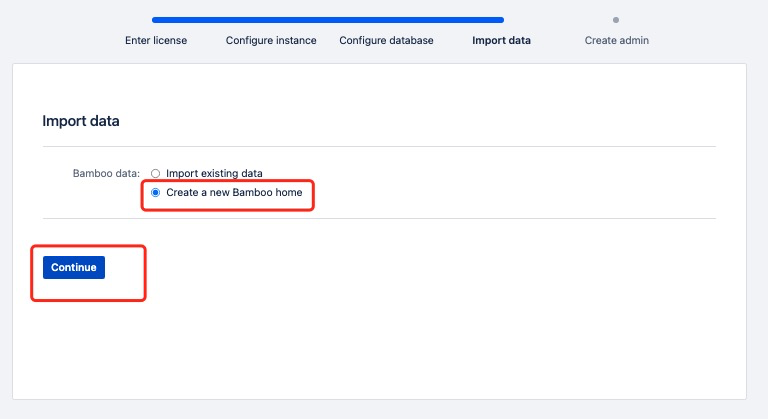
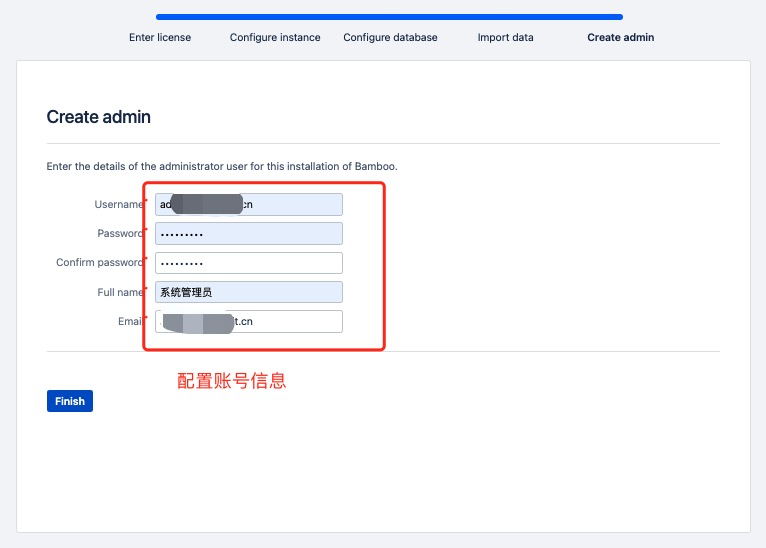
8.6、配置 Bamboo
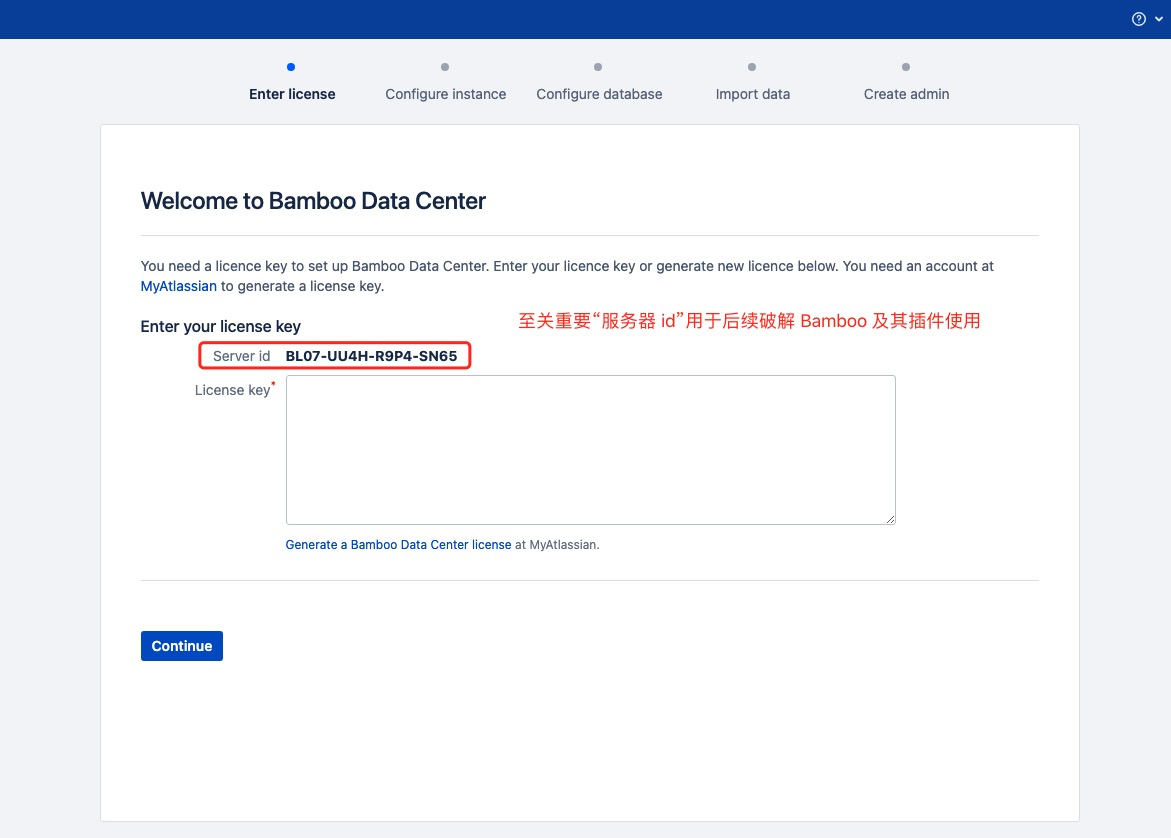
8.6.1、破解 Bamboo
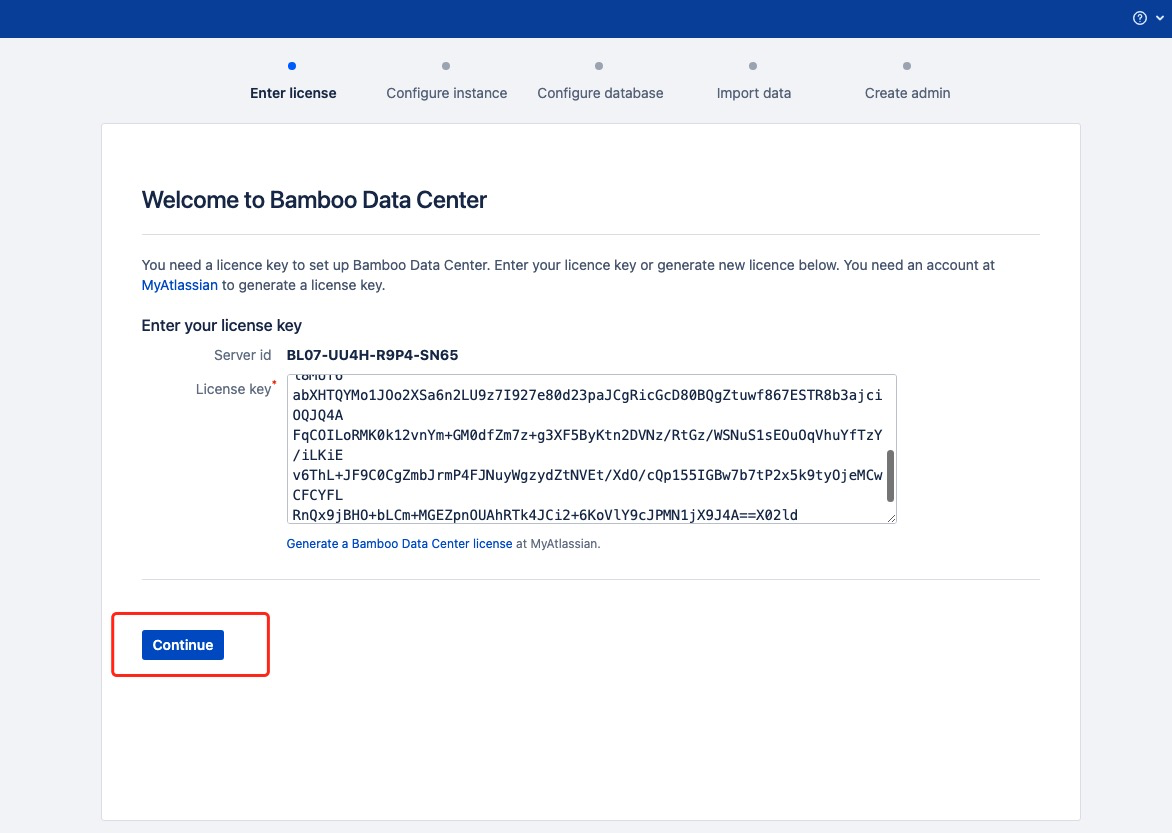
得到服务器 id BL07-UU4H-R9P4-SN65 后通过破解程序atlassian-agent.jar获取许可证信息
开始破解获取许可证信息
> java -jar /opt/atlassian-agent/atlassian-agent.jar -m admin@bolangit.cn -n bolangit.cn -p bamboo -o http://10.14.48.14:16664 -s BL07-UU4H-R9P4-SN65
得到如下信息
====================================================
=======     Atlassian Crack Agent v1.3.1     =======
=======           https://zhile.io           =======
=======          QQ Group: 30347511          =======
====================================================

Your license code(Don't copy this line!!!):

AAABvg0ODAoPeJx1UtuOmzAUfPdXIPUZFgMLJJKlclslFZA0l626b4acBLdgsrZz269fQojUVqlkW
fIceeacOfPlB2y0vD1qlqNhPMbPY9vXouVKs0wLo0gAVazlMVVAroiOsW45qKBN0bZGykrgElaXP
eS0ARLNsixZRNMgRcmR1of+L9nSWgKKQZaC7XtkzWvWMNUp1zcGrbholVJ7OX56+qhYDQZr0UzsK
GfyRnKtdkVsGtgxHL+7x9h1XQdFLVe0VElGWU3opmH8a9HWlO+YMkqOBoEJlRXJolP0EhZbmeFos
z2fv9XsTb2F8mUiAjdkWVB9P717H5zHr+tDwmZJ/uvnzvXfT9CWZkAI6jS4Ak55Ccl5z8Rl8MUf6
abXHTQYMo1JOo2XSa6n2LU9z7I927e80d23paJCgRicGcD80BQgZtuwf867ESTR8b3ajciOQJQ4A
FqCOILoRMK0k12vnYm+GM0dfZm7z+g3XF5ByKtn2DVNz/RtGz/WSNuS1sEOuOqVhuYfTzY/iLKiE
v6ThL+JF9C0CgZmbJrmP4FJNuyWgzydZtNVEt/XdO/cQp155IGBw7b7tP2x5k9tyOjeMCwCFCYFL
RnQx9jBHO+bLCm+MGEZpnOUAhRTk4JCi2+6KoVlY9cJPMN1jX9J4A==X02ld
8.6.2、验证破解情况
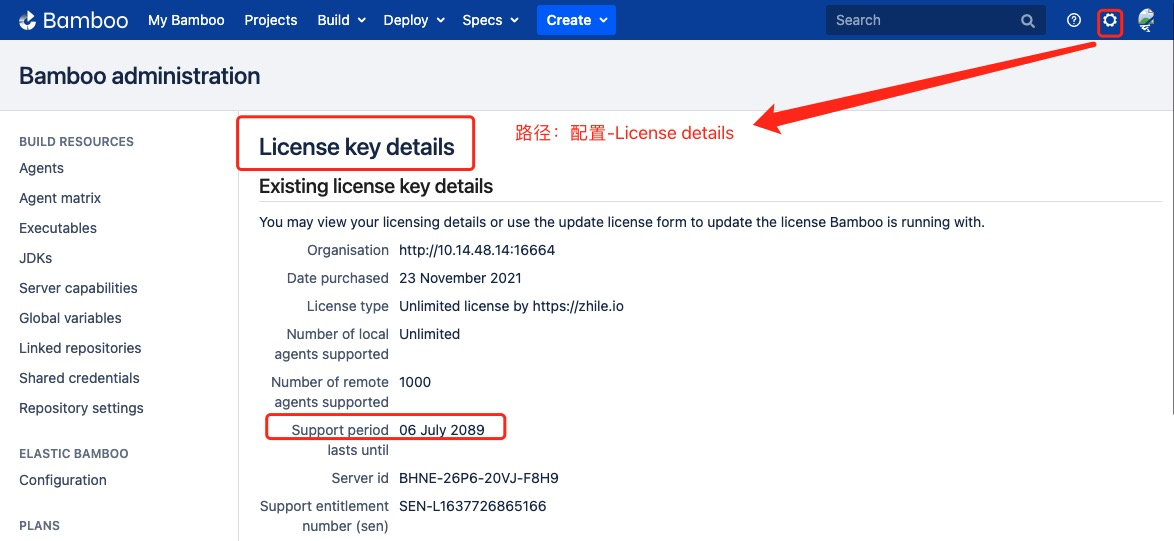
九、安装 Fisheye
本文已安装
fisheye-4.8.8.zip为例
9.1、准备安装包
## 通过断点续传下载安装包
> wget -c https://product-downloads.atlassian.com/software/fisheye/downloads/fisheye-4.8.8.zip
## 解压安装包
> unzip fisheye-4.8.8.zip
## 默认解压成fecru目录
> mv fecru-4.8.8/ /opt/atlassian/fecru
# 创建独立安装账号
> useradd fecru
> passwd fecru
## 密码:968856.Xx
> su - fecru
## 修改所有者为 bamboo 账号,并修改账号权限为775
> chown -R fecru:root /opt/atlassian/fecru/
> chmod -R 775 /opt/atlassian/fecru/
9.2、修改服务端口
将默认端口8060修改为16665
## 修改配置文件
>   nano /opt/atlassian/fecru/config.xml
查找到8060修改为16665
重启生效
## 关闭 fecru 服务
su fecru /opt/atlassian/fecru/bin/stop.sh
## 启动 fecru 服务
su fecru /opt/atlassian/fecru/bin/start.sh
9.3、修改 Fisheye的 Home 目录(数据存储目录)
## 修改配置文件
> nano /etc/profile
## 添加如下信息
# fisheye 数据目录配置
export FISHEYE_INST="/opt/data/var/atlassian/application-data/fecru"
export FISHEYE_HOME="/opt/atlassian/fecru"
## 重新加载环境变量
> source /etc/profile
## 重启生效
## 关闭 fecru 服务
su fecru /opt/atlassian/fecru/bin/stop.sh
## 启动 fecru 服务
su fecru /opt/atlassian/fecru/bin/start.sh
8.4、添加 MySQL 数据库驱动
这里使用的是mysql-connector-java-5.1.46.jar
## 将数据库驱动jar包复制到 bamboo 安装目录
> cp ./mysql-connector-java-5.1.46/*  /opt/atlassian/bamboo/atlassian-bamboo/WEB-INF/lib/
8.5、创建数据库
登入10.14.48.12 MySQL数据库
> mysql -u root -p
Enter password:
Welcome to the MySQL monitor.  Commands end with ; or \g.
Your MySQL connection id is 3943
Server version: 5.7.36 MySQL Community Server (GPL)

Copyright (c) 2000, 2021, Oracle and/or its affiliates.

Oracle is a registered trademark of Oracle Corporation and/or its
affiliates. Other names may be trademarks of their respective
owners.

Type 'help;' or '\h' for help. Type '\c' to clear the current input statement.

mysql>
创建 bamboo数据库
## 创建数据库
mysql> create database bamboo character set utf8 collate utf8_bin;
Query OK, 1 row affected (0.00 sec)

mysql>
数据库授权(之前已经授权了一个全局账号 application)
GRANT ALL PRIVILEGES ON *.* TO 'application'@'%' IDENTIFIED BY 'aBc!@#123' WITH GRANT OPTION;
9.6、配置 Fisheye
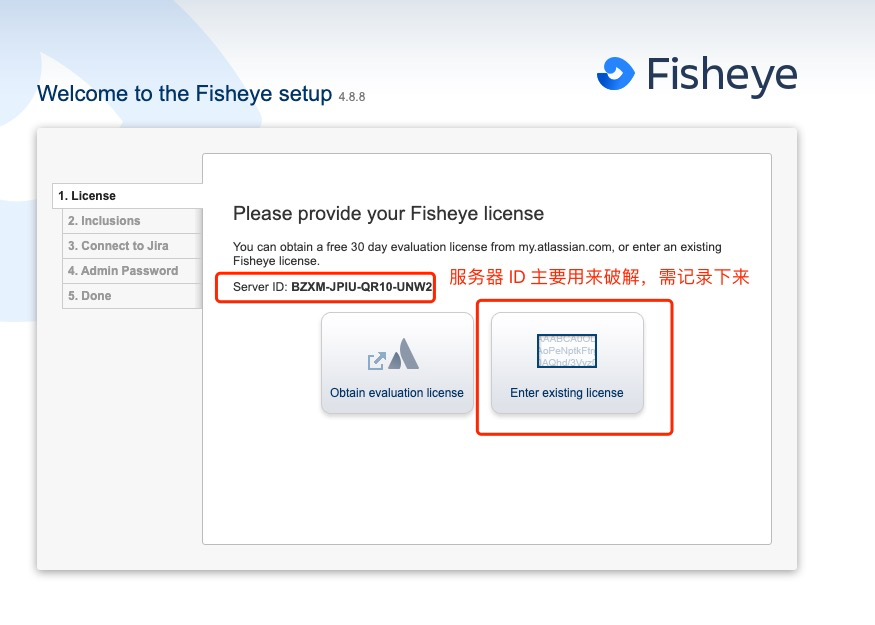
9.6.1、破解Fisheye
得到服务器 id BZXM-JPIU-QR10-UNW2 后通过破解程序atlassian-agent.jar获取许可证信息
开始破解获取许可证信息
> java -jar /opt/atlassian-agent/atlassian-agent.jar -m admin@bolangit.cn -n bolangit.cn -p fisheye -o http://10.14.48.14:16665 -s BZXM-JPIU-QR10-UNW2
得到如下信息
====================================================
=======     Atlassian Crack Agent v1.3.1     =======
=======           https://zhile.io           =======
=======          QQ Group: 30347511          =======
====================================================

Your license code(Don't copy this line!!!):

AAABmw0ODAoPeJxtUdFumzAUffdXIO2xgtiEOhDJ0lLCurRA0tC03d4cchO8EpPaho5+/UhKummqZ
PnhnnvvueecL0klrbRqLDewMB67wdijVpjdWy52CQoVcCMqOeUG2LFiE2K7AYoaXtYnhG15qQFNQ
edKHE6VlSzFXhjYWKXIQWqw1q1VGHPQ48HgrRAlOKJCc7XjUuj3JUe0Awl2iOd4fvePCaX0EoWVN
Dw3UcJFyfhmL+TXdVVyuRPGySXqCb5zXbAkfA2/TdybzW5h/Ovm+qXKcfLk3T7o7O1HZIJJsRyOd
rcXixf41Tz6KY3b+JI/54PauxJ3jKGOQxqQXOYQ/T4I1faq/cDGo+6h+J1tNmXxbJpFqR0TOvQJo
YFPPZ+grdAFtOBkhisDqrfmXO2n79sDpHwPLJwnSbQMZ5P4o6VTKhpgRtV/x9J6vwY13640KM1sg
jJQDajuiKufT4l9s5it7LslwfYqfXTRM7QPXd/RU0IxHmF/OCTnwz9XtahVXnAN/2fce3te56JOM
ftEdR/RSdM/2fwBptzB1jAtAhUAix2kQdAHYg78fFXccLEjszOXvNACFCmExYQ4EpO4AYs3bFtaL
PxJTu/EX02jr
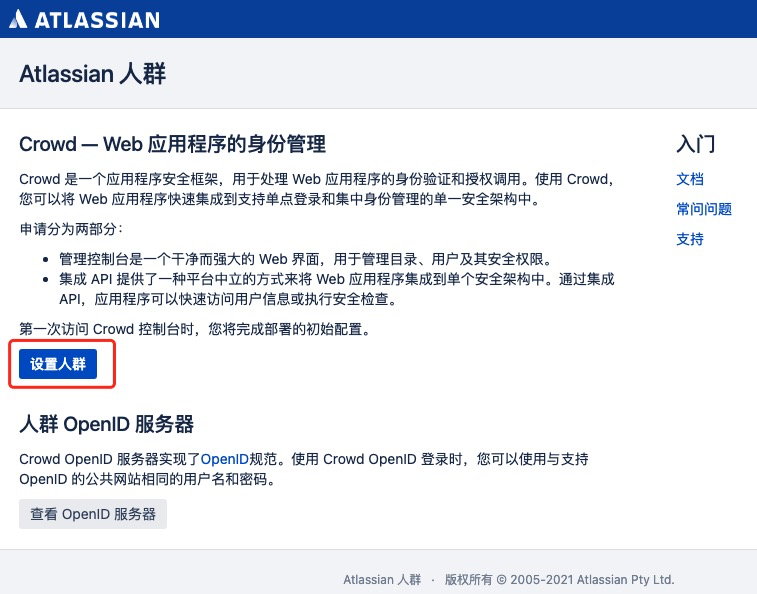
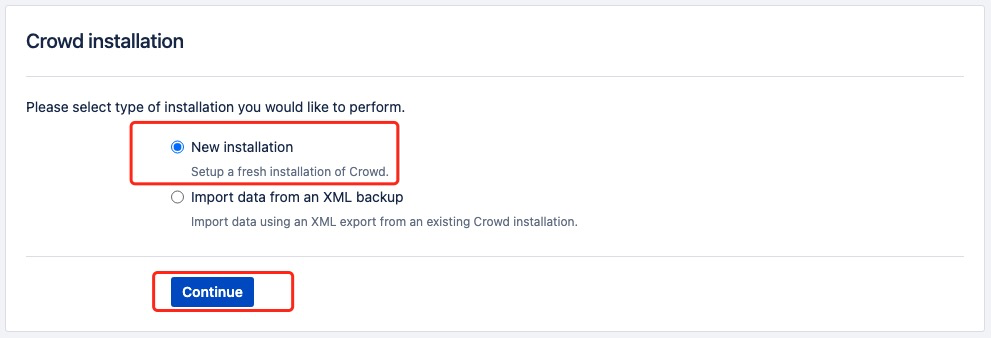
九、安装 Crowd
本文已安装
atlassian-crowd-4.3.5.tar.gz为例
9.1、准备安装包
## 通过断点续传下载安装包
> wget -c https://product-downloads.atlassian.com/software/crowd/downloads/atlassian-crowd-4.3.5.tar.gz
## 解压安装包
> tar -zxvf atlassian-crowd-4.3.5.tar.gz
> mv atlassian-crowd-4.3.5/ /opt/atlassian/crowd
# 创建独立安装账号
> useradd crowd
> passwd crowd
## 密码:968856.Xx
> su - crowd
## 修改所有者为 crowd 账号,并修改账号权限为775
> chown -R crowd:root /opt/atlassian/crowd/
> chmod -R 775 /opt/atlassian/crowd/
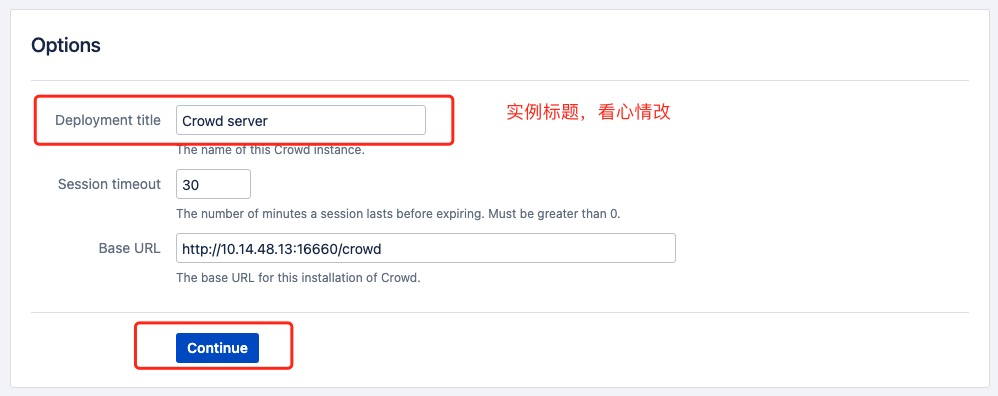
9.2、修改服务端口
将默认端口8095修改为16660
## 修改配置文件
>  nano /opt/atlassian/crowd/apache-tomcat/conf/server.xml
查找到8095修改为16660
重启生效
## 关闭 Crowd 服务
> su crowd  /opt/atlassian/crowd/stop_crowd.sh
## 启动 Crowd 服务
> su crowd  /opt/atlassian/crowd/start_crowd.sh
9.3、修改 Crowd 的 Home 目录(数据存储目录)
## 修改配置文件
> nano /opt/atlassian/crowd/crowd-webapp/WEB-INF/classes/crowd-init.properties
## crowd.home=/opt/data/var/atlassian/application-data/crowd
crowd.home=/opt/data/var/atlassian/application-data/crowd
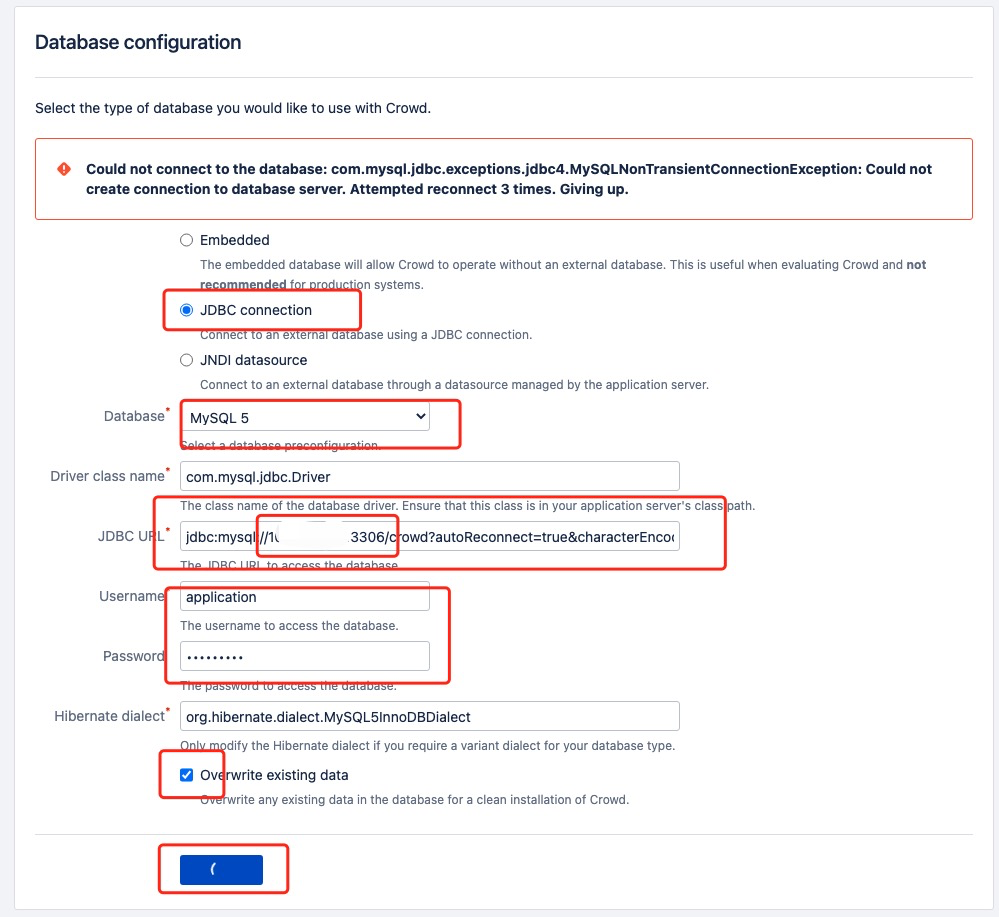
9.4、添加 MySQL 数据库驱动
这里使用的是mysql-connector-java-5.1.46.jar
## 将数据库驱动jar包复制到 crowd 安装目录
> cp ./mysql-connector-java-5.1.46/*  /opt/atlassian/crowd/apache-tomcat/lib/
9.5、创建数据库
登入10.14.48.12 MySQL数据库
> mysql -u root -p
Enter password:
Welcome to the MySQL monitor.  Commands end with ; or \g.
Your MySQL connection id is 3943
Server version: 5.7.36 MySQL Community Server (GPL)

Copyright (c) 2000, 2021, Oracle and/or its affiliates.

Oracle is a registered trademark of Oracle Corporation and/or its
affiliates. Other names may be trademarks of their respective
owners.

Type 'help;' or '\h' for help. Type '\c' to clear the current input statement.

mysql>
创建 crowd数据库
## 创建数据库
mysql> create database crowd character set utf8mb4 collate utf8mb4_bin;
Query OK, 1 row affected (0.00 sec)

mysql>
数据库授权(之前已经授权了一个全局账号 application)
GRANT ALL PRIVILEGES ON *.* TO 'application'@'%' IDENTIFIED BY 'aBc!@#123' WITH GRANT OPTION;
9.6、配置 Crowd
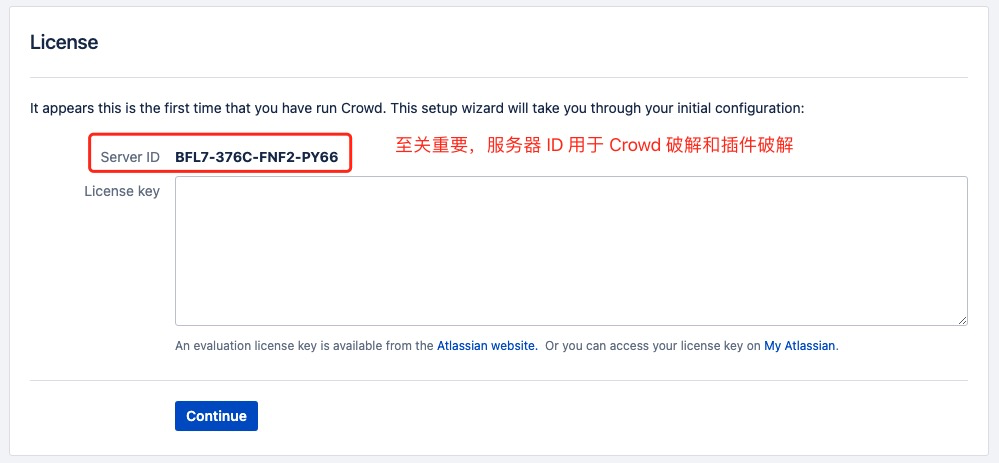
9.6.1、破解 Crowd
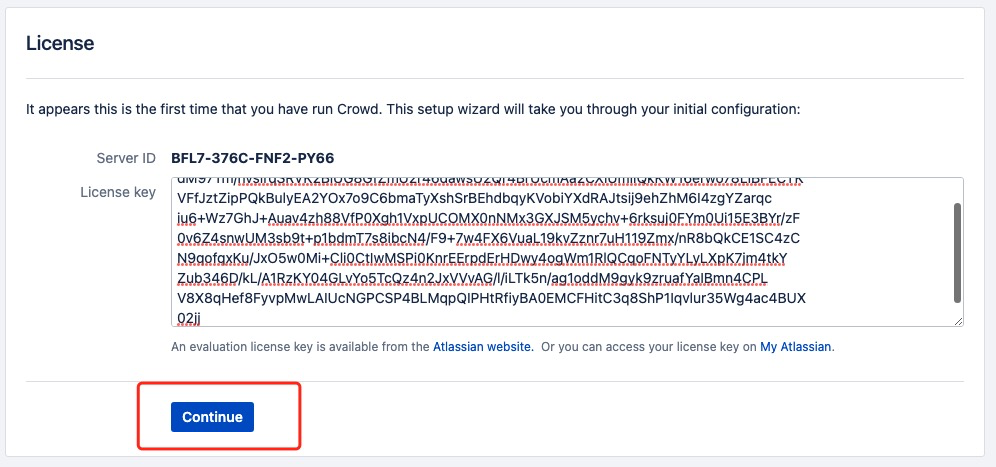
得到服务器 id BFL7-376C-FNF2-PY66 后通过破解程序atlassian-agent.jar获取许可证信息
开始破解获取许可证信息
> java -jar /opt/atlassian-agent/atlassian-agent.jar -d -m admin@bolangit.cn -n bolangit.cn -p crowd -o http://10.14.48.13:16660 -s BFL7-376C-FNF2-PY66
注意:加上参数-d这注册的才是数据中心版本,才能启用单点登入。
得到如下信息
====================================================
=======     Atlassian Crack Agent v1.3.1     =======
=======           https://zhile.io           =======
=======          QQ Group: 30347511          =======
====================================================

Your license code(Don't copy this line!!!):

AAABlg0ODAoPeJxtkV+PojAUxd/7KUj2cQK2dATGpMmOgNEsoDvo/nurcJVmsTClwjCfflExmWwm6
dM97Tm/nvslrqSRVK2BiUG8GfZmU2r46dawsU2Qr4BrUcmAa2CXiUmIiQkKW16erwo78LIBFECTK
VFfJztZipPQkBulyEA2YOx7o9C6bmaTyXshSrBEhdbqyKVobiYXdRAJtsij9ehZhM6I4zgYZarqc
iu6+Wz7GhJ+Auav4zh88VfP0Xgh1VxpUCOMX0nNMx3GXJSM5ychv+6rksuj0FYm0Ui15E3BYr/zF
0v6Z4snwUM3sb9t+p1bdmT7s8ibcN4/F9+7w4FX6VuaL19kvZznr7uH119Zmx/nR8bQkCE1SC4zC
N9qofqxKu/JxO5w0Mi+Cli0CtIwMSPi0KnrEErpdErHDwy4ogWm1RlQCqoFNTyYLyLXpK7jm4tkY
Zub346D/kL/A1RzKY04GLvYo5TcQz4n2JxVVvAG/l/iLTk5n/ag1oddM9gyk9zruafYaIBmn4CPL
V8X8qHef8FyvpMwLAIUcNGPCSP4BLMqpQIPHtRfiyBA0EMCFHitC3q8ShP1Iqvlur35Wg4ac4BUX
02jj
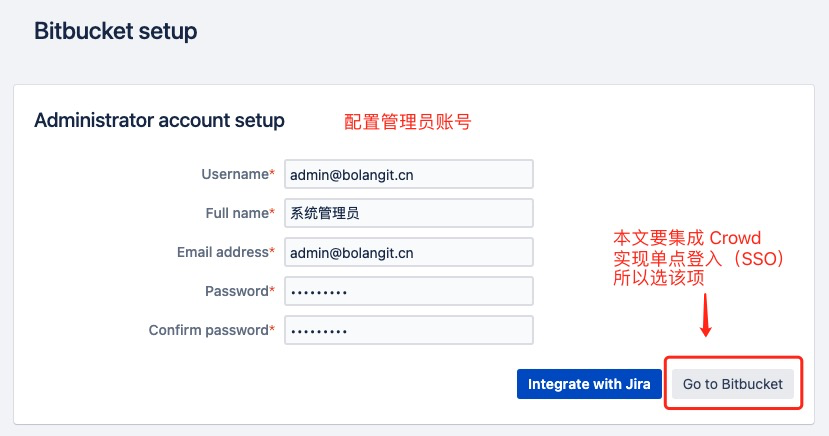
安装完 Crowd 就可以依次在里面创建 用户目录、用户组、用户账号和应用程序,并与 atlassian 家族产品进行单点(SSO)登入集成。
更多Crowd配置参见第11.2.1章节
十、安装 Nginx
本文已在 10.14.48.13 服务器上安装 Nginx V1.19.8 版本为例
10.1、准备安装包
## 下载nginx-1.19.8.tar.gz
> wget -c http://nginx.org/download/nginx-1.19.8.tar.gz
## 解压到/tmp 目录
> tar -zxvf ./nginx-1.19.8.tar.gz  -C /tmp/
## 修改执行权限
> chmod +x /tmp/nginx-1.19.8/
10.2、安装 nginx
## 安装环境依赖
> yum install -y gcc pcre pcre-devel openssl openssl-devel gd gd-devel
## 编译安装nginx  安装路径设置成/usr/local/nginx,启用 SSL 模块
> ./configure --prefix=/usr/local/nginx --with-http_stub_status_module --with-http_ssl_module
> make
> make install
## 创建并设置nginx运行账号
> groupadd nginx
> useradd -M -g nginx -s /sbin/nologin nginx
## 修改配置加入运行账号
> nano /usr/local/nginx/conf/nginx.conf
## /usr/local/nginx/conf/nginx.conf 添加 user nginx nginx;
# user  nobody;
user nginx nginx;
## 添加开机起启动
## 添加启动服务文件  nano /usr/lib/systemd/system/nginx.service
> nano /usr/lib/systemd/system/nginx.service
##  /usr/lib/systemd/system/nginx.service
[Unit]
Description=nginx
After=network.target
[Service]
Type=forking
ExecStart=/usr/local/nginx/sbin/nginx
ExecReload=/usr/local/nginx/sbin/nginx -s reload
ExecStop=/usr/local/nginx/sbin/nginx -s stop
PrivateTmp=true
[Install]
WantedBy=multi-user.target
## 设置开机启动
> systemctl enable nginx.service
10.3、nginx 常用命令
## 启动
> systemctl start nginx
# 或
> /usr/local/nginx/sbin/nginx
## 停止
> systemctl stop nginx
# 或
> /usr/local/nginx/sbin/nginx -s stop
## 重启
> systemctl restart nginx.service
# 或
> /usr/local/nginx/sbin/nginx -s reload
## 查看运行状态
> systemctl status nginx
10.4、添加模块
这里已添加 SSL 为例,如果一开始忘了安装 ssl 可以参照如下形式安装。
## 进入 Nginx 安装包目录配置 ssl模块
> ./configure --with-http_stub_status_module --with-http_ssl_module
## 编译(注意不要执行  make install  否着会覆盖安装)
> make
## 备份 nginx 执行程序
> cp /usr/local/nginx/sbin/nginx  /usr/local/nginx/sbin/nginx.bak
## 复制 模块  覆盖原有版本
> cp -rfp objs/nginx /usr/local/nginx/sbin/nginx
## 验证 配置
> /usr/local/nginx/sbin/nginx -t
## 重启
> /usr/local/nginx/sbin/nginx -s reload
10.4、配置 SSL 证书
可以通过阿里云等第三方平台申请免费域名证书,免费证书有效期为1年,到期需要再次手动申请替换。
server {
    listen 80;
    #需要将dev.eulei.vip替换成证书绑定的域名。
    server_name dev.eulei.vip;
    #将所有HTTP请求通过rewrite指令重定向到HTTPS。
    rewrite ^(.*)$ https://$host$1;
    location / {
        index index.html index.htm;
    }
}


  server {
        listen       443;
        server_name  dev.eulei.vip;
        ssl          on;
        #配置HTTPS的默认访问端口为443。
        #如果未在此处配置HTTPS的默认访问端口,可能会造成Nginx无法启动。
        #如果您使用Nginx 1.15.0及以上版本,请使用listen 443 ssl代替listen 443和ssl on。
        #需要将cert-file-name.pem替换成已上传的证书文件的名称。
        ssl_certificate  /usr/local/nginx/conf/cert/6670613_dev.eulei.vip.pem;
        #需要将cert-file-name.key替换成已上传的证书私钥文件的名称。
        ssl_certificate_key /usr/local/nginx/conf/cert/6670613_dev.eulei.vip.key;
        ssl_session_timeout 5m;
        ssl_ciphers ECDHE-RSA-AES128-GCM-SHA256:ECDHE:ECDH:AES:HIGH:!NULL:!aNULL:!MD5:!ADH:!RC4;
        #表示使用的加密套件的类型。
        ssl_protocols TLSv1 TLSv1.1 TLSv1.2; #表示使用的TLS协议的类型。
        ssl_prefer_server_ciphers on;

        #charset koi8-r;
        #access_log  logs/host.access.log  main;
        # jira 的 nginx 设置,其他类似
        location ^~ /crowd {
                proxy_pass http://10.14.48.13:16660/crowd;

                sendfile off;
                proxy_set_header   Host             $host:$server_port;
                proxy_set_header   X-Real-IP        $remote_addr;
                proxy_set_header   X-Forwarded-For  $proxy_add_x_forwarded_for;
                proxy_max_temp_file_size 0;

                # This is the maximum upload size
                client_max_body_size       10m;
                client_body_buffer_size    128k;

                proxy_connect_timeout      90;
                proxy_send_timeout         90;
                proxy_read_timeout         90;
                proxy_temp_file_write_size 64k;

                # Required for new HTTP-based CLI
                proxy_http_version 1.1;
                proxy_request_buffering off;
                proxy_buffering off;
                # Required for HTTP-based CLI to work over SSL
        }
        location ^~ /crowd/*.*\.(js|css)$ {
                proxy_pass http://10.14.48.13:16660/crowd;
        }

        #error_page  404              /404.html;
        # redirect server error pages to the static page /50x.html
        #
        error_page   500 502 503 504  /50x.html;
        location = /50x.html {
            root   html;
        }
}
十一、Crowd 与Jira、Confluence、Bitbucket、Bamboo 集成
11.1、配置 context-path统一根域名
默认安装好的 Atlassian 各应用是这样的:
- Crowd:http://ip:8095/crowd
- JIRA:http://ip:8080
- Confluence:http://ip:8090
- Bitbucket:http://ip:7990
- Bamboo:http://ip:8085
本文修改过各个端口
- Crowd:http://ip:16660/crowd
- JIRA:http://ip:16661
- Confluence:http://ip:16662
- Bitbucket:http://ip:16663
- Bamboo:http://ip:16664
为了快捷访问,需要设置 Atlassian 各应用的访问地址为统一规范,如下:
域名dev.eulei,vip是本文作者自己的测试域名,用来解析替代 Ip+端口
- Crowd:http://dev.eulei.vip/crowd
- JIRA:http://dev.eulei.vip/jira
- Confluence:http://dev.eulei.vip/confluence
- Bitbucket:http://dev.eulei.vip/bitbucket
- Bamboo:http://dev.eulei.vip/bamboo
方案
- 设置各应用的 context-path 为 "/"+"应用名"
- 使用 nginx 代理,使 www.xxx.com/xxx 分别指向 http://ip:port/xxx
配置 Nginx
> nano /usr/local/nginx/conf/nginx.conf
#user  nobody;
user nginx nginx;
worker_processes  8;
worker_cpu_affinity 00000001 00000010 00000100 00001000 00010000 00100000 01000000 10000000;
#error_log  logs/error.log;
#error_log  logs/error.log  notice;
#error_log  logs/error.log  info;

#pid        logs/nginx.pid;

#Just for Test,if it doesn't work
#受到/proc/sys/fs/file-max这个影响,通过ulimit -n查看,或直接使用ulimit -n 65535修改
worker_rlimit_nofile 65535;

events {
     use epoll;
     worker_connections 65535;
}


http {
    include       mime.types;
    default_type  application/octet-stream;


    #根据系统执行getconf PAGESIZE的值来设置
    client_header_buffer_size 4k;

    open_file_cache max=65535 inactive=60s;
    open_file_cache_min_uses 1;
    open_file_cache_valid 60s;


    #log_format  main  '$remote_addr - $remote_user [$time_local] "$request" '
    #                  '$status $body_bytes_sent "$http_referer" '
    #                  '"$http_user_agent" "$http_x_forwarded_for"';

    #access_log  logs/access.log  main;

    sendfile        on;
    #等到数据包最大一次性的传输出去,这样有助于解决网络堵塞
    tcp_nopush     on;
    tcp_nodelay on;
    server_tokens off;
    #keepalive_timeout  0;

        #这个时间根据你们测试结果设置,如果过大会导致许多无效的http连接占据着nginx的连接数引起崩溃
    keepalive_timeout  60;

    gzip on;
    gzip_min_length 1k;
    gzip_buffers 4 16k;
    gzip_http_version 1.1;
    gzip_comp_level 9;
    gzip_types  text/css text/xml application/javascript;
    gzip_vary off;


    include vhost/atlassian.conf;
}
mkdir /usr/local/nginx/conf/vhost
chmod -R 775 /usr/local/nginx/conf/vhost
nano /usr/local/nginx/conf/vhost/atlassian.config
 server {
        listen       80;
        server_name  dev.eulei.vip;
        #root  /opt/gwc/vue_manager;
        #charset koi8-r;
        #access_log  logs/host.access.log  main;
        # jira 的 nginx 设置,其他类似
        location ^~ /jira {
                proxy_pass http://10.14.48.13:16662/jira;

                sendfile off;
                proxy_set_header   Host             $host:$server_port;
                proxy_set_header   X-Real-IP        $remote_addr;
                proxy_set_header   X-Forwarded-For  $proxy_add_x_forwarded_for;
                proxy_max_temp_file_size 0;

                # This is the maximum upload size
                client_max_body_size       10m;
                client_body_buffer_size    128k;

                proxy_connect_timeout      90;
                proxy_send_timeout         90;
                proxy_read_timeout         90;
                proxy_temp_file_write_size 64k;

                # Required for new HTTP-based CLI
                proxy_http_version 1.1;
                proxy_request_buffering off;
                proxy_buffering off;
                # Required for HTTP-based CLI to work over SSL
        }


        #error_page  404              /404.html;
        # redirect server error pages to the static page /50x.html
        #
        error_page   500 502 503 504  /50x.html;
        location = /50x.html {
            root   html;
        }
}
11.1.1、配置 Jira context-path
## 编辑/opt/atlassian/jira/conf/server.xml配置文件
> nano /opt/atlassian/jira/conf/server.xml
## 找到如下内容,将 path="" 改为path="/jira"
<Context path="/jira" docBase="${catalina.home}/atlassian-jira" reloadable="false" useHttpOnly="true">
   <Resource name="UserTransaction" auth="Container" type="javax.transaction.UserTransaction"
                              factory="org.objectweb.jotm.UserTransactionFactory" jotm.timeout="60"/>
   <Manager pathname=""/>
   <JarScanner scanManifest="false"/>
   <Valve className="org.apache.catalina.valves.StuckThreadDetectionValve" threshold="120" />
</Context>
## 重启生效
>/etc/init.d/jira stop
>/etc/init.d/jira start
11.1.1.1、通过Nginx ssl反向代理 Jira
## 打开以下配置,原有配置修改port端口,用来调试使用,等调试正常后再关闭
<Connector port="16661"
relaxedPathChars="[]|"
relaxedQueryChars="[]|{}^\`"<>"
maxThreads="150"
minSpareThreads="25"
connectionTimeout="20000"
enableLookups="false"
maxHttpHeaderSize="8192"
protocol="HTTP/1.1"
useBodyEncodingForURI="true"
redirectPort="8443"
acceptCount="100"
disableUploadTimeout="true"
bindOnInit="false"
secure="true" <-- 通过 Nginx ssl 反向代理多出来的配置项
scheme="https" <-- 通过 Nginx ssl 反向代理多出来的配置项
proxyName="dev.eulei.vip" <-- 通过 Nginx ssl 反向代理多出来的配置项
proxyPort="443" <-- 通过 Nginx ssl 反向代理多出来的配置项
/>
11.1.2、配置 Confluence context-path
## 编辑/opt/atlassian/confluence/conf/server.xml配置文件
> nano /opt/atlassian/confluence/conf/server.xml
## 找到如下内容,将 path="" 改为path="/confluence"
<Context path="/confluence" docBase="../confluence" debug="0" reloadable="false" useHttpOnly="true">
<!-- Logging configuration for Confluence is specified in confluence/WEB-INF/classes/log4j.properties -->
	<Manager pathname=""/>
	<Valve className="org.apache.catalina.valves.StuckThreadDetectionValve" threshold="60"/>

	<!-- http://tomcat.apache.org/tomcat-9.0-doc/config/valve.html#Access_Log_Valve -->
	<Valve className="org.apache.catalina.valves.AccessLogValve"
                           directory="logs"
                           maxDays="30"
                           pattern="%t %{X-AUSERNAME}o %I %h %r %s %Dms %b %{Referer}i %{User-Agent}i"
                           prefix="conf_access_log"
                           requestAttributesEnabled="true"
                           rotatable="true"
                           suffix=".log"
	/>

	<!-- http://tomcat.apache.org/tomcat-9.0-doc/config/valve.html#Remote_IP_Valve -->
	<Valve className="org.apache.catalina.valves.RemoteIpValve" />
</Context>
## 重启生效
>/etc/init.d/confluence restart
11.1.2.1、通过 Nginx ssl反向代理Confluence
如果使用了 nginx 做了反向代理,还需调整 /opt/atlassian/confluence/conf/server.xml 文件
## /opt/atlassian/confluence/conf/server.xml
## 关闭原有连接器,使用如下连接器,取消如下注释,注意proxyName配置要和 nginx 上的域名配置一致
        <Connector port="16662"
        			connectionTimeout="20000"
        			redirectPort="8443"
        			maxThreads="48"
        			minSpareThreads="10"
                   enableLookups="false"
                   acceptCount="10" debug="0"
                   URIEncoding="UTF-8"
                   protocol="org.apache.coyote.http11.Http11NioProtocol"
                   scheme="https"  				<-- 通过 Nginx ssl 反向代理需要添加的配置项
                   secure="true"  				<-- 通过 Nginx ssl 反向代理需要添加的配置项
                   proxyName="dev.eulei.vip"    <-- 通过 Nginx ssl 反向代理需要添加的配置项
                   proxyPort="443"              <-- 通过 Nginx ssl 反向代理需要添加的配置项
                   />

##  可以将原有配置复制一份,修改port端口,用来调试使用,等调试正常后再关闭
11.1.3、配置 Bitbucket context-path
# bitbucket.properties
> echo "server.context-path=/bitbucket" >>  /opt/data/var/atlassian/application-data/bitbucket/shared/bitbucket.properties

# 重启生效
> /etc/init.d/atlbitbucket restart
11.1.3.1、通过 Nginx ssl反向代理Bitbucket
bitbucket 反向代理还需要对 Nginx 进行重定向配置
##  nano /usr/local/nginx/conf/vhost/atlassian.conf
		location ^~ /bitbucket {
                proxy_pass http://10.14.48.13:16663/bitbucket;
                sendfile off;
                proxy_set_header   Host             $host:$server_port;
                proxy_set_header   X-Real-IP        $remote_addr;
                proxy_set_header   X-Forwarded-For  $proxy_add_x_forwarded_for;
                ## nginx https 代理  springboot 的 http  需额外配置以下3行
                proxy_set_header   X-Forwarded-Proto   $scheme;
                proxy_set_header   X-Forwarded-Port   $server_port;
                proxy_redirect off

                proxy_max_temp_file_size 0;
                # This is the maximum upload size
                client_max_body_size       50m;
                client_body_buffer_size    128k;
                proxy_connect_timeout      90;
                proxy_send_timeout         90;
                proxy_read_timeout         90;
                proxy_temp_file_write_size 64k;
                # Required for new HTTP-based CLI
                proxy_http_version 1.1;
                proxy_request_buffering off;
                proxy_buffering off;
                # Required for HTTP-based CLI to work over SSL
        }
## 编辑 /opt/data/var/atlassian/application-data/bitbucket/shared/bitbucket.properties 配置代理信息
> nano /opt/data/var/atlassian/application-data/bitbucket/shared/bitbucket.properties
## /opt/data/var/atlassian/application-data/bitbucket/shared/bitbucket.properties
## 末端添加如下信息
server.secure=true
server.scheme=https
server.proxy-port=443
## 域名要和 nginx 设置的域名一致
server.proxy-name=dev.eulei.vip
11.1.4、配置 Bamboo context-path
# server.xml,在 Context 标签中添加 path="/bamboo"
> nano /opt/atlassian/bamboo/conf/server.xml
## 找到如下内容,将 path="" 改为path="/bamboo"
<Context path="/bamboo" docBase="${catalina.home}/atlassian-bamboo" reloadable="false" useHttpOnly="true">
	<!--<Resource name="UserTransaction" auth="Container" type="javax.transaction.UserTransaction"-->
	<!--factory="org.objectweb.jotm.UserTransactionFactory" jotm.timeout="60"/>-->
	<Manager pathname=""/>
</Context>
## 重启生效
## 关闭 bamboo 服务
su bamboo /opt/atlassian/bamboo/bin/stop-bamboo.sh
## 启动 bamboo 服务
su bamboo /opt/atlassian/bamboo/bin/start-bamboo.sh
11.1.4.1、通过 Nginx ssl反向代理Bamboo
如果使用了 nginx 做了反向代理,还需调整 /opt/atlassian/bamboo/conf/server.xml 文件
# server.xml,取消包含有scheme="https"的Connector配置的注释
> nano /opt/atlassian/bamboo/conf/server.xml
##  取消以下内容的注释,修改 proxyName 值为"dev.bolangit.cn" 与 nginx 配置的域名一致
            <Connector
                port="16664"
                protocol="HTTP/1.1"
                maxThreads="150" minSpareThreads="25"
                connectionTimeout="20000"
                disableUploadTimeout="true"
                acceptCount="100"
                enableLookups="false"
                maxHttpHeaderSize="8192"
                useBodyEncodingForURI="true"
                URIEncoding="UTF-8"
                proxyName="dev.bolangit.cn"         <-- 通过 Nginx ssl 反向代理需要添加的配置项
                proxyPort="443"                     <-- 通过 Nginx ssl 反向代理需要添加的配置项
                scheme="https"                      <-- 通过 Nginx ssl 反向代理需要添加的配置项
                redirectPort="8443">
            <UpgradeProtocol className="org.apache.coyote.http2.Http2Protocol" />
        </Connector>

##  可以修改原有配置port端口,用来调试使用,等调试正常后再关闭
11.1.5、配置 Crowd context-path
Crowd 默认已经配置了 context-path,无需修改
11.1.5.1、通过 Nginx ssl反向代理Crowd
## 修改配置文件
>  nano /opt/atlassian/crowd/apache-tomcat/conf/server.xml
## nano /opt/atlassian/crowd/apache-tomcat/conf/server.xml
## 打开一下配置的注释
        <Connector acceptCount="100"
                   connectionTimeout="20000"
                   disableUploadTimeout="true"
                   enableLookups="false"
                   maxHttpHeaderSize="8192"
                   maxThreads="150"
                   minSpareThreads="25"
                   port="16660"
                   redirectPort="8443"
                   useBodyEncodingForURI="true"
                   URIEncoding="UTF-8"
                   proxyName="dev.eulei.vip"
                   proxyPort="443"        <-- 通过 Nginx ssl 反向代理需要添加的配置项
                   scheme="https"         <-- 通过 Nginx ssl 反向代理需要添加的配置项
                   compression="on"       <-- 通过 Nginx ssl 反向代理需要添加的配置项
                   sendReasonPhrase="true"                 compressableMimeType="text/html,text/xml,application/xml,text/plain,text/css,application/json,application/javascript,application/x-javascript" />

 ## 复制原有配置,并将端口设置成26660等其他端口,用来调试异常的时候使用,测试成功后可关闭。
 <Connector acceptCount="100"
                   connectionTimeout="20000"
                   disableUploadTimeout="true"
                   enableLookups="false"
                   maxHttpHeaderSize="8192"
                   maxThreads="150"
                   minSpareThreads="25"
                   port="26660"
                   redirectPort="8443"
                   useBodyEncodingForURI="true"
                   URIEncoding="UTF-8"
                   compression="on"
                   sendReasonPhrase="true"        		 compressableMimeType="text/html,text/xml,application/xml,text/plain,text/css,application/json,application/javascript,application/x-javascript" />
## 重启生效
## 关闭 Crowd 服务
> su crowd  /opt/atlassian/crowd/stop_crowd.sh
## 启动 Crowd 服务
> su crowd  /opt/atlassian/crowd/start_crowd.sh
11.1.6、配置 Fisheye context-path
# config.xml,在 web-server 标签中添加 context="fisheye" site-url="http://localhost:16665/fisheye"
> nano /opt/atlassian/fecru/config.xml
## 找到如下内容,在 web-server 标签中添加 context="fisheye" site-url="http://localhost:16665/fisheye"
    <web-server context="fisheye" site-url="http://localhost:16665/fisheye">
        <http bind=":16665"/>
    </web-server>
## 重启生效
## 关闭 fecru 服务
su fecru /opt/atlassian/fecru/bin/stop.sh
## 启动 fecru 服务
su fecru /opt/atlassian/fecru/bin/start.sh
11.2、单点登入(SSO)配置
单点登录(SSO)最好有域名支持,也就是说,在配置sso之前,各应用系统已配置好相应的域名。
11.2.1、Crowd 设置
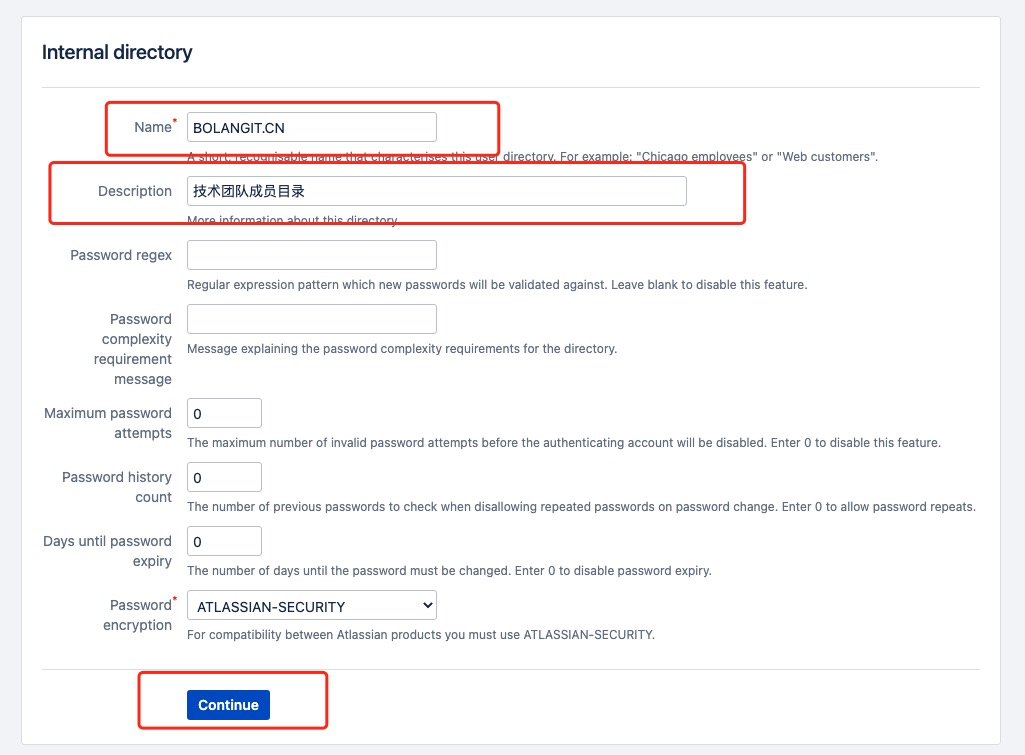
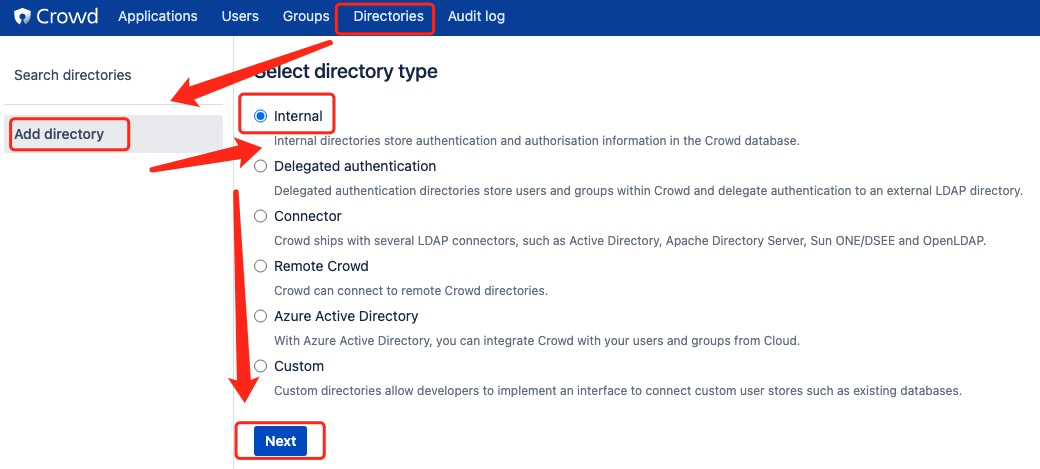
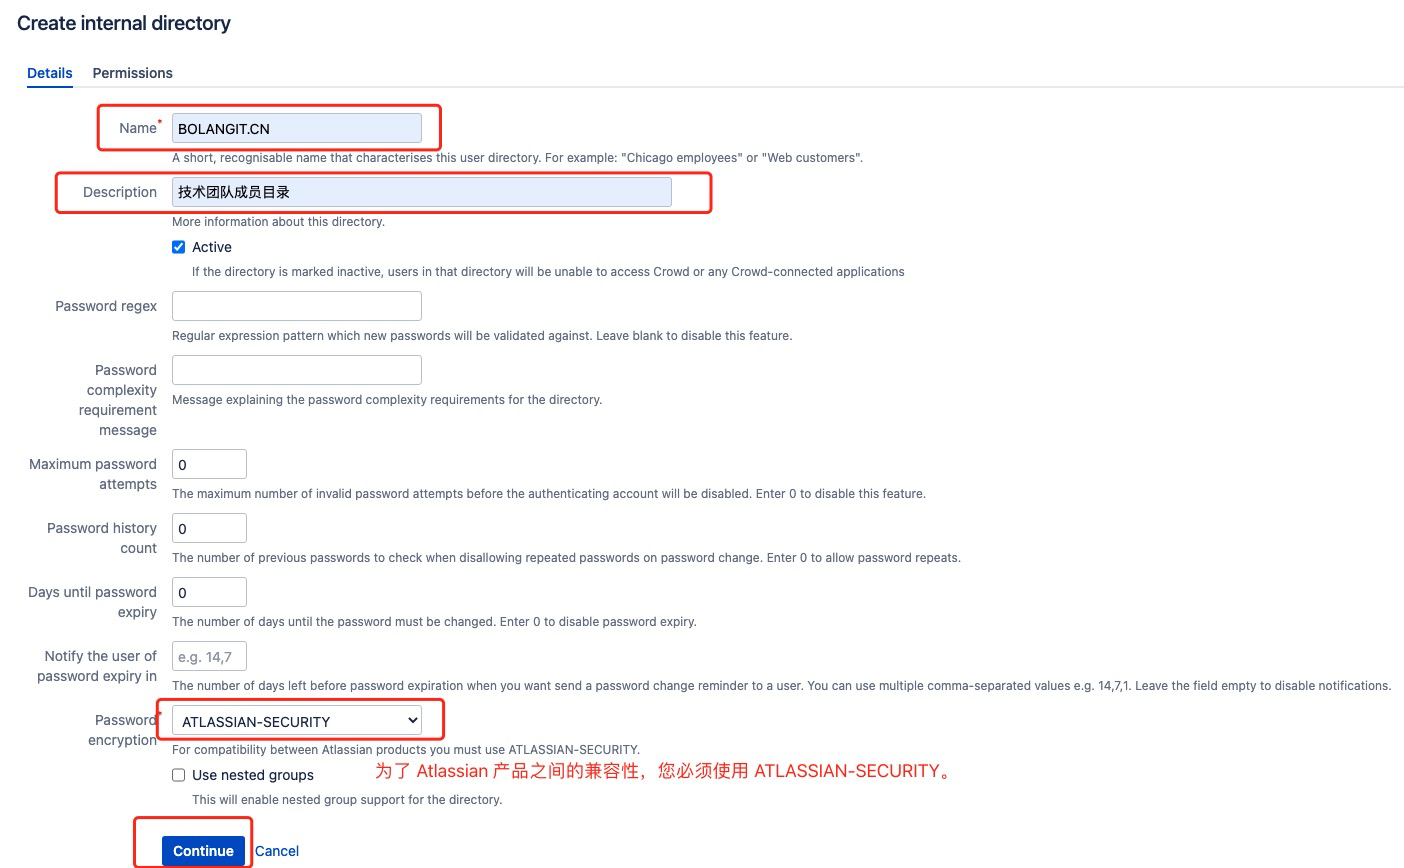
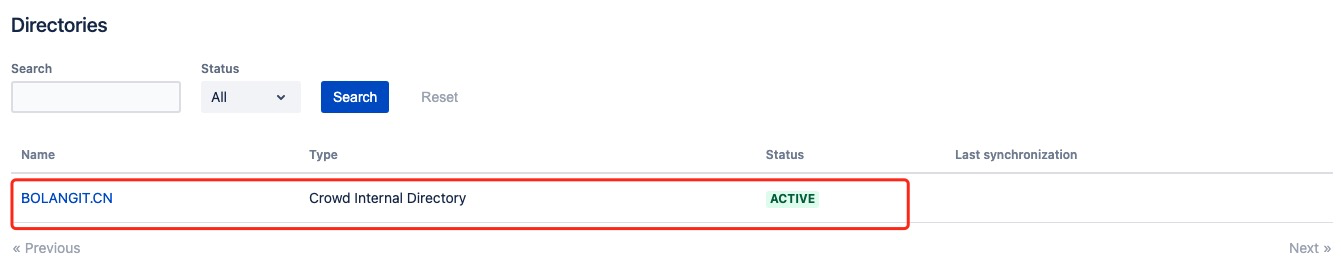
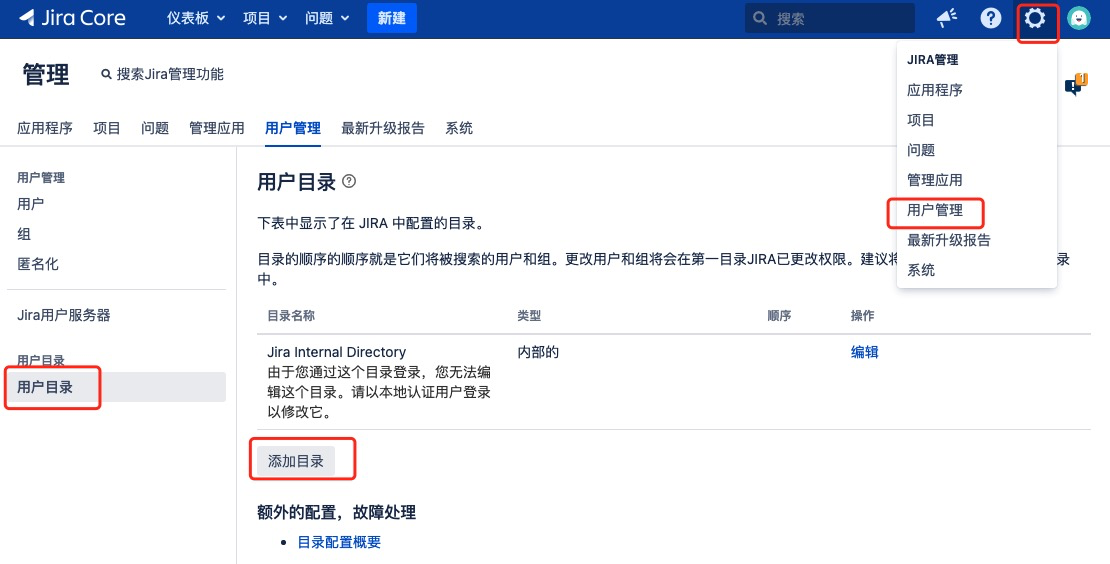
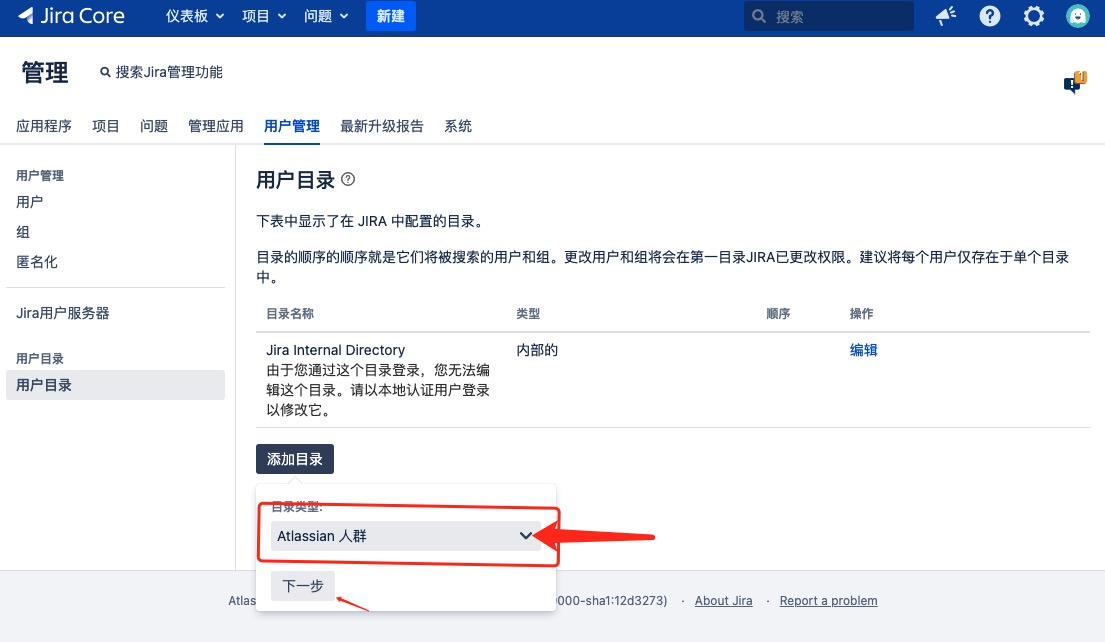
11.2.1.1、配置目录(Directorise)
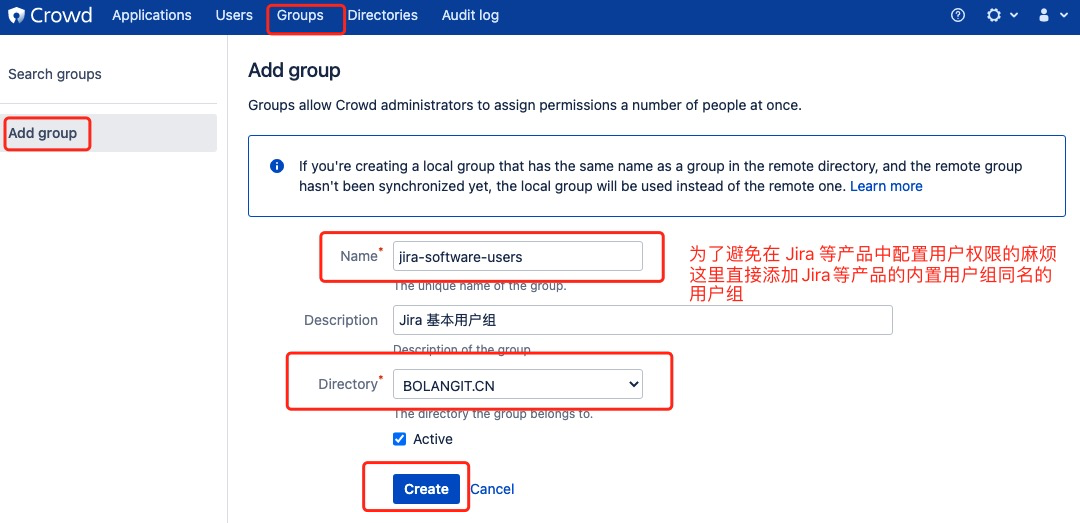
11.2.1.2、配置用户组
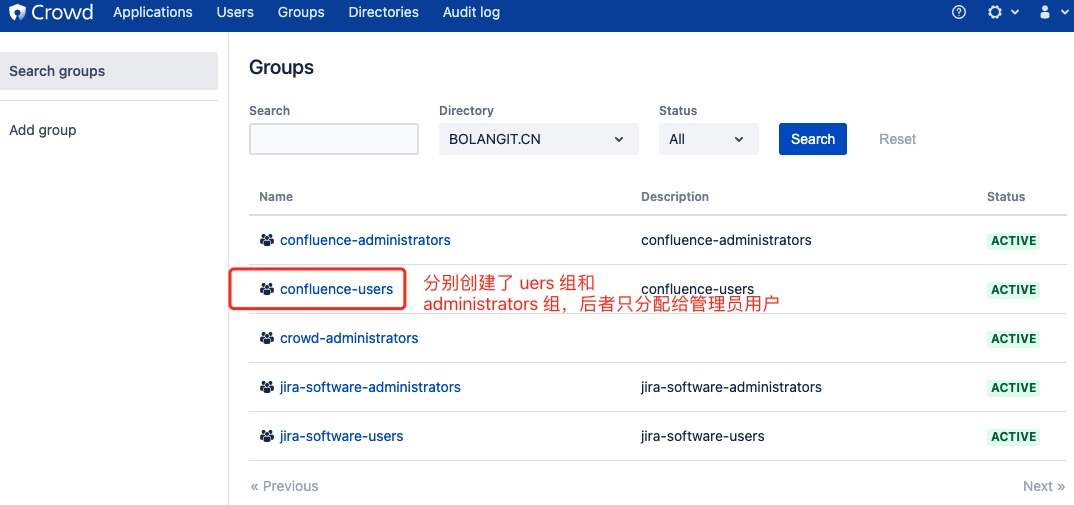
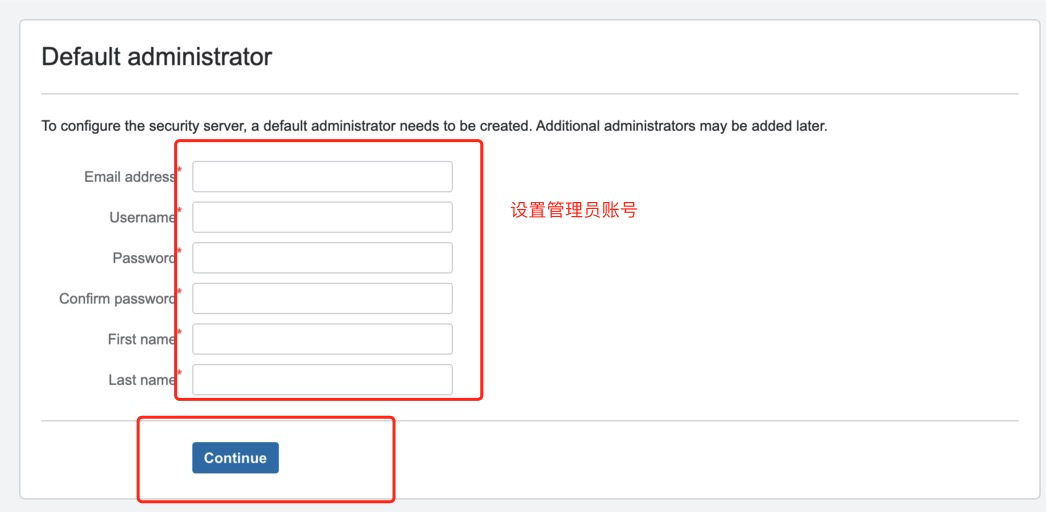
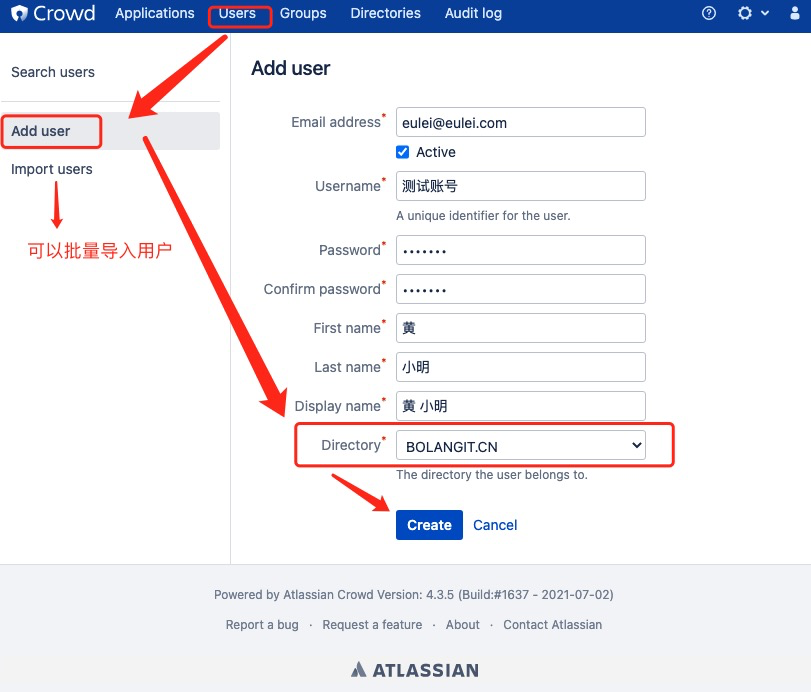
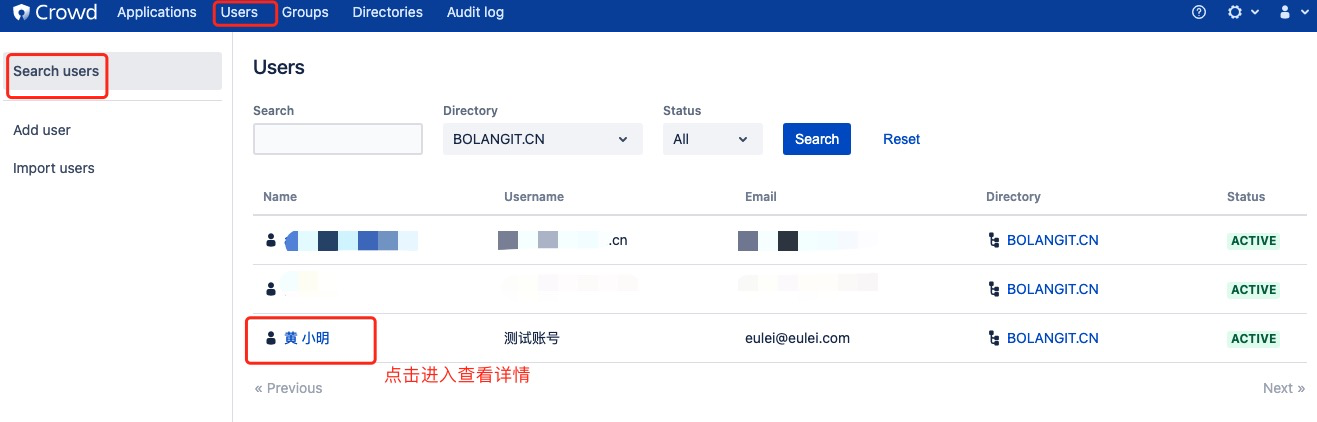
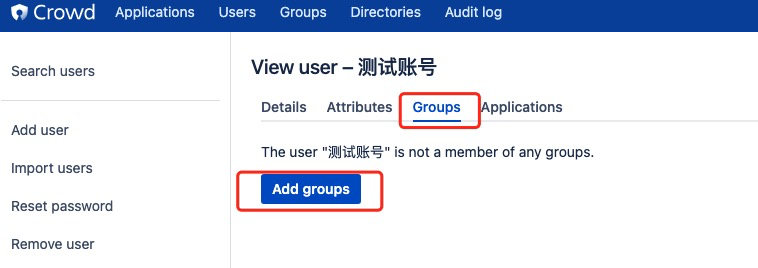
11.2.1.3、配置创建用户账号
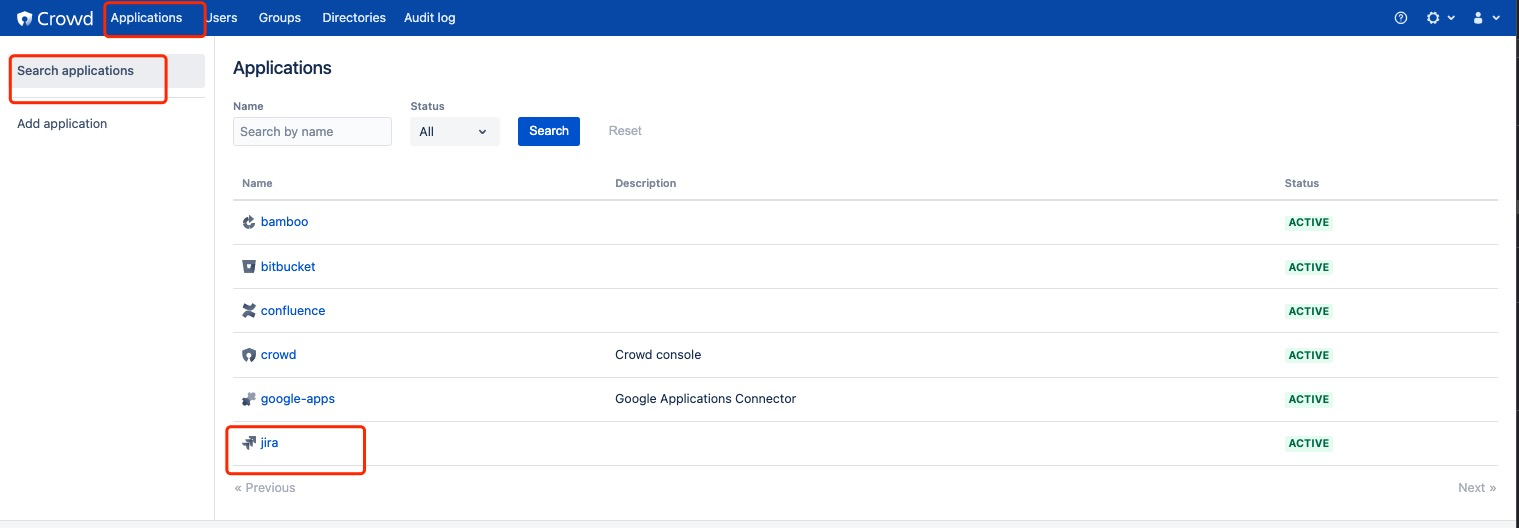
11.2.1.4、创建应用程序
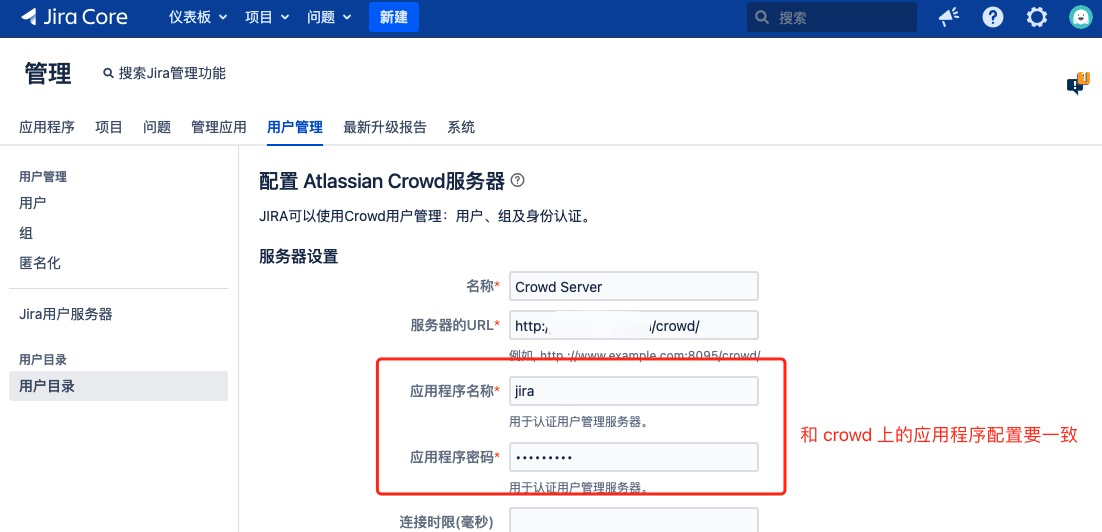
需要为每一个atlassian 家族的产品创建一个应用程序,并引用同一个用户目录。
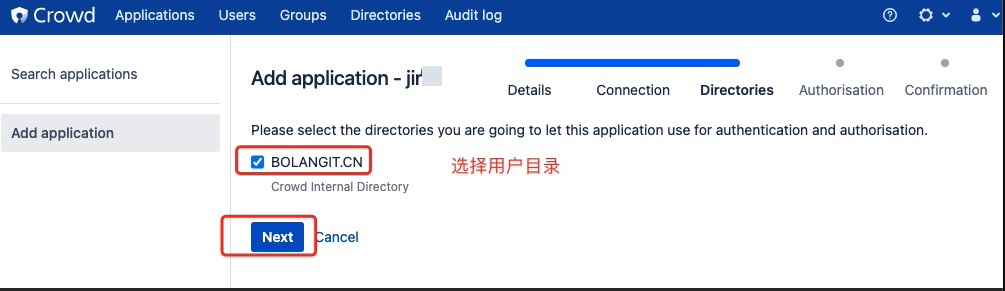
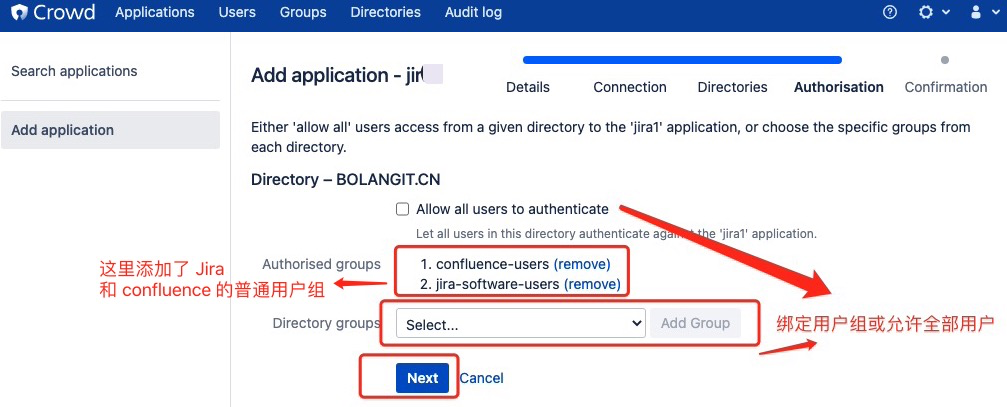
这里要注意,这里的配置要和 内置的crowd应用配置一致,才可以正常使用单点登入功能(SSO)。
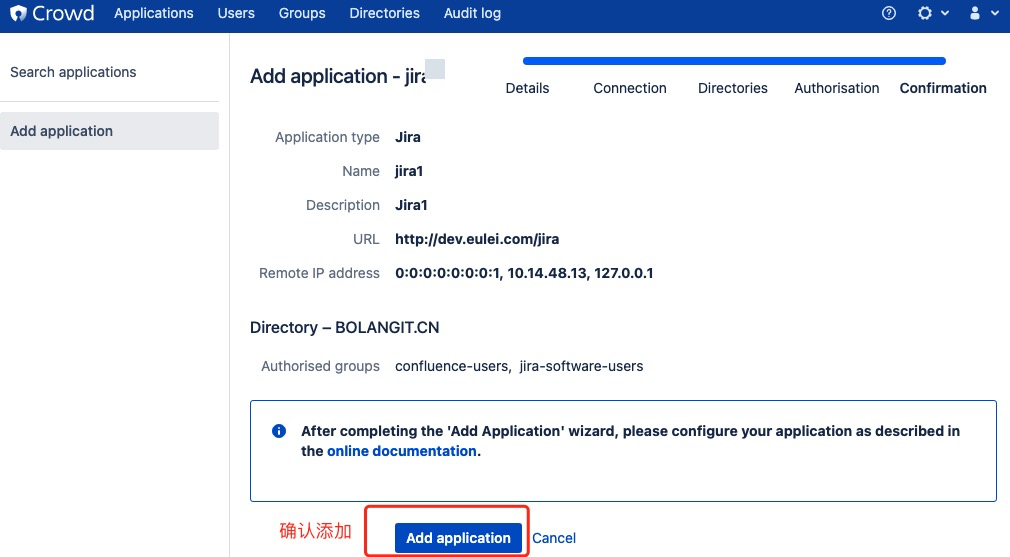
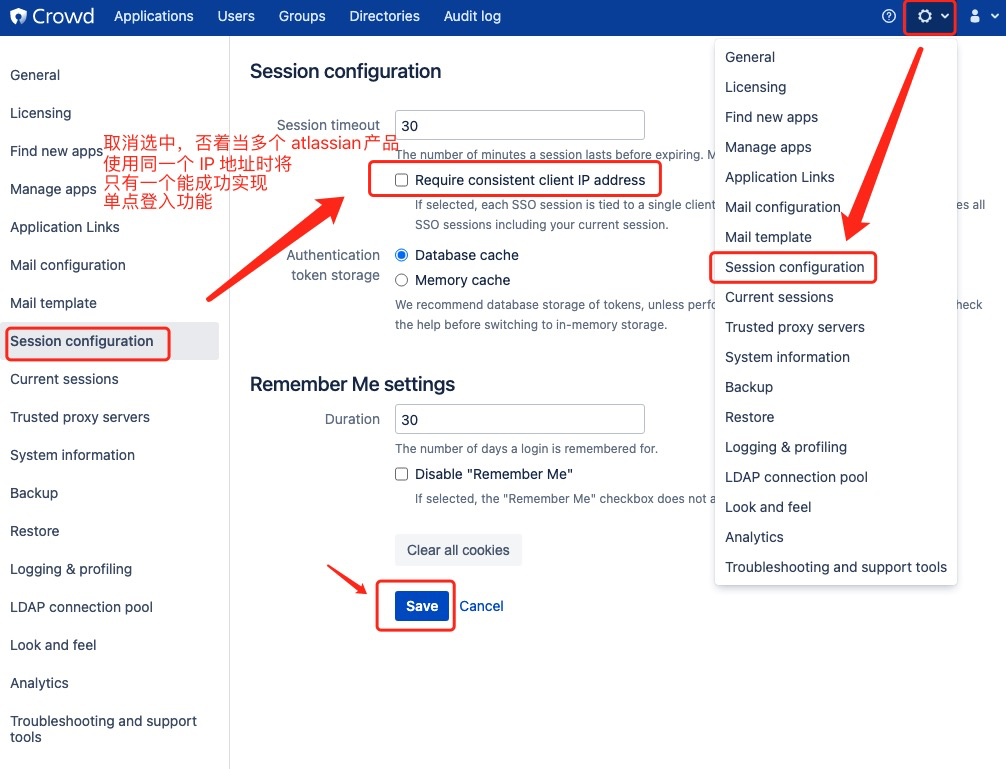
11.2.1.5、取消 IP 限制
11.2.1、Jira 配置单点登入(SSO)
配置单点登入前请确认已经通过 nginx SSL方向代理配置, 可以成功通过 https://访问 Jira 和 crowd。
11.2.1.1、设置用户目录同步

#####11.2.1.2、配置 SSO 配置文件
## 编辑 /opt/atlassian/jira/atlassian-jira/WEB-INF/classes/seraph-config.xml 文件
>  nano /opt/atlassian/jira/atlassian-jira/WEB-INF/classes/seraph-config.xml
## /opt/atlassian/jira/atlassian-jira/WEB-INF/classes/seraph-config.xml
## 用 <!-- xxx  -->  注释掉,注意一旦改完配置,原有本地账号密码为不可用状态
<!--
<authenticator class="com.atlassian.jira.security.login.JiraSeraphAuthenticator"/>
-->
## 取消以下释掉
<authenticator class="com.atlassian.jira.security.login.SSOSeraphAuthenticator"/>
## 编辑 /opt/atlassian/jira/atlassian-jira/WEB-INF/classes/crowd.properties 文件
## JIRA 的安装目录里没有 crowd.properties 文件,可以从 Confluence 或者 Crowd 拷贝一份,然后修改配置的内容即可
> nano /opt/atlassian/jira/atlassian-jira/WEB-INF/classes/crowd.properties
## /opt/atlassian/jira/atlassian-jira/WEB-INF/classes/crowd.properties

## 配置 crowd 里该 Application 的名称
application.name                        jira
## 配置 crowd 里该 Application 的密码
application.password                    123456
## 配置 crowd 的地址
application.login.url                   https://dev.eulei.vip/crowd/console/

## 配置 crowd 的 services 地址
crowd.server.url                        https://dev.eulei.vip/crowd/services/
## 配置 crowd 的 baseurl 地址
crowd.base.url                          https://dev.eulei.vip/crowd/

session.isauthenticated                 session.isauthenticated
## 与 crowd 管理页面的SSO cookie name保持一致
session.tokenkey                        session.tokenkey
session.validationinterval              2
session.lastvalidation                  session.lastvalidation
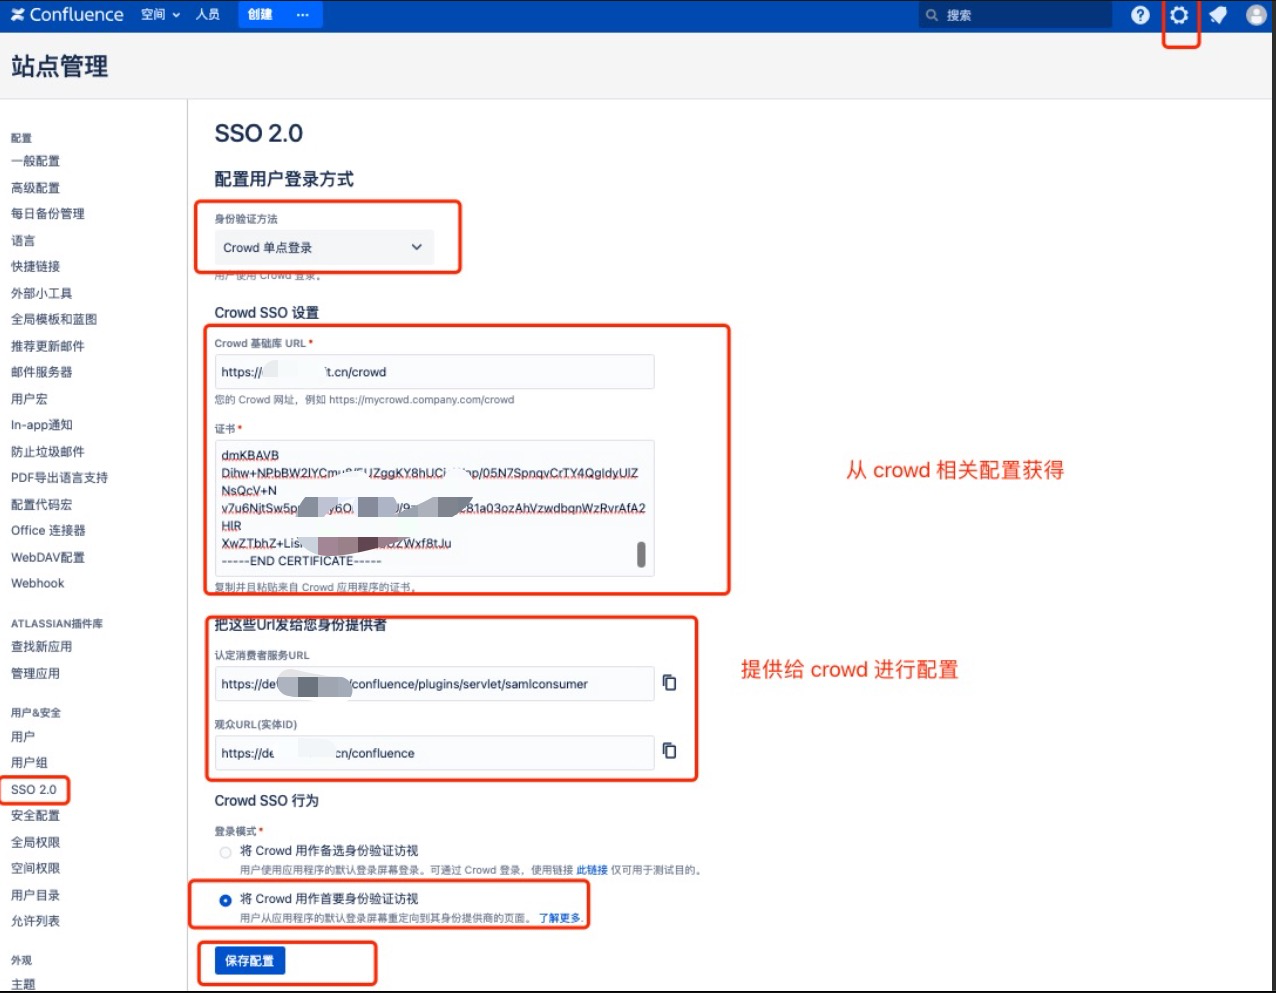
11.2.1.3、配置 认证方式
11.2.1.3.1、crowd中配置 SSO
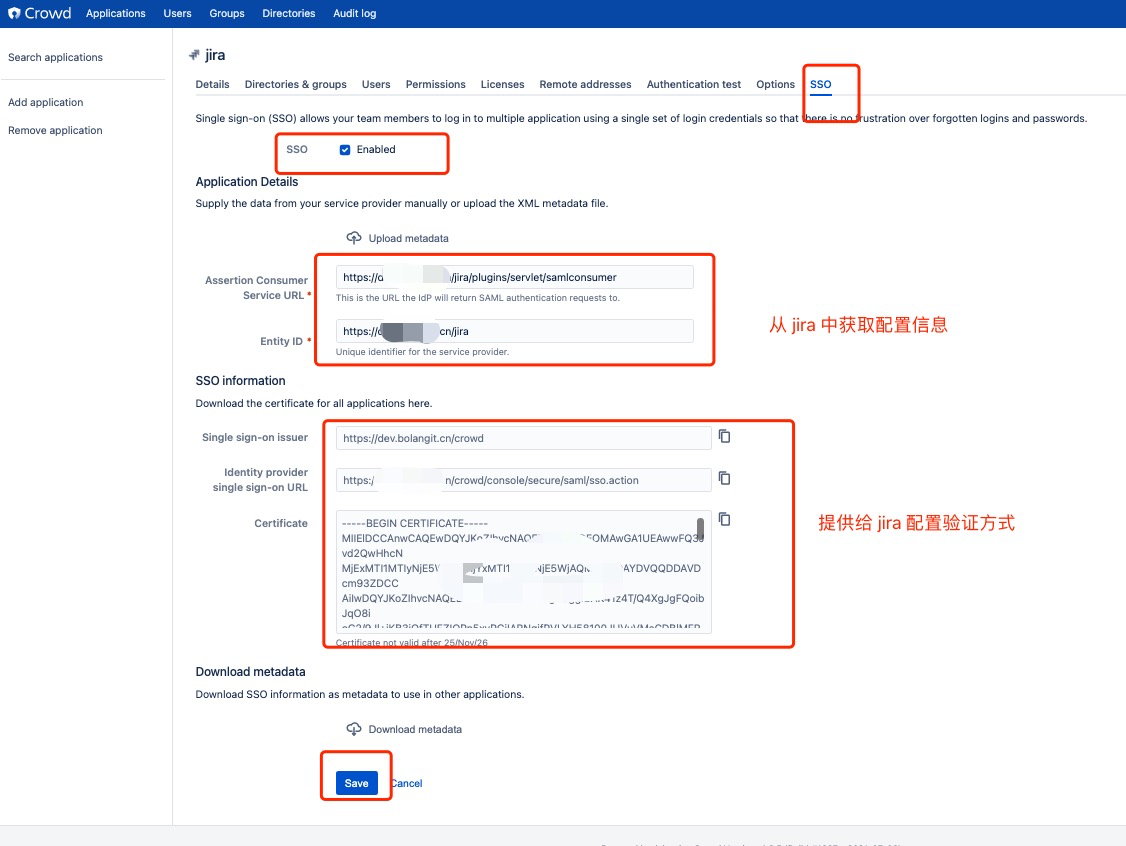
11.2.1.3.2、jira中配置 SSO
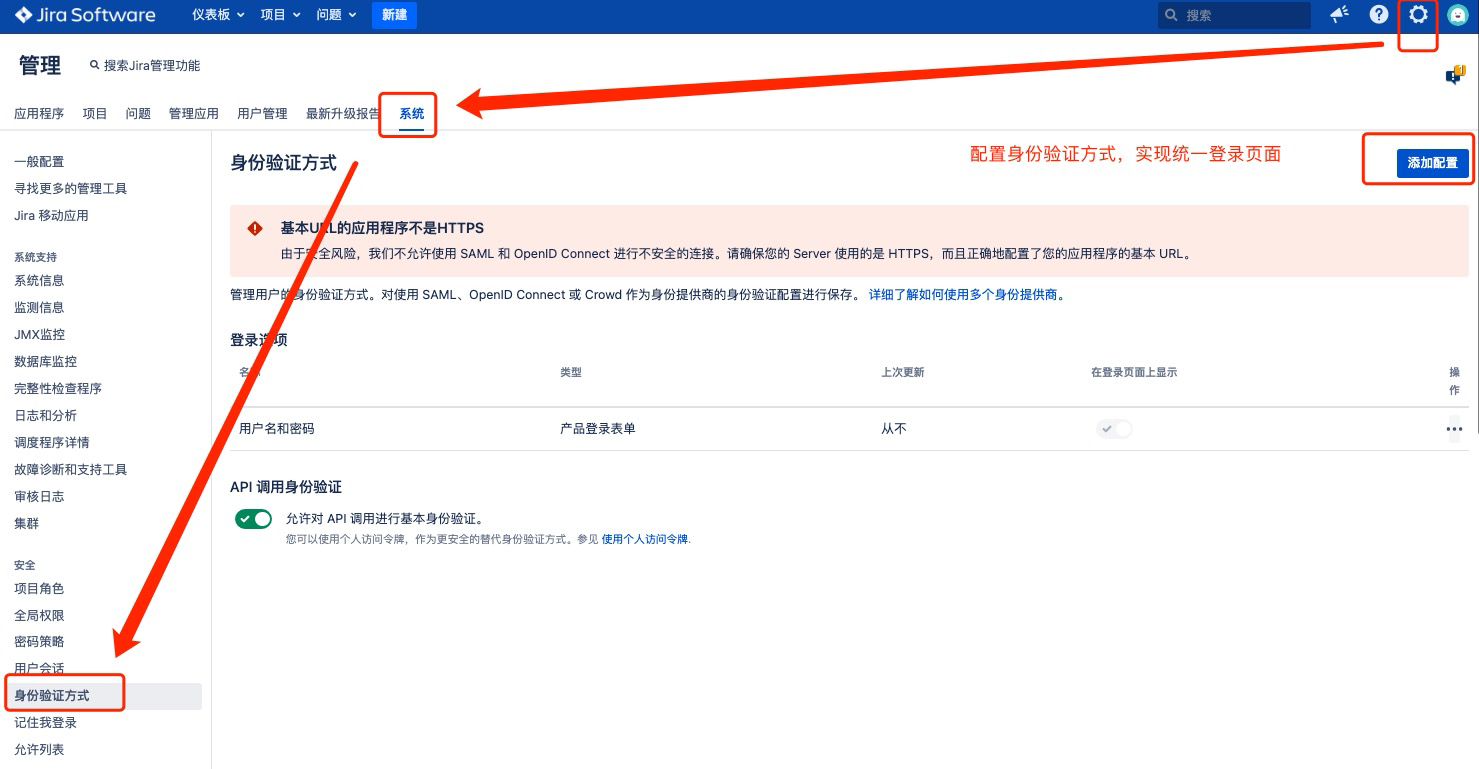
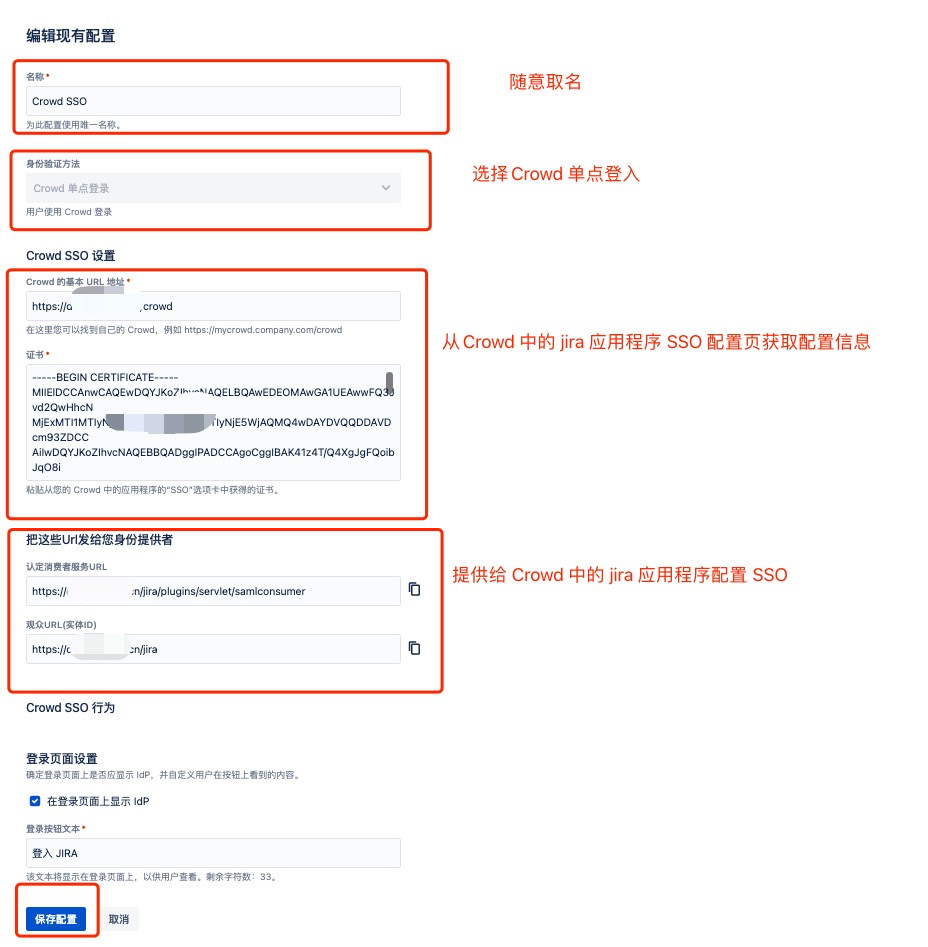
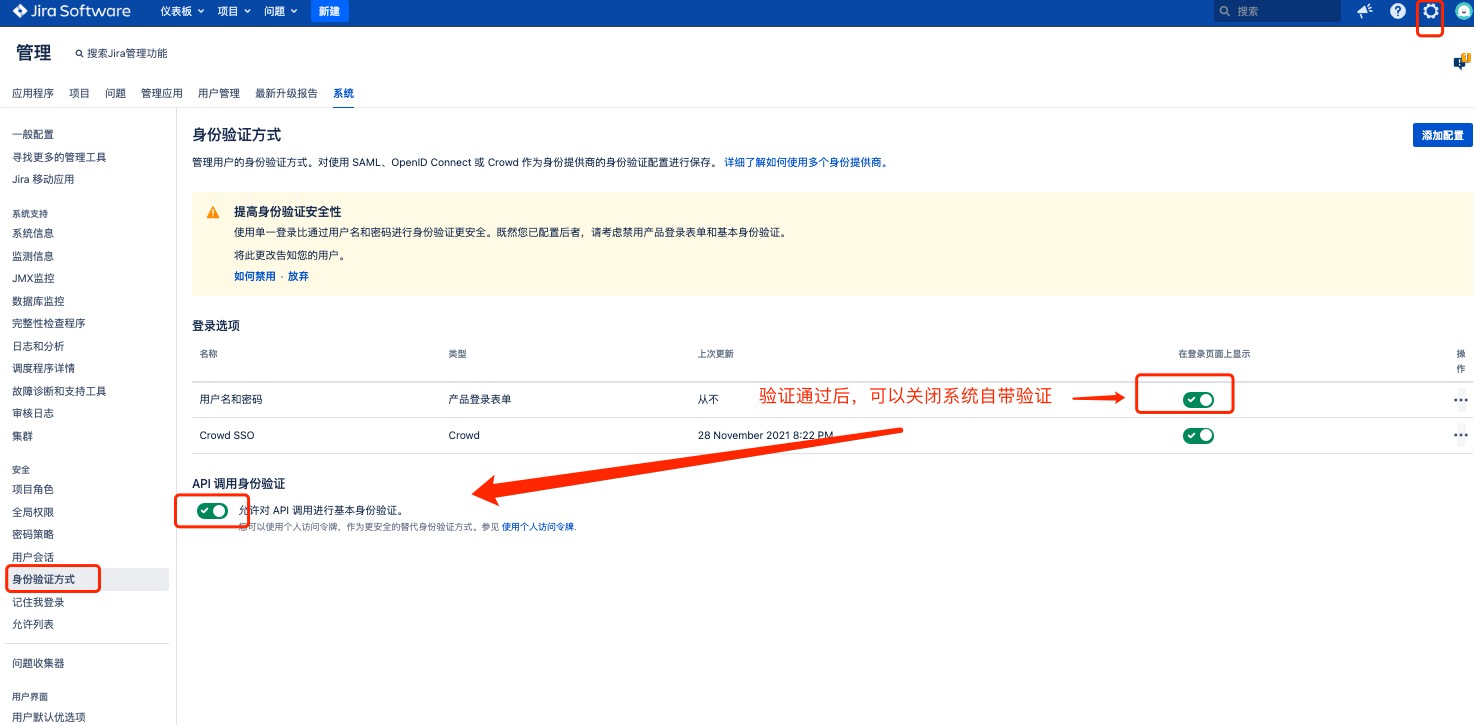
重启生效
11.2.2、Confluence 配置单点登入(SSO)
crowd 上的 application(应用)配置、confluence目录同步和 SSO 验证方式配置,参见 “Jira 配置单点登入(SSO)章节“。
## 编辑 /opt/atlassian/confluence/confluence/WEB-INF/classes/seraph-config.xml 文件
> nano /opt/atlassian/confluence/confluence/WEB-INF/classes/seraph-config.xml
## /opt/atlassian/confluence/confluence/WEB-INF/classes/seraph-config.xml
## 用 <!-- xxx  -->  注释掉,注意一旦改完配置,原有本地账号密码为不可用状态
<!--
<authenticator class="com.atlassian.confluence.user.ConfluenceAuthenticator"/>
-->
## 取消以下释掉
<authenticator class="com.atlassian.confluence.user.ConfluenceCrowdSSOAuthenticator"/>
## 编辑 /opt/atlassian/confluence/confluence/WEB-INF/classes/crowd.properties 文件
> nano /opt/atlassian/confluence/confluence/WEB-INF/classes/crowd.properties
## /opt/atlassian/confluence/confluence/WEB-INF/classes/crowd.properties

## 配置 crowd 里该 Application 的名称
application.name                        confluence
## 配置 crowd 里该 Application 的密码
application.password                    123456
## 配置 crowd 的地址
application.login.url                   https://dev.eulei.vip/crowd/console/

## 配置 crowd 的 services 地址
crowd.server.url                        https://dev.eulei.vip/crowd/services/
## 配置 crowd 的 baseurl 地址
crowd.base.url                          https://dev.eulei.vip/crowd/

session.isauthenticated                 session.isauthenticated
## 与 crowd 管理页面的SSO cookie name保持一致
session.tokenkey                        session.tokenkey
session.validationinterval              2
session.lastvalidation                  session.lastvalidation
11.2.2.1、配置认证方式
重启生效
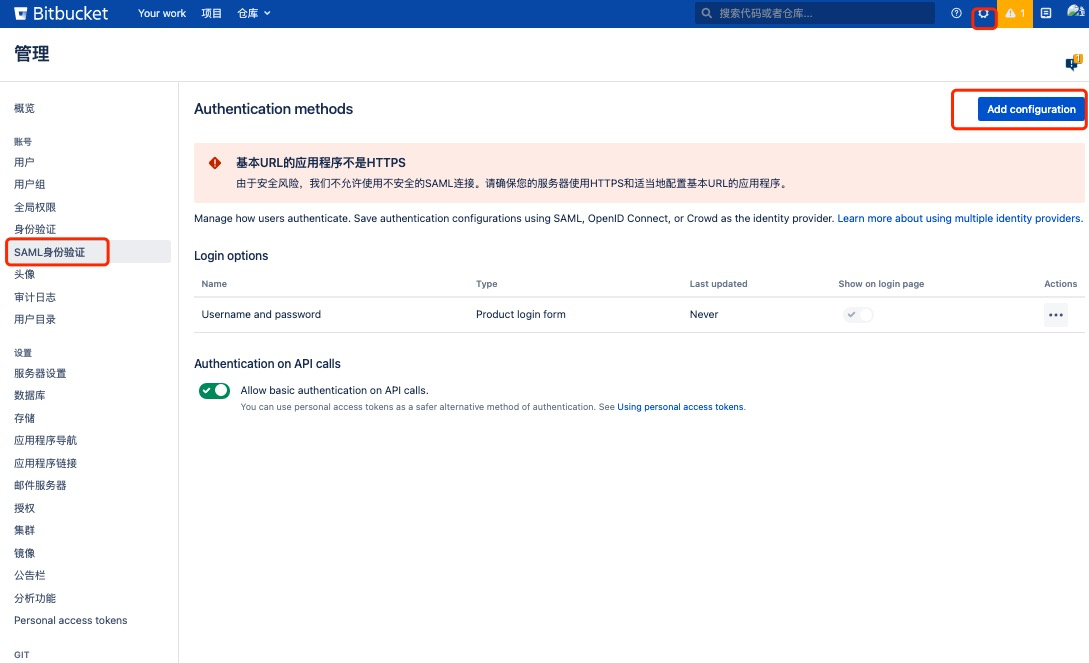
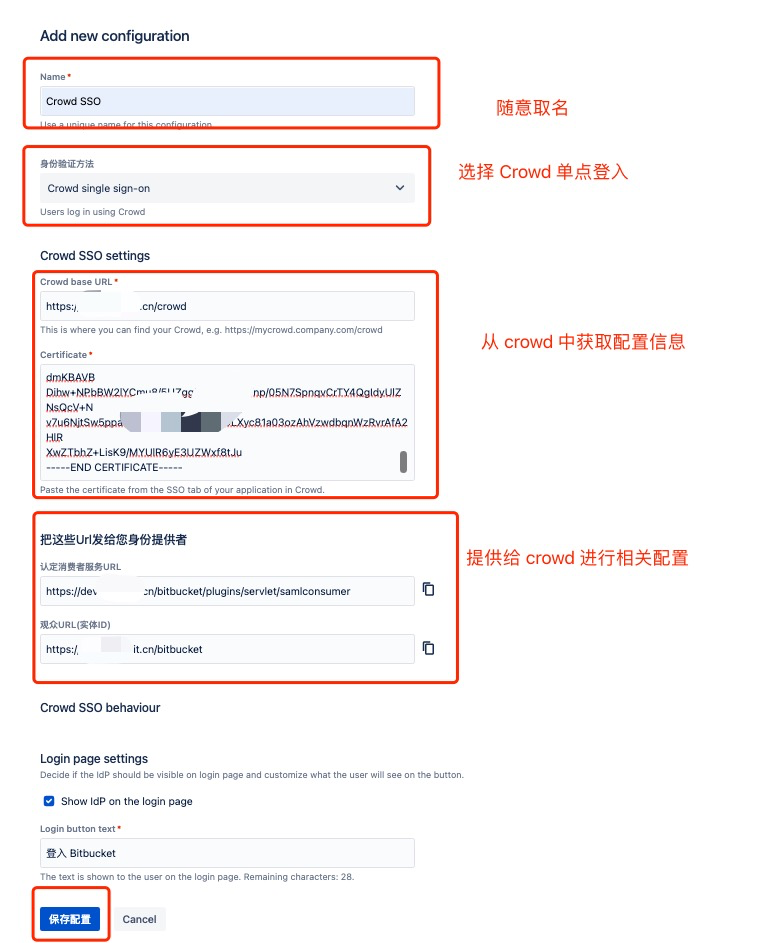
11.2.3、Bitbucket 配置单点登入(SSO)
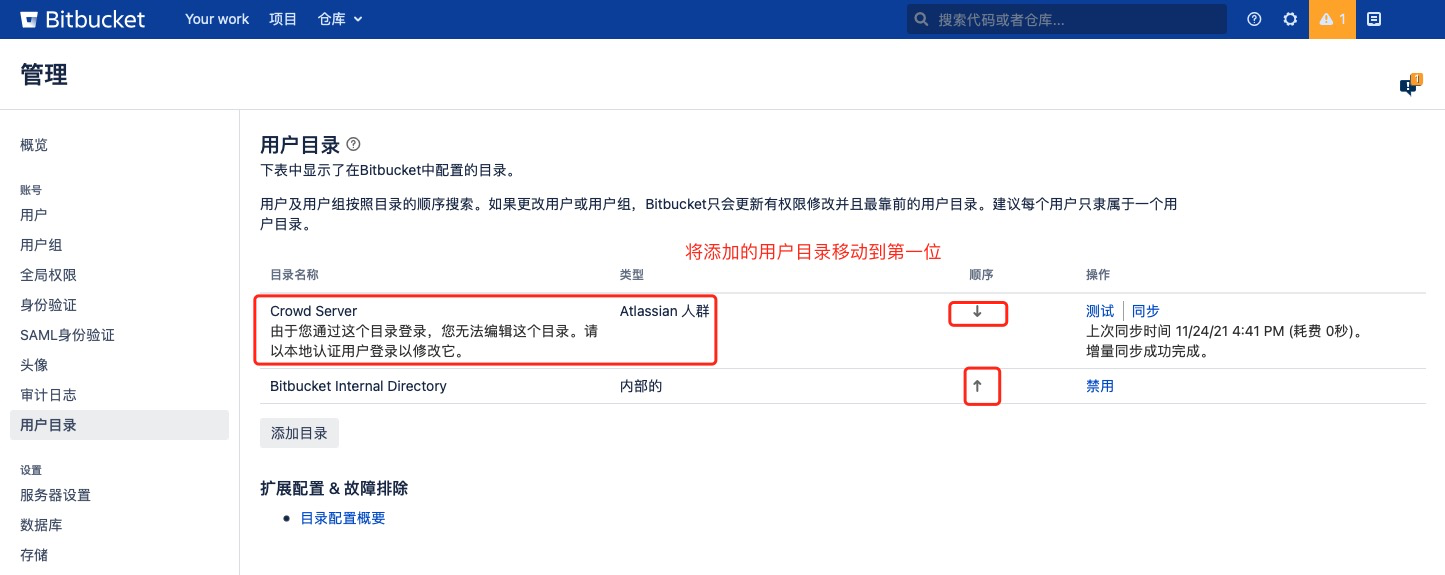
crowd 上的 application(应用)配置和 bitbucket目录同步,参见 “Jira 配置单点登入(SSO)章节“。
注意:记得调整用户目录顺序和用户组权限
# 编辑 bitbucket.properties
> nano /opt/data/var/atlassian/application-data/bitbucket/shared/bitbucket.properties
# 添加下面的属性
plugin.auth-crowd.sso.enabled=true

# 重启 Bitbucket 生效
> /etc/init.d/atlbitbucket restart
11.2.3.1、配置验证方式
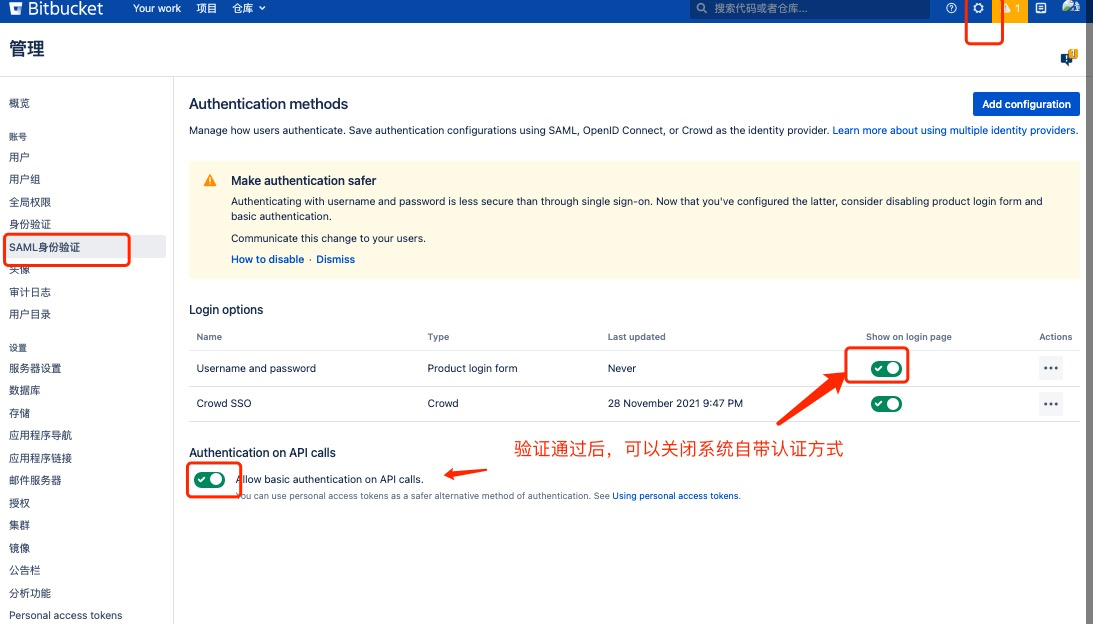
重启生效
11.2.4、Bamboo 配置单点登入(SSO)
crowd 上的 application(应用)配置和 bamboo 目录同步,参见 “Jira 配置单点登入(SSO)章节“。
注意:记得调整用户目录顺序和用户组权限
## 编辑  nano /opt/atlassian/bamboo/atlassian-bamboo/WEB-INF/classes/seraph-config.xml  文件
> nano /opt/atlassian/bamboo/atlassian-bamboo/WEB-INF/classes/seraph-config.xml
## /opt/atlassian/bamboo/atlassian-bamboo/WEB-INF/classes/seraph-config.xml
## 用 <!-- xxx  -->  注释掉,注意一旦改完配置,原有本地账号密码为不可用状态
<!--
<authenticator class="com.atlassian.bamboo.user.authentication.BambooAuthenticator"/>
-->
## 取消以下释掉
<authenticator class="com.atlassian.crowd.integration.seraph.v25.BambooAuthenticator"/>
## 编辑 /opt/atlassian/bamboo/atlassian-bamboo/WEB-INF/classes/crowd.properties 文件
> nano /opt/atlassian/bamboo/atlassian-bamboo/WEB-INF/classes/crowd.properties
## /opt/atlassian/bamboo/atlassian-bamboo/WEB-INF/classes/crowd.properties

## 配置 crowd 里该 Application 的名称
application.name                        bamboo
## 配置 crowd 里该 Application 的密码
application.password                    123456
## 配置 crowd 的地址
application.login.url                   http://dev.eulei.vip/crowd/console/

## 配置 crowd 的 services 地址
crowd.server.url                        http://dev.eulei.vip/crowd/services/
## 配置 crowd 的 baseurl 地址
crowd.base.url                          http://dev.eulei.vip/crowd/

session.isauthenticated                 session.isauthenticated
## 与 crowd 管理页面的SSO cookie name保持一致
session.tokenkey                        session.tokenkey
session.validationinterval              2
session.lastvalidation                  session.lastvalidation
## 修改 nano /opt/atlassian/bamboo/atlassian-bamboo/WEB-INF/classes/atlassian-user.xml  配置
>  nano /opt/atlassian/bamboo/atlassian-bamboo/WEB-INF/classes/atlassian-user.xml
## nano /opt/atlassian/bamboo/atlassian-bamboo/WEB-INF/classes/atlassian-user.xml
## 使得文件内容如下
atlassian-user>
    <repositories>

        <crowd key="crowd" name="Crowd Repository"/>

    </repositories>
</atlassian-user>
## 重启生效
## 关闭 bamboo 服务
su bamboo /opt/atlassian/bamboo/bin/stop-bamboo.sh
## 启动 bamboo 服务
su bamboo /opt/atlassian/bamboo/bin/start-bamboo.sh
附件:生产环境关键信息
| 序号 | 服务奇名称 | ip | 程序名称 | 备注 | |
|---|---|---|---|---|---|
| 1 | 数据库服务器(jira-db-svr) | 10.14.48.14 | MySQL5.7 | nano、lrzsz、 | |
| 2 | 业务服务器(jira-apps-svr) | 10.14.48.15 | jira(V8.20.0) | nano、lrzsz、java1.8 | |

 浙公网安备 33010602011771号