Docker的学习1
Docker是开源的应用容器引擎。可以理解为轻量级的虚拟机,又可以理解为开了挂的chroot。
官方解释为docker是一个开源的项目,可以用来将任何应用以轻量级容器的形式,打包,发布和运行。
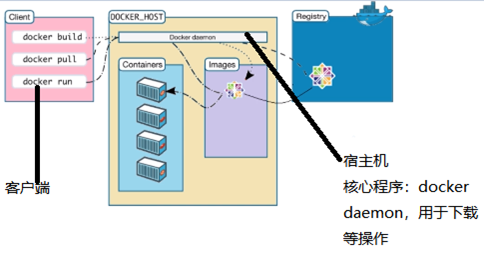
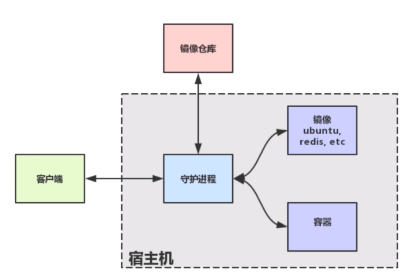
docker架构:


docker run images_name 运行容器
docker images 查看所有本地的容器
docker pull 获取image
docker build -t image_name 路径名 创建image
docker rm 删除container
docker rmi 删除image
docker ps 查看正在运行的容器
docker
-p 端口映射
-d 直接返回
docker cp 文件 容器id://容器内的地址 cp文件到容器内的地址,但当重启后,文件不再容器内,这时就需要保存,保存的命令为:docker commit -m ‘message’ 容器id 新的容器名称,这时就产生了一个新的image
docker stop 容器id 停止当前容器
docker ps -a 历史容器
例:下载nginx镜像并运行:
[root@localhost ~]# docker pull nginx Using default tag: latest latest: Pulling from library/nginx Digest: sha256:9688d0dae8812dd2437947b756393eb0779487e361aa2ffbc3a529dca61f102c Status: Image is up to date for nginx:latest docker.io/library/nginx:latest

运行nginx镜像:

[root@localhost ~]# docker run -p 8080:80 -d docker.io/nginx #

cad31276eaaa32efa41eb5355189b5c657a4bac22cc0da24f43fd889c8e2c883

将本地的8080端口映射到80端口

[root@localhost ~]# netstat -anp |grep 8080 tcp6 0 0 :::8080 :::* LISTEN 1972/docker-proxy

开放8080端口

[root@localhost ~]# iptables -I INPUT -p tcp --dport 8080 -j ACCEPT
通过编写简单的文件自创docker镜像
1、首先建立文件夹Docker
2、在Docker文件夹下建立Dockerfile文件,并编辑:
FROM alpine:latest ##是一个专门针对docker做的一个环境 MAINTAINER xbf CMD echo "Hello Docker"
3、利用docker build 命令构建新的image
[root@localhost dockertest]# docker build -t hello_docker .

# Sending build context to Docker daemon 2.048kB

Step 1/3 : FROM alpine:latest

latest: Pulling from library/alpine

9d48c3bd43c5: Pull complete

Digest: sha256:72c42ed48c3a2db31b7dafe17d275b634664a708d901ec9fd57b1529280f01fb

Status: Downloaded newer image for alpine:latest

---> 961769676411

Step 2/3 : MAINTAINER xbf

---> Running in c92d0fa7be5c

Removing intermediate container c92d0fa7be5c

---> 3f3ea64dc595

Step 3/3 : CMD echo "Hello Docker"

---> Running in 6568cd66097d Removing intermediate container 6568cd66097d

---> d7cc9ec010e5

Successfully built d7cc9ec010e5

Successfully tagged hello_docker:latest

[root@localhost dockertest]# docker images

REPOSITORY TAG IMAGE ID CREATED SIZE

hello_docker latest d7cc9ec010e5 9 seconds ago 5.58MB

nginx latest ab56bba91343 20 hours ago 126MB

alpine latest 961769676411 3 weeks ago 5.58MB

hello-world latest fce289e99eb9 8 months ago 1.84kB
4、利用docker run来运行此image
[root@localhost dockertest]# docker run hello_docker Hello Docker
第二个dockerfile
1、首先建立文件夹Docker2
2、在Docker2文件夹下建立Dockerfile文件,并编辑:
FROM ubuntu

MAINTAINER root

RUN sed -i 's/archive.ubuntu.com/mirrors.ustc.edu.cn/g' /etc/apt/sources.list

RUN apt-get update && apt-get install nginx -y

COPY index.html /var/www/html

ENTRYPOINT ["/usr/local/nginx/sbin/nginx","-g","daemon off;"]

EXPOSE 80
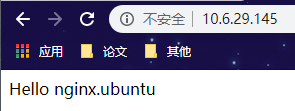
3、建立www/index.html文件
touch index.html
Hello nginx.ubuntu
4、构建新的image。
docker build -t whr/hello-nginx /dockertest/Docker2

[root@localhost Docker2]# docker images

REPOSITORY TAG IMAGE ID CREATED SIZE

whr/hello-nginx latest f6efa129cd16 2 minutes ago 149MB
5、启动whr/hello-nginx
[root@localhost Docker2]# docker run -d -p 80:80 whr/hello-nginx
ada48aa3a8fef5e1feb35e5c90ff176f584cd69b8ad1af403de96cd883247599

Dockerfile的语法
FROM base image
RUN 执行命令
ADD 添加文件
COPY 拷贝文件
CMD 执行命令
EXPOSE 暴露窗口
WORKDIR 指定路径
MAINTAINER 维护者
ENV 设定环境变量
ENTRYPOINT 容器入口
USER 指定用户
VOLUME mount point
镜像分层
Dockerfile中的每一行都会产生一个新层


