STLPort解决VC6.0多线程下使用STL容器存在的问题
当使用VC自带的STL string append进行字符串拼接操作的时候,如下所示:
// demo.cpp : Defines the entry point for the console application.
//
#include "stdafx.h"
#include<iostream>
#include <string>
#include<windows.h>
#include <exception>
using namespace std;
//#define TEST_1

int CloseHandles();
DWORD WINAPI ThreadProc(LPVOID lpParam);
int CreateThreads();
int main(int argc, char* argv[])
{
    printf("Hello World!\n");
    CreateThreads();
    while(1)
    {
        Sleep(5000);
    }
    return 0;
}
int CreateThreads()
{
    int a = 1;
    int b = 2;
    for(int i=0;i<100;i++)
    {
      CreateThread(NULL, 0, ThreadProc, &i, 0, NULL);
    }
    return 0;
}
DWORD WINAPI ThreadProc(LPVOID lpParam)
{
    int i=0;
    while(1)
    {
#ifdef TEST_1

        char programName[3]= {"pn"};
        char threadName[6] = {"name2"};
        char *mTest = new char[100];
        memset(mTest,0,100);
        memcpy(mTest,programName,2);
        memcpy(mTest+2,threadName,5);
        string message("");
        message.append(mTest);
        delete []mTest;
#else
        string programName="pn";
        string threadName="threadname1";
        string threadID="0";
        string message("");
        message.append("PN:" + programName+ ";");
        message.append("TN:" + threadName+ ";");
        message.append("TI:" + threadID+ ";");
        message.append("|");
#endif
    }
    return 0;
}
使用源码Debug运行的时候会抛出“Please enter the path for DEGHEAP.C”的Find Source 对话框,点击取消,然后 点击查看-->调试窗口->调用堆栈,可以定位到具体的函数信息如下:
_heap_alloc_dbg(unsigned int 33, int 1, const char * 0x00000000, int 0) line 338
_nh_malloc_dbg(unsigned int 33, int 1, int 1, const char * 0x00000000, int 0) line 248 + 21 bytes
_nh_malloc(unsigned int 33, int 1) line 197 + 19 bytes
operator new(unsigned int 33) line 24 + 11 bytes
std::_Allocate(int 33, char * 0x00000000) line 30 + 9 bytes
std::allocator<char>::allocate(unsigned int 33, const void * 0x00000000) line 59 + 18 bytes
std::basic_string<char,std::char_traits<char>,std::allocator<char> >::_Copy(unsigned int 3) line 526 + 17 bytes
std::basic_string<char,std::char_traits<char>,std::allocator<char> >::_Grow(unsigned int 3, unsigned char 1) line 568
std::basic_string<char,std::char_traits<char>,std::allocator<char> >::assign(const char * 0x00414044 `string', unsigned int 3) line 133 + 21 bytes
std::basic_string<char,std::char_traits<char>,std::allocator<char> >::assign(const char * 0x00414044 `string') line 138 + 32 bytes
std::basic_string<char,std::char_traits<char>,std::allocator<char> >::basic_string<char,std::char_traits<char>,std::allocator<char> >(const char * 0x00414044 `string', const std::allocator<char> & {...}) line 51 + 39 bytes
std::operator+(const char * 0x00414044 `string', const std::basic_string<char,std::char_traits<char>,std::allocator<char> > & {0x00b44b21 "threadname1"}) line 24 + 54 bytes
ThreadProc(void * 0x0019fe88) line 109 + 26 bytes
KERNEL32! 75d90419()
APP01! 77a366dd()
APP01! 77a366ad()
经过查询资料知晓,VC6.0自带的STL本身不是线程安全的。
VC自带的STL是浅拷贝的。相关文件参考:
https://microsoft.public.vc.stl.narkive.com/JsB9CWHq/thread-safe-stl-for-vc6-0
里面提到了几种解决方法:
1.修改STL源码文件XSTRING里面enum _Mref {_FROZEN = 255}为_FROZEN = 0 。(替换了,貌似不起作用)
2.不再使用VC6.0,升级到更新的版本。
3. STL替换为第三方线程安全的容器,如STLPort(可以解决)
4.不使用字符串std:string进行字符串拼接,而是采用char数组或者指针进行替换。
此处以第三种方案为例子进行讲述。
从http://www.stlport.org/下载源码,并解压到指定路径,此处我的路径为:D:\STLport-5.1.5。
要想使得VC6.0使用STLPort,相关替换操作如下:
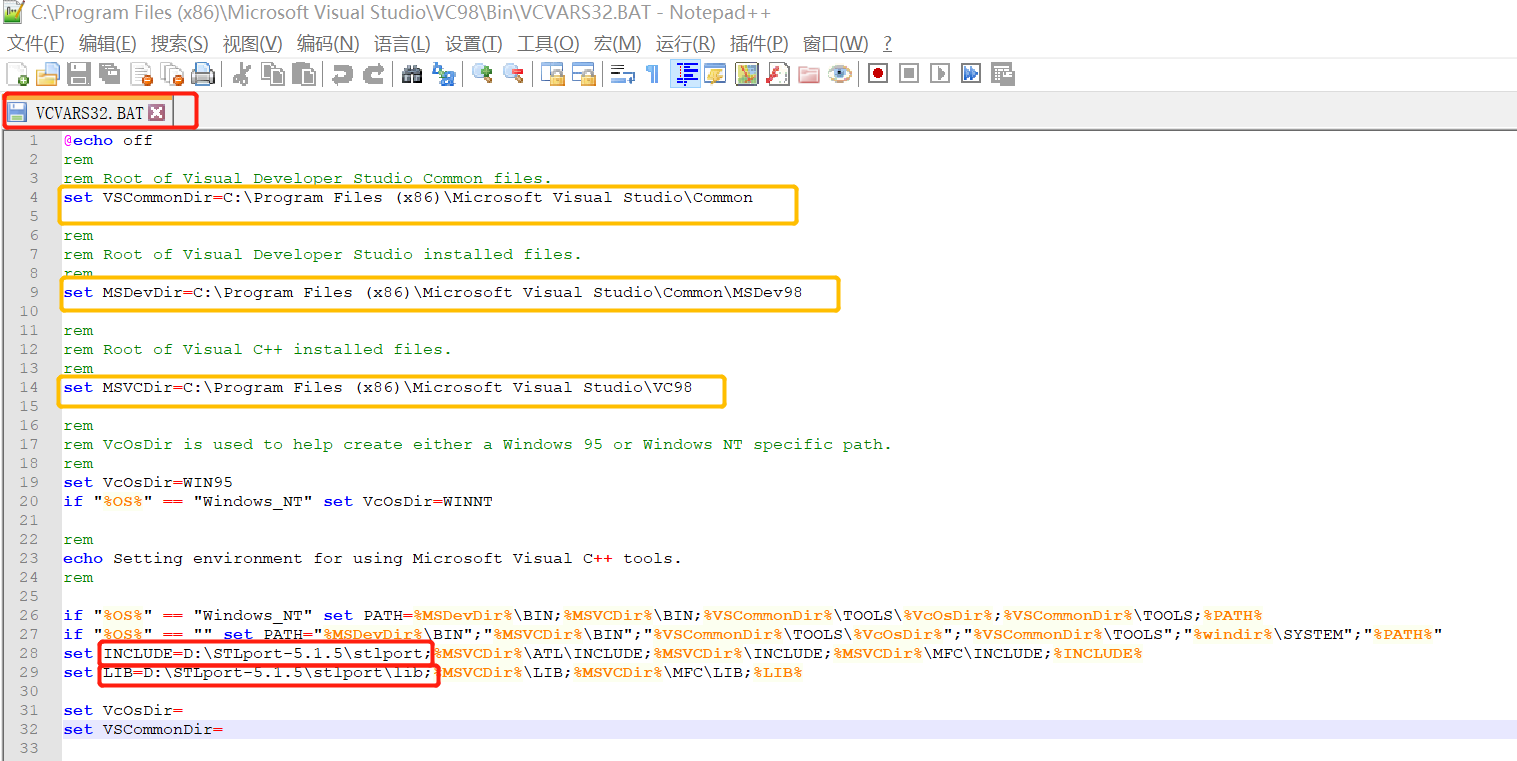
1.修改VCVARS32.BAT文件。
在…/Microsoft Visual Studio/VC98/Bin/VCVARS32.BAT中,把D:\STLport-5.1.5/stlport; 加入Include路径中;把D:\STLport-5.1.5/lib; 加入Lib路径中;(这里在D:\STLport-5.1.5下没有lib子目录,先加上去,一会编译会生成的)

2.CMD命令运行VCVARS32.BAT文件;
3.运行configure 命令
进入D:\STLport-5.1.5\build\lib\路径,运行configure -c msvc6。注意:configure命令要加上路径,因为configure命令是linux下的命令,dos中没有。当然,如果在当前目录下可以不带路径。下面nmake一样。
4.接下来先进入D:\STLport-5.1.5\build\lib ;执行nmake /fmsvc.mak,这个要等一段时间;之后,执行nmake /fmsvc.mak install,是一些copy动作。
在运行nmake指令的时候,会提示'nmake' 不是内部或外部命令,只需要安装步骤1中的黄色标识修改即可。
5.就是配置VC6.0了:
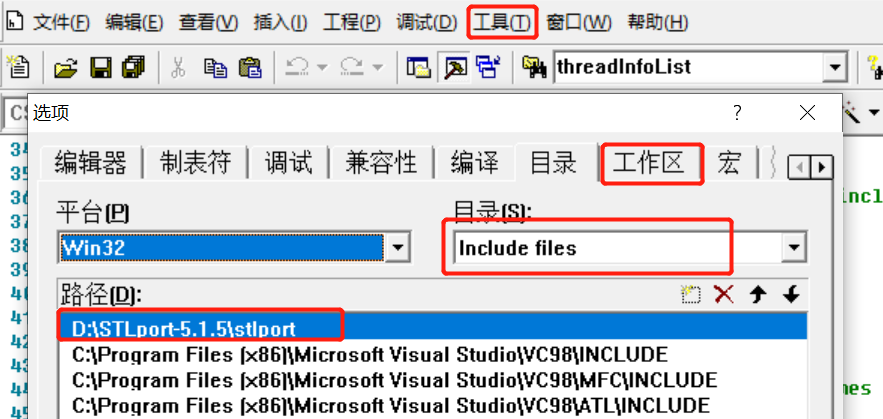
a、Tools -> Options -> Directories,选“Include files”,增加D:\STLport-5.1.5\stlport,并移至顶端;不移至顶端,还是会用原来VC自带的STL;

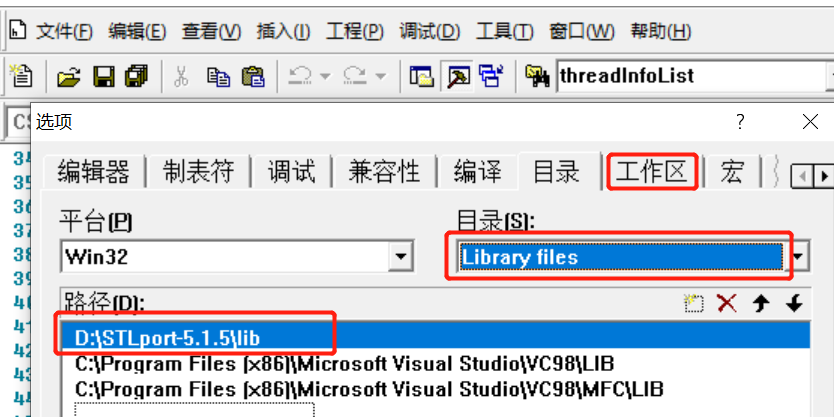
选“Library files”,增加D:\STLport-5.1.5\lib,并移至顶端;

b、Project -> Settings -> C/C++, 在Category中选 “C++ Language”,
勾选“Enable exception handling”(这个最好选一下);在Category中选“Code Generation”, 在“Use run-time library”中选“Debug Mulithreaded”(这个Release版选“Mulithreaded”;如果想用动态链接,则要先编译动态链接版本的 STLport,再在这儿选择相应的DLL)
基本可以了,给个简单例子,试试:(VC自带的STL没有slist,只有安装成功了,才能编译成功)
#include <slist>
#include <iostream>
using namespace std;
int main(void)
{
    slist<int> sl;
    sl.push_front(11);
    sl.push_front(23);
    sl.push_front(39);
    //打印单向链表元素
    slist<int>::iterator i,iend;
    iend=sl.end();
    for(i=sl.begin(); i!=iend; i++)
        cout << *i << ' ';
    cout << endl;
    return 0;
}


