大数据基础---MapReduce-API操作
一.环境
Hadoop部署环境:
Centos3.10.0-327.el7.x86_64
Hadoop2.6.5
Java1.8.0_221
代码运行环境:
Windows 10
Hadoop 2.6.5
二.安装Hadoop-Eclipse-Plugin
在Eclipse中编译和运行Mapreduce程序,需要安装hadoop-eclipse-plugin,可下载Github上的 hadoop2x-eclipse-plugin 。
下载后将release中的hadoop-eclipse-plugin-2.6.0.jar放在eclipse下面plugins目录下。
三.配置Hadoop-Plugin
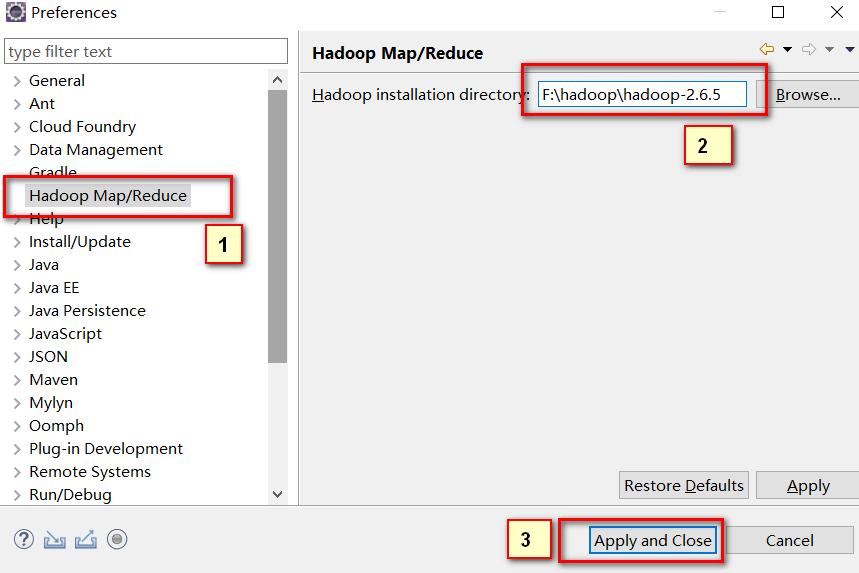
运行eclipse后,点击Window->Preferences在Hadoop Map/Reduce中填上计算机中安装的hadoop目录。
四.在Eclipse中操作HDFS中的文件
我们之前一直使用命令操作Hdfs,接下来再配置几步就可以在Eclipse中可视化操作啦。
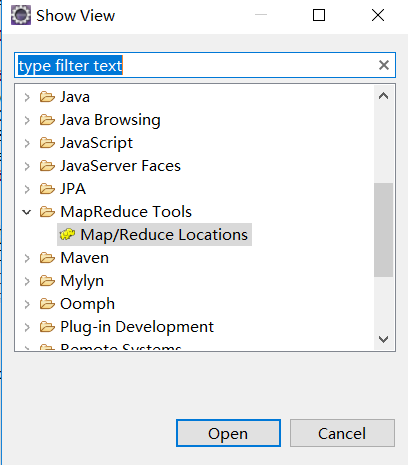
选择Window下面的Show View->Other... ,在弹出的框里面展开MapReduce Tools,选择Map/Reduce Locations点击Open。
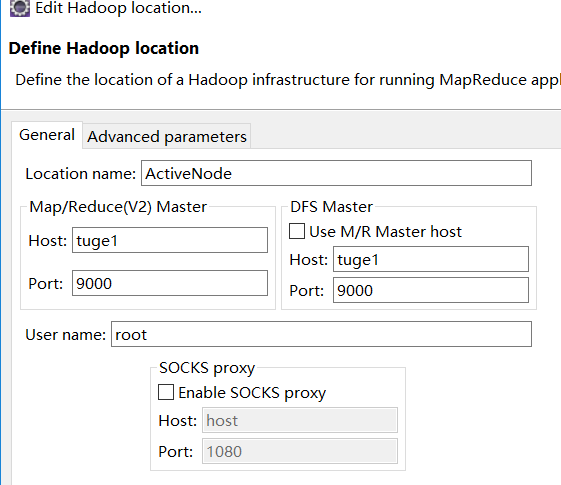
然后在弹出的栏目右键,点击New Hadoop location在弹出框General下面填上活跃的NameNode和端口号信息。

配置好后,可以在左侧刷新即可看到HDFS文件(Tips:对HDFS很多操作后,插件不会自动帮我们刷新内容,需要我们手动刷新)

五.在Eclipse中创建MapReduce项目
选择File->New->Project... 选择Map/Reduce Project ,选择Next,填写项目名称,这里我起名MapReduceFirstDemo。
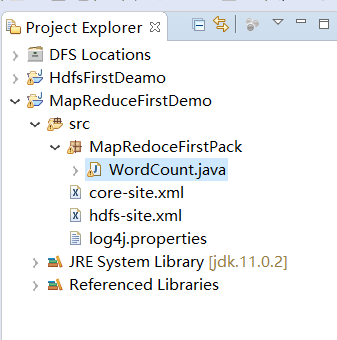
然后将服务器上的core-site.xml和hdfs-site.xml复制到项目根目录下,并在根目录下创建一个log4j.properties,填上如下内容:
hadoop.root.logger=DEBUG, console
log4j.rootLogger = DEBUG, console
log4j.appender.console=org.apache.log4j.ConsoleAppender
log4j.appender.console.target=System.out
log4j.appender.console.layout=org.apache.log4j.PatternLayout
log4j.appender.console.layout.ConversionPattern=%d{yy/MM/dd HH:mm:ss} %p %c{2}: %m%n
在src中右键创建一个Package,起名MapReduceFirstPack,然后在MapReduceFirstPack下面创建一个WordCount类。大致结构如下图:
将下面的代码复制到WordCount里面
package MapRedoceFirstPack;

import java.io.IOException;
import java.util.Iterator;
import java.util.StringTokenizer;
import org.apache.hadoop.conf.Configuration;
import org.apache.hadoop.fs.Path;
import org.apache.hadoop.io.IntWritable;
import org.apache.hadoop.io.Text;
import org.apache.hadoop.mapreduce.Job;
import org.apache.hadoop.mapreduce.Mapper;
import org.apache.hadoop.mapreduce.Reducer;
import org.apache.hadoop.mapreduce.lib.input.FileInputFormat;
import org.apache.hadoop.mapreduce.lib.output.FileOutputFormat;
import org.apache.hadoop.util.GenericOptionsParser;


public class WordCount {

    public static void main(String[] args) throws Exception {
        // TODO Auto-generated method stub
        Configuration conf=new Configuration();
        String[] otherArgs=(new GenericOptionsParser(conf, args)).getRemainingArgs();
        if(otherArgs.length<2) {
            System.err.println("Usage:wordcount");
            System.exit(2);
        }
        Job job=Job.getInstance(conf,"word count");
        job.setJarByClass(WordCount.class);
        job.setMapperClass(WordCount.TokenizerMapper.class);
        job.setCombinerClass(WordCount.IntSumReducer.class);
        job.setReducerClass(WordCount.IntSumReducer.class);
        job.setOutputKeyClass(Text.class);
        job.setOutputValueClass(IntWritable.class);
        for(int i=0;i<otherArgs.length-1;++i) {
            FileInputFormat.addInputPath(job, new Path(otherArgs[i]));
        }
        FileOutputFormat.setOutputPath(job, new Path(otherArgs[otherArgs.length-1]));
        System.exit(job.waitForCompletion(true)?0:1);

    }


    private static class IntSumReducer extends Reducer<Text,IntWritable,Text,IntWritable>{
        public IntSumReducer() {}

        private IntWritable result=new IntWritable();
        public void reduce(Text key,Iterable<IntWritable> values,Reducer<Text,IntWritable,Text,IntWritable>.Context context) throws IOException,InterruptedException{
            int sum=0;
            IntWritable val;
            for(Iterator i$=values.iterator();i$.hasNext();sum+=val.get()) {
                val=(IntWritable)i$.next();
            }
            this.result.set(sum);
            context.write(key, this.result);
        }
    }

    public static class TokenizerMapper extends Mapper<Object,Text,Text,IntWritable>{
        private static final IntWritable one=new IntWritable(1);
        private Text word=new Text();
        public TokenizerMapper() {

        }
        public void map(Object key,Text value,Mapper<Object,Text,Text,IntWritable>.Context context) throws IOException,InterruptedException {
            StringTokenizer itr=new StringTokenizer(value.toString());
            while(itr.hasMoreTokens()) {
                this.word.set(itr.nextToken());
                context.write(this.word, one);
            }

        }


    }

}
六.在Eclipse中运行MapReduce项目
在运行上述项目之前,我们需要配置下运行参数。 在项目右键Run As->Run Configuration。 在弹出的框里面选择Java Applicaton下面的WordCount(Tips:如果没有WordCount,则双击Java Application就有了),在Arguments下面添加input output(Tips:代表了输入目录和输出目录,输入目录放要计算的内容,这个需要自己创建,输出目录一定不要创建,它会自动生成,否则会提示已存在此目录的错误),如下图:
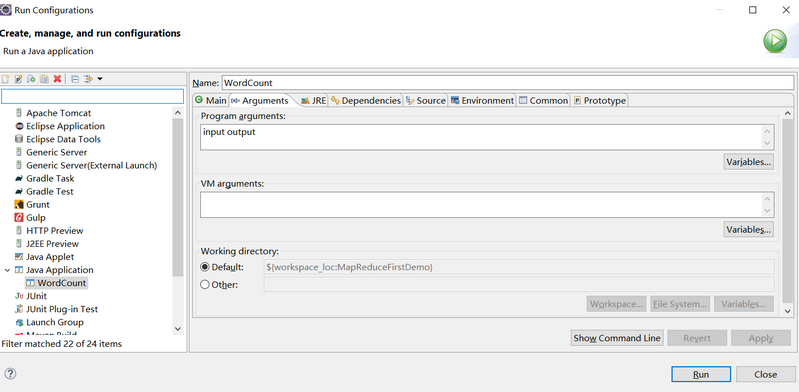
然后点击Run运行。
运行完毕后,在左侧刷新,在output目录可以看到两个文件,_SUCCESS是标识文件,代表执行成功的意思。part-r-00000存放的执行结果。
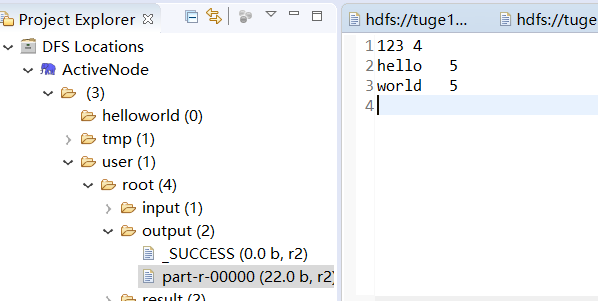
参考资料:
本文来自博客园,作者:数据驱动,转载请注明原文链接:https://www.cnblogs.com/shun7man/p/11763091.html


