Ajax 以及 Ajax基于Promise封装
-
AJAX - 创建 XMLHttpRequest 对象
var xmlhttp = new XMLHttpRequest();
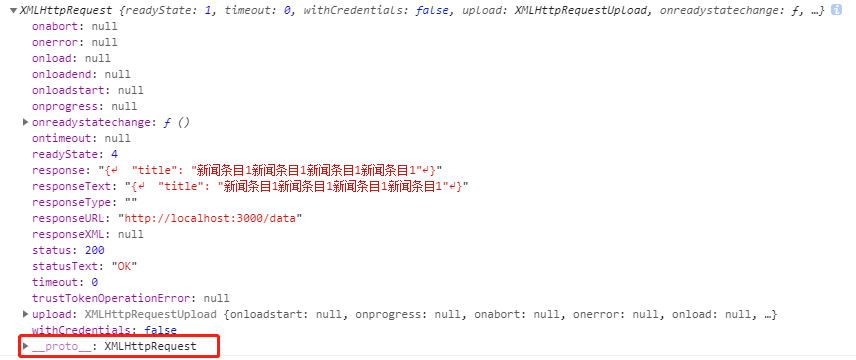
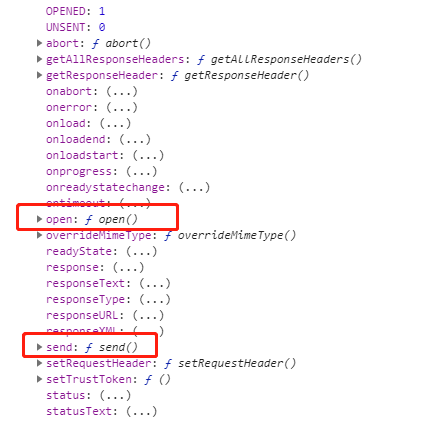
通过打印实例对象我们发现,我们打印的是 xmlhttp 对象,里面所有的属性即是 XMLHttpRequest() 这个构造函数原型对象身上的属性, 既 XMLHttpRequest.prototype的属性
.open()
.send()
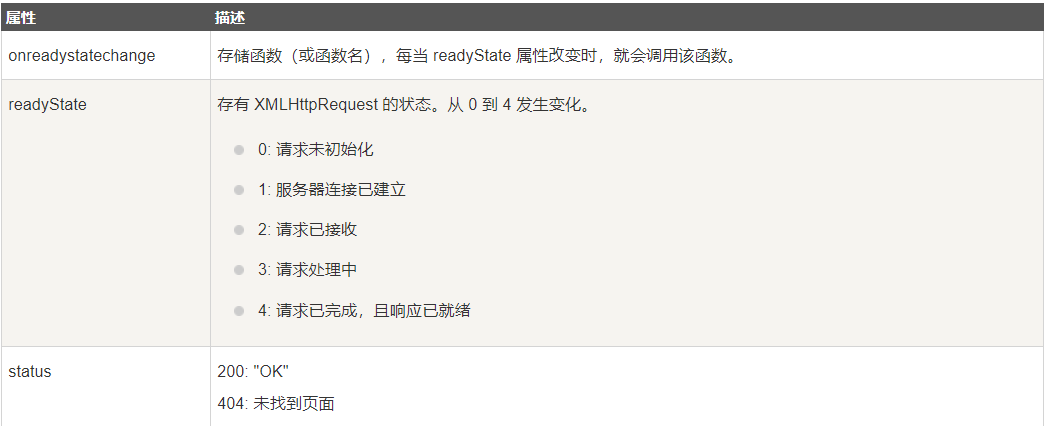
.onreadystatechange
.readyState
.status
所以,xmlhttp实例对象可以访问到这些属性,但是send()和open()存在于圆形链上,xmlhttp.__proto = XMLHttpRequest.prototype


-
AJAX - 向服务器发送请求请求
向服务器发送请求
如需将请求发送到服务器,我们使用 XMLHttpRequest 实例对象的 open() 和 send() 方法:
open的第二个参数url,我们需要把要请求的文件起在本地服务器上,方法在底部

第二个参数url,文件在服务器上的位置,所以说要先本地起一个服务,然后在发请求(最底部有本地起服务的方法)
1 xmlhttp.open("get", "http://localhost:3000/data", true);
2 xmlhttp.send();
-
AJAX - onreadystatechange 事件
当请求被发送到服务器时,我们需要执行一些基于响应的任务。
每当 readyState 改变时,就会触发 onreadystatechange 事件。
readyState 属性存有 XMLHttpRequest 的状态信息。

在 onreadystatechange 事件中,我们规定当服务器响应已做好被处理的准备时所执行的任务。
当 readyState 等于 4 且状态为 200 时,表示响应已就绪:
 xmlhttp.onreadystatechange = function () {
    if (xmlhttp.readyState == 4 && xmlhttp.status == 200) {
      document.getElementById("myDiv").innerHTML = xmlhttp.responseText;
    }
  };
-
AJAX - 服务器 响应
如需获得来自服务器的响应,请使用 XMLHttpRequest 对象的 responseText 或 responseXML 属性

完整代码:
 1 <body>
 2   <div id="myDiv">
 3
 4   </div>
 5 </body>
 6 <script>
 7   var xmlhttp = new XMLHttpRequest();
 8   console.log(XMLHttpRequest.prototype)
 9
10   console.log(xmlhttp.__proto__.send);
11
12   xmlhttp.onreadystatechange = function () {
13     if (xmlhttp.readyState == 4 && xmlhttp.status == 200) {
14       document.getElementById("myDiv").innerHTML = xmlhttp.responseText;
15     }
16   };
17
18   xmlhttp.open("get", "http://localhost:3000/obj", true);
19   xmlhttp.send();
20 </script>
 1   function dataJson(url, type, data) {
 2     const promise = new Promise((reslove, reject) => {
 3       const xmlHttp = new XMLHttpRequest()
 4       xmlHttp.open(type, url)
 5       if (type == 'GET') {
 6         xmlHttp.send()
 7       } else {
 8         xmlHttp.setRequestHeader("Content-Type", "application/json")
 9         xmlHttp.send(JSON.stringify(data))
10       }
11       xmlHttp.responseType = 'json'
12
13       xmlhttp.onreadystatechange = function () {
14         if (xmlhttp.readyState != 4) return
15         if (xmlhttp.status == 200) {
16           resolve(xmlHttp.response)
17         } else {
18           reject(new Error(xmlHttp.statusText))
19         }
20       };
21
22     })
23     return promise
24   }
最后:
1. json-server
终端运行
npm init
安装json-server
npm install -g json-server
项目根目录新建 data.json 文件(就是将数据放到本地服务器上,方便ajax请求)
{
  "obj": {
    "title": "ajax哈哈哈"
  }
}
然后配置命令
"json:server": "json-server --watch data.json"
运行
npm run json:server
输出类似以下内容,说明启动成功
\{^_^}/ hi!

  Loading data.json
  Done

  Resources
  http://localhost:3000/obj

  Home
  http://localhost:3000
浏览器访问 http://localhost:3000/obj,就看到数据了,ajax请求这个路径
json-server 的相关启动参数:
| 参数 | 简写 | 默认值 | 说明 |
|---|---|---|---|
| --config | -c | 指定配置文件 | [默认值: "json-server.json"] |
| --port | -p | 设置端口 [默认值: 3000] | Number |
| --host | -H | 设置域 [默认值: "0.0.0.0"] | String |
| --watch | -w | Watch file(s) | 是否监听 |
| --routes | -r | 指定自定义路由 | |
| --middlewares | -m | 指定中间件 files | [数组] |
| --static | -s | Set static files directory | 静态目录,类比:express的静态目录 |
| --readonly | --ro | Allow only GET requests [布尔] | |
| --nocors | --nc | Disable Cross-Origin Resource Sharing [布尔] | |
| --no | gzip | , --ng Disable GZIP Content-Encoding [布尔] | |
| --snapshots | -S | Set snapshots directory [默认值: "."] | |
| --delay | -d | Add delay to responses (ms) | |
| --id | -i | Set database id property (e.g. _id) [默认值: "id"] | |
| --foreignKeySuffix | -- | fks Set foreign key suffix (e.g. _id as in post_id) | [默认值: "Id"] |
| --help | -h | 显示帮助信息 | [布尔] |
| --version | -v | 显示版本号 | [布尔] |
2,express插件


