


CUDA入门到精通(4)vs2019+cuda11.4创建缺省CUDA工程项目
https://zhuanlan.zhihu.com/p/399725374
CUDA入门到精通(4)vs2019+cuda11.4创建缺省CUDA工程项目
致力于国产CFD开源软件
前面提到了:
这里继续进行关于cuda学习的探索和测试。这个工作开始的时候,作者对cuda所知不多,没怎么用过,结束之后应该基本可以运用到所需要的工程项目中,并逐步迭代完善。这个过程展现出的就是敏捷开发思想。
前面运用此方法的系列是:
言归正传。
安装了vs2019和cuda11.4后,可以创建cuda项目:
打开vs2019

选择创建新项目:
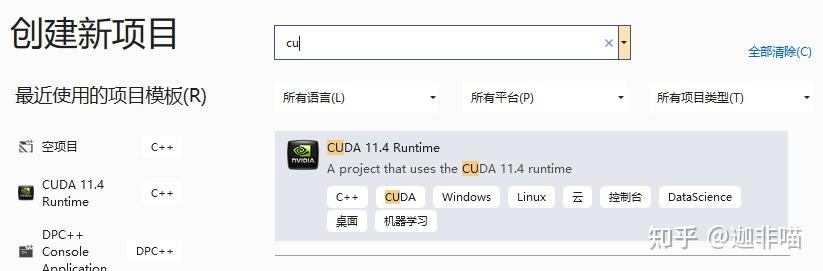
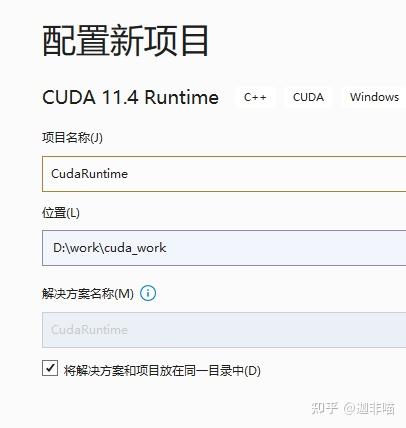
选择CUDA 11.4Runtime,配置
有:
可以看到vs2019自动创建了cuda项目:
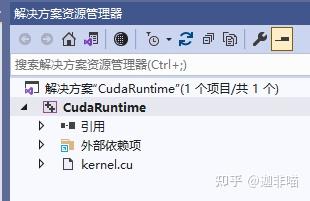
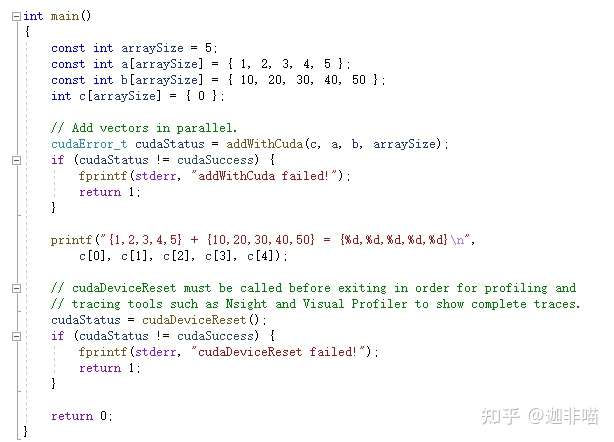
还缺省建立了kernel.cu:
#include "cuda_runtime.h"
#include "device_launch_parameters.h"

#include <stdio.h>

cudaError_t addWithCuda(int *c, const int *a, const int *b, unsigned int size);

__global__ void addKernel(int *c, const int *a, const int *b)
{
    int i = threadIdx.x;
    c[i] = a[i] + b[i];
}

int main()
{
    const int arraySize = 5;
    const int a[arraySize] = { 1, 2, 3, 4, 5 };
    const int b[arraySize] = { 10, 20, 30, 40, 50 };
    int c[arraySize] = { 0 };

    // Add vectors in parallel.
    cudaError_t cudaStatus = addWithCuda(c, a, b, arraySize);
    if (cudaStatus != cudaSuccess) {
        fprintf(stderr, "addWithCuda failed!");
        return 1;
    }

    printf("{1,2,3,4,5} + {10,20,30,40,50} = {%d,%d,%d,%d,%d}\n",
        c[0], c[1], c[2], c[3], c[4]);

    // cudaDeviceReset must be called before exiting in order for profiling and
    // tracing tools such as Nsight and Visual Profiler to show complete traces.
    cudaStatus = cudaDeviceReset();
    if (cudaStatus != cudaSuccess) {
        fprintf(stderr, "cudaDeviceReset failed!");
        return 1;
    }

    return 0;
}

// Helper function for using CUDA to add vectors in parallel.
cudaError_t addWithCuda(int *c, const int *a, const int *b, unsigned int size)
{
    int *dev_a = 0;
    int *dev_b = 0;
    int *dev_c = 0;
    cudaError_t cudaStatus;

    // Choose which GPU to run on, change this on a multi-GPU system.
    cudaStatus = cudaSetDevice(0);
    if (cudaStatus != cudaSuccess) {
        fprintf(stderr, "cudaSetDevice failed!  Do you have a CUDA-capable GPU installed?");
        goto Error;
    }

    // Allocate GPU buffers for three vectors (two input, one output)    .
    cudaStatus = cudaMalloc((void**)&dev_c, size * sizeof(int));
    if (cudaStatus != cudaSuccess) {
        fprintf(stderr, "cudaMalloc failed!");
        goto Error;
    }

    cudaStatus = cudaMalloc((void**)&dev_a, size * sizeof(int));
    if (cudaStatus != cudaSuccess) {
        fprintf(stderr, "cudaMalloc failed!");
        goto Error;
    }

    cudaStatus = cudaMalloc((void**)&dev_b, size * sizeof(int));
    if (cudaStatus != cudaSuccess) {
        fprintf(stderr, "cudaMalloc failed!");
        goto Error;
    }

    // Copy input vectors from host memory to GPU buffers.
    cudaStatus = cudaMemcpy(dev_a, a, size * sizeof(int), cudaMemcpyHostToDevice);
    if (cudaStatus != cudaSuccess) {
        fprintf(stderr, "cudaMemcpy failed!");
        goto Error;
    }

    cudaStatus = cudaMemcpy(dev_b, b, size * sizeof(int), cudaMemcpyHostToDevice);
    if (cudaStatus != cudaSuccess) {
        fprintf(stderr, "cudaMemcpy failed!");
        goto Error;
    }

    // Launch a kernel on the GPU with one thread for each element.
    addKernel<<<1, size>>>(dev_c, dev_a, dev_b);

    // Check for any errors launching the kernel
    cudaStatus = cudaGetLastError();
    if (cudaStatus != cudaSuccess) {
        fprintf(stderr, "addKernel launch failed: %s\n", cudaGetErrorString(cudaStatus));
        goto Error;
    }

    // cudaDeviceSynchronize waits for the kernel to finish, and returns
    // any errors encountered during the launch.
    cudaStatus = cudaDeviceSynchronize();
    if (cudaStatus != cudaSuccess) {
        fprintf(stderr, "cudaDeviceSynchronize returned error code %d after launching addKernel!\n", cudaStatus);
        goto Error;
    }

    // Copy output vector from GPU buffer to host memory.
cudaStatus = cudaMemcpy(c, dev_c, size * sizeof(int), cudaMemcpyDeviceToHost);
    if (cudaStatus != cudaSuccess) {
        fprintf(stderr, "cudaMemcpy failed!");
        goto Error;
    }

Error:
    cudaFree(dev_c);
    cudaFree(dev_a);
    cudaFree(dev_b);

    return cudaStatus;
}
编译有:
已启动生成…
1>------ 已启动生成: 项目: CudaRuntime, 配置: Debug x64 ------
1>Compiling CUDA source file kernel.cu...
1>
1>D:\work\cuda_work\CudaRuntime>"C:\Program Files\NVIDIA GPU Computing Toolkit\CUDA\v11.4\bin\nvcc.exe" -gencode=arch=compute_52,code=\"sm_52,compute_52\" --use-local-env -ccbin "C:\Program Files (x86)\Microsoft Visual Studio\2019\Community\VC\Tools\MSVC\14.29.30133\bin\HostX86\x64" -x cu   -I"C:\Program Files\NVIDIA GPU Computing Toolkit\CUDA\v11.4\include" -I"C:\Program Files\NVIDIA GPU Computing Toolkit\CUDA\v11.4\include"  -G   --keep-dir x64\Debug  -maxrregcount=0  --machine 64 --compile -cudart static  -g  -DWIN32 -DWIN64 -D_DEBUG -D_CONSOLE -D_MBCS -Xcompiler "/EHsc /W3 /nologo /Od /Fdx64\Debug\vc142.pdb /FS /Zi /RTC1 /MDd " -o x64\Debug\kernel.cu.obj "D:\work\cuda_work\CudaRuntime\kernel.cu"
1>kernel.cu
1>  正在创建库 D:\work\cuda_work\CudaRuntime\x64\Debug\CudaRuntime.lib 和对象 D:\work\cuda_work\CudaRuntime\x64\Debug\CudaRuntime.exp
1>CudaRuntime.vcxproj -> D:\work\cuda_work\CudaRuntime\x64\Debug\CudaRuntime.exe
========== 生成: 成功 1 个,失败 0 个,最新 0 个,跳过 0 个 ==========
运行有:

这样利用vs2019创建缺省的CUDA项目的流程测试完毕。
发布于 2021-08-14 14:07
分类:
CUDA编程+GPU


【推荐】国内首个AI IDE,深度理解中文开发场景,立即下载体验Trae
【推荐】编程新体验,更懂你的AI,立即体验豆包MarsCode编程助手
【推荐】抖音旗下AI助手豆包,你的智能百科全书,全免费不限次数
【推荐】轻量又高性能的 SSH 工具 IShell:AI 加持,快人一步
· 阿里最新开源QwQ-32B,效果媲美deepseek-r1满血版,部署成本又又又降低了!
· 开源Multi-agent AI智能体框架aevatar.ai,欢迎大家贡献代码
· Manus重磅发布:全球首款通用AI代理技术深度解析与实战指南
· 被坑几百块钱后,我竟然真的恢复了删除的微信聊天记录!
· 没有Manus邀请码?试试免邀请码的MGX或者开源的OpenManus吧
2021-01-25 使用最新目标跟踪框mmtracking实现自己的目标跟踪项目
2021-01-25 终端常用命令:----------------------->>服务器挂载
2021-01-25 我用YOLO-V5实现行人社交距离风险提示,代码开源!
2021-01-25 在win10、Ubuntu双系统下,卸载Ubuntu
2021-01-25 ubuntu安装并切换多个版本的cuda