
Spring(四)——事务管理
1.概念
Spring的事务管理化简了传统的事务管理流程,一定程度上减少了开发者的工作量。即对本地事务操作的一次性封装,相当于把JDBC代码开启、提交、回滚事务进行了封装。
2.导包
- commons-logging
- spring-beans
- spring-context
- spring-core
- spring-expression(以上是IOC需要的包)
- spring-jdbc
- spring-orm
- spring-tx(以上是JdbcTemplate需要的包,事务管理的核心在tx里)
- mysql-connector-java(数据驱动和数据源)
- com.springsoure.net.sf.cglib
- com.springsoure.org.aopalliance
- com.springsoure.org.aspectj.weaver
- spring-aop
- spring-aspects(AOP的切面技术需要的包)
3.运用事务管理的步骤
(1)创建并配置数据源
(2)通过数据源配置JDBC
(3)配置事务管理器
(4)开启事务注解驱动,然后对要声明成事务的方法用@Transactional注解(也可以用配置文件声明需要变成事务的方法)
(5)对于事务方法里的jdbcTemplate记得装配
如下是开启事务管理的XML文件
<?xml version="1.0" encoding="UTF-8"?>
<beans xmlns="http://www.springframework.org/schema/beans"
    xmlns:xsi="http://www.w3.org/2001/XMLSchema-instance"

    xmlns:p="http://www.springframework.org/schema/p"
    xmlns:util="http://www.springframework.org/schema/util"
    xmlns:context="http://www.springframework.org/schema/context"
    xmlns:aop="http://www.springframework.org/schema/aop"
    xmlns:tx="http://www.springframework.org/schema/tx"
    xsi:schemaLocation="
    http://www.springframework.org/schema/beans
     http://www.springframework.org/schema/beans/spring-beans-4.3.xsd

     http://www.springframework.org/schema/util
     http://www.springframework.org/schema/util/spring-util.xsd

     http://www.springframework.org/schema/context
     http://www.springframework.org/schema/context/spring-context-4.3.xsd

     http://www.springframework.org/schema/aop
     http://www.springframework.org/schema/aop/spring-aop-4.3.xsd

     http://www.springframework.org/schema/tx
     http://www.springframework.org/schema/tx/spring-tx-4.3.xsd
     ">


       <!-- 引入资源文件db.properties,以下两种方式选一种-->
       <bean class="org.springframework.beans.factory.config.PropertyPlaceholderConfigurer">
           <property name="Location" value="db.properties"></property>
       </bean>
       <!-- <context:property-placeholder location="db.properties"/> -->

       <!-- 扫描包 -->
       <context:component-scan base-package="com.atguigu.jdbcc" />

       <!-- 开启通知注解功能 -->
       <aop:aspectj-autoproxy />


       <!-- 1.创建并通过外部资源文件配置数据源 -->
       <bean id="dataSource" class="org.springframework.jdbc.datasource.DriverManagerDataSource">
           <property name="driverClassName" value="${jdbc.driverClassName}"></property>
           <property name="url" value="${jdbc.url}"></property>
           <property name="username" value="${jdbc.username}"></property>
           <property name="password" value="${jdbc.password}"></property>
       </bean>

       <!-- 2.通过数据源配置JdbcTemplate -->
       <bean id="jdbcTemplate" class="org.springframework.jdbc.core.JdbcTemplate">
           <property name="dataSource" ref="dataSource"></property><!-- 通过上面德鲁伊创建的数据源来 -->
       </bean>

       <!-- 3.配置事务管理器 -->
       <bean id="dataSourceTransactionManager" class="org.springframework.jdbc.datasource.DataSourceTransactionManager">
           <property name="dataSource" ref="dataSource"></property>
       </bean>

       <!-- 4.开启事务注解驱动 -->
    <tx:annotation-driven proxy-target-class="true" transaction-manager="dataSourceTransactionManager" />

       <!--5.对于事务方法所在的类DaoImp需要 注入jdbcTemplate,这里用xml配置-->
    <bean id="daoImp" class="com.atguigu.jdbcc.DaoImp">
          <property name="jdbcTemplate" ref="jdbcTemplate" />
    </bean>

</beans>
4.声明事务的几个注意点
(1)事务方法必须是public
(2)开启注解驱动时 需要加上proxy-target-class="true"
(3)注解@Transactional的属性中,(rollbackFor = Exception.class)可写可不写,默认存在
(4)在方法中捕获异常则不回滚
(5)在方法参数后面 抛出异常 会回滚
(6)静态方法则全部都要用静态变量,不回滚
(7)方法中使用的jdbcTemplate变量记得注入,可以通过注解@Autowired或者XML配置
5.事务传播特性(propagation属性)
(1)PROPAGATION_REQUIRED :required , 必须。默认值,A如果有事务,B将使用该事务;如果A没有事务,B将创建一个新的事务。
(2)PROPAGATION_SUPPORTS:supports ,支持。A如果有事务,B将使用该事务;如果A没有事务,B将以非事务执行。
(3)PROPAGATION_MANDATORY:mandatory ,强制。A如果有事务,B将使用该事务;如果A没有事务,B将抛异常。
(4)PROPAGATION_REQUIRES_NEW :requires_new,必须新的。如果A有事务,将A的事务挂起,B创建一个新的事务;如果A没有事务,B创建一个新的事务。
(5)PROPAGATION_NOT_SUPPORTED :not_supported ,不支持。如果A有事务,将A的事务挂起,B将以非事务执行;如果A没有事务,B将以非事务执行。
(6)PROPAGATION_NEVER :never,从不。如果A有事务,B将抛异常;如果A没有事务,B将以非事务执行。
(7)PROPAGATION_NESTED :nested ,嵌套。A和B底层采用保存点机制,形成嵌套事务。
6.事务隔离级别(isolation)
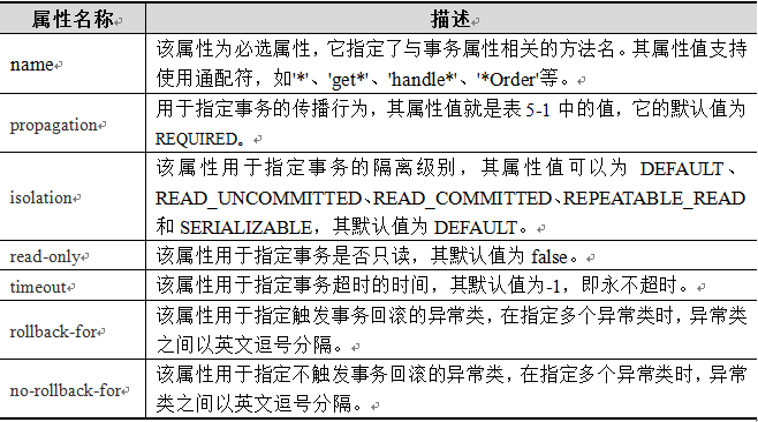
7.事务参数
参考&引用
学习资料:B站尚硅谷Spring视频
https://blog.csdn.net/xiaocai9999/article/details/87902000
