零零散散的python笔记 2
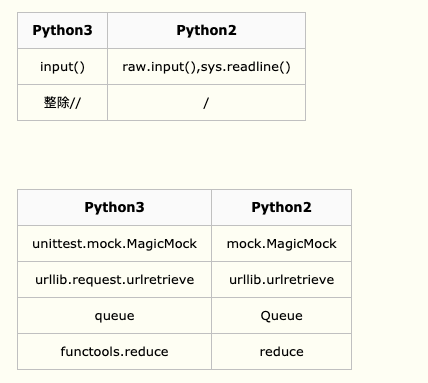
python2和python3的兼容性方面
工具
2to3 python3中自带的工具,可以检查python2升级到python3的diff:
2to3 x.py
2to3 -w x.py # 检查diff的同时,修改原文件并备份
https://docs.python.org/zh-cn/3/library/2to3.html
根据版本来判断
根据sys.version_info.major来判断Python的版本,根据不同的版本导入不同的库。
# -*- coding: utf-8 -*-
import sys

if sys.version_info.major == 2:
    # Python2
    from urllib import urlencode
    from urllib import quote
    from urlparse import urlparse
    import urllib2 as request
else:
    # Python3
    from urllib.parse import urlencode
    from urllib.parse import quote
    from urllib.parse import urlparse
    import urllib.request as request
# do something

一些引入
from __future__ import absolute_import, print_function, divsion
不等于语法
P2 支持使用 <> 和 != 表示不等于。
P3 仅支持使用 != 表示不等于。
P2 中整数类型可以细分为短整型 int 和长整型 long。
P3 废除了短整型,并统一使用 int 表示长整型(不再有 L 跟在 repr 后面)。
# Python 2 only
k =9223372036854775808L
# Python 2 and 3:
k =9223372036854775808
整数除法
P2 的除法 / 符号实际上具有两个功能:
当两个操作数均为整型对象时,进行的是地板除(截除小数部分),返回整型对象;
当两个操作数存在至少一个浮点型对象时,进行的是真除(保留小数部分),返回浮点型对象。
P3 的除法 / 符号仅仅具有真除的功能,而地板除的功能则交由 // 来完成。
# Python 2 only:
assert2 /3 ==0
# Python 2 and 3:
assert2 //3 ==0
“True division” (float division):
# Python 3 only:
assert3 /2 ==1.5
# Python 2 and 3:
from__future__ importdivision # (at top of module)
字符编码类型
P2 默认使用 ASCII 字符编码,但因为 ASCII 只支持数百个字符,并不能灵活的满足非英文字符,所以 P2 同时也支持 Unicode 这种更强大的字符编码。不过,由于 P2 同时支持两套字符编码,就难免多出了一些标识和转换的麻烦。
而 P3 统一使用 Unicode 字符编码,这节省了开发者的时间,同时也可以轻松地在程序中输入和显示更多种类的字符。
兼容技巧:
在所有的字符串赋值中均使用前缀 u,或引入 unicode_literals 字符模块。
# Python 2 only
s1 ='PythonTab'
s2 =u'PythonTab中文网'
# Python 2 and 3
s1 =u'PythonTab'
s2 =u'PythonTab中文网'
# Python 2 and 3
from__future__ importunicode_literals # at top of module
s1 ='PythonTab'
s2 ='PythonTab中文网'
导入模块的路径搜索方式
P2 导入一个模块时首先会搜索当前目录(cwd),若非,则搜索环境变量路径(sys.path)。这一特性时常给开发者带来困扰,相信大家都曾经碰到过,尤其当自定义模块与系统模块重名的时候;
为了解决这个问题,默认的 P3 仅会搜索环境变量路径,当你需要搜索自定义模块时,你可以在包管理模式下将项目路径加入到环境变量中,然后再使用绝对路径和相对路径(以 . 开头)的方式来导入。
兼容技巧:
统一使用绝对路径进行自定义模块导入。
修正列表推导式的变量作用域泄露
P2 的列表推倒式中的变量会泄露到全局作用域,例如:
import platform
print('Python', platform.python_version())
i =1
print('before: I = %s' %i)
print('comprehension: %s' %[i fori inrange(5)])
print('after: I = %s' %i)
# OUT
Python 2.7.6
before: i =1
comprehension: [0, 1, 2, 3, 4]
after: i =4
P3 则解决了这个问题,列表推倒式中的变量不再泄露到全局作用域。
importplatform
print('Python', platform.python_version())
i =1
print('before: i =', i)
print('comprehension:', [i fori inrange(5)])
print('after: i =', i)
# OUT
Python 3.4.1
before: i =1
comprehension: [0, 1, 2, 3, 4]
after: i =1
修正非法比较操作异常
P2 能够对两个数据类型并不相同的对象进行比较。
importplatform
print('Python', platform.python_version())
print("[1, 2] > 'foo' = ", [1, 2] > 'foo')
print("(1, 2) > 'foo' = ", (1, 2) > 'foo')
print("[1, 2] > (1, 2) = ", [1, 2] > (1, 2))
# OUT
Python 2.7.6
[1, 2] > 'foo' = False
(1, 2) > 'foo' = True
[1, 2] > (1, 2) = False
不过,这种看似方便的特性,实际上却是一个定时炸弹,因为你无法唯一的确定到底是什么原因导致的返回值为 False(可能是数据比较、也可能是数据类型不一致)。
P3 则对其进行了修正,如果比较操作数类型不一致时,会触发 TypeError 异常。
兼容技巧:
永远不要比较数据类型不一致的对象。
抛出异常语法
P2 同时支持新旧两种异常触发语法:
raiseIOError, "file error" # Old
raiseIOError("file error") # New
P3 则统一使用新异常触发语法,否则会触发 SyntaxError 异常:
raiseIOError("file error")
兼容技巧:
### 抛出异常
# Python 2 only:
raiseValueError, "dodgy value"
# Python 2 and 3:
raiseValueError("dodgy value")
### 使用 traceback 抛出异常
# Python 2 only:
traceback =sys.exc_info()[2]
raiseValueError, "dodgy value", traceback
# Python 3 only:
raiseValueError("dodgy value").with_traceback()
# Python 2 and 3: option 1
fromsix importreraise as raise_
# or # from future.utils import raise_
traceback =sys.exc_info()[2]
raise_(ValueError, "dodgy value", traceback)
# Python 2 and 3: option 2
fromfuture.utils importraise_with_traceback
raise_with_traceback(ValueError("dodgy value"))
### 异常链处理
# Setup:
classDatabaseError(Exception):
pass
# Python 3 only
classFileDatabase:
def__init__(self, filename):
try:
self.file =open(filename)
exceptIOError as exc:
raiseDatabaseError('failed to open') fromexc
# Python 2 and 3:
fromfuture.utils importraise_from
classFileDatabase:
def__init__(self, filename):
try:
self.file =open(filename)
exceptIOError as exc:
raise_from(DatabaseError('failed to open'), exc)
异常处理语法
P2 实现异常处理也能够支持两种语法。
try:
let_us_cause_a_NameError
exceptNameError, err:
# except NameError as err:
print err, '--> our error message'
P3 的异常处理则强制要求使用 as 关键字的方式。
try:
let_us_cause_a_NameError
exceptNameError as err:
print(err, '--> our error message')
兼容技巧:
统一使用 as 关键字的异常处理方式。
输入函数
P2 支持 raw_input 和 input 两个输入函数,区别在于前者仅能返回 String 类型对象,后者则支持返回数字和字符串两种数据类型对象,并且当输入为表达式时,会隐式调用 eval 函数返回其执行结果。显然的,使用 input 是更加灵活的写法。
所以 P3 统一的使用了 input 函数进行输入处理。
兼容技巧:
统一使用 input 内置函数。
# Python 2 only:
input("Type something safe please: ")
# Python 2 and 3
fromfuture.builtins import input
eval(input("Type something safe please: "))
输出函数
P2 中的 print 即是关键字又是内置函数。print 'Hello world!' 为一条语句,print('Hello world!') 则为一次函数调用。
P3 统一使用 print 函数进行输出操作,其原型如下,这一改变让 P3 的输出处理变得更加简洁、强大而优雅,通过实参的传递就能替代 P2 中繁复的代码实现。
print(*objects, sep=' ', end='\n', file=sys.stdout, flush=False)
兼容技巧:
### 单行打印单个 String
# Python 2 only:
print 'Hello'
# Python 2 only:
print'Hello'
### 单行打印多个 String
# Python 2 only:
print 'Hello', 'Guido'
# Python 2 and 3:
from__future__ importprint_function # (at top of module)
print('Hello', 'Guido')
### 输出重定向
# Python 2 only:
print>> sys.stderr, 'Hello'
# Python 2 and 3:
from__future__ importprint_function
print('Hello', file=sys.stderr)
### 换行打印
# Python 2 only:
print'Hello',
# Python 2 and 3:
from__future__ importprint_function
print('Hello', end='')
文件操作函数
P2 支持使用 file 和 open 两个函数来进行文件操作。
P3 则统一使用 open 来进行文件操作。
兼容技巧:
统一使用 open 函数。
# Python 2 only:
f =file(pathname)
# Python 2 and 3:
f =open(pathname)
列表迭代器生成函数
P2 支持使用 range 和 xrange 两个函数来生成可迭代对象,区别在于前者返回的是一个列表类型对象,后者返回的是一个类似生成器(惰性求值)的迭代对象,支持无限迭代。所以当你需要生成一个很大的序列时,推荐使用 xrange,因为它不会一上来就索取序列所需的所有内存空间。如果只对序列进行读操作的话,xrange 方法效率显然会更高,但是如果要修改序列的元素,或者往序列增删元素的话,那只能通过 range 方法生成一个 list 对象了。
P3 则统一使用 range 函数来生成可迭代对象,但其实 P3 的 range 更像是 P2 的 xrange。所以在 P3 中如果你想得到一个可以被修改的列表对象,你需要这么做:
list(range(1,10))
[1, 2, 3, 4, 5, 6, 7, 8, 9]
兼容技巧:
统一使用 range 函数
# Python 2 only:
fori in xrange(10**8):
...
# Python 2 and 3: forward-compatible
from future.builtins import range
fori in range(10**8):
...
# Python 2 and 3: backward-compatible
frompast.builtins importxrange
fori inxrange(10**8):
...
迭代器迭代函数
P2 中支持使用内置函数 next 和迭代器对象的 .next() 实例方法这两种方式来获取迭代器对象的下一个元素。所以,在实现自定义迭代器对象类时,必须实现 .next() 实例方法:
# Python 2 only
classUpper(object):
def__init__(self, iterable):
self._iter =iter(iterable)
defnext(self): # Py2-styface iterator interface
returnself._iter.next().upper()
def__iter__(self):
returnself
itr =Upper('hello')
assertitr.next() =='H' # Py2-style
assertlist(itr) ==list('ELLO')
但在 P3 中统一了使用 next 内置函数来获取下一个元素,如果试图调用 .next() 方法则会触发 AttributeError 异常。所以,在 P3 中实现自定义迭代器所要实现的是 __next__ 特殊方法。
兼容技巧:
# Python 2 and 3: option 1
fromfuture.builtins importobject
classUpper(object):
def__init__(self, iterable):
self._iter =iter(iterable)
def__next__(self): # Py3-style iterator interface
returnnext(self._iter).upper() # builtin next() function calls
def__iter__(self):
returnself
itr =Upper('hello')
assertnext(itr) =='H' # compatible style
assertlist(itr) ==list('ELLO')
# Python 2 and 3: option 2
fromfuture.utils importimplements_iterator
@implements_iterator
classUpper(object):
def__init__(self, iterable):
self._iter =iter(iterable)
def__next__(self): # Py3-style iterator interface
return next(self._iter).upper() # builtin next() function calls
def__iter__(self):
returnself
itr =Upper('hello')
assertnext(itr) =='H'
assertlist(itr) ==list('ELLO')
python3 next: https://www.runoob.com/python3/python3-file-next.html

