


Tensorflow on Modeling
1.!pip install tensorflow
遇到问题
ValueError: numpy.ufunc size changed, may indicate binary incompatibility. Expected 216 from C header, got 192 from PyObject
2.!pip install --upgrade numpy
Looking in indexes: http://mirrors.cloud.aliyuncs.com/pypi/simple/
Requirement already satisfied: numpy in /root/****
WARNING: Running pip as the 'root' user can result in broken permissions and conflicting behaviour with the system package manager. It is recommended to use a virtual environment instead: https://pip.pypa.io/warnings/venv
3.仍然无法安装
直接从清华镜像下载,起作用。
!pip install -i https://pypi.tuna.tsinghua.edu.cn/simple numpy==1.19.5
这个版本是 TF 要求的。
4.Jupyter报错
InvalidArgumentError: cannot compute MatMul as input #1(zero-based) was expected to be a double tensor but is a float tensor [Op:MatMul] name: MatMul/
解决方法,用 TF 再构造一遍矩阵
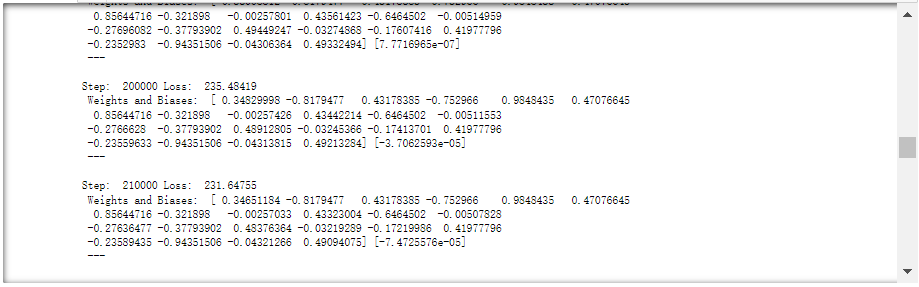
5.训练过程中遇到 ZigZag
一开始还不信,我又测试了一个确定数据
1 2 3 4 5 6 7 8 9 10 11 12 13 14 15 16 17 18 19 20 21 22 23 24 25 26 27 28 29 30 31 32 33 34 35 36 37 38 39 40 41 42 | import tensorflow as tf# --- create TF INPUT DATA ---- # weights and biases refer: https://zhuanlan.zhihu.com/p/33742694 # initial weights and biases, normal distribution value from 0 to 1Weights = tf.Variable(tf.random.uniform([1], -1.0, 1.0) )biases = tf.Variable(tf.zeros([1])) # y=Y; x_data=X; y_data = x_data + biases # Matrix Computation refer: https://blog.csdn.net/kane7csdn/article/details/84843154y=tf.constant([2,6,12,20,30,42,56,72,90], dtype='float32' )x_data = tf.constant( [[1,2,3,4,5,6,7,8,9], [1,4,9,16,25,36,49,64,81]], dtype='float32')y_data_mat = tf.multiply(x_data, Weights) # 这里注意, tf.matmul 不能用,因为 tf.matmul 针对 rank>2 的。rank=1 用 multiplyy_data = tf.reduce_sum(y_data_mat, axis=0)+biases # 按列相加loss = tf.reduce_mean(tf.square(y-y_data)) # loss 是一个数值,永远大于 0 # optimizeroptimizer = tf.compat.v1.train.GradientDescentOptimizer(0.0001) # Parameter:learning ratetf.compat.v1.disable_eager_execution() # traintrain = optimizer.minimize(loss, var_list=(Weights, biases)) # defining training process # initializationinit = tf.compat.v1.global_variables_initializer()<br># --- create tensorflow structure END ---- # activation -- BEFORE launch a session!sess = tf.compat.v1.Session()sess.run(init) # Very importance stepfor step in range(6): sess.run(train) if step % 1 == 0: print("Step: ", step, "Loss: ", sess.run(loss), "Weights and Biases: ", sess.run(Weights), sess.run(biases)) |
------------------------------------ Code Suite ------------------------------------
optimizer = tf.compat.v1.train.GradientDescentOptimizer( learning_rate )
train = optimizer.minimize(loss, var_list=(Weights, biases))
for { sess.run(train) }
只改变 tf.Variable() 不改变 tf.constant()
-----------------------------------------------------------------------------------------
得到结果
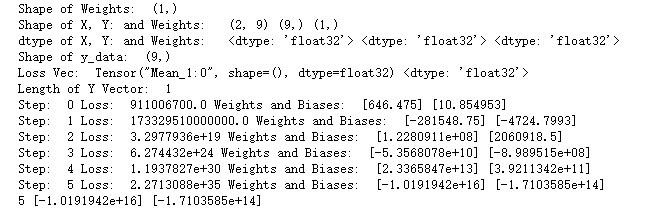
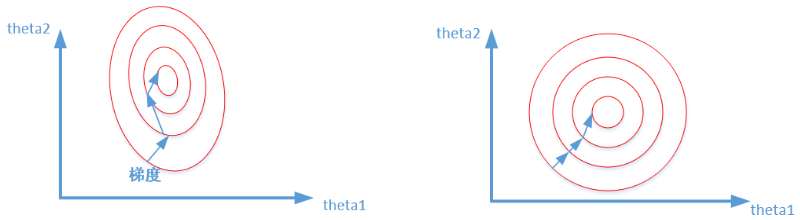
问题:因为 learning rate 太大造成 zigzag。
参考:https://blog.csdn.net/charles_neil/article/details/107981854
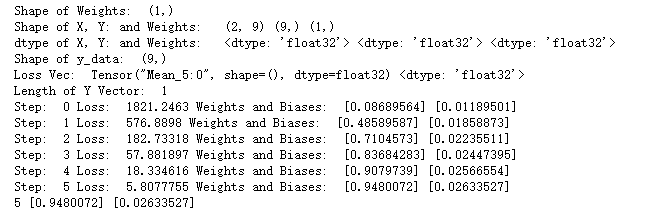
因此测试更小的 learning rate。于是,learning rate 调整成万分之一,即 0.0001,终于下降了!
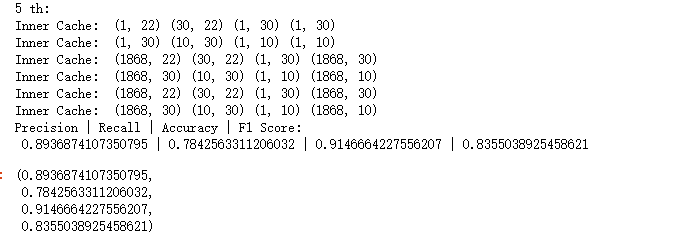
6.模型评估
查准率、查全率、F1score 的计算。按行是 before,按列 after,这是习惯,必须记住,这个问题和别人反过来就聊不了了。
口诀:左边是过去,上边是未来。
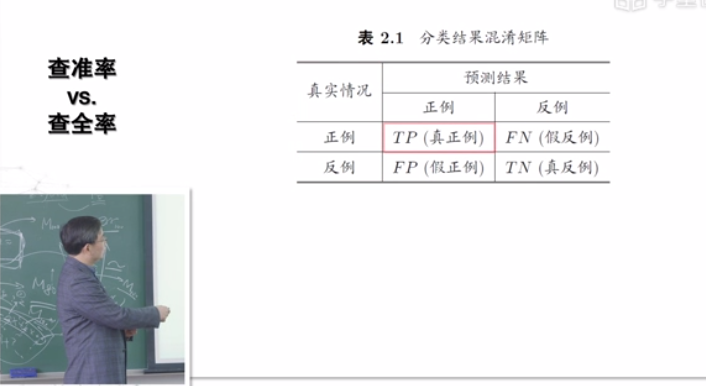
* Precision = TP / (TP+FP)
* Recall = TP / (TP+FN)
* Accuracy = (TP+FN) / (TP+TN+FP+FN)
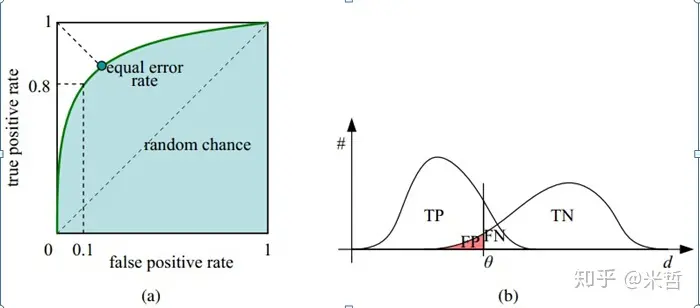
其他资料,具象化理解。注意,alpha 第一类错误,beta 第二类错误,如何理解。
参考
https://zhuanlan.zhihu.com/p/73569538
7.重新复习了一下自己解构的神经网络模型代码
注意以下几点:
(1)前传的工作,主要是识别每一层神经元,是怎么接受上一层的信息的,这个【权重】是前传的时候训练的。关注点,因为每个神经元都有 Activation Func. 所以是非线性的,传播的时候还是 Linear Product。
(2)后传播,和 Loss Function, Learning Rate 都有关系,Loss Function 决定方向,Learning Rate 决定步长。方向的计算方法,例如,obj = (x-xi)^2, grad = 2*(x-xi) ,向量每个 dimension 的数值代入即可。
(3)一个 Fetch 含义,先前传识别权重分布,再后传调整向量方向。训练出的权重应该是可以直接乘在特征上的。 —— 暂时这么理解吧,还不是很自信呐!
神经网络代码解读:https://shoelesscai.com/EssaySpace2/a/153005100001/945
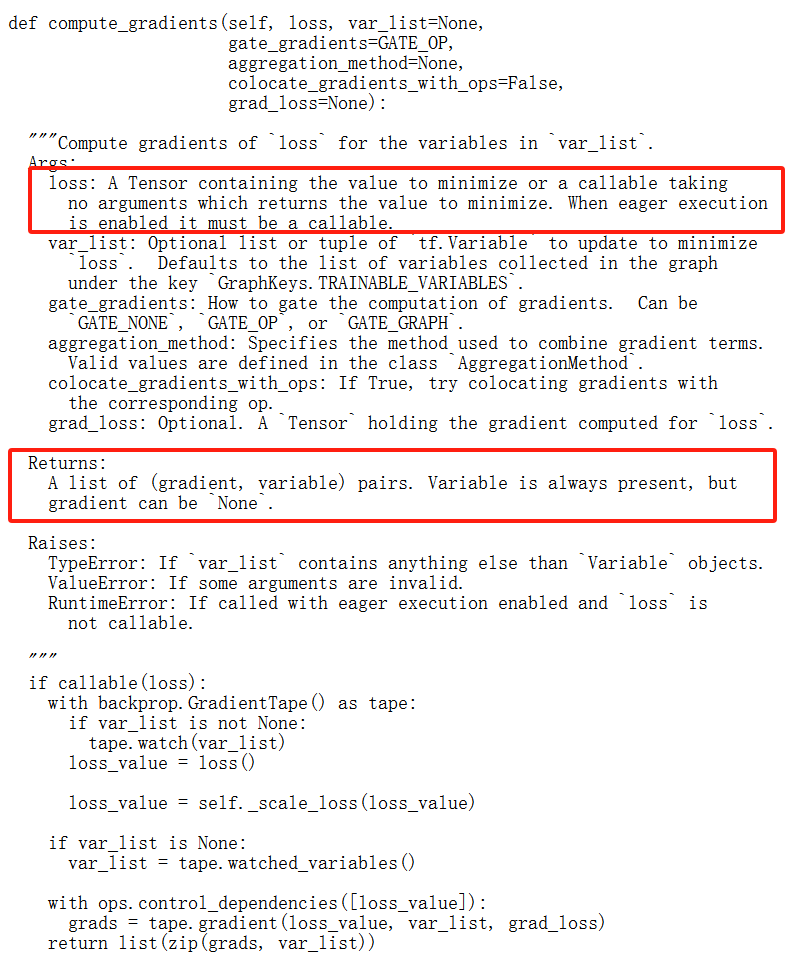
8.查了下 Github 源代码,目的是,确认上述理解正确。
关注,离散情况,如何计算 Gradient,以至于梳理出返回的是 Weights 本身,还是 Differentiation。
9.找资料时候 关于 Placeholder 用法
参考
https://blog.csdn.net/weixin_43615222/article/details/84330475
10.tf.train.AdamOptimizer() 学习率会变 —— CHECK
参考
https://www.jianshu.com/p/200f3c4336a3
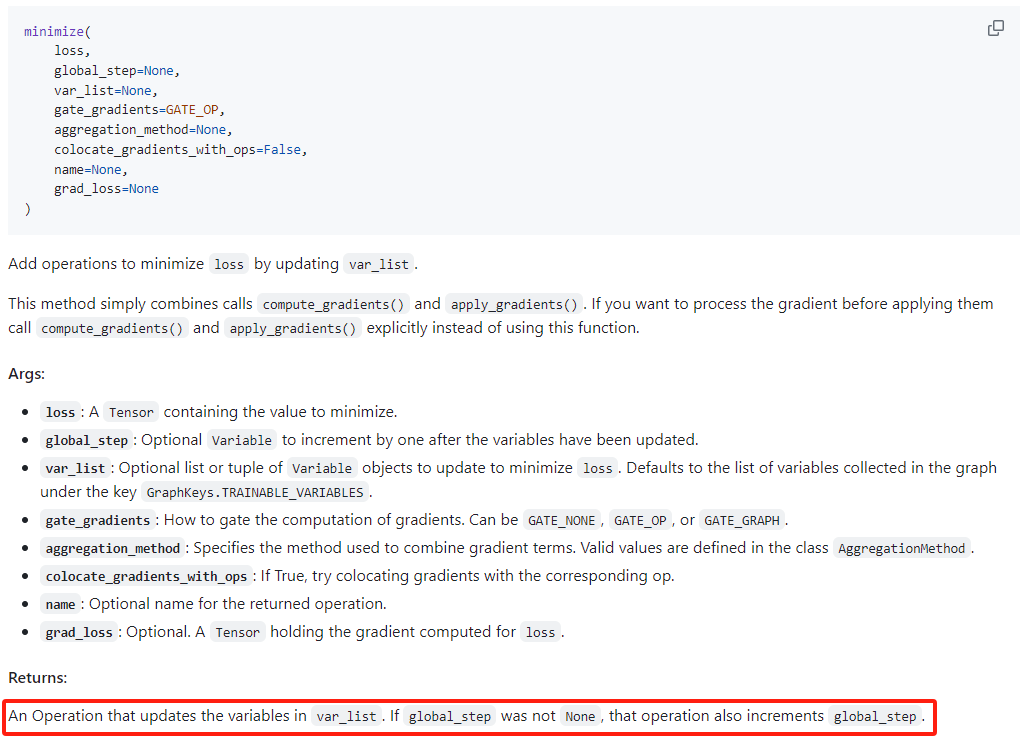
11. tf.train.GradientDescentOptimizer()
参考 Github ,也不知是不是官方的。参考:
https://github.com/William-Yin123/tensorflow-docs/blob/master/tf/compat/v1/train/GradientDescentOptimizer.md
w3school 解答
https://www.w3cschool.cn/doc_tensorflow_python/tensorflow_python-tf-train-gradientdescentoptimizer.html
我们得出结论,.minimize() 子函数用户修改输入的 var_list。
因此,按照上述模型训练,输入的权重 weights 和偏差 biases 就是更改之后可以直接使用的。
12.如何理解 TF 的 tf.Variable() 和 tf.constant() ?
参考
https://blog.csdn.net/huqinweI987/article/details/82771521
13.TF 讨论区
https://discuss.tensorflow.org/
14.TF 内置方法训练和评估
https://tensorflow.google.cn/guide/keras/train_and_evaluate?hl=zh-cn
15.激活函数选择
https://zhuanlan.zhihu.com/p/427541517
16.学习率过小
笔者第一反应,是否需要对变量进行标准化。
下降速度如图所示。
标准化作用
参考: https://zhuanlan.zhihu.com/p/148394470
17.第一个版本完成,自我评价
2024年4月11日,7:47PM。完成一个模型。最终发现是个多元回归,不是神经网络。表示我对神经网络没理解。
那么,先思考这么个问题,隐藏层到底是什么,还是特征吗?这是个好问题,因为隐藏层可以有不同的 Neuron,因此肯定和特征个数(即向量维度会有差)。
我们可以这么总结,隐藏层是 Activate( Linear-Product ),Linear-Product = Weight * 前一层的输出值(前一层为输入层的话,这个输出值就是 Feature Value)。
以下是其他人的解释。
来源:https://zhuanlan.zhihu.com/p/50476131
我们的输入特征是:身高、体重、胸围、腿长、脸长等等一些外貌特征,输出是三个类:帅气如彭于晏,帅气如我,路人。
那么隐藏层H1中,身高体重腿长这些特征,在H1中表达的特征就是身材匀称程度,胸围,腰围,臀围这些可能表达的特征是身材如何,脸长和其他的一些长表达的特征就是五官协调程度。
那么把这些特征,再输入到H2中,H2中的神经元可能就是在划分帅气程度,身材好坏了,然后根据这些结果,分出了三个类。
忘了贴结果了,第一个版本没有增加 【隐藏层】。

18.损失集锦
平时使用,知道选项及后果即可。
参考:https://zhuanlan.zhihu.com/p/44216830
19.神经网络模型,手把手教
讲得蛮清楚,当作分解动作,可以用来专项练习。
参考:https://zhuanlan.zhihu.com/p/373664997
这篇文章的【结论】作参考,我自己还没看。
https://zhuanlan.zhihu.com/p/363645881
20.第二天,2024年4月12日。今天我测试 Neural Network,TF。
1) tf.compat.v1.placeholder + sess.run( 优化器, feed_dict={ x_place: x } )
2) 上述操作遇到问题:x 变量类型有限制,不能把 tf.Tensor 传进去。可选择的 x 变量,scalars, strings, lists, numpy ndarrays, or TensorHandles。
参考
https://blog.csdn.net/sdnuwjw/article/details/85935373
我采取的解决方式,即强行转换为 np.ndarray。
21.今天上午我模型调整出来
第一,隐藏层中间的神经元数量自己确定;
第二,如果是 tf.placeholder + sess.run( , feed_dict={ } ) feed_dict 只能 feed array / string 之类的,tf 内部定义数据类型,不行。
第三,tf.Tensor 转换 np.array var_new = var.eval( session=sess ) 这样就能转换了!
调通的代码如下:
1 2 3 4 5 6 7 8 9 10 11 12 13 14 15 16 17 18 19 20 21 | import numpy as npimport tensorflow as tftf.compat.v1.disable_eager_execution()sess = tf.compat.v1.Session()(x_train, y_train), (x_test, y_test) = tf.keras.datasets.mnist.load_data()# 规定数据类型x_train = x_train.astype('float32')x_test = x_test.astype('float32')m, n, k=x_train.shapeprint(x_train.dtype)x_train_1=x_train[:,:,0]print(x_train_1.shape)for i in range(1,k): x_train_1 = np.hstack([x_train_1, x_train[:,:,i]])print( x_train_1.shape) |
运行结果
float32
(60000, 28)
(60000, 784)
1 2 3 4 5 6 7 8 9 10 11 12 13 14 15 16 17 18 19 20 21 22 23 24 25 26 27 28 29 30 31 32 33 34 35 36 37 38 39 40 41 42 43 44 45 46 | import tensorflow as tf# 构建神经网络结构x = tf.compat.v1.placeholder(tf.float32, [None, 784]) # 输入y = tf.compat.v1.placeholder(tf.float32, [None, 10]) # 输出keep_prob = tf.compat.v1.placeholder(tf.float32) # Dropout的保留比例W1 = tf.Variable(tf.compat.v1.random.truncated_normal([784, 500], stddev=0.1))b1 = tf.Variable(tf.zeros([500]))W2 = tf.Variable(tf.compat.v1.random.truncated_normal([500, 10], stddev=0.1))b2 = tf.Variable(tf.zeros([10]))h1 = tf.nn.relu(tf.matmul(x, W1) + b1) # 第一层隐藏层,激活函数使用ReLU# h1_dropout = tf.nn.dropout(h1, keep_prob) # 第一层隐藏层加入Dropouth1_dropout =h1y_pred = tf.nn.softmax(tf.matmul(h1_dropout, W2) + b2) # 输出层,激活函数使用Softmaxprint("y_pred shape: ", h1.shape)# 定义损失函数、优化器cross_entropy = tf.reduce_mean(-tf.reduce_sum(y * tf.math.log(y_pred), axis=1 ))train_step = tf.compat.v1.train.AdamOptimizer(learning_rate=0.01).minimize(cross_entropy)# 训练模型with tf.compat.v1.Session() as sess: sess.run(tf.compat.v1.global_variables_initializer()) for i in range(10000): batch_xs, batch_ys = x_train_1[:100] , y_train[:100] # mnist.train.next_batch(100) print(batch_xs.shape, "w1", W1.shape) x_w_multiply = tf.matmul(batch_xs_1, W1) h2 = tf.nn.relu( x_w_multiply + b1 ) batch_ys = tf.nn.softmax(tf.matmul(h2, W2) + b2) # -- data_tensor.eval(session=sess) batch_xs_1 = batch_xs batch_ys_1 = batch_ys.eval(session=sess) sess.run(train_step, feed_dict={x: batch_xs_1, y: batch_ys_1, keep_prob: 0.5}) # Dropout保留50% # 在测试集上测试模型性能 correct_prediction = tf.equal(tf.argmax(y_pred, 1), tf.argmax(y, 1)) accuracy = tf.reduce_mean(tf.cast(correct_prediction, tf.float32)) print("Test accuracy with Dropout:", sess.run(accuracy, feed_dict={x: mnist.test.images, y: mnist.test.labels, keep_prob: 1.0})) # Dropout保留100% |
运行结果
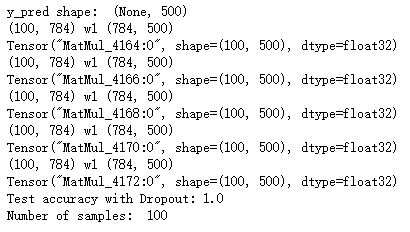
2024.4.17 构建了本人第一个,BP-NN!
这个结果我还没分析过,换言之,就是数据还没看过。
这个公式最好用。


参考:https://shoelesscai.com/EssaySpace2/a/153005100001/945
另一篇 卷积神经网络,Airbnb。
参考:https://shoelesscai.com/EssaySpace2/a/153005100001/944
ShoelessCai.com 值得您关注!


【推荐】国内首个AI IDE,深度理解中文开发场景,立即下载体验Trae
【推荐】编程新体验,更懂你的AI,立即体验豆包MarsCode编程助手
【推荐】抖音旗下AI助手豆包,你的智能百科全书,全免费不限次数
【推荐】轻量又高性能的 SSH 工具 IShell:AI 加持,快人一步
· 被坑几百块钱后,我竟然真的恢复了删除的微信聊天记录!
· 没有Manus邀请码?试试免邀请码的MGX或者开源的OpenManus吧
· 【自荐】一款简洁、开源的在线白板工具 Drawnix
· 园子的第一款AI主题卫衣上架——"HELLO! HOW CAN I ASSIST YOU TODAY
· Docker 太简单,K8s 太复杂?w7panel 让容器管理更轻松!