WebSocket集群解决方案,不用MQ

首先不了解WebSocket的可以先看看这篇文章,以及传统的WebSocket方案是怎么做的,https://www.cnblogs.com/jeremylai7/p/16875115.html 这是用MQ解决的版本,那么这种方案存在什么问题呢。

第一:增加MQ,可能造成消息挤压、消息顺序的问题

第二:增加MQ,则还需要保证MQ的可用性

第三:每个socket服务都需要去消费消息,增加每个服务的压力(做无用功)


那么,基于以上问题,还有没有解决方案呢?

当然有!!!


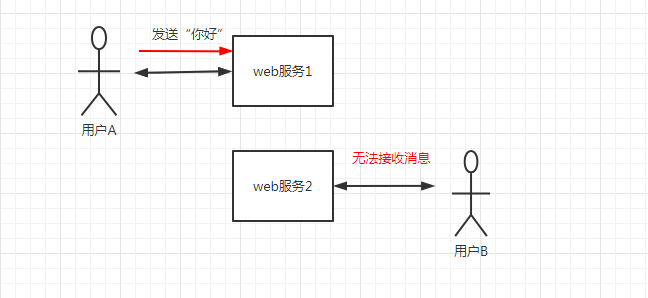
首先我们理解一个逻辑,为什么WebSocket不能直接做集群,socket是一个长链接,当我们要给socket用户发送消息的时候,我们不知道用户是连接到哪一个服务上面的,这样就无法直接发送消息了
 

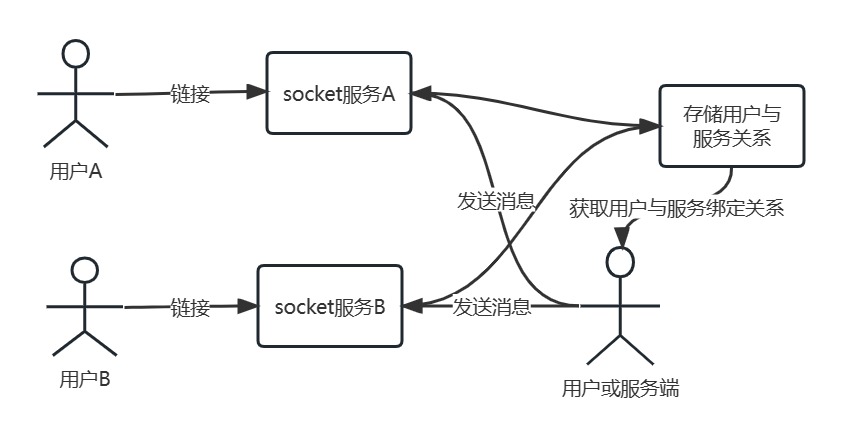
那么,我们能不能给每一个socket服务器增加一个标识,然后在用户连接的时候将用户与socket服务器的关系绑定起来,然后在使用的时候再去判断用户存在哪,再给指定的服务器发送消息不就解决问题了吗?
 

那么,我们来结合springcloud来完成这个工作,根据这个理论,其他方式也可以实现

首先,来看websocket服务,启动的时候主要注意的问题

@SpringBootApplication
public class WsApplication implements CommandLineRunner {

    public static void main(String[] args) {
        //动态服务名
        System.setProperty("SpringApplicationName", "WS-" + IdUtil.simpleUUID());
        SpringApplication.run(WsApplication.class, args);
    }

    @Override
    public void run(String... args) {
        System.out.println("项目启动完毕");
    }

}

需要注意的是动态服务名这里,每个服务的名字都是不一样的,这样就保证了每个服务的一个唯一性

spring:
  application:
    #随机名字,做ws集群使用
    name: ${SpringApplicationName}
  #    name: ws
  redis:
    host: 127.0.0.1
  cloud:
    nacos:
      server-addr: 127.0.0.1
      config:
        file-extension: yaml

server:
  port: 9090

这里用到了nacos与redis,使用的地方待会会有,其中SpringApplicationName是在启动的时候传入的

接下来看WebSocket链接时候需要注意的点

@Component
@ServerEndpoint("/ws/{userId}")
public class WebSocket {

    /**
     * 存放用户信息
     */
    private static final ConcurrentHashMap<Long, WebSocket> WEB_SOCKET_MAP = new ConcurrentHashMap<>(16);
    /**
     * session
     */
    private Session session;

    private Long userId;

    private String applicationName = System.getProperty("SpringApplicationName");

    private StringRedisTemplate stringRedisTemplate = SpringUtil.getBean(StringRedisTemplate.class);

    /**
     * 静态常量
     */
    private static final String SOCKET_USER_SPRING_APPLICATION_NAME = "ws:socket:user:spring:application:name";

    /**
     * 当有新的WebSocket连接完成时
     *
     * @param session
     * @param userId
     */
    @OnOpen
    public void onOpen(Session session, @PathParam("userId") Long userId) {
        System.out.println("new connection");
        System.out.println(userId);
        this.session = session;
        //根据token获取用户信息
        this.userId = userId;
        WEB_SOCKET_MAP.put(this.userId, this);
        this.stringRedisTemplate.opsForHash().put(SOCKET_USER_SPRING_APPLICATION_NAME, userId + "", applicationName);
    }
}

其中在链接的时候,将用户ID与socket服务的关系保存进了redis,这样我们在使用的时候就可以根据这个关系,找到对应的socket服务从而实现自己的业务逻辑

然后我们定义一个发送消息的接口

@RestController
@RequestMapping("push")
public class PushController {


    @PostMapping("{userId}")
    public void pushMessage(@PathVariable Long userId, @RequestBody JSONObject message) {
        WebSocket.sendMessage(userId, message);
    }
}

再单独封装一个接口,供使用方使用feign

@FeignClient(name = "pushFeign", configuration = DynamicRoutingConfig.class)
public interface PushFeign {

    /**
     * 推送消息
     *
     * @param serviceName 服务名
     * @param userId      用户
     * @param message     消息体
     */
    @PostMapping(value = "//{serviceName}/push/{userId}")
    void pushMessage(@PathVariable String serviceName, @PathVariable Long userId, @RequestBody JSONObject message);
}

再来个Service

@Service
public class PushService {

    @Resource
    private PushFeign pushFeign;

    @Resource
    private StringRedisTemplate stringRedisTemplate;

    /**
     * 静态常量
     */
    private static final String SOCKET_USER_SPRING_APPLICATION_NAME = "ws:socket:user:spring:application:name";

    /**
     * 发送消息
     *
     * @param userId
     * @param message
     */
    public void pushMessage(Long userId, JSONObject message) {
        Object serviceName = this.stringRedisTemplate.opsForHash().get(SOCKET_USER_SPRING_APPLICATION_NAME, userId + "");
        if (serviceName != null) {
            this.pushFeign.pushMessage(serviceName.toString(), userId, message);
        }
    }
}

还有个feign的配置文件,将链接重写DynamicRoutingConfig

public class DynamicRoutingConfig {
    @Bean
    public RequestInterceptor cloudContextInterceptor() {
        return template -> {
            String url = template.url();
            if (url.startsWith("//")) {
                url = "http:" + url;
                if (url.contains("?")) {
                    url = url.substring(0, url.indexOf("?"));
                }
                template.target(url);
                template.uri("");
            }
        };
    }
}

那么在使用的时候,我们可以直接调用PushService.pushMessage方法就可以直接给对应的用户发送消息了


那么可能又有人想问了,每个服务都不一样,那网关这些该怎么做,项目源码已经放在了码云上面, https://gitee.com/liupan1230/spring-cloud-websocket-cluster  大家可以参考,同时也有发送方调用示例

posted @ 2023-03-28 11:26  十月南城  阅读(2072)  评论(0编辑  收藏  举报