《项目实战》springboot开始
源码地址
https://github.com/OctoberSouth/spring-series-demo
首先创建maven项目,我这里用的开发工具是idea,用eclipse这些也可以,工具只是帮助我们开发的东西而已
首先创建父级项目
<?xml version="1.0" encoding="UTF-8"?>
<project xmlns="http://maven.apache.org/POM/4.0.0"
   xmlns:xsi="http://www.w3.org/2001/XMLSchema-instance"
   xsi:schemaLocation="http://maven.apache.org/POM/4.0.0 http://maven.apache.org/xsd/maven-4.0.0.xsd">
   <modelVersion>4.0.0</modelVersion>
   <groupId>com.lp</groupId>
   <artifactId>springboot-series</artifactId>
   <version>0.0.1-SNAPSHOT</version>
   <packaging>pom</packaging>

   <modules>
      <!-- 用户子级项目 -->
      <module>springboot-user</module>
   </modules>

   <name>springboot</name>
   <url>http://maven.apache.org</url>

   <properties>
      <project.build.sourceEncoding>UTF-8</project.build.sourceEncoding>
      <maven-jar-plugin.version>3.0.0</maven-jar-plugin.version>
      <maven.compiler.source>1.8</maven.compiler.source>
      <maven.compiler.target>1.8</maven.compiler.target>
      <skipTests>true</skipTests>
   </properties>

   <!-- 指定Spring Boot的版本 2.2.1.RELEASE -->
   <parent>
      <groupId>org.springframework.boot</groupId>
      <artifactId>spring-boot-starter-parent</artifactId>
      <version>2.2.1.RELEASE</version>
   </parent>

   <dependencies>
   </dependencies>

</project>
然后创建springboot-user子级项目
<?xml version="1.0" encoding="UTF-8"?>
<project xmlns="http://maven.apache.org/POM/4.0.0"
         xmlns:xsi="http://www.w3.org/2001/XMLSchema-instance"
         xsi:schemaLocation="http://maven.apache.org/POM/4.0.0 http://maven.apache.org/xsd/maven-4.0.0.xsd">

    <modelVersion>4.0.0</modelVersion>
    <!-- 用户相关 -->
    <artifactId>springboot-user</artifactId>
    <packaging>jar</packaging>
    <name>springboot-user</name>
    <description>用户模块</description>

    <parent>
        <artifactId>springboot-series</artifactId>
        <groupId>com.lp</groupId>
        <version>0.0.1-SNAPSHOT</version>
    </parent>


    <dependencies>
    </dependencies>

    <!-- 这个插件,可以将应用打包成一个可执行的jar包 -->
    <build>
        <plugins>
            <plugin>
                <groupId>org.springframework.boot</groupId>
                <artifactId>spring-boot-maven-plugin</artifactId>
            </plugin>
        </plugins>
    </build>
</project>
创建AppleApplication启动类
package com.lp;

import org.springframework.boot.CommandLineRunner;
import org.springframework.boot.SpringApplication;
import org.springframework.boot.autoconfigure.SpringBootApplication;

/**
 * springboot 启动
 */
@SpringBootApplication
/**
 * 启动
 * @author 刘攀
 * @version 1.0
 * @date 2019/12/5 21:15
 * @return
 * @describe
 */
public class AppleApplication implements CommandLineRunner {

   public static void main(String[] args) {
      SpringApplication.run(AppleApplication.class, args);
   }

   @Override
   public void run(String... strings) {
      System.out.println("服务启动完毕.");
   }
}
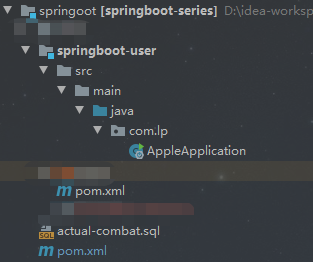
最后形成的项目结构

然后执行AppleApplication的main方法

看到控制台有如下结果,则表明springboot项目启动成功,默认访问端口8080

浏览器访问http://127.0.0.1:8080/ 页面显示以下内容,则表示我们springboot项目搭建成功
进阶之路,神挡杀神佛挡杀佛,欢迎大家一起加QQ群共同讨论成长,群号:620095084
欢迎搜索关注微信公众号 基础全知道 :JavaBasis ,第一时间阅读最新文章
欢迎搜索关注微信公众号 基础全知道 :JavaBasis ,第一时间阅读最新文章

