
React全家桶开发「新闻后台管理项目」实战(前端项目+源码)
本项目1.0完成于2022年3月8日,请注意时效~
// 暂不可用!项目部署预览地址:点击查看
// 暂不可用!项目Github地址(包含所有源码、数据):点击查看如有疑问请私信博客,期待你的star!
项目Gitee地址(包含所有源码、数据):点击查看如有疑问请私信博客,期待你的star!
React教程参考:千锋2022版React全家桶教程
一、项目目标
1.1 个人期望
经过了下列文档&刷题,期望实战中提高。
- MDN:web/html/css/js文档
- React官方文档
- FCC:响应式网页设计(html5等)/js算法与数据结构(ES6、面向对象编程、函数式编程、算法等)/前端开发库(react/redux/sass等)刷题
技术目标:使用React全家桶
- React组件开发
- React Hooks
- React Router
- Recat Redux
- Antd组件库
1.2 产品选择
可借鉴的有:网易云音乐PC项目、后台管理系统项目。结合使用帆软数据可视化产品的经验,选择做后台管理项目。业务交互选择新闻后台管理。
1.3 项目描述
实现一个新闻发布管理平台,业务目标:
- 用户登录
- 游客访问:浏览新闻
- 用户管理:新增用户、修改用户、删除用户、禁用用户
- 权限管理:角色管理、页面访问权限控制、侧边栏权限控制
- 新闻业务:撰写新闻、草稿箱、新闻审核、新闻发布及下线等
1.4 适合人群
- 对前端有兴趣
- 对HTML/CSS/JS/REACT有一定了解
- 希望有一定的的那个项目经验
1.5 推荐用时
60h~100h
二、技术选型
- create-react-app:脚手架
- React Hooks:函数式编程,用过的都说真的爽
- React Router V6:路由控制访问,V6升级了许多东西
- Recat Redux:状态管理,组件通信
- Antd组件库:你为什么要使用react?
- axios:实现网络请求
- JSON Server:生成数据接口
- react-tsparticles:登陆页面粒子美化
- draft-js:富文本编辑
- draftjs-to-html:富文本转换html
- html-to-draftjs:html转换富文本
- Echarts:数据可视化(柱状图、饼图)
- Sass: CSS辅助工具,实现变量、嵌套、导入
- http-proxy-middleware:开发环境反向代理跨域(前期使用练手,JSON Server不需要~);引入后需要重启服务器
- CSS Modules: CSS模块化,选取class
.moduleTest或id选择器,将CSS module文件引入style变量,设置className={style.moduleTest}
三、项目模块文档
3.1 登录
实现用户登录功能:用户进入登陆页面,输入必填项账号及密码,点击登录校验账号密码,登录成功后保存状态,跳转至home页面;若登陆失败弹出“用户名或密码不匹配”。
实现效果:
(首页使用了粒子效果太大了,展示不出来)
3.2 首页
首页展示四个模块:用户最常浏览、用户点赞最多、用户信息、新闻分类。用户最常浏览模块展示浏览量最多的6个新闻标题;用户点赞最多模块展示点赞量最多的6个新闻标题;用户信息展示用户头像&名称&角色&地区,并设有按钮弹出展示该用户已发布新闻分类的饼图;新闻分类使用柱状图展示所有用户的新闻分类数量。其中,新闻标题可点击预览新闻内容。
实现效果:

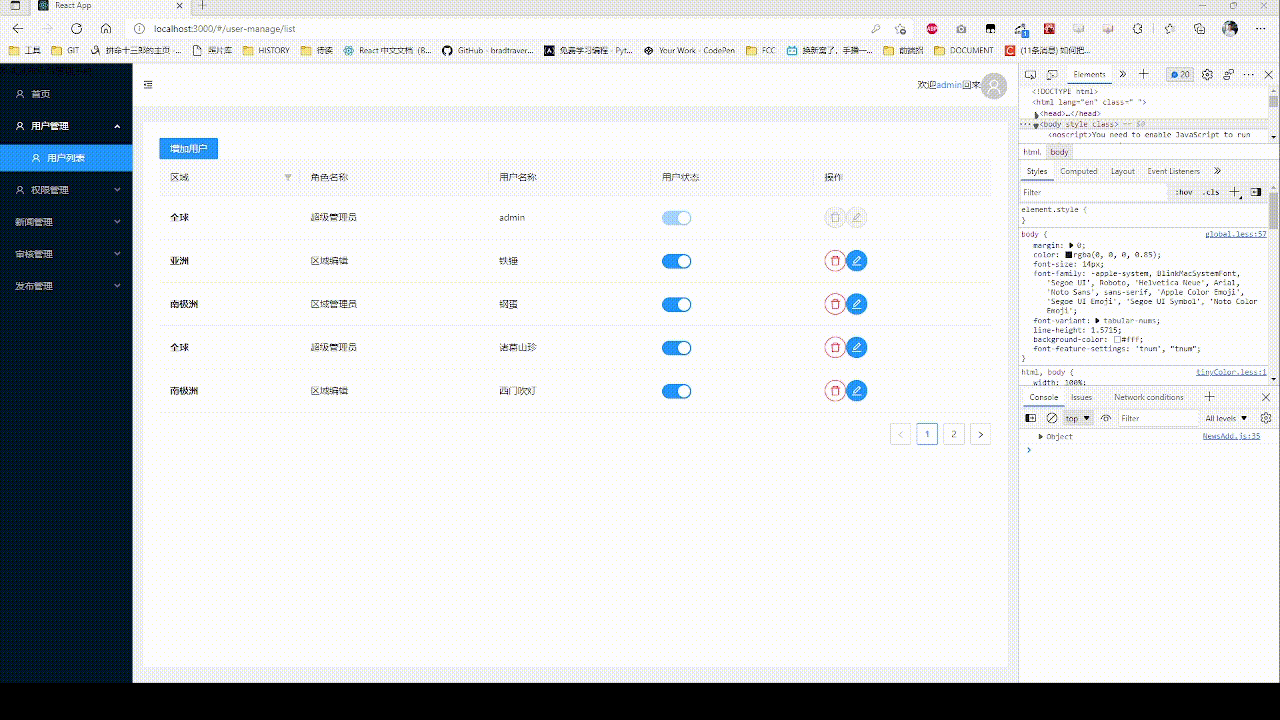
3.3 用户管理
用户管理页面展示用户信息列表及用户操作:包括新增用户、区域筛选、用户状态开关、删除用户、编辑用户等。用户信息列表展示区域、角色、名称、状态、操作(删除、编辑)。超级管理员可以添加、删除、编辑所有用户;区域管理员尽可以新增、删除、编辑本用户及本区域下的区域编辑用户;区域编辑没有本页面权限。
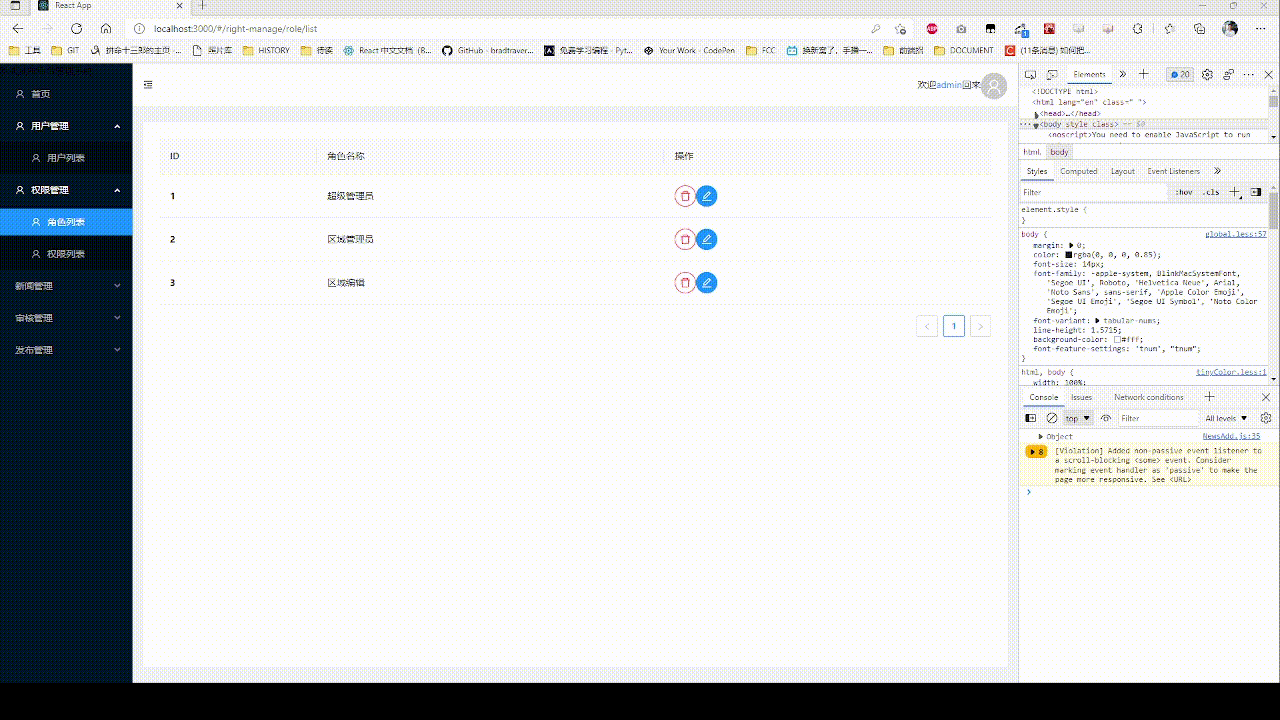
3.4 权限管理
权限管理包含两个页面:角色列表;权限列表。
角色列表展示角色ID、角色名称、角色操作(删除角色、编辑角色权限)。
权限列表展示页面ID、权限名称、权限路径、操作(删除路径、路径配置状态)。
实现效果:
3.5 新闻管理
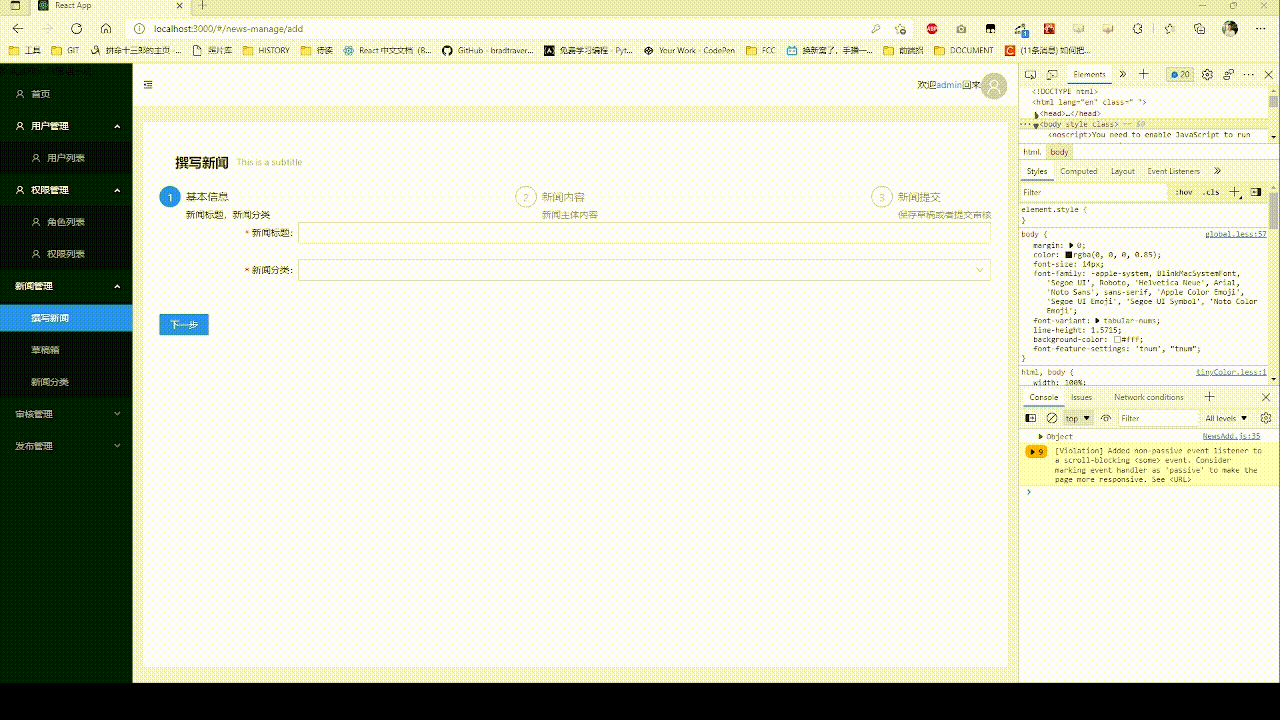
新闻管理包含三个页面:撰写新闻、草稿箱、新闻分类。
撰写新闻包括:新闻标题、新闻分类(下拉选择)、新闻内容、新闻提交。其中新闻提交要包括保存草稿箱及提交审核两个操作。
点击保存草稿箱,跳转至草稿箱页面,并在右下侧通知用户相关消息,草稿箱页面显示新闻ID、新闻标题(新闻标题可点击预览新闻内容)、作者、分类、操作(删除、修改、提交审核)。
点击提交审核,将跳转至审核管理-审核列表,并在右下侧通知用户相关消息。
新闻分类页面展示分类ID、分类名称(可修改)、操作(删除)。
实现效果:
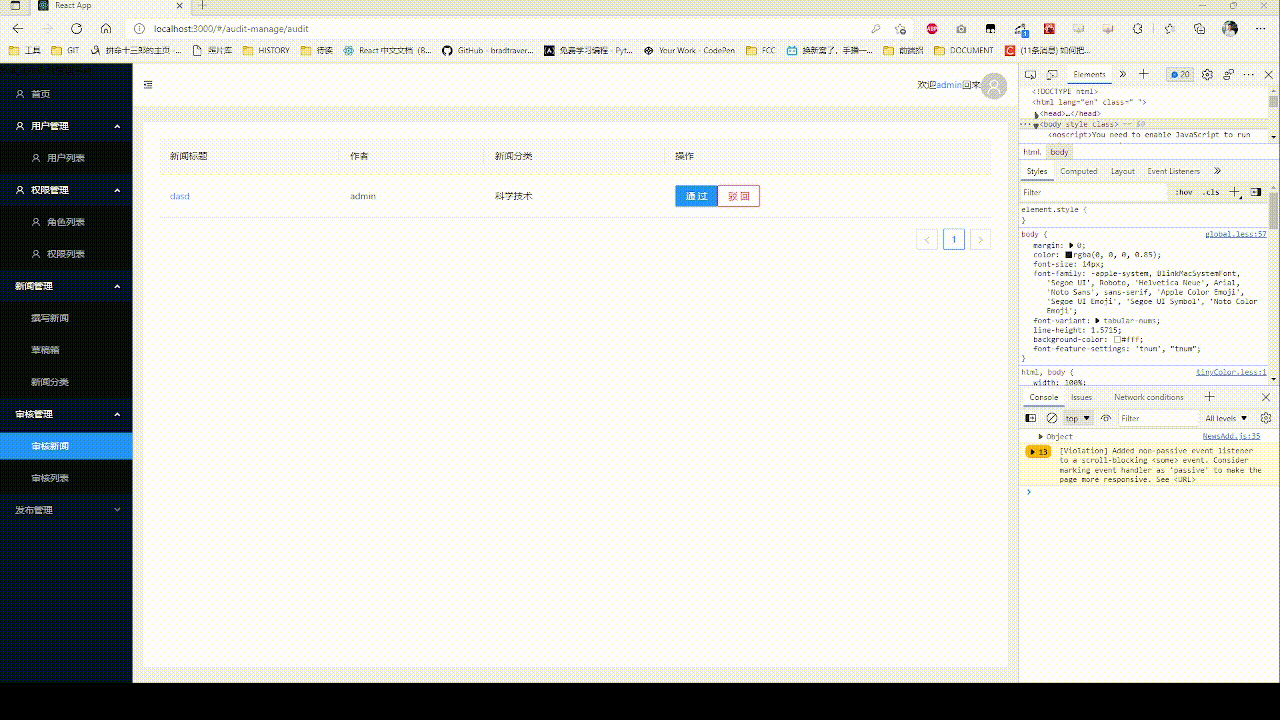
3.6 审核管理
审核管理包括两个页面:审核新闻、审核列表。
审核新闻页面展示待审核的新闻项,内容有:新闻标题、作者、分类、操作(通过、驳回)。点击通过或驳回在右下侧通知用户相关消息。
审核列表展示本用户在审核阶段的新闻,内容有:新闻标题、作者、分类、审核状态、操作。若审核状态为未通过、操作为更新;若审核状态为已通过、操作为发布。点击更新可编辑新闻内容(类似撰写新闻的页面);点击发布则跳转至已发布页面,并在右下侧通知用户相关消息。
实现效果:
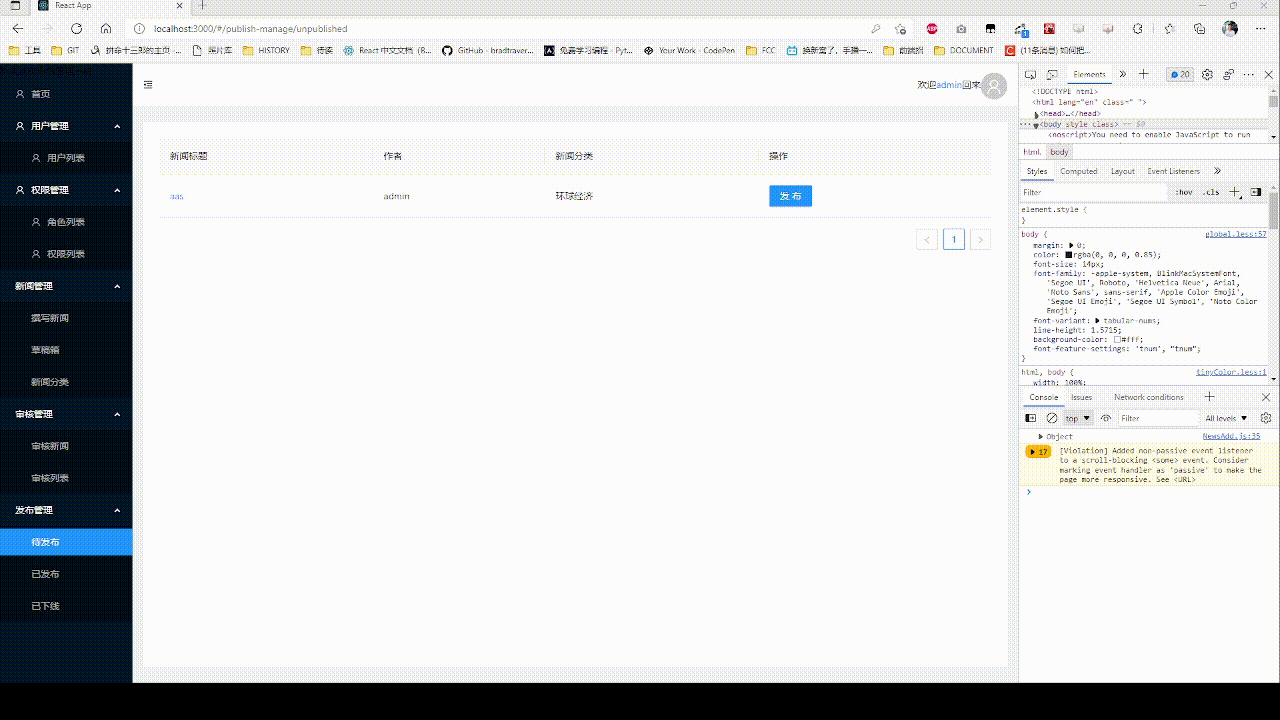
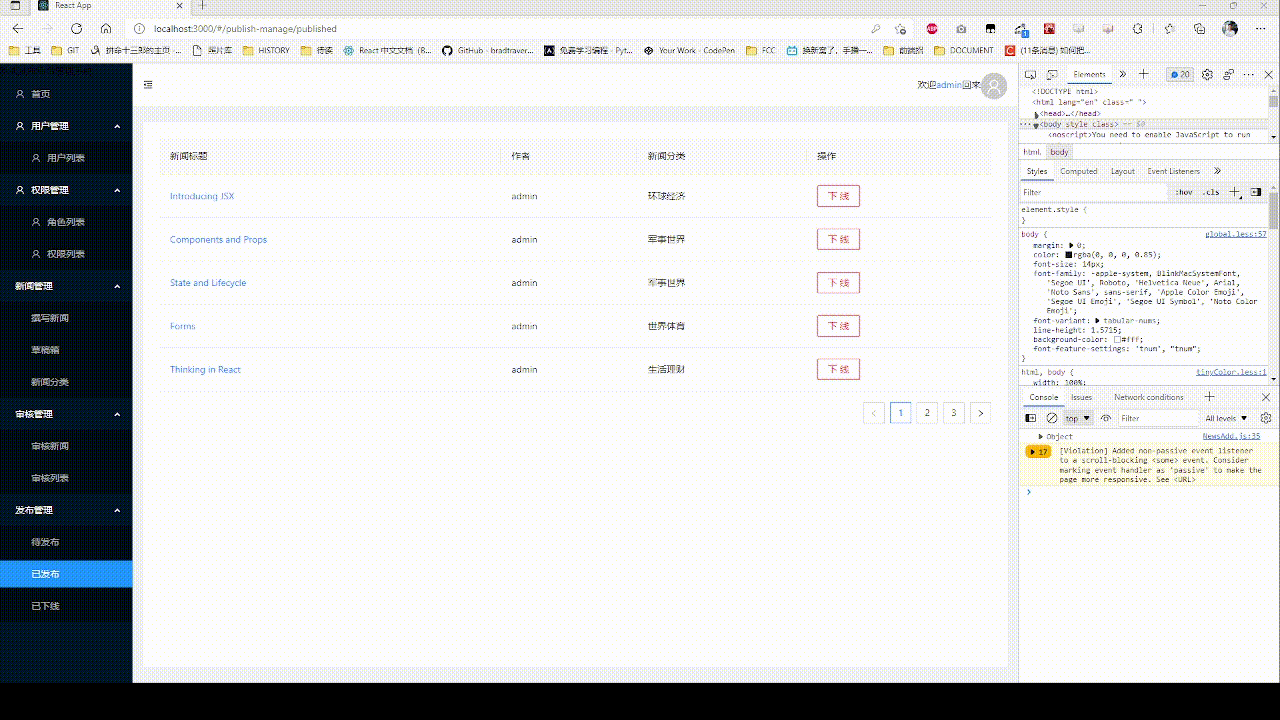
3.7 发布管理
发布管理包括三个页面:待发布、已发布、已下线。
待发布页面展示本用户审核通过仍未发布的新闻,内容有新闻标题、作者、分类、操作(发布)。
已发布页面展示本用户已发布的新闻,内容有新闻标题、作者、分类、操作(下线)。
已下线页面展示本用户已下线的新闻,内容有新闻标题、作者、分类、操作(删除)。
实现效果:
四、项目规范
- 文件夹、文件名称统一小写
- JS组件采用大驼峰命名,比那辆采用小驼峰命名
- 使用hooks编写
- 丰富注释
- rudux:每个模块有自己独立的reducer,通过combineReducer进行合并
五、技术文档
- 接口:使用JSON Server部署本地数据接口(http://localhost:5000)
| 功能 | 接口地址 | 调用案例 |
|---|---|---|
| 用户 | /users | 获取用户及其角色权限/users?_expand=role |
| 角色权限 | /roles | |
| 子菜单 | /children | |
| 父菜单 | /rights | 取父子菜单/rights?_embed=children |
| 新闻分类 | /categories | |
| 区域 | /regions | |
| 新闻 | /news | 获取对应新闻内容、分类及作者权限/news/${id}?_expand=category&_expand=role// 审核状态、发布状态映射(数组id即为状态码)const auditList = ["未审核", '审核中', '已通过', '未通过']const publishList = ["未发布", '待发布', '已上线', '已下线'] |
- 路由架构
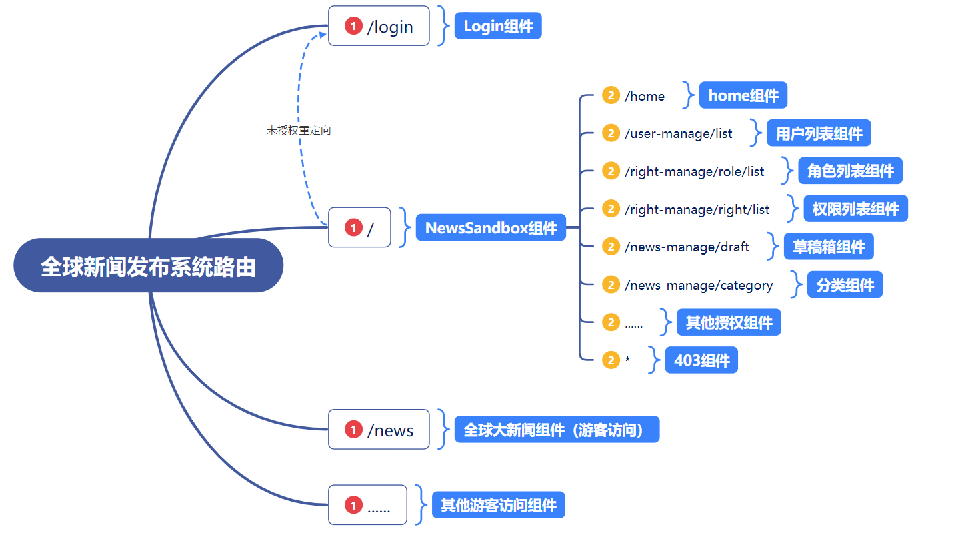
// V6实例
import React from 'react'
import {
    HashRouter as Router,
    Routes,
    Route,
    Navigate
} from "react-router-dom"
import Login from '../views/login/Login'
import NewsSandBox from '../views/sandbox/NewsSandBox'
import News from '../views/news/News'
import Detail from '../views/news/Detail'

export default function IndexRouter() {

    return (
        <Router>
            <Routes>
                <Route path="/login" element={<Login />} />
                <Route path="/news" element={<News />}/>
                <Route path="/detail/:id" element={<Detail />}/>
                <Route path="/*" element={localStorage.getItem("token")?<NewsSandBox />:<Navigate to="/login" />} />
             {/*
                {localStorage.getItem("token")?<Route path="/" element={<NewSandBox />} />:<Route path="*" element={<Navigate to="/login" />} />}
            */}
            </Routes>
        </Router>
    )
}
- 简单数据处理:使用lodash进行简单数据处理
renderBarView(_.groupBy(res.data, item => item.category.title))
- 顶栏控制侧边栏伸缩
// 顶栏组件
const mapStateToProps = ({CollapsedReducer: {isCollapsed}})=>{
   return {
    isCollapsed
   }
}
const mapDispatchToProps = {
  changeCollapsed(){
    return {
      type:"change_collapsed"
    }
  }
}

export default connect(mapStateToProps,mapDispatchToProps)(TopHeader)
// 侧边栏组件
// 侧边栏伸缩,使用connect
const mapStateToProps = ({CollapsedReducer: {isCollapsed}})=>({isCollapsed})
export default connect(mapStateToProps)(SideMenu)
实现效果:
- 数据加载Loading,状态持久化
// Redux store设置,使用黑名单避免&实现持久化
import {createStore,combineReducers} from 'redux'
import {CollapsedReducer} from './reducers/CollapsedReducer'
import {LoadingReducer} from './reducers/LoadingReducer'
import { persistStore, persistReducer } from 'redux-persist'
import storage from 'redux-persist/lib/storage' // defaults to localStorage for web

const persistConfig = {
    key: 'hangyi',
    storage,
    blacklist: ['LoadingReducer']
}
const reducer = combineReducers({
    CollapsedReducer,
    LoadingReducer
})
const persistedReducer = persistReducer(persistConfig, reducer)

const store = createStore(persistedReducer);
const persistor = persistStore(store)
export {
    store,
    persistor
}
// Reducer设置
export const CollapsedReducer = (prevState={
    isCollapsed:false
},action)=>{
    let {type} =action

    switch(type){
        case "change_collapsed":
            let newstate = {...prevState}
            newstate.isCollapsed = !newstate.isCollapsed
            return newstate
        default:
            return prevState
    }
}
- JSON Server方法
//取数据  get
        // axios.get("http://localhost:8000/posts/2").then(res=>{
        //     console.log(res.data)
        // })

        // 增  post
        // axios.post("http://localhost:8000/posts",{
        //     title:"33333",
        //     author:"xiaoming"
        // })

        // 更新 put

        // axios.put("http://localhost:8000/posts/1",{
        //     title:"1111-修改"
        // })

        // 更新 patch
        // axios.patch("http://localhost:8000/posts/1",{
        //     title:"1111-修改-11111"
        // })

        // 删除  delete
        // axios.delete("http://localhost:8000/posts/1")

        // _embed
        // axios.get("http://localhost:8000/posts?_embed=comments").then(res=>{
        //     console.log(res.data)
        // })

        // _expand
        // axios.get("http://localhost:8000/comments?_expand=post").then(res=>{
        //     console.log(res.data)
        // })
- 权限:页面本身权限配置+用户角色权限配置
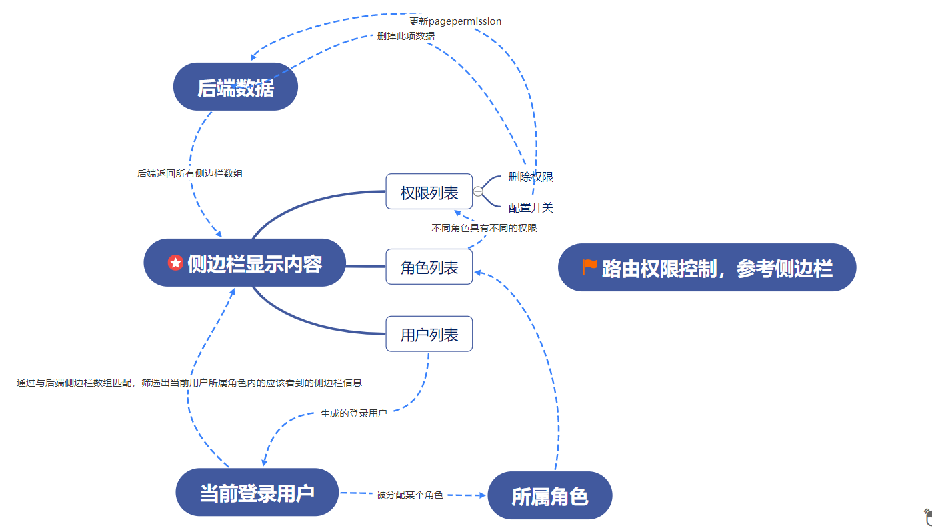
// 解构当前用户的页面权限
  const {role: {rights}} = JSON.parse(localStorage.getItem("token"));
  // 检查登录用户页面权限方法
  const checkPagePermission = (item) => {
    return item.pagepermisson && rights.includes(item.key)
  };
   // 导航方法
  const navigate = useNavigate();
  // 截取当前URL路径
  const location = useLocation();
  const selectedkeys = location.pathname;
  const openkeys = ["/" + location.pathname.split("/")[1]];
  // 侧边栏内容列表
  const renderMenu = (menuList) => {
    return menuList.map(item => {
      // 检查每一项是否有下级列表(使用可选链语法)&& 页面权限
      if (item.children?.length > 0 && checkPagePermission(item)) {
        return <SubMenu key={item.key} icon={iconList[item.key]} title={item.title}>
          {renderMenu(item.children)}
        </SubMenu>
      }
      return checkPagePermission(item) && <Menu.Item key={item.key} icon={iconList[item.key]} onClick={() =>
        navigate(item.key)
      }>{item.title}</Menu.Item>
    })
  }
- 多级用户管理:在添加用户、编辑用户时,超级管理员可以随意添加、区域管理员可以添加编辑本人及本区域下的区域编辑。
// 代码节选
const {roleId,region,username} = JSON.parse(localStorage.getItem("token"));
  // 初始化用户权限列表
  useEffect(() => {
    const roleObj = {
      "1":"superadmin",
      "2":"admin",
      "3":"editor"
  }
    axios.get("/users?_expand=role").then(res => {
      const list = res.data;
      setdataSource(roleObj[roleId]==="superadmin"?list:[
        // 超级管理员不限制,区域管理员:自己+自己区域编辑,区域编辑:看不到用户列表
        ...list.filter(item=>item.username===username),
        ...list.filter(item=>item.region===region&& roleObj[item.roleId]==="editor")
    ])
    })
  }, [roleId,region,username]);

// 控制区域、角色的新增&编辑权限
// 父组件传递 regionList={regionList} roleList={roleList}等参数
<Modal title="添加用户" okText="确定" cancelText="取消" visible={isModalVisible} onOk={handleOk} onCancel={handleCancel}>
        <UserForm ref={addForm} regionList={regionList} roleList={roleList} />
      </Modal>

      <Modal title="更新用户" okText="更新" cancelText="取消" visible={isUpdateVisible} onOk={updateOk} onCancel={updateCancel}>
      <UserForm ref={updateForm} regionList={regionList} roleList={roleList} isUpdateDisabled={isUpdateDisabled} />
    </Modal>

// 子组件props.regionList
 <Select disabled={isDisabled} >
                    {props.regionList.map(item => {
                        return <Option value={item.value} key={item.id} disabled={checkRegionDisabled(item)}>{item.title}</Option>
                    })}
                </Select>
- 可编辑单元格
// 参考https://ant.design/components/table-cn/#components-table-demo-edit-cell
    // 使用Context来实现跨层级的组件数据传递
    const EditableContext = React.createContext(null);
    const EditableRow = ({ index, ...props }) => {
        const [form] = Form.useForm();
        return (
            <Form form={form} component={false}>
                <EditableContext.Provider value={form}>
                    <tr {...props} />
                </EditableContext.Provider>
            </Form>
        );
    };
    const EditableCell = ({
        title,
        editable,
        children,
        dataIndex,
        record,
        handleSave,
        ...restProps
    }) => {
        const [editing, setEditing] = useState(false);
        const inputRef = useRef(null);
        const form = useContext(EditableContext);
        useEffect(() => {
            if (editing) {
                inputRef.current.focus();
            }
        }, [editing]);

        const toggleEdit = () => {
            setEditing(!editing);
            form.setFieldsValue({
                [dataIndex]: record[dataIndex],
            });
        };

        const save = async () => {
            try {
                const values = await form.validateFields();
                toggleEdit();
                handleSave({ ...record, ...values });
            } catch (errInfo) {
                console.log('Save failed:', errInfo);
            }
        };

        let childNode = children;

        if (editable) {
            childNode = editing ? (
                <Form.Item
                    style={{
                        margin: 0,
                    }}
                    name={dataIndex}
                    rules={[
                        {
                            required: true,
                            message: `${title} is required.`,
                        },
                    ]}
                >
                    <Input ref={inputRef} onPressEnter={save} onBlur={save} />
                </Form.Item>
            ) : (
                    <div
                        className="editable-cell-value-wrap"
                        style={{
                            paddingRight: 24,
                        }}
                        onClick={toggleEdit}
                    >
                        {children}
                    </div>
                );
        }

        return <td {...restProps}>{childNode}</td>;
    };
···
<Table dataSource={dataSource} columns={columns}
                pagination={{
                    pageSize: 5
                }}
                rowKey={item => item.id}

                 components={{
                     body: {
                         row: EditableRow,
                         cell: EditableCell,
                     }
                 }}

            />
六、疑难巧点
6.1 react routerV6新版本
- Routes代替Switch
- element代替component:
// V6
element={<Login />}
// history
component={Login}
- Navigate干掉了Redirect:
// V6
<Route path="/*" element={localStorage.getItem("token")?<NewsSandBox />:<Navigate to="/login" />} />
// history
<Route path="/" render={()=>localStorage.getItem("token")?<NewsSandBox ></NewsSandBox>:<Redirect to="/login"/>}/>
- useNavigate, useLocation等代替withRouter,props.history.push等的方法
// V6
const location = useLocation();
const selectedkeys = location.pathname;
const openkeys = ["/" + location.pathname.split("/")[1]];
// history
const selectKeys = [props.location.pathname]
const openKeys = ["/"+props.location.pathname.split("/")[1]]

// 导航方法
// V6
const navigate = useNavigate();
navigate(item.key)
// history
props.history.push(item.key)
6.2 axios拦截
可以实现:
- 简化每次axios请求的代码量
- 实现加载数据时有提示
import axios from 'axios'
import {store} from '../redux/store'
axios.defaults.baseURL="http://localhost:5000"

// axios.defaults.headers

// axios.interceptors.request.use
// axios.interceptors.response.use
axios.interceptors.request.use(function (config) {
    // Do something before request is sent
    // 显示loading
    store.dispatch({
        type:"change_loading",
        payload:true
    })
    return config;
  }, function (error) {
    // Do something with request error
    return Promise.reject(error);
  });

// Add a response interceptor
axios.interceptors.response.use(function (response) {
    // Any status code that lie within the range of 2xx cause this function to trigger
    // Do something with response data
    store.dispatch({
        type:"change_loading",
        payload:false
    })
    //隐藏loading
    return response;
  }, function (error) {
    // Any status codes that falls outside the range of 2xx cause this function to trigger
    // Do something with response error
    store.dispatch({
        type:"change_loading",
        payload:false
    })
     //隐藏loading
    return Promise.reject(error);
  });
七、待补充
- 性能优化:useMemo、useCallback和memo等
- redux hooks
八、附录
8.1 命令表
// 创建react-app
npx create-react-app my-app
// 进入该目录
cd my-app
// 启动工程
npm start
// npm安装相关依赖(例如antd)
npm i --save antd
// JSON Server启动(使用db.json文件,本地5000端口)
json-server --watch db.json --port 5000
本文来自博客园,作者:沧浪浊兮,转载请注明原文链接:https://www.cnblogs.com/shixiu/p/15983351.html


【推荐】国内首个AI IDE,深度理解中文开发场景,立即下载体验Trae
【推荐】编程新体验,更懂你的AI,立即体验豆包MarsCode编程助手
【推荐】抖音旗下AI助手豆包,你的智能百科全书,全免费不限次数
【推荐】轻量又高性能的 SSH 工具 IShell:AI 加持,快人一步