


CentOS下配置NTP时间服务器
使用虚拟机搭建NTP时间服务器,server端通过外网同步时间,通过内网给局域网内的主机提供时间同步服务。
1. 环境准备
1.1 虚拟机准备
需要以下环境
- 两台VMware虚拟机
- 宿主机可以联网
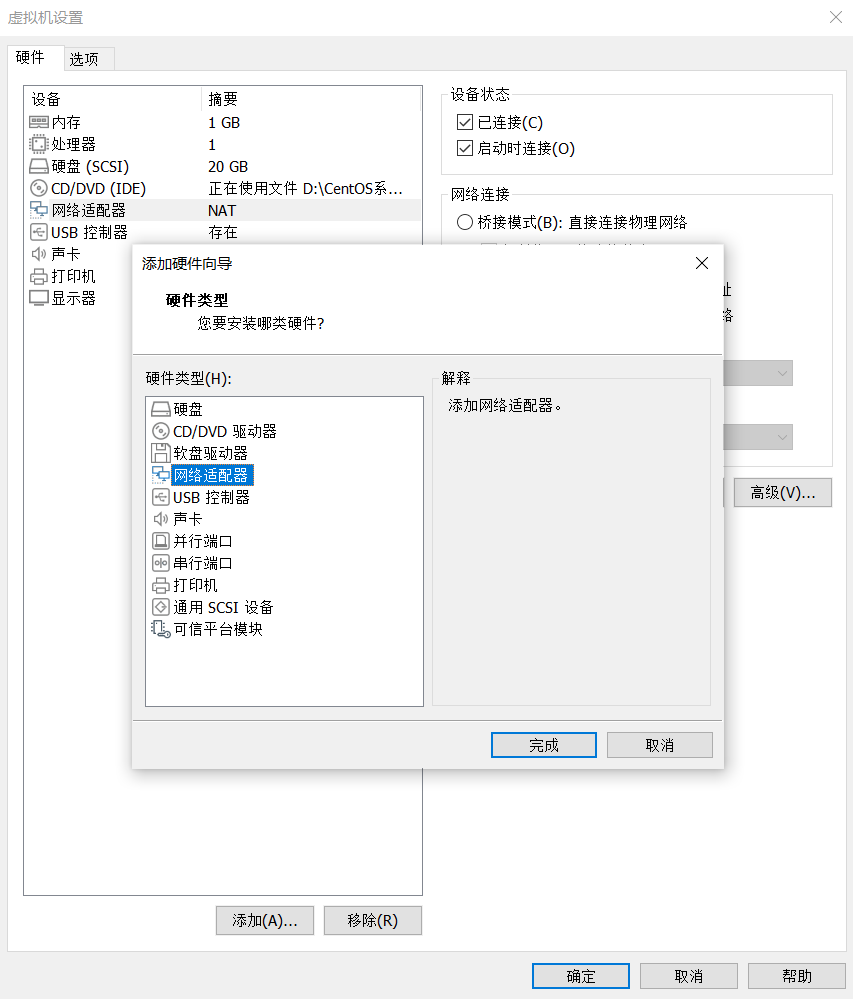
2. 服务器端设置
2.1 网卡设置
-
主机第一块网卡使用nat模式联网

-
添加第二块网卡为仅主机模式
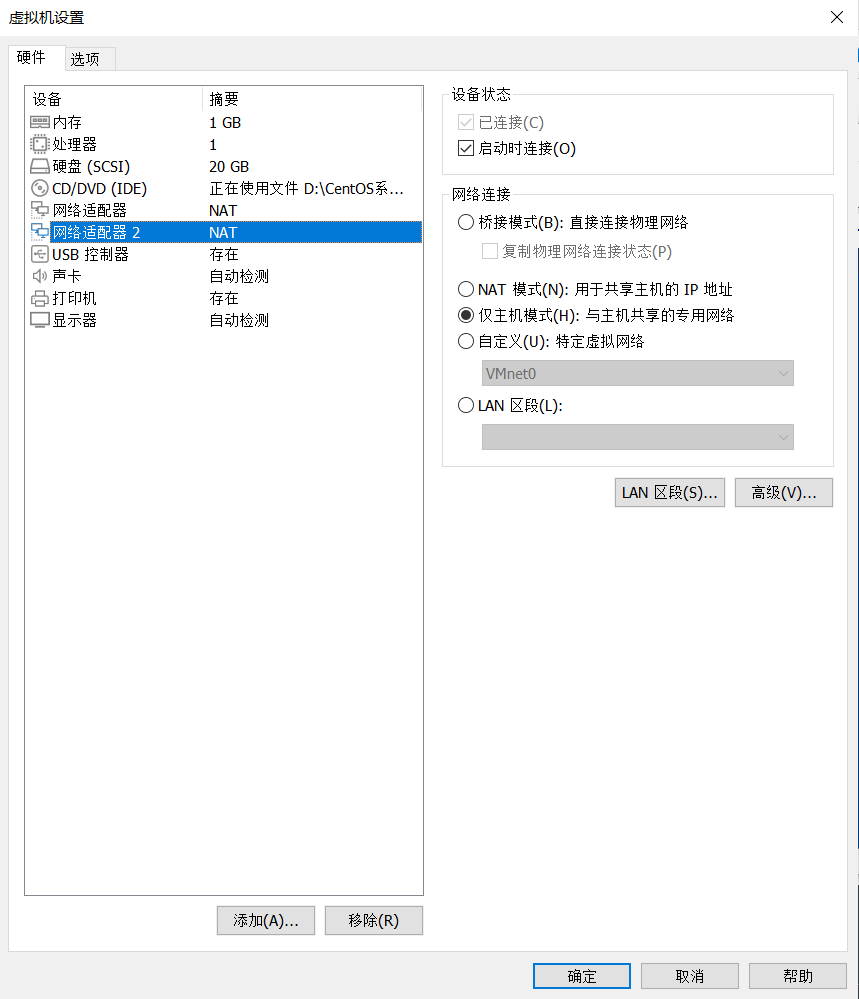
使用ifconfig打开网卡,如果是CentOS7的话可以看到ens36这个网卡,这个网卡使我们新添加的。
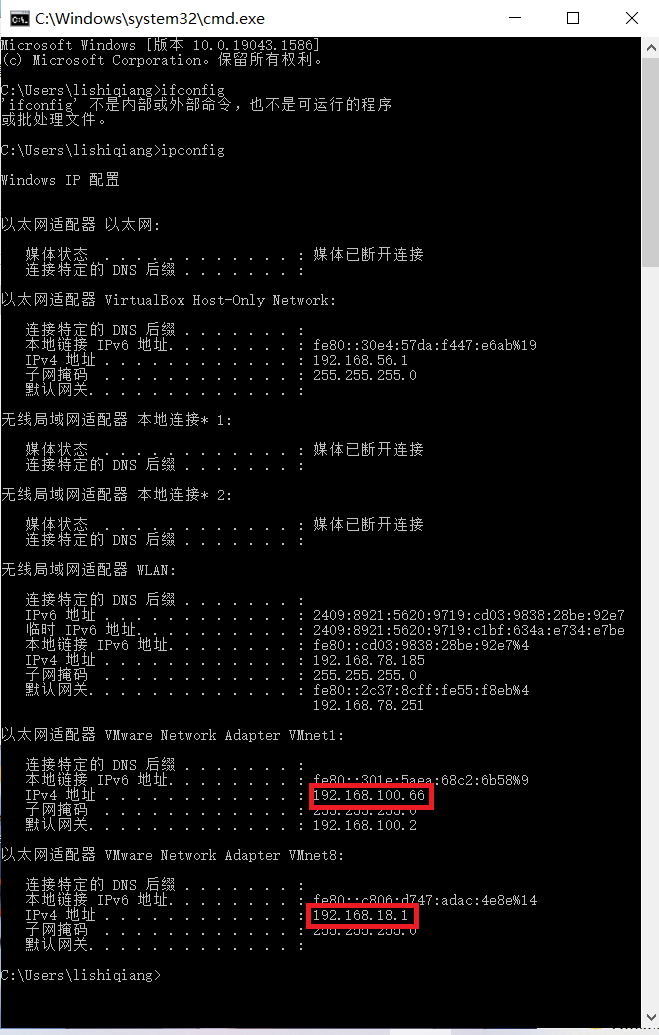
- 配置ens33网卡使他与宿主机上的VMnet8网卡在同一网段,ens36网卡与VMnet1网卡在同一个网段即可。在命令行模式下查看宿主机网卡
-
虚拟机配置第一块网卡ens33
[root@server ~]# vim /etc/sysconfig/network-scripts/ifcfg-ens33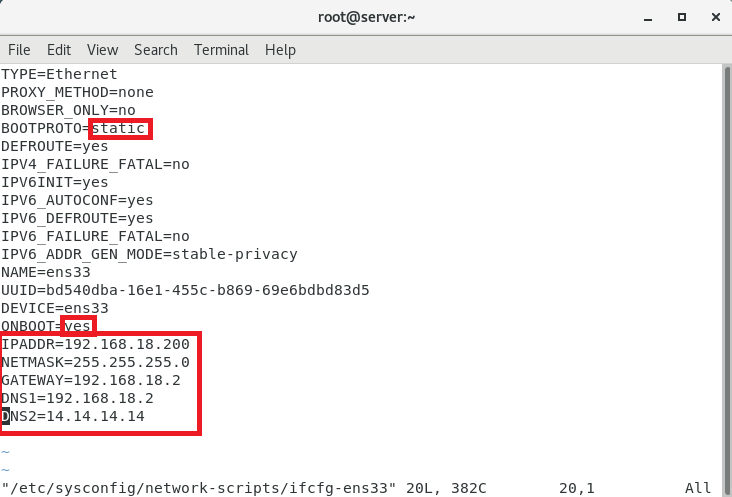
设置完毕保存退出
-
设置第二块网卡ens36
[root@server ~]# vim /etc/sysconfig/network-scripts/ifcfg-ens36如果提示是new file的话,就暂时不保存退出,使用以下命令复制ens33的配置文件修改一下,再次使用上述命令打开即可
[root@server ~]# cp /etc/sysconfig/network-scripts/ifcfg-ens33 /etc/sysconfig/network-scripts/ifcfg-ens36配置网卡ens36,使ip地址与宿主机的VMnet1在同一个网段内
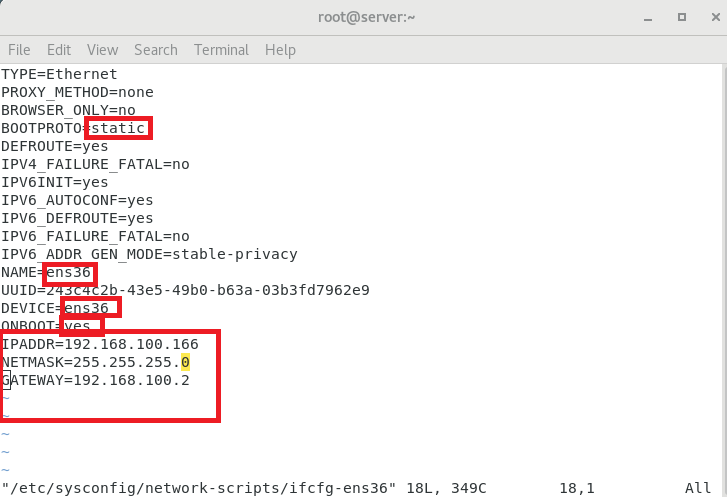
如果是复制的ens33的网卡的配置文件,需要使用uuidgen命令生成uuid,然后在ifcfg-ens36文件中重新设置uuid
[root@server ~]# uuidgen ens36 243c4c2b-43e5-49b0-b63a-03b3fd7962e9 -
重启网络服务
[root@server ~]# systemctl restart network -
重新查看IP是否设置成功
[root@server ~]# ifconfig如果没生效,重启虚拟机
-
查看网络是否正常
[root@server ~]# ping www.baidu.com
PING www.a.shifen.com (112.80.248.75) 56(84) bytes of data.
64 bytes from 112.80.248.75 (112.80.248.75): icmp_seq=1 ttl=128 time=9.92 ms
64 bytes from 112.80.248.75 (112.80.248.75): icmp_seq=2 ttl=128 time=9.49 ms
64 bytes from 112.80.248.75 (112.80.248.75): icmp_seq=3 ttl=128 time=8.73 ms
^C
--- www.a.shifen.com ping statistics ---
3 packets transmitted, 3 received, 0% packet loss, time 2005ms
2.2 NTP服务安装与设置
-
安装ntp
[root@server ~]# yum install ntp -
配置ntp.conf
[root@server ~]# vim /etc/ntp.conf# For more information about this file, see the man pages # ntp.conf(5), ntp_acc(5), ntp_auth(5), ntp_clock(5), ntp_misc(5), ntp_mon(5). driftfile /var/lib/ntp/drift # Permit time synchronization with our time source, but do not # permit the source to query or modify the service on this system. restrict default nomodify notrap nopeer noquery restrict 192.168.100.0 mask 255.255.255.0 nomodify notrap restrict ntp.aliyun.com nomodify restrict cn.pool.ntp.org nomodify # Permit all access over the loopback interface. This could # be tightened as well, but to do so would effect some of # the administrative functions. restrict 127.0.0.1 restrict ::1 # Hosts on local network are less restricted. #restrict 192.168.1.0 mask 255.255.255.0 nomodify notrap # Use public servers from the pool.ntp.org project. # Please consider joining the pool (http://www.pool.ntp.org/join.html). server ntp.aliyun.com iburst prefer server cn.pool.ntp.org iburst server 0.centos.pool.ntp.org iburst server 1.centos.pool.ntp.org iburst server 2.centos.pool.ntp.org iburst server 3.centos.pool.ntp.org iburst #broadcast 192.168.1.255 autokey # broadcast server #broadcastclient # broadcast client #broadcast 224.0.1.1 autokey # multicast server #multicastclient 224.0.1.1 # multicast client #manycastserver 239.255.254.254 # manycast server #manycastclient 239.255.254.254 autokey # manycast client # Enable public key cryptography. #crypto includefile /etc/ntp/crypto/pw # Key file containing the keys and key identifiers used when operating # with symmetric key cryptography. keys /etc/ntp/keys # Specify the key identifiers which are trusted. #trustedkey 4 8 42 # Specify the key identifier to use with the ntpdc utility. #requestkey 8 # Specify the key identifier to use with the ntpq utility. #controlkey 8 # Enable writing of statistics records. #statistics clockstats cryptostats loopstats peerstats # Disable the monitoring facility to prevent amplification attacks using ntpdc # monlist command when default restrict does not include the noquery flag. See # CVE-2013-5211 for more details. # Note: Monitoring will not be disabled with the limited restriction flag. disable monitor参数说明:
restrict IP地址 mask 子网掩码
其中 IP 可以是IP地址,也可以是 default ,default 就是指所有的IP,默认拒绝所有操作。:
ignore :关闭所有的 NTP 联机服务
nomodify:客户端不能更改服务端的时间参数,但是客户端可以通过服务端进行网络校时。
notrust :客户端除非通过认证,否则该客户端来源将被视为不信任子网
noquery :不提供客户端的时间查询notrap : 不提供trap远端事件登录功能
nopeer : 不与 同一层的ntp服务器进行时间同步
kod : 阻止kiss of death包对服务器的破坏
server IP地址或域名 [prefer]
注:IP地址或域名就是我们指定的上级时间服务器,如果 Server 参数最后加上 prefer,表示我们的 NTP 服务器主要以该部主机时间进行校准。解决NTP服务器校准时间时的传送延迟
-
配置ntpd
[root@server ~]# vim /etc/sysconfig/ntpd# Command line options for ntpd OPTIONS="-u ntp:ntp -p /var/run/ntpd.pid -g" SYNC_HWCLOCK=yes注:SYNC_HWCLOCK=yes #make no into yes; BIOS的时间也会跟着修改
-
修改 /etc/ntp/step-tickers文件
将上层NTP服务器的地址或FQDN添加到这个文件中。作用是当NTP服务在启动时,会自动的与该文件中记录的时间服务器进行时间同步
[root@server ~]# vim /etc/ntp/step-tickers# List of NTP servers used by the ntpdate service. # 0.centos.pool.ntp.org 210.72.145.44 -
防火墙设置
关闭防火墙,当然为了安全,可以只放行123端口,在这里为了简单,关闭防火墙
[root@server ~]#systemctl disable firewalld.service启动服务
[root@server ~]# service ntpd start
Redirecting to /bin/systemctl start ntpd.service
3.客户端设置
3.1 安装chrony
-
首先把网卡配置成nat模式,安装chrony和ntpdate包
请参考配置服务器的nat设置,设置完毕安装chrony
[root@node1 ~]# yum install -y chrony[root@node1 ~]# yum install -y ntpdate -
在把网卡设置成host-only(仅主机)模式
参考上上述的ens36网卡设置,把客户端的ens33重新是这个成仅主机模式。
这里设置与服务器端在同一个网段的IP即可。
3.2 客户端配置
- 参数配置
[root@node1 ~]# cat <<EOF>>/var/spool/cron/root
> 00 12 * * * /usr/sbin/ntpdate -u 192.168.100.166 && /usr/sbin/hwclock -w
> EOF
[root@node1 ~]# crontab -l
00 12 * * * /usr/sbin/ntpdate -u 192.168.100.166 && /usr/sbin/hwclock -w
/usr/sbin/ntpdate -u 10.211.55.200 && /usr/sbin/hwclock -w
注:每天的12时,获取服务器时间并同步客户端时间
-
客户端验证
当服务器端的服务开启10分钟后,可以在客户端使用以下命令,查看是否可以同步ntp服务器的时间

4.到此结束
本文来自博客园,作者:何以卿卿,转载请注明原文链接:https://www.cnblogs.com/shiqiang-lee/p/16155208.html

