LVS-DR:搭建HTTP和HTTPS负载均衡集群
LVS-DR实战:搭建HTTP和HTTPS负载均衡集群
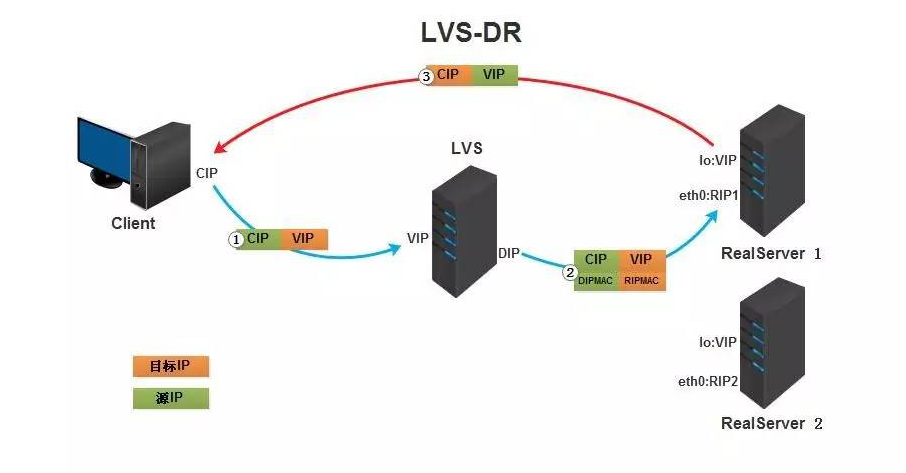
DR模式是通过director将报文源和目标MAC地址修改,发送给RS,RS将响应报文直接发送给client。
环境说明:
| LVS服务器(DR) | DIP:192.168.32.125 | VIP:192.168.32.250 |
|---|---|---|
| apache服务器(RS) | IP:192.168.32.130 | VIP:192.168.32.250 |
| apache服务器(RS) | IP:192.168.32.135 | VIP:192.168.32.250 |
三台机器分别配置了对应的本地静态地址DIP和RIP,VIP之后配置
1. 搭建lvs-dr模式的http负载集群
LVS服务器配置要点
LVS是被编译进内核中,主要分为两部分ipvs和ipvsadm,ipvs是LVS软件核心,是运行在LB上的,这是个基于ip层的负载均衡;ipvsadm是用户空间的集群管理工具。
要想起到负载均衡效果,那么所有请求报文必须发往LVS服务器(DS),然后DS根据指定算法分发到后端服务器上,因此DS必须配置VIP地址,VIP是与公网client通信地址,这样DS才能接受到请求报文进行分发。
一定要先设置好内核参数在配置VIP,如果先配置VIP,VIP配置好后会立即通告给所有人,而修改内核参数就是为了不通告
LVS-DR模式的注意情况:
VS 的VIP 和 RS 必须在同一个网段,不然广播后所有的包都会丢掉: 提前确认LVS/硬件LB 是什么模式,是否需要在同一个网段 所有的RS都必须绑定VIP的IP地址,否则RS收到package后发现dst 不是自己的IP,所有包都会丢掉。 RS处理完包后直接把package 通过dst IP 发送给 client ,不通过LVS/迎接IP 了这样的LVS /VIP 效率会更高一点。【通过把realserver的ip暴漏给外界,不是很安全】
1.1 LVS上配置IP
[root@DR ~]# ip addr add 192.168.32.250/32 dev eth0
[root@DR ~]# ip a
1: lo: <LOOPBACK,UP,LOWER_UP> mtu 65536 qdisc noqueue state UNKNOWN group default qlen 1000
    link/loopback 00:00:00:00:00:00 brd 00:00:00:00:00:00
    inet 127.0.0.1/8 scope host lo
       valid_lft forever preferred_lft forever
    inet6 ::1/128 scope host
       valid_lft forever preferred_lft forever
2: eth0: <BROADCAST,MULTICAST,UP,LOWER_UP> mtu 1500 qdisc pfifo_fast state UP group default qlen 1000
    link/ether 00:0c:29:39:18:a9 brd ff:ff:ff:ff:ff:ff
    inet 192.168.32.125/24 brd 192.168.32.255 scope global noprefixroute eth0
       valid_lft forever preferred_lft forever
    inet 192.168.32.250/32 scope global eth0
       valid_lft forever preferred_lft forever
    inet6 fe80::20c:29ff:fe39:18a9/64 scope link
       valid_lft forever preferred_lft forever
1.2 RS上配置arp内核参数
[root@RS-1 ~]# vim /etc/sysctl.conf
#添加以下两行
net.ipv4.conf.all.arp_ignore = 1
# 将对应网卡设置为只回应目标IP为自身接口地址的ARP请求
net.ipv4.conf.all.arp_announce = 2
# 将ARP请求的源IP设置为eth0上的IP,也就是RIP

[root@RS-1 ~]# sysctl -p
net.ipv4.conf.all.arp_ignore = 1
net.ipv4.conf.all.arp_announce = 2

##两台RS都要进行以上操作
[root@RS-2 ~]# echo 'net.ipv4.conf.all.arp_ignore = 1' >> /etc/sysctl.conf
[root@RS-2 ~]# echo 'net.ipv4.conf.all.arp_announce = 2' >> /etc/sysctl.conf
[root@RS-2 ~]# sysctl -p
net.ipv4.conf.all.arp_ignore = 1
net.ipv4.conf.all.arp_announce = 2
1.3 RS上配置VIP
一定要先设置好内核参数在配置VIP,如果先配置VIP,VIP配置好后会立即通告给所有人,而修改内核参数就是为了不通告
LVS服务器的eth0网卡的IP:192.168.32.250作为VIP
两台RS上都要做
[root@RS-1 ~] ip addr add 192.168.32.250/32 dev lo
[root@RS-2 ~] ip addr add 192.168.32.250/32 dev lo

#永久生效在配置文件中加IP
所有RS上都要做
[root@RS-1 ~]# route add -host 192.168.32.250/32 dev lo
#永久配置
		echo '192.168.32.250/32 via dev lo' > /etc/sysconfig/network-scripts/route-lo


[root@RS-2 ~]# route add -host 192.168.32.250/32 dev lo
1.4 DR上配置lvs-dr转发规则
#LVS依赖于ipvsadm来进行配置,所以我们首先先安装ipvsadm
[root@DR ~]# yum -y install ipvsadm

[root@DR ~]# ipvsadm -A -t 192.168.32.250:80 -s rr
[root@DR ~]# ipvsadm -a -t 192.168.32.250:80 -r 192.168.32.130:80 -g
[root@DR ~]# ipvsadm -a -t 192.168.32.250:80 -r 192.168.32.135:80 -g
[root@DR ~]# ipvsadm -Sn
-A -t 192.168.32.250:80 -s rr
-a -t 192.168.32.250:80 -r 192.168.32.130:80 -m -w 1
-a -t 192.168.32.250:80 -r 192.168.32.135:80 -m -w 1

[root@DR ~]# ipvsadm -Sn > /etc/sysconfig/ipvsadm
1.5 RS上配置http并启动
[root@RS-1 ~]# yum -y install httpd
[root@RS-1 ~]# echo 'rs1' > /var/www/html/index.html
[root@RS-1 ~]# systemctl start httpd

[root@RS-2 ~]# yum -y install httpd
[root@RS-2 ~]# echo 'rs1' > /var/www/html/index.html
[root@RS-2 ~]# systemctl start httpd
1.6 客户端访问测试
[root@localhost ~]# for i in $(seq 10);do curl 192.168.32.250:80;done
rs2
rs1
rs2
rs1
rs2
rs1
rs2
rs1
rs2
rs1
搭建https的负载集群
在以上配置基础下搭建https
1. LVS服务器搭建CA服务端
1.生成密钥对
[root@DR ~]# cd /etc/pki/CA/
[root@DR CA]# (ls)
certs  crl  newcerts  private
[root@DR CA]# (umask 077;openssl genrsa -out private/cakey.pem 2048)
Generating RSA private key, 2048 bit long modulus
.................................+++
.........................................................................................+++
e is 65537 (0x10001)
[root@DR CA]# openssl rsa -in private/cakey.pem -pubout
writing RSA key
-----BEGIN PUBLIC KEY-----
MIIBIjANBgkqhkiG9w0BAQEFAAOCAQ8AMIIBCgKCAQEAxBHetLa8VvcmikZNDbG/
tXsbrxvCBsMnsMcwqCKLupcZiRhlUgjY+AAYPrBM5sE8jlJAW/mEGZc1fHG30ruU
5Lnbh2NeHrHJZUuZS6WYCslDKzd0KRDW2GR43CtfqLmFc8g+3DWIqEdeXrH29o5L
cm4AsfeqjBQaNIoNXKcnl/7Yc0mJK+yp3AHO4EFadXTQF+nx6A0mfVRw254h4lgP
6YdL3izUlG2JZ5kqZfytMzG1lKz+O651alNo+Lq14mSKxJArLAT5mWvJ/JJXH/7q
qIHk1RPHQ2XkZyk7QONhjLfZN9aY1h3EawAoBH8etbasbUoPWaUeV+wxzDqPF4pY
qQIDAQAB
-----END PUBLIC KEY-----
2.生成自签署证书
[root@DR CA]#  openssl req -new -x509 -key private/cakey.pem -out cacert.pem -days 1024
You are about to be asked to enter information that will be incorporated
into your certificate request.
What you are about to enter is what is called a Distinguished Name or a DN.
There are quite a few fields but you can leave some blank
For some fields there will be a default value,
If you enter '.', the field will be left blank.
-----
Country Name (2 letter code) [XX]:CN
State or Province Name (full name) []:HB
Locality Name (eg, city) [Default City]:WH
Organization Name (eg, company) [Default Company Ltd]:runtime
Organizational Unit Name (eg, section) []:runtime
Common Name (eg, your name or your server's hostname) []:runtime
Email Address []:
[root@DR CA]#
[root@DR CA]# touch index.txt && echo 01 > serial
3.RS生成证书签署请求,并发送给CA
#RS-1(httpd服务器)生成密钥
[root@RS-1 ssl]# (umask 077;openssl genrsa -out httpd.key 2048)
Generating RSA private key, 2048 bit long modulus
...................................................................................................................................................................................................................................................+++
................+++
e is 65537 (0x10001)

#RS-1(httpd服务器)生成证书签署请求
[root@RS-1 ~]# mkdir /etc/httpd/ssl
[root@RS-1 ~]# cd /etc/httpd/ssl
[root@RS-1 ssl]# openssl req -new -key httpd.key -days 1024 -out httpd.csr
You are about to be asked to enter information that will be incorporated
into your certificate request.
What you are about to enter is what is called a Distinguished Name or a DN.
There are quite a few fields but you can leave some blank
For some fields there will be a default value,
If you enter '.', the field will be left blank.
-----
Country Name (2 letter code) [XX]:CN
State or Province Name (full name) []:HB
Locality Name (eg, city) [Default City]:WH
Organization Name (eg, company) [Default Company Ltd]:runtime
Organizational Unit Name (eg, section) []:runtime
Common Name (eg, your name or your server's hostname) []:runtime
Email Address []:

Please enter the following 'extra' attributes
to be sent with your certificate request
A challenge password []:
An optional company name []:
[root@RS-1 ssl]#
[root@RS-1 ssl]# ls
httpd.csr  httpd.key


#把证书签署请求文件发送给CA
[root@RS-1 ssl]# scp httpd.csr root@192.168.32.125:/root
4.CA签署证书并发给客户端
[root@DR ~]# ls
anaconda-ks.cfg  httpd.csr
[root@DR ~]# openssl ca -in /root/httpd.csr -out httpd.crt -days 1024
Using configuration from /etc/pki/tls/openssl.cnf
Check that the request matches the signature
Signature ok
Certificate Details:
        Serial Number: 1 (0x1)
        Validity
            Not Before: Jul 24 15:27:28 2020 GMT
            Not After : May 14 15:27:28 2023 GMT
        Subject:
            countryName               = CN
            stateOrProvinceName       = HB
            organizationName          = runtime
            organizationalUnitName    = runtime
            commonName                = runtime
        X509v3 extensions:
            X509v3 Basic Constraints:
                CA:FALSE
            Netscape Comment:
                OpenSSL Generated Certificate
            X509v3 Subject Key Identifier:
                51:C2:11:E1:0D:86:FB:40:79:0B:F3:DD:5E:49:71:C6:D3:88:41:B1
            X509v3 Authority Key Identifier:
                keyid:31:D2:0A:8F:D2:DD:B9:3E:EE:05:B5:1B:58:C4:AF:8C:45:3B:C8:A0

Certificate is to be certified until May 14 15:27:28 2023 GMT (1024 days)
Sign the certificate? [y/n]:y


1 out of 1 certificate requests certified, commit? [y/n]y
Write out database with 1 new entries
Data Base Updated
[root@DR ~]# ls
anaconda-ks.cfg  httpd.crt  httpd.csr

#CA把签署好的证书httpd.crt和服务端的证书cacert.pem发给客户端
[root@DR ~]# scp httpd.crt root@192.168.32.130:/etc/httpd/ssl
[root@DR ~]# scp cacert.pem root@192.168.32.130:/etc/httpd/ssl
2.配置https
1.将RS-1的证书和密钥发给RS-2
[root@RS-2 ~]# yum -y install mod_ssl
[root@RS-2 ~]# mkdir /etc/httpd/ssl

[root@RS-1 ~]# yum -y install mod_ssl
[root@RS-1 ssl]# ls
cacert.pem  httpd.crt  httpd.csr  httpd.key
[root@RS-1 ssl]# scp cacert.pem httpd.crt httpd.key root@192.168.32.135:/etc/httpd/ssl
root@192.168.32.135's password:
cacert.pem                                                       100% 1294     1.4MB/s   00:00
httpd.crt                                                        100% 4416     5.4MB/s   00:00
httpd.key

#RS-2上查看
[root@RS-2 ~]# ls /etc/httpd/ssl/
cacert.pem  httpd.crt  httpd.key
2.修改https配置文件
[root@RS-1 ~]# vim /etc/httpd/conf.d/ssl.conf
//修改后如下所示
#   Server Certificate:
# Point SSLCertificateFile at a PEM encoded certificate.  If
# the certificate is encrypted, then you will be prompted for a
# pass phrase.  Note that a kill -HUP will prompt again.  A new
# certificate can be generated using the genkey(1) command.
SSLCertificateFile /etc/httpd/ssl/httpd.crt

#   Server Private Key:
#   If the key is not combined with the certificate, use this
#   directive to point at the key file.  Keep in mind that if
#   you've both a RSA and a DSA private key you can configure
#   both in parallel (to also allow the use of DSA ciphers, etc.)
SSLCertificateKeyFile /etc/httpd/ssl/httpd.key

#   Server Certificate Chain:
#   Point SSLCertificateChainFile at a file containing the
#   concatenation of PEM encoded CA certificates which form the
#   certificate chain for the server certificate. Alternatively
#   the referenced file can be the same as SSLCertificateFile
#   when the CA certificates are directly appended to the server
#   certificate for convinience.
#SSLCertificateChainFile /etc/pki/tls/certs/server-chain.crt

#   Certificate Authority (CA):
#   Set the CA certificate verification path where to find CA
#   certificates for client authentication or alternatively one
#   huge file containing all of them (file must be PEM encoded)
SSLCACertificateFile /etc/httpd/ssl/cacert.pem


#重启服务
[root@RS-1 ~]# systemctl restart httpd
[root@RS-1 ~]# ss -tanl
State       Recv-Q Send-Q    Local Address:Port                   Peer Address:Port
LISTEN      0      100           127.0.0.1:25                                *:*
LISTEN      0      128                   *:22                                *:*
LISTEN      0      100               [::1]:25                             [::]:*
LISTEN      0      128                [::]:443                            [::]:*
LISTEN      0      128                [::]:80                             [::]:*
LISTEN      0      128                [::]:22                             [::]:*
RS-2上也要做如上配置
3. LVS上配置规则
[root@DR ~]# ipvsadm -Ln
IP Virtual Server version 1.2.1 (size=4096)
Prot LocalAddress:Port Scheduler Flags
  -> RemoteAddress:Port           Forward Weight ActiveConn InActConn
TCP  192.168.32.250:80 rr
  -> 192.168.32.130:80            Masq    1      0          0
  -> 192.168.32.135:80            Masq    1      0          0
[root@DR ~]#
[root@DR ~]#
[root@DR ~]#
[root@DR ~]#
[root@DR ~]#
[root@DR ~]# ipvsadm -A -t 192.168.32.250:443 -s rr
[root@DR ~]# ipvsadm -a -t 192.168.32.250:443 -r 192.168.32.130 -m
[root@DR ~]# ipvsadm -a -t 192.168.32.250:443 -r 192.168.32.135 -m
[root@DR ~]#
[root@DR ~]#
[root@DR ~]#
[root@DR ~]#
[root@DR ~]# ipvsadm -Ln
IP Virtual Server version 1.2.1 (size=4096)
Prot LocalAddress:Port Scheduler Flags
  -> RemoteAddress:Port           Forward Weight ActiveConn InActConn
TCP  192.168.32.250:80 rr
  -> 192.168.32.130:80            Masq    1      0          0
  -> 192.168.32.135:80            Masq    1      0          0
TCP  192.168.32.250:443 rr
  -> 192.168.32.130:443           Masq    1      0          0
  -> 192.168.32.135:443           Masq    1      0          0
4. 客户端访问测试
curl 可以使用-k参数不验证证书的合法性
[root@localhost ~]#  for i in $(seq 10);do curl http://192.168.32.250;done
rs2
rs1
rs2
rs1
rs2
rs1
rs2
rs1
rs2
rs1

[root@localhost ~]#  for i in $(seq 10);do curl -k https://192.168.32.250;done
rs2
rs1
rs2
rs1
rs2
rs1
rs2
rs1
rs2
rs1

 浙公网安备 33010602011771号