
LVS-NAT:搭建HTTP及HTTPS负载均衡集群
目录
LVS-NAT:搭建HTTP及HTTPS负载均衡集群
环境说明:
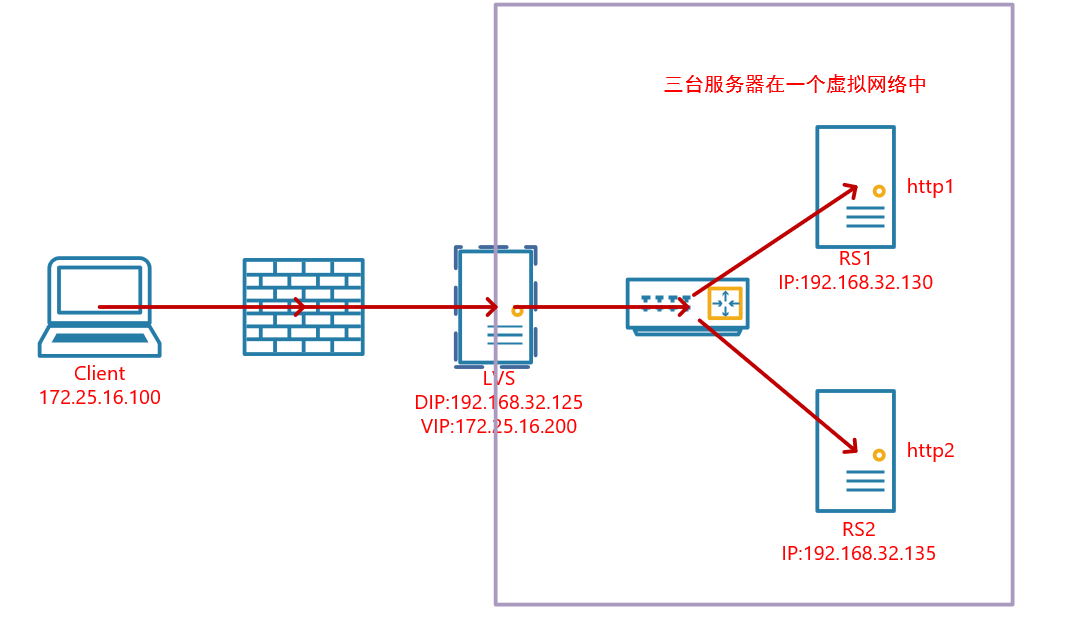
服务器的系统均为centos7,三台服务器分别配置了对应的本地静态地址DIP和RIP,且在一个内网中。
LVS有两块网卡,一块IP是内网的DIP,另一块IP是公网IP的VIP
客户端的IP和VIP都是公网IP
RS的网关指向DIP
搭建NAT模式的HTTP负载集群
1. 配置好IP地址信息
[root@DR ~]# ip a
1: lo: <LOOPBACK,UP,LOWER_UP> mtu 65536 qdisc noqueue state UNKNOWN group default qlen 1000
    link/loopback 00:00:00:00:00:00 brd 00:00:00:00:00:00
    inet 127.0.0.1/8 scope host lo
       valid_lft forever preferred_lft forever
    inet6 ::1/128 scope host
       valid_lft forever preferred_lft forever
2: eth0: <BROADCAST,MULTICAST,UP,LOWER_UP> mtu 1500 qdisc pfifo_fast state UP group default qlen 1000
    link/ether 00:0c:29:39:18:a9 brd ff:ff:ff:ff:ff:ff
    inet 192.168.32.125/24 brd 192.168.32.255 scope global noprefixroute eth0
       valid_lft forever preferred_lft forever
    inet6 fe80::20c:29ff:fe39:18a9/64 scope link
       valid_lft forever preferred_lft forever
3: eth1: <BROADCAST,MULTICAST,UP,LOWER_UP> mtu 1500 qdisc pfifo_fast state UP group default qlen 1000
    link/ether 00:0c:29:39:18:b3 brd ff:ff:ff:ff:ff:ff
    inet 172.25.16.200/24 brd 172.25.16.255 scope global noprefixroute eth1
       valid_lft forever preferred_lft forever
    inet6 fe80::20c:29ff:fe39:18b3/64 scope link
       valid_lft forever preferred_lft forever


[root@RS-1 ~]# ip a
1: lo: <LOOPBACK,UP,LOWER_UP> mtu 65536 qdisc noqueue state UNKNOWN group default qlen 1000
    link/loopback 00:00:00:00:00:00 brd 00:00:00:00:00:00
    inet 127.0.0.1/8 scope host lo
       valid_lft forever preferred_lft forever
    inet6 ::1/128 scope host
       valid_lft forever preferred_lft forever
2: ens33: <BROADCAST,MULTICAST,UP,LOWER_UP> mtu 1500 qdisc pfifo_fast state UP group default qlen 1000
    link/ether 00:0c:29:d7:d9:41 brd ff:ff:ff:ff:ff:ff
    inet 192.168.32.130/24 brd 192.168.32.255 scope global noprefixroute ens33
       valid_lft forever preferred_lft forever
    inet6 fe80::20c:29ff:fed7:d941/64 scope link
       valid_lft forever preferred_lft forever

[root@RS-2 ~]# ip a
1: lo: <LOOPBACK,UP,LOWER_UP> mtu 65536 qdisc noqueue state UNKNOWN group default qlen 1000
    link/loopback 00:00:00:00:00:00 brd 00:00:00:00:00:00
    inet 127.0.0.1/8 scope host lo
       valid_lft forever preferred_lft forever
    inet6 ::1/128 scope host
       valid_lft forever preferred_lft forever
2: ens33: <BROADCAST,MULTICAST,UP,LOWER_UP> mtu 1500 qdisc pfifo_fast state UP group default qlen 1000
    link/ether 00:0c:29:26:1e:fc brd ff:ff:ff:ff:ff:ff
    inet 192.168.32.135/24 brd 192.168.32.255 scope global noprefixroute ens33
       valid_lft forever preferred_lft forever
    inet6 fe80::20c:29ff:fe26:1efc/64 scope link
       valid_lft forever preferred_lft forever
2. DR上开启IP转发
配置NAT模式下的ip转发,让通过Load Balancer的ip包能够转发到真正提供服务的Real Server之上进行处理:
[root@DR ~]# echo 'net.ipv4.ip_forward = 1' >> /etc/sysctl.conf
[root@DR ~]# sysctl -p
net.ipv4.ip_forward = 1
3.DR上配置lvs-nat的转发机制
#LVS依赖于ipvsadm来进行配置,所以我们首先先安装ipvsadm
[root@DR ~]# yum -y install ipvsadm
[root@DR ~]# ipvsadm -A -t 172.25.16.200:80 -s rr
[root@DR ~]# ipvsadm -a -t 172.25.16.200:80 -r 192.168.32.130:80 -m
[root@DR ~]# ipvsadm -a -t 172.25.16.200:80 -r 192.168.32.135:80 -m


#保存配置信息
[root@DR ~]# ipvsadm -Sn > /etc/sysconfig/ipvsadm
#查看配置的规则
[root@DR ~]# ipvsadm -Ln
IP Virtual Server version 1.2.1 (size=4096)
Prot LocalAddress:Port Scheduler Flags
  -> RemoteAddress:Port           Forward Weight ActiveConn InActConn
TCP  192.168.32.100:80 rr
  -> 192.168.32.130:80            Masq    1      0          0
  -> 192.168.32.135:80            Masq    1      0          0
4. RS上安装httpd并启动
#RS1安装apache
[root@RS-1 ~]# yum -y install httpd
[root@RS-1 ~]# echo 'this is RS1' > /var/www/html/index.html
[root@RS-1 ~]# systemctl start httpd
#RS2安装apache
[root@RS-2 ~]# yum -y install httpd
[root@RS-2 ~]# echo 'this is RS2' > /var/www/html/index.html
[root@RS-2 ~]# systemctl start httpd
5. 客户端访问测试
[root@client ~]# ip a
1: lo: <LOOPBACK,UP,LOWER_UP> mtu 65536 qdisc noqueue state UNKNOWN group default qlen 1000
    link/loopback 00:00:00:00:00:00 brd 00:00:00:00:00:00
    inet 127.0.0.1/8 scope host lo
       valid_lft forever preferred_lft forever
    inet6 ::1/128 scope host
       valid_lft forever preferred_lft forever
2: ens33: <BROADCAST,MULTICAST,UP,LOWER_UP> mtu 1500 qdisc pfifo_fast state UP group default qlen 1000
    link/ether 00:0c:29:89:35:d0 brd ff:ff:ff:ff:ff:ff
    inet 172.25.16.100/24 brd 172.25.16.255 scope global noprefixroute ens33
       valid_lft forever preferred_lft forever
    inet6 fe80::20c:29ff:fe89:35d0/64 scope link
       valid_lft forever preferred_lft forever
[root@client ~]# for i in $(seq 10);do curl 172.25.16.200;done
this is RS2
this is RS1
this is RS2
this is RS1
this is RS2
this is RS1
this is RS2
this is RS1
this is RS2
this is RS1
搭建NAT模式的HTTPS负载集群
在以上配置基础下搭建https
1. LVS服务器搭建CA服务端
1.生成一对密钥
#生成一对密钥
[root@DR ~]# cd /etc/pki/CA/
[root@DR CA]# (umask 077;openssl genrsa -out private/cakey.pem 2048)
Generating RSA private key, 2048 bit long modulus
.........+++
....................................+++
e is 65537 (0x10001)

[root@DR CA]# openssl rsa -in private/cakey.pem -pubout
writing RSA key
-----BEGIN PUBLIC KEY-----
MIIBIjANBgkqhkiG9w0BAQEFAAOCAQ8AMIIBCgKCAQEA1dMt1vGcp1EJaHG/QVaA
+izqDmC4M4gbqiGkQbEm8/T3a6gcsHdFKszQGIwigQoL273Wbq7QAzXmAd9FU8Zp
fm01a+wJ8ie+ZM4NDSCOveyXbg4EWxalB03vLmoDXpw+uzMyMuMYHDPWYBdCscYn
H7w/91oYRV/dxc1qSMr8zZi584Rg9hbwWHPVdobnVMid9QfXh0CJdZEANsEyrGnF
cF+GP6xU4VBAFfEduuif/geL4lbDGJKB1ibDIMlTqpmdAh7+5fvK2eD/c9E1k55w
9QN8fOMi0YHyJ+2aPjfEicgJyh+kmkN7LPkEiC5H3ZsXnjVEN3PkbTnYyrSp5rWW
6wIDAQAB
-----END PUBLIC KEY-----
2.生成自签署证书
 #生成自签署证书
[root@DR CA]#  openssl req -new -x509 -key private/cakey.pem -out cacert.pem -days 1024
You are about to be asked to enter information that will be incorporated
into your certificate request.
What you are about to enter is what is called a Distinguished Name or a DN.
There are quite a few fields but you can leave some blank
For some fields there will be a default value,
If you enter '.', the field will be left blank.
-----
Country Name (2 letter code) [XX]:CN
State or Province Name (full name) []:HB
Locality Name (eg, city) [Default City]:WH
Organization Name (eg, company) [Default Company Ltd]:runtime
Organizational Unit Name (eg, section) []:runtime
Common Name (eg, your name or your server's hostname) []:runtime
Email Address []:
[root@DR CA]# touch index.txt && echo 01 > serial
3.RS生成证书签署请求,并发送给CA
#RS-1(httpd服务器)生成密钥
#创建了/etc/httpd/ssl目录,用来存放证书
[root@RS-1 ssl]# (umask 077;openssl genrsa -out httpd.key 2048)
Generating RSA private key, 2048 bit long modulus
...................................................................................................................................................................................................................................................+++
................+++
e is 65537 (0x10001)

#RS-1(httpd服务器)生成证书签署请求

[root@RS-1 ssl]# openssl req -new -key httpd.key -days 1024 -out httpd.csr
You are about to be asked to enter information that will be incorporated
into your certificate request.
What you are about to enter is what is called a Distinguished Name or a DN.
There are quite a few fields but you can leave some blank
For some fields there will be a default value,
If you enter '.', the field will be left blank.
-----
Country Name (2 letter code) [XX]:CN
State or Province Name (full name) []:HB
Locality Name (eg, city) [Default City]:WH
Organization Name (eg, company) [Default Company Ltd]:runtime
Organizational Unit Name (eg, section) []:runtime
Common Name (eg, your name or your server's hostname) []:runtime
Email Address []:

Please enter the following 'extra' attributes
to be sent with your certificate request
A challenge password []:
An optional company name []:
[root@RS-1 ssl]#
[root@RS-1 ssl]# ls
httpd.csr  httpd.key


#把证书签署请求文件发送给CA
[root@RS-1 ssl]# scp httpd.csr root@192.168.32.125:/root
4.CA签署证书并发给客户端
[root@DR ~]# ls
anaconda-ks.cfg  httpd.csr
[root@DR ~]# openssl ca -in /root/httpd.csr -out httpd.crt -days 1024
Using configuration from /etc/pki/tls/openssl.cnf
Check that the request matches the signature
Signature ok
Certificate Details:
        Serial Number: 1 (0x1)
        Validity
            Not Before: Jul 24 15:27:28 2020 GMT
            Not After : May 14 15:27:28 2023 GMT
        Subject:
            countryName               = CN
            stateOrProvinceName       = HB
            organizationName          = runtime
            organizationalUnitName    = runtime
            commonName                = runtime
        X509v3 extensions:
            X509v3 Basic Constraints:
                CA:FALSE
            Netscape Comment:
                OpenSSL Generated Certificate
            X509v3 Subject Key Identifier:
                51:C2:11:E1:0D:86:FB:40:79:0B:F3:DD:5E:49:71:C6:D3:88:41:B1
            X509v3 Authority Key Identifier:
                keyid:31:D2:0A:8F:D2:DD:B9:3E:EE:05:B5:1B:58:C4:AF:8C:45:3B:C8:A0

Certificate is to be certified until May 14 15:27:28 2023 GMT (1024 days)
Sign the certificate? [y/n]:y


1 out of 1 certificate requests certified, commit? [y/n]y
Write out database with 1 new entries
Data Base Updated
[root@DR ~]# ls
anaconda-ks.cfg  httpd.crt  httpd.csr

#CA把签署好的证书httpd.crt和服务端的证书cacert.pem发给客户端
[root@DR ~]# scp httpd.crt root@192.168.32.130:/etc/httpd/ssl
[root@DR ~]# scp cacert.pem root@192.168.32.130:/etc/httpd/ssl
2.配置https
1.将RS-1的证书和密钥发给RS-2
[root@RS-2 ~]# yum -y install mod_ssl
[root@RS-2 ~]# mkdir /etc/httpd/ssl

[root@RS-1 ~]# yum -y install mod_ssl
[root@RS-1 ssl]# scp cacert.pem httpd.crt httpd.key root@192.168.32.135:/etc/httpd/ssl
root@192.168.32.135's password:
cacert.pem                                                       100% 1294     1.4MB/s   00:00
httpd.crt                                                        100% 4416     5.4MB/s   00:00
httpd.key

#RS-2上查看
[root@RS-2 ~]# ls /etc/httpd/ssl/
cacert.pem  httpd.crt  httpd.key
2.修改https配置文件
[root@RS-1 ~]# vim /etc/httpd/conf.d/ssl.conf
//修改后如下所示
#   Server Certificate:
# Point SSLCertificateFile at a PEM encoded certificate.  If
# the certificate is encrypted, then you will be prompted for a
# pass phrase.  Note that a kill -HUP will prompt again.  A new
# certificate can be generated using the genkey(1) command.
SSLCertificateFile /etc/httpd/ssl/httpd.crt

#   Server Private Key:
#   If the key is not combined with the certificate, use this
#   directive to point at the key file.  Keep in mind that if
#   you've both a RSA and a DSA private key you can configure
#   both in parallel (to also allow the use of DSA ciphers, etc.)
SSLCertificateKeyFile /etc/httpd/ssl/httpd.key

#   Server Certificate Chain:
#   Point SSLCertificateChainFile at a file containing the
#   concatenation of PEM encoded CA certificates which form the
#   certificate chain for the server certificate. Alternatively
#   the referenced file can be the same as SSLCertificateFile
#   when the CA certificates are directly appended to the server
#   certificate for convinience.
#SSLCertificateChainFile /etc/pki/tls/certs/server-chain.crt

#   Certificate Authority (CA):
#   Set the CA certificate verification path where to find CA
#   certificates for client authentication or alternatively one
#   huge file containing all of them (file must be PEM encoded)
SSLCACertificateFile /etc/httpd/ssl/cacert.pem


#重启服务
[root@RS-1 ~]# systemctl restart httpd
[root@RS-1 ~]# ss -tanl
State       Recv-Q Send-Q    Local Address:Port                   Peer Address:Port
LISTEN      0      100           127.0.0.1:25                                *:*
LISTEN      0      128                   *:22                                *:*
LISTEN      0      100               [::1]:25                             [::]:*
LISTEN      0      128                [::]:443                            [::]:*
LISTEN      0      128                [::]:80                             [::]:*
LISTEN      0      128                [::]:22                             [::]:*
RS-2上也要做如上配置
3. LVS上配置规则
[root@DR ~]# ipvsadm -Ln
IP Virtual Server version 1.2.1 (size=4096)
Prot LocalAddress:Port Scheduler Flags
  -> RemoteAddress:Port           Forward Weight ActiveConn InActConn
TCP  172.25.16.200:80 rr
  -> 192.168.32.130:80            Masq    1      0          0
  -> 192.168.32.135:80            Masq    1      0          0
[root@DR ~]#
[root@DR ~]#
[root@DR ~]#
[root@DR ~]#
[root@DR ~]#
[root@DR ~]# ipvsadm -A -t 172.25.16.200:443 -s rr
[root@DR ~]# ipvsadm -a -t 172.25.16.200:443 -r 192.168.32.130 -m
[root@DR ~]# ipvsadm -a -t 172.25.16.200:443 -r 192.168.32.135 -m
[root@DR ~]#
[root@DR ~]#
[root@DR ~]#
[root@DR ~]#
[root@DR ~]# ipvsadm -Ln
IP Virtual Server version 1.2.1 (size=4096)
Prot LocalAddress:Port Scheduler Flags
  -> RemoteAddress:Port           Forward Weight ActiveConn InActConn
TCP  172.25.16.200:80 rr
  -> 192.168.32.130:80            Masq    1      0          0
  -> 192.168.32.135:80            Masq    1      0          0
TCP  172.25.16.200:443 rr
  -> 192.168.32.130:443           Masq    1      0          0
  -> 192.168.32.135:443           Masq    1      0          0
4. 客户端访问测试
curl 可以使用-k参数不验证证书的合法性
[root@client ~]# ip a
1: lo: <LOOPBACK,UP,LOWER_UP> mtu 65536 qdisc noqueue state UNKNOWN group default qlen 1000
    link/loopback 00:00:00:00:00:00 brd 00:00:00:00:00:00
    inet 127.0.0.1/8 scope host lo
       valid_lft forever preferred_lft forever
    inet6 ::1/128 scope host
       valid_lft forever preferred_lft forever
2: ens33: <BROADCAST,MULTICAST,UP,LOWER_UP> mtu 1500 qdisc pfifo_fast state UP group default qlen 1000
    link/ether 00:0c:29:89:35:d0 brd ff:ff:ff:ff:ff:ff
    inet 172.25.16.100/24 brd 172.25.16.255 scope global noprefixroute ens33
       valid_lft forever preferred_lft forever
    inet6 fe80::20c:29ff:fe89:35d0/64 scope link
       valid_lft forever preferred_lft forever

[root@client ~]# for i in $(seq 10);do curl http://172.25.16.200;done
this is RS2
this is RS1
this is RS2
this is RS1
this is RS2
this is RS1
this is RS2
this is RS1
this is RS2
this is RS1
[root@client ~]# for i in $(seq 10);do curl -k https://172.25.16.200;done
this is RS2
this is RS1
this is RS2
this is RS1
this is RS2
this is RS1
this is RS2
this is RS1
this is RS2
this is RS1

 浙公网安备 33010602011771号