python 四cv2库
https://blog.csdn.net/qq_40962368/article/details/80444144
pip install opencv-python ;import cv2
一、图像的读取、复制、显示、保存
①cv2.imread(filename='f_path',flags=1) flags默认值为1 表示彩图模式打开,flags=0打开灰图。
②因为img是numpy.ndarray类型,像素值当np访问处理;img.copy()深度复制。
 img.shape(height,width,3) img[:,:,0]b img[:,:,1]g img[:,:,2]r
图片显示挺麻烦的,可以改用from PIL import Image(效果也不太好啊,还是cv2.imwrite保存后再看吧)
cv2.namedWindow('hello')  # 必须创建窗口
cv2.imshow('hello', img)
cv2.waitKey(0)    # 让图片在使窗口保持住
cv2.destroyAllWindows()
img_pil = Image.fromarray(img.astype('uint8')).convert('RGB')
img = numpy.array(img_pil)
Image.show(img_pil)
③cv2.imwrite(filename='f_path', img1, params=[cv2.IMWRITE_JPEG_QUALITY, 80])
params:对于JPEG格式后面的80是指图片质量,默认95 最高100,设置为个位数的保存图片很模糊。
对于PNG格式[cv2.IMWRITE_PNG_COMPRESSION, 0],后面的0表示图片压缩程度:从0到9压缩级别越高,图片尺寸越小。
最后cv2.IMWRITE_JPEG_QUALITY是一个整数常数
二、获取、播放、保存视频
逐帧读取并播放 摄像头拍摄的或test.mp4中的图像。以下初始化了cap类,cap.isOpened()、cap.open()
cap.set(id,value) cap.get(id),id从0到18,3是width 4是height。
import numpy as np
import cv2

cap = cv2.VideoCapture(0)  # 0号摄像头,也可以是'./test.mp4'

while(True):
    # Capture frame-by-frame
    ret, frame = cap.read()

    # Our operations on the frame come here
    gray = cv2.cvtColor(frame, cv2.COLOR_BGR2GRAY)

    # Display the resulting frame
    cv2.imshow('frame',gray)
    if cv2.waitKey(1) & 0xFF == ord('q'):
        break

# When everything done, release the capture
cap.release()
cv2.destroyAllWindows()
拍摄并保存视频
# -*- coding=utf-8 -*-
import numpy as np
import cv2

cap = cv2.VideoCapture(0)  # 'test.mp4'
# Define the codec and create VideoWriter object
fourcc = cv2.VideoWriter_fourcc(*'XVID')
out = cv2.VideoWriter('output.avi', fourcc, 2.0, (640, 480))

while cap.isOpened():
    # Capture frame-by-frame
    ret, frame = cap.read()

    # Our operations on the frame come here
    # frame = cv2.cvtColor(frame, cv2.COLOR_BGR2GRAY)

    # Display the resulting frame
    if ret:
        frame = cv2.flip(frame, 0)

        # write the flipped frame
        out.write(frame)
        cv2.imshow('frame', frame)
        if cv2.waitKey(40) & 0xFF == ord('q'):  # waitKey 40 ms毫秒
            for i in range(19):
                print('index %d, info is :' % i, cap.get(i))
            break
    else:
        break

# When everything done, release the capture
cap.release()
out.release()
cv2.destroyAllWindows()
三、绘制简单的几何图形、显示文字
https://blog.csdn.net/qq_40962368/article/details/80463108
import cv2
import numpy as np
img = np.zeros([512, 512, 3])
cv2.line(img, (255, 400), (255, 0), (255, 0, 255), 9)
cv2.rectangle(img, (150, 150), (350, 350), (255, 255, 0), 2)
cv2.imwrite('line_rect.jpg',img)
cv2.circle(img, (255, 255), 50, (0, 0, 255), 1)
cv2.circle(img, (400, 150), 20, (255, 100, 100), 25)
cv2.ellipse(img, (255, 255), (170, 70), 20, 0, 270, (0, 255, 0), 2)
pts = np.array([[50, 190], [380, 420], [255, 50], [120, 420], [450, 190]])  # pts.shape=(num_points,2)
cv2.polylines(img, [pts], True, (255, 255, 0), 15)
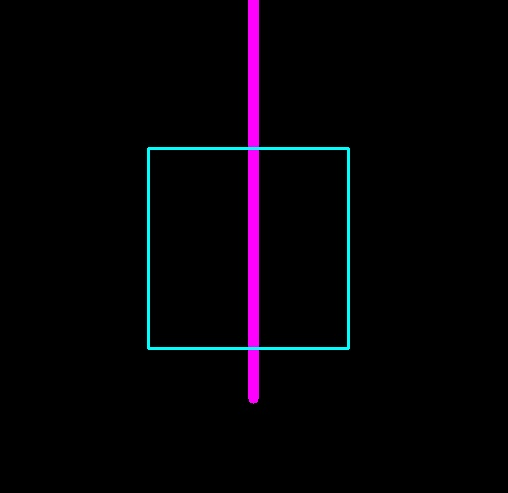
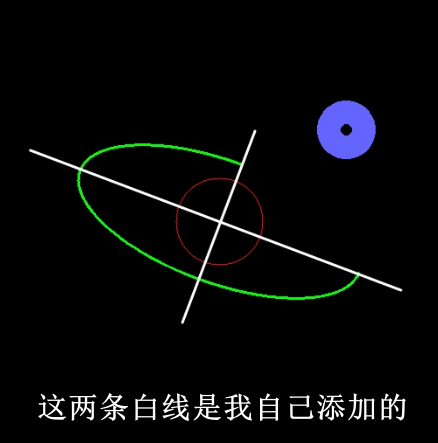

直线 cv2.line(img, 直线起点坐标,终点坐标,颜色,直线粗细)
矩形 cv2.rectangl(img, 矩形左上角坐标,矩形右下角坐标,颜色,矩形边的线的粗细)
圆 cv2.circle(img, 圆心坐标, 半径, 颜色, 圆弧的粗细)
椭圆 cv2.ellipse(img, 椭圆圆心, 长轴半径和短轴半径, 长轴逆时针偏角, 逆时针开始画弧线的角度, 划弧线结束时的角度, 颜色, 弧线粗细) #负数则为顺时针
多边形 cv2.polylines(img, [np.shape=(num_points,2)], 首尾两点是否连接, 线的粗细)
文字 cv2.putText(img, 'wen huai yi shi xin', org=(10, 255), fontFace=cv2.FONT_HERSHEY_SIMPLEX, fontScale=1.6, color=(255, 255, 0), thickness=2,linetype=cv2.LINE_AA)
cv2.putText(img, '内容',文字起始位置,font,单个文字大小,文字粗细),org设置的是文本框的左下角。
总结:以上关于角度默认逆时针,关于点坐标(x-width, y-height)
四、图像的简单几何变换(resize和旋转)
img = cv2.resize(img, None, fx=2, fy=2, interpolation=cv2.INTER_LINEAR)
img = cv2.resize(img, (int(0.8*width), int(0.8*height)), interpolation=cv2.INTER_AREA)
rows, cols = img.shape[:2]    # height,width
M1 = cv2.getRotationMatrix2D((cols/2, rows/2), 45, 0.5)  # 设置变换方式
cv2.warpAffine(img, M1, (cols, rows))

①缩放resize:缩放因子fx,fy > 1时扩大,否则缩小。 因凸显变化而有的插值问题,扩大时用cv2.INTER_CUBIC和cv2.INTER_LINEAR,缩小时用cv2.INTER_AREA
②旋转:cv2.getRotationMatrix2D(旋转中心,旋转角度,旋转后resize的缩放因子)。
注意:旋转的是M1,img的值没有改变!
五、常用cv2函数
①cv2.minAreaRect寻找最小矩形(包含所有poly中的点)
输入:poly必须为ndarray类型,poly.shape=(num_points, 2)
输出:rect元组((x0,y0),(width,height),theta) ,其中角度的正负 width是那条边取决于cv2的版本了!
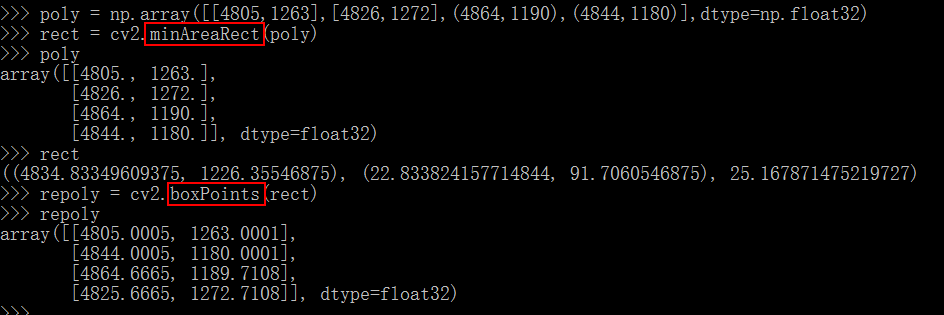
cv2.boxPoints和minAreaRect是功能相对的一组。
②drawContours(image, contours, contourIdx, color, thickness=None, lineType=None, hierarchy=None, maxLevel=None, offset=None)

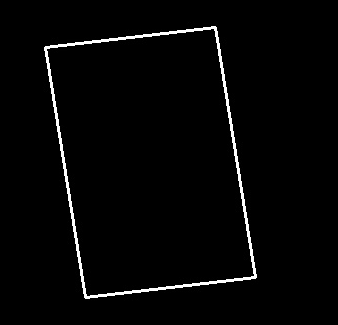
第一个cv2.drawContours没用,第二个contours=[poly.reshape(-1,1,2)]才有效果。cv2.contourArea(poly.reshape(-1,1,2))计算返回浮点数(面积)
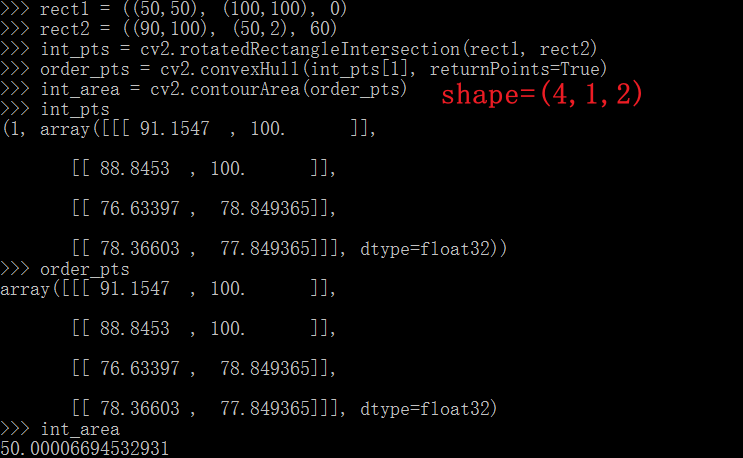
③两个opencv框 -> poly框(求交集框)cv2.rotatedRectangleIntersection(rect1,rect2)。其中cv2.convexHull也是求多个点的凸包,不明白这跟cv2.boxPoints的区别。
