OpenStack离线安装系列-0制作yum源
0.环境说明
| 系统名称 | 版本 | ip |
|---|---|---|
| Cent os7 | CentOS-7-x86_64-Minimal-2009 | 192.168.2.166 |
由于要存储yum依赖,硬盘容量建议50G+
1. 软件安装
安装之前建议将yum源修改为国内源地址。
国内源地址:
- http://mirrors.aliyun.com/centos/7/cloud/x86_64/ (阿里源)
- https://mirrors.tuna.tsinghua.edu.cn/centos/7/cloud/x86_64/ (清华源)
- https://repo.huaweicloud.com/centos/7/cloud/x86_64/ (华为源)
1.1 yum源替换
- 如果镜像是从国内源地址提供的镜像,可忽略1.1步骤。
备份源
# 备份自带源
cd /etc/yum.repos.d/
# 备份
mkdir repo
mv *.repo repo
下载源文件
cd /etc/yum.repos.d/
# 下载cent os 7 源地址镜像
wget -O /etc/yum.repos.d/CentOS-Base.repo http://mirrors.aliyun.com/repo/Centos-7.repo
或者
curl -o /etc/yum.repos.d/CentOS-Base.repo http://mirrors.aliyun.com/repo/Centos-7.repo
清除缓存
# 清除系统yum缓存
yum clean all
# 生成yum缓存
yum makecache
下载工具
# 同步源工具下载
yum -y install createrepo yum-utils net-tools reposync
# 此处选择安装openstack-train版
yum install centos-release-openstack-train
# 进入repos.d目录查看
ls -1 /etc/yum.repos.d/
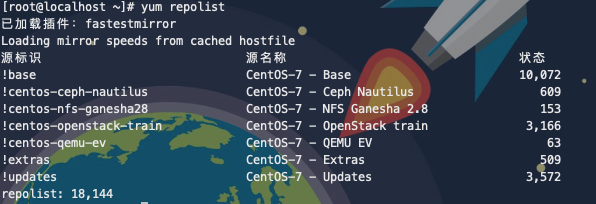
yum repolist

同步到本地
# 创建同步yum存储文件夹
mkdir -p /var/www/html/yumrepository

# 同步
reposync -p /var/www/html/yumrepository
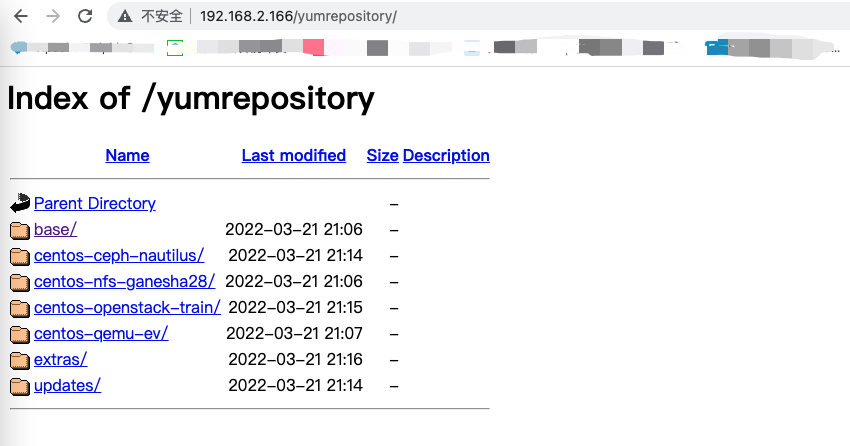
同步完成后,会出现如图所示文件夹

2. 本地制作
创建yum仓库
# 进入每一个仓库
cd /var/www/html/yumrepository

cd ./base
# 利用createrepo工具制作yum镜像
yum -y install createrepo
createrepo .
createrepo执行结束后,会在相应路径下出现repodata文件

注意:在同步下来的每一个yum仓库目录都需要执行上述步骤
cd /var/www/html/yumrepository/base/
createrepo
# 后续如果更新了rpm包,需要进入相应的目录,利用createrepo update命令进行同步
reposync -p /var/www/html/yumrepository/
createrepo  --update .
3. 配置httpd服务
# 下载http服务
yum -y install httpd
# 启动服务
systemctl start httpd
# 开机自启动
systemctl enable httpd
# 查看状态
systemctl status httpd
httpd相关配置路径说明
服务目录 /etc/httpd
主配置目录 /etc/httpd/conf/httpd.conf
网站数据目录 /var/www/html (此处和repo存储的目录对应)
访问日志目录 /var/log/httpd/access_log
错误日志 /var/log/httpd/error_log
修改配置文件,关闭防火墙
vi /etc/selinux/config

SELINUX=disabled
关闭防火墙、selinux
systemctl stop firewalld
systemctl dsable firewalld
setenforce 0
测试下httpd暴露的yum源访问连通性

4. 验证
在另一个机器上,新建一个repo文件
# 移除原系统自带的repo。
mkdir ori_repo-config
# 移动之前的repo到备份文件架
mv /etc/yum.repos.d/* ./ori_repo-config/
# 创建新的repo文件
vi /etc/yum.repos.d/CentOS-PrivateLocal.repo
[base]
name=CentOS-$releasever - Base
baseurl=http://192.168.2.166/yumrepository/base/
gpgcheck=0
enabled=1

[updates]
name=CentOS-$releasever - Updates
baseurl=http://192.168.2.166/yumrepository/updates/
gpgcheck=0
enabled=1

[extras]
name=CentOS-$releasever - Extras
baseurl=http://192.168.2.166/yumrepository/extras/
gpgcheck=0
enabled=1

[centos-openstack-train]
name=CentOS-7 - OpenStack train
baseurl=http://192.168.2.166/yumrepository/centos-openstack-train/
gpgcheck=0
enabled=1

[centos-qemu-ev]
name=CentOS-$releasever - QEMU EV
baseurl=http://192.168.2.166/yumrepository/centos-qemu-ev/
gpgcheck=0
enabled=1

[centos-ceph-nautilus]
name=CentOS-7 - Ceph Nautilus
baseurl=http://192.168.2.166/yumrepository/centos-ceph-nautilus/
gpgcheck=0
enabled=1

[centos-nfs-ganesha28]
name=CentOS-7 - NFS Ganesha 2.8
baseurl=http://192.168.2.166/yumrepository/centos-nfs-ganesha28/
gpgcheck=0
enabled=1
- ip地址为yumrepository所在主机地址
- 为避免冲突,[centos-openstack-stein]和[centos-openstack-train]只保留一个。
配置完成后,清除原有的cache,并重新生成cache。
yum clean all
yum makecache
参考文档
分类:
OpenStack


【推荐】国内首个AI IDE,深度理解中文开发场景,立即下载体验Trae
【推荐】编程新体验,更懂你的AI,立即体验豆包MarsCode编程助手
【推荐】抖音旗下AI助手豆包,你的智能百科全书,全免费不限次数
【推荐】轻量又高性能的 SSH 工具 IShell:AI 加持,快人一步
· AI与.NET技术实操系列:基于图像分类模型对图像进行分类
· go语言实现终端里的倒计时
· 如何编写易于单元测试的代码
· 10年+ .NET Coder 心语,封装的思维:从隐藏、稳定开始理解其本质意义
· .NET Core 中如何实现缓存的预热?
· 分享一个免费、快速、无限量使用的满血 DeepSeek R1 模型,支持深度思考和联网搜索!
· 25岁的心里话
· 基于 Docker 搭建 FRP 内网穿透开源项目(很简单哒)
· ollama系列01:轻松3步本地部署deepseek,普通电脑可用
· 按钮权限的设计及实现