VMware Workstation安装Redhat6.4全过程附图(二)
Redhat安装见上一篇:VMware Workstation安装Redhat6.4全过程附图(一)
本篇主要讲虚拟机网络配置以及如何跳过yum收费问题。
虚拟机安装后,我们输入ping自己的宿主机IP172.168.43.41,会提示Network is unreachable。

输入ifconfig命令,发现并没有eth0网卡信息。

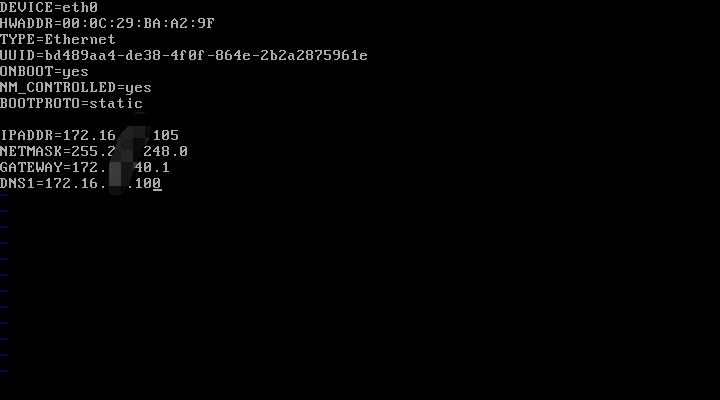
编辑网络配置文件:vi /etc/sysconfig/network-scripts/ifcfg-eth0,修改如下

配置项说明,例子而已。
DEVICE=eth0     #网卡设备名称
ONBOOT=yes      #启动时是否激活 yes | no
BOOTPROTO=static        #协议类型
IPADDR=192.168.1.90     #网络IP地址
NETMASK=255.255.255.0       #网络子网地址
GATEWAY=192.168.1.1     #网关地址
BROADCAST=192.168.1.255     #广播地址
HWADDR=00:0C:29:FE:1A:09        #网卡MAC地址
TYPE=Ethernet       #网卡类型为以太网
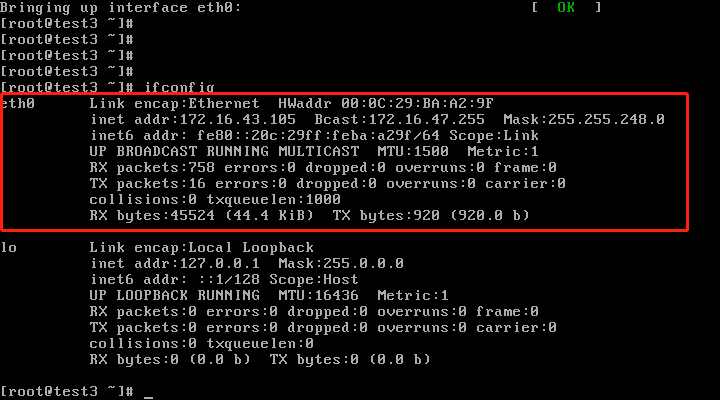
重启网卡:service network restart

再次输入ifconfig命令,可以看到eth0网卡信息了。

从虚拟机ping宿主机,从宿主机ping虚拟机,都通啦。

从虚拟机ping百度,也没有问题

现在尝试安装lrzsz命令,运行命令yum -y install lrzsz。

报错This system is not registered。要解决这个问题,只能把redhat自带yum卸载,然后用centos源的yum命令。
1、进入/usr/local目录,创建一个soft文件夹,将安装yum所需要的包下载到soft文件夹下。
wget https://vault.centos.org/6.5/os/x86_64/Packages/python-iniparse-0.3.1-2.1.el6.noarch.rpm
wget https://vault.centos.org/6.5/os/x86_64/Packages/python-urlgrabber-3.9.1-9.el6.noarch.rpm
wget https://vault.centos.org/6.5/os/x86_64/Packages/yum-3.2.29-40.el6.centos.noarch.rpm
wget https://vault.centos.org/6.5/os/x86_64/Packages/yum-metadata-parser-1.1.2-16.el6.x86_64.rpm
wget https://vault.centos.org/6.5/os/x86_64/Packages/yum-plugin-fastestmirror-1.1.30-14.el6.noarch.rpm

2、查看原来是否安装yum: rpm -qa |grep yum
3、直接卸载自带的yum: rpm -qa|grep yum|xargs rpm -e --nodeps
4、查看是否卸载干净: rpm -qa |grep yum

5、依次安装之前下载的5个rpm文件
rpm -ivh python-iniparse-0.3.1-2.1.el6.noarch.rpm
rpm -ivh python-urlgrabber-3.9.1-9.el6.noarch.rpm
rpm -ivh yum-3.2.29-40.el6.centos.noarch.rpm --force --nodeps
rpm -ivh yum-metadata-parser-1.1.2-16.el6.x86_64.rpm
rpm -ivh yum-plugin-fastestmirror-1.1.30-14.el6.noarch.rpm --force --nodeps
6、更换yum源。使用163的源
进入/etc/yum.repos.d/目录,把rhel-source.repo文件备份一份
备份命令:cp rhel-source.repo rhel-source.repo.bak
执行vi rhel-source.repo命令,替换文件内容为:
# CentOS-Base.repo
#
# The mirror system uses the connecting IP address of the client and the
# update status of each mirror to pick mirrors that are updated to and
# geographically close to the client.  You should use this for CentOS updates
# unless you are manually picking other mirrors.
#
# If the mirrorlist= does not work for you, as a fall back you can try the
# remarked out baseurl= line instead.
#
#

[base]
name=CentOS-6.7 - Base - 163.com
baseurl=https://vault.centos.org/centos/6.7/os/$basearch/
#mirrorlist=http://mirrorlist.centos.org/?release=6.7&arch=$basearch&repo=os
gpgcheck=1
gpgkey=http://mirror.centos.org/centos/RPM-GPG-KEY-CentOS-6

#released updates
[updates]
name=CentOS-6.7 - Updates - 163.com
baseurl=https://vault.centos.org/centos/6.7/updates/$basearch/
#mirrorlist=http://mirrorlist.centos.org/?release=6.7&arch=$basearch&repo=updates
gpgcheck=1
gpgkey=http://mirror.centos.org/centos/RPM-GPG-KEY-CentOS-6

#additional packages that may be useful
[extras]
name=CentOS-6.7 - Extras - 163.com
baseurl=https://vault.centos.org/centos/6.7/extras/$basearch/
#mirrorlist=http://mirrorlist.centos.org/?release=6.7&arch=$basearch&repo=extras
gpgcheck=1
gpgkey=http://mirror.centos.org/centos/RPM-GPG-KEY-CentOS-6

#additional packages that extend functionality of existing packages
[centosplus]
name=CentOS-6.7 - Plus - 163.com
baseurl=https://vault.centos.org/centos/6.7/centosplus/$basearch/
#mirrorlist=http://mirrorlist.centos.org/?release=6.7&arch=$basearch&repo=centosplus
gpgcheck=1
enabled=0
gpgkey=http://mirror.centos.org/centos/RPM-GPG-KEY-CentOS-6

#contrib - packages by Centos Users
[contrib]
name=CentOS-6.7 - Contrib - 163.com
baseurl=https://vault.centos.org/centos/6.7/contrib/$basearch/
#mirrorlist=http://mirrorlist.centos.org/?release=6.7&arch=$basearch&repo=contrib
gpgcheck=1
enabled=0
gpgkey=http://mirror.centos.org/centos/RPM-GPG-KEY-CentOS-6
7、清除缓存: yum clean all
运行yum clean all时报如下错误:

这时我们只需要把subscription-manager命令卸载即可
查看subscription-manager版本: rpm -qa | grep subscription-manager
卸载subscription-manager:rpm -e subscription-manager-1.1.23-1.el6.x86_64

卸载之后再次执行yum clean all
8、测试,再次安装rzsz命令:yum -y install lrzsz,执行成功。
9、建立元数据缓存:yum makecache
到此RedHat安装结束。


