4.4 线程
线程
相关概念

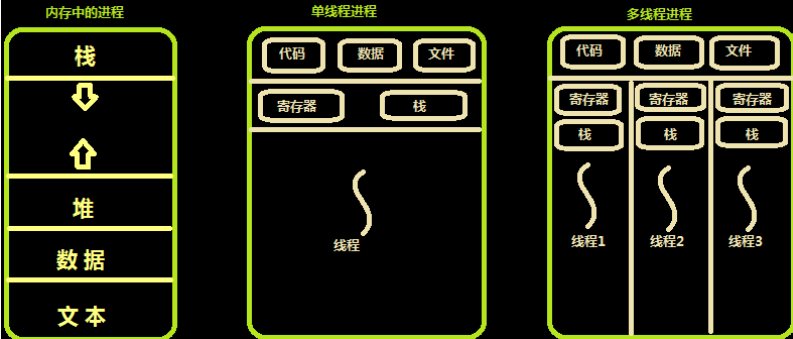
进程线程关系图

threading 模块
线程创建

方法形式创建线程

from threading import Thread
import time
def sayhi(name):
    time.sleep(2)
    print('%s say hello' %name)

if __name__ == '__main__':
    t=Thread(target=sayhi,args=('egon',))
    t.start()
    print('主线程')
类形式创建线程(必须内含有 run方法 以及继承 Thread)

from threading import Thread
import time
class Sayhi(Thread):
    def __init__(self,name):
        super().__init__()
        self.name=name
    def run(self):
        time.sleep(2)
        print('%s say hello' % self.name)


if __name__ == '__main__':
    t = Sayhi('egon')
    t.start()
    print('主线程')
相关方法
Thread实例对象的方法
  # isAlive(): 返回线程是否活动的。
  # getName(): 返回线程名。
  # setName(): 设置线程名。

threading模块提供的一些方法:
  # threading.currentThread(): 返回当前的线程变量。
  # threading.enumerate(): 返回一个包含正在运行的线程的list。正在运行指线程启动后、结束前,不包括启动前和终止后的线程。
  # threading.activeCount(): 返回正在运行的线程数量,与len(threading.enumerate())有相同的结果。
join 方法实例

from threading import Thread
import time
def sayhi(name):
    time.sleep(2)
    print('%s say hello' %name)

if __name__ == '__main__':
    t=Thread(target=sayhi,args=('egon',))
    t.start()
    t.join()
    print('主线程')
    print(t.is_alive())
    '''
    egon say hello
    主线程
    False
    '''
守护线程实例

from threading import Thread
import time
def sayhi(name):
    time.sleep(2)
    print('%s say hello' %name)

if __name__ == '__main__':
    t=Thread(target=sayhi,args=('egon',))
    t.setDaemon(True) #必须在t.start()之前设置
    t.start()

    print('主线程')
    print(t.is_alive())
    '''
    主线程
    True
    '''

from threading import Thread
import time
def foo():
    print(123)
    time.sleep(1)
    print("end123")

def bar():
    print(456)
    time.sleep(3)
    print("end456")


t1=Thread(target=foo)
t2=Thread(target=bar)

t1.daemon=True
t1.start()
t2.start()
print("main-------")
锁
同步锁
用法和场景同 进程
import threading
R=threading.Lock()
R.acquire()
'''
对公共数据的操作
'''
R.release()
死锁/重入锁
死锁实例
from threading import Lock as Lock
import time
mutexA=Lock()
mutexA.acquire()
mutexA.acquire()
print(123)
mutexA.release()
mutexA.release()
科学家吃面死锁问题

import time
from threading import Thread,Lock
noodle_lock = Lock()
fork_lock = Lock()
def eat1(name):
    noodle_lock.acquire()
    print('%s 抢到了面条'%name)
    fork_lock.acquire()
    print('%s 抢到了叉子'%name)
    print('%s 吃面'%name)
    fork_lock.release()
    noodle_lock.release()

def eat2(name):
    fork_lock.acquire()
    print('%s 抢到了叉子' % name)
    time.sleep(1)
    noodle_lock.acquire()
    print('%s 抢到了面条' % name)
    print('%s 吃面' % name)
    noodle_lock.release()
    fork_lock.release()

for name in ['哪吒','egon','yuan']:
    t1 = Thread(target=eat1,args=(name,))
    t2 = Thread(target=eat2,args=(name,))
    t1.start()
    t2.start()
解决方式:重入锁

import time
from threading import Thread,RLock
fork_lock = noodle_lock = RLock()
def eat1(name):
    noodle_lock.acquire()
    print('%s 抢到了面条'%name)
    fork_lock.acquire()
    print('%s 抢到了叉子'%name)
    print('%s 吃面'%name)
    fork_lock.release()
    noodle_lock.release()

def eat2(name):
    fork_lock.acquire()
    print('%s 抢到了叉子' % name)
    time.sleep(1)
    noodle_lock.acquire()
    print('%s 抢到了面条' % name)
    print('%s 吃面' % name)
    noodle_lock.release()
    fork_lock.release()

for name in ['哪吒','egon','yuan']:
    t1 = Thread(target=eat1,args=(name,))
    t2 = Thread(target=eat2,args=(name,))
    t1.start()
    t2.start()
信号量 Semaphore

信号量 Semaphore 举例

from threading import Thread,Semaphore,currentThread
import time,random
sm = Semaphore(5) #运行的时候有5个人
def task():
    sm.acquire()
    print('\033[42m %s上厕所'%currentThread().getName())
    time.sleep(random.randint(1,3))
    print('\033[31m %s上完厕所走了'%currentThread().getName())
    sm.release()
if __name__ == '__main__':
    for i in range(20):  #开了10个线程 ,这20人都要上厕所
        t = Thread(target=task)
        t.start()
Event 事件
线程的一个关键特性是每个线程都是独立运行且状态不可预测。
如果程序中的其 他线程需要通过判断某个线程的状态来确定自己下一步的操作,这时线程同步问题就会变得非常棘手。
为了解决这些问题,我们需要使用threading库中的Event对象。 对象包含一个可由线程设置的信号标志,它允许线程等待某些事件的发生。
在 初始情况下,Event对象中的信号标志被设置为假。如果有线程等待一个Event对象, 而这个Event对象的标志为假,那么这个线程将会被一直阻塞直至该标志为真。
一个线程如果将一个Event对象的信号标志设置为真,它将唤醒所有等待这个Event对象的线程。
如果一个线程等待一个已经被设置为真的Event对象,那么它将忽略这个事件, 继续执行
简单来说:
当存在多个线程之间有这状态依附时,使用 Event
Event 对象的 初始 状态值 为 False 当 isSet 判断状态时就一直 wait 阻塞
当达到需求的状态时,通过 set 将状态置 True (或者通过 clear 恢复成 False)
为 True 时才可以正确下面的代码执行
from threading import Event
Event.isSet() #返回event的状态值
Event.wait() #如果 event.isSet()==False将阻塞线程;
Event.set() #设置event的状态值为True,所有阻塞池的线程激活进入就绪状态, 等待操作系统调度;
Event.clear() #恢复
链接数据库实例

# 首先定义两个函数,一个是连接数据库
# 一个是检测数据库
from threading import Thread, Event, currentThread
import time

e = Event()


def conn_mysql():
    '''链接数据库'''
    count = 1
    while not e.is_set():  # 当没有检测到时候 is_set 为 False
        if count > 3:  # 如果尝试次数大于3,就主动抛异常
            raise ConnectionError('尝试链接的次数过多')
        print('\033[45m%s 第%s次尝试' % (currentThread(), count))
        e.wait(timeout=1)  # 等待检测(里面的参数是超时1秒)
        count += 1
    print('\033[44m%s 开始链接...' % (currentThread().getName()))


def check_mysql():
    '''检测数据库'''
    print('\033[42m%s 检测mysql...' % (currentThread().getName()))
    time.sleep(5)
    e.set()     # 检测成功后设置为 True


if __name__ == '__main__':
    for i in range(3):  # 三个去链接
        t = Thread(target=conn_mysql)
        t.start()
    t = Thread(target=check_mysql)
    t.start()
红绿灯例子

from  threading import Thread,Event,currentThread
import time
e = Event()
def traffic_lights():
    '''红绿灯'''
    time.sleep(5)
    e.set()
def car():
    '''车'''
    print('\033[42m %s 等绿灯\033[0m'%currentThread().getName())
    e.wait()
    print('\033[44m %s 车开始通行' % currentThread().getName())
if __name__ == '__main__':
    for i in range(10):
        t = Thread(target=car)  #10辆车
        t.start()
    traffic_thread = Thread(target=traffic_lights)  #一个红绿灯
    traffic_thread.start()
定时器
指定n秒后执行某操作
from threading import Timer
def func(n):
    print('hello,world',n)
t = Timer(3,func,args=(123,))  #等待三秒后执行func函数,因为func函数有参数,那就再传一个参数进去
t.start()
GIL 全局解释器锁
概念

在Cpython解释器中,因为有GIL锁的存在同一个进程下开启的多线程,同一时刻只能有一个线程执行,无法利用多核优势。
同一时刻同一进程中只有一个线程被执行
线程池
创建方法
from  concurrent.futures import ThreadPoolExecutor
from threading import currentThread
import os,time,random
def task(n):
    print('%s:%s is running'%(currentThread().getName(),os.getpid()))  #看到的pid都是一样的,因为线程是共享了一个进程
    time.sleep(random.randint(1,3))  #I/O密集型的,,一般用线程,用了进程耗时长
    return n**2
if __name__ == '__main__':
    start = time.time()
    p = ThreadPoolExecutor() #线程池 #如果不给定值,默认cup*5
    l = []
    for i in range(10):  #10个任务 # 线程池效率高了
        obj  = p.submit(task,i)  #相当于apply_async异步方法
        l.append(obj)
    p.shutdown()  #默认有个参数wite=True (相当于close和join)
    print('='*30)
    print([obj.result() for obj in l])
    print(time.time() - start)  #3.001171827316284

"""
ThreadPoolExecutor-0_0:12816 is running
ThreadPoolExecutor-0_1:12816 is running
ThreadPoolExecutor-0_2:12816 is running
ThreadPoolExecutor-0_3:12816 is running
ThreadPoolExecutor-0_4:12816 is running
ThreadPoolExecutor-0_5:12816 is running
ThreadPoolExecutor-0_6:12816 is running
ThreadPoolExecutor-0_7:12816 is running
ThreadPoolExecutor-0_8:12816 is running
ThreadPoolExecutor-0_9:12816 is running
==============================
[0, 1, 4, 9, 16, 25, 36, 49, 64, 81]
3.0191218852996826

"""
线程池实例
from concurrent.futures import ThreadPoolExecutor,ProcessPoolExecutor
import requests
import time,os
def get_page(url):
    print('<%s> is getting [%s]'%(os.getpid(),url))
    response = requests.get(url)
    if response.status_code==200:
        return {'url':url,'text':response.text}
def parse_page(res):
    res = res.result() # 需要用 result 拿到对象结果
    print('<%s> is getting [%s]'%(os.getpid(),res['url']))
    with open('db.txt','a') as f:
        parse_res = 'url:%s size:%s\n'%(res['url'],len(res['text']))
        f.write(parse_res)
if __name__ == '__main__':
    # p = ThreadPoolExecutor()
    p = ProcessPoolExecutor()
    l = [
        'http://www.baidu.com',
        'http://www.baidu.com',
        'http://www.baidu.com',
        'http://www.baidu.com',
    ]
    for url in l:
        res = p.submit(get_page,url).add_done_callback(parse_page) #这里的回调函数拿到的是一个对象。
    #  需要先把返回的res得到一个结果。即在前面加上一个res.result() ,谁好了谁去掉用回调函数
    #  回调函数也是一种编程思想。不仅开线程池用,开线程池也用
    p.shutdown()  #相当于进程池里的close和join
    print('主',os.getpid())
map 应用实例
map 也可以回调函数,所以功能上可以替换
# 我们的那个p.submit(task,i)和map函数的原理类似。我们就
# 可以用map函数去代替。更减缩了代码
from  concurrent.futures import ProcessPoolExecutor,ThreadPoolExecutor
import os,time,random
def task(n):
    print('[%s] is running'%os.getpid())
    time.sleep(random.randint(1,3))  #I/O密集型的,,一般用线程,用了进程耗时长
    return n**2
if __name__ == '__main__':
    p = ProcessPoolExecutor()
    obj = p.map(task,range(10))
    p.shutdown()  #相当于close和join方法
    print('='*30)
    print(obj)  #返回的是一个迭代器
    print(list(obj))

# map函数应用
本文来自博客园,作者:羊驼之歌,转载请注明原文链接:https://www.cnblogs.com/shijieli/p/10340390.html


