Nginx 服务器开启status页面检测服务状态
原文:http://www.cnblogs.com/hanyifeng/p/5830013.html
一、Nginx status monitor
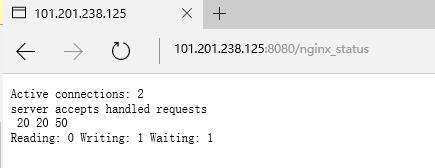
和apache 中服务器状态一样。输出的内容如:

第1列:
- 当前与http建立的连接数,包括等待的客户端连接:2
第2列: - 接受的客户端连接总数目:20
- 处理的客户端连接总数目:20
- 客户端总的请求数目:50
第3列: - 当前,nginx读请求连接
- 当前,nginx写响应返回给客户端
- 目前有多少空闲客户端请求连接
二、启用 status 条件
1.检查一下当前nginx的安装配置
[root@elk ~]# nginx -V
nginx version: nginx/1.10.1
built by gcc 4.8.5 20150623 (Red Hat 4.8.5-4) (GCC)
built with OpenSSL 1.0.1e-fips 11 Feb 2013
TLS SNI support enabled
configure arguments: --prefix=/etc/nginx --sbin-path=/usr/sbin/nginx --modules-path=/usr/lib64/nginx/modules \
--conf-path=/etc/nginx/nginx.conf --error-log-path=/var/log/nginx/error.log --http-log-path=/var/log/nginx/access.log \
--pid-path=/var/run/nginx.pid --lock-path=/var/run/nginx.lock --http-client-body-temp-path=/var/cache/nginx/client_temp \
--http-proxy-temp-path=/var/cache/nginx/proxy_temp --http-fastcgi-temp-path=/var/cache/nginx/fastcgi_temp \
--http-uwsgi-temp-path=/var/cache/nginx/uwsgi_temp --http-scgi-temp-path=/var/cache/nginx/scgi_temp --user=nginx --group=nginx \
--with-http_ssl_module --with-http_realip_module --with-http_addition_module --with-http_sub_module --with-http_dav_module \
--with-http_flv_module --with-http_mp4_module --with-http_gunzip_module --with-http_gzip_static_module --with-http_random_index_module \
--with-http_secure_link_module --with-http_stub_status_module --with-http_auth_request_module --with-http_xslt_module=dynamic \
--with-http_image_filter_module=dynamic --with-http_geoip_module=dynamic --with-http_perl_module=dynamic \
--add-dynamic-module=njs-1c50334fbea6/nginx --with-threads --with-stream --with-stream_ssl_module --with-http_slice_module --with-mail \
--with-mail_ssl_module --with-file-aio --with-ipv6 --with-http_v2_module --with-cc-opt='-O2 -g -pipe -Wall -Wp,-D_FORTIFY_SOURCE=2
-fexceptions -fstack-protector-strong --param=ssp-buffer-size=4 -grecord-gcc-switches -m64 -mtune=generic'
-
如果你的环境中可以看到有 --with-http_sub_module 这个模块,就代表可以启用status 。如果没有,可以在编译时加上。
- 现在编辑nginx 的配置文件。我们新建一个配置文件 /etc/nginx/conf.d/status.conf, 内容如下
[root@elk ~]# cat /etc/nginx/conf.d/status.conf
server {
    listen 8080;
    access_log off;
    server_name localhost;
    root /var/www/html;

    location /nginx_status {
       stub_status on;
       access_log off;
       allow 223.xxx.xxx.xxx;
       allow 139.59.253.208;
       deny all;

    }

}
对该页面的访问者进行了过滤,并禁用了访问写入log文件。
3.重启nginx后,在网站后面加上/nginx_status 即可。
http://101.201.238.125:8080/nginx_status
看完打开支付宝扫一扫领个红包吧!


 浙公网安备 33010602011771号