Centos7 安装mysql 5.7 教程
安装 yum 源
需要在系统上启用 MySQL 5.7 Community Release YUM 存储库。用于 yum 存储库配置的 rpm 包可在 MySQL 的官方网站上找到。
首先将最新的MySQL GPG密钥导入您的系统
sudo rpm --import https://repo.mysql.com/RPM-GPG-KEY-mysql-2022
然后安装mysql源
sudo yum localinstall https://dev.mysql.com/get/mysql57-community-release-el7-11.noarch.rpm
用下面的命令检查 mysql 源是否安装成功
yum repolist enabled | grep "mysql.*-community.*"

出现这个画面表示mysql 源安装成功。
安装 MySQL
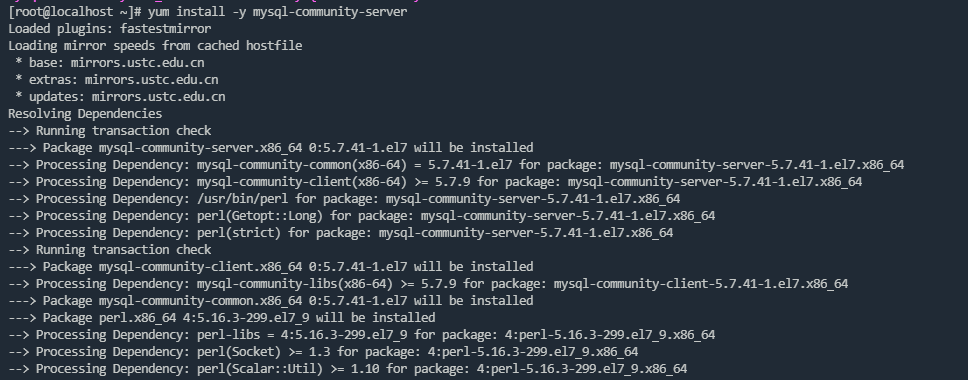
使用 yum install 命令安装
yum install -y mysql-community-server
启动 MySQL 服务
在 CentOS 7 下,新的启动/关闭服务的命令是 systemctl start|stop
systemctl start mysqld
systemctl stop mysqld
用 systemctl status 查看 MySQL 状态
systemctl status mysqld
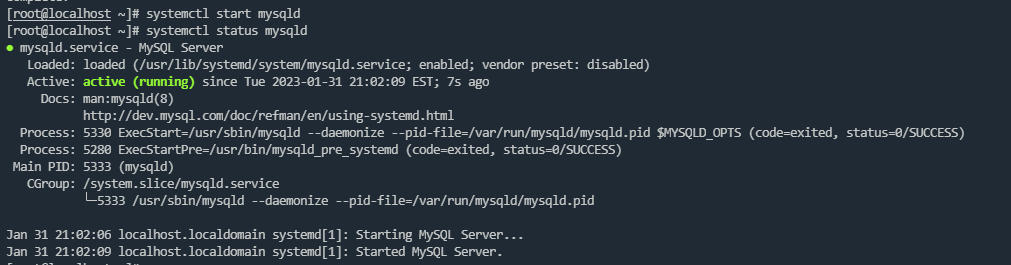
这样表示Mysql已经成功运行。
设置开机启动
systemctl enable mysqld
重载所有修改过的配置文件
systemctl daemon-reload
修改 root 本地账户密码 mysql 安装完成之后,生成的默认密码在 /var/log/mysqld.log 文件中。使用 grep 命令找到日志中的密码。
grep 'temporary password' /var/log/mysqld.log
![]()

红框里面就是临时密码。
首次通过初始密码登录
shell> mysql -uroot -pG2akvCwSln??
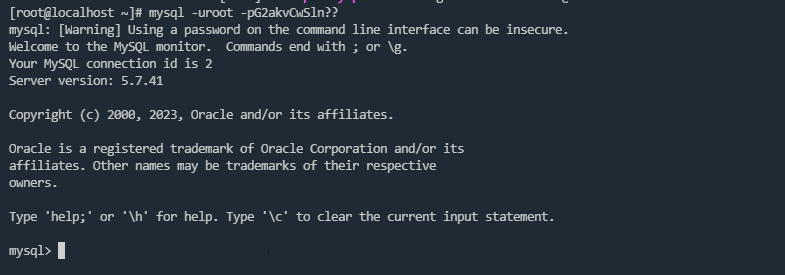
note: 远程登录用-h 端口-P。
修改密码
mysql> use mysql;
mysql> alter user root@localhost identified by '123';
mysql> flush privileges;
注意:mysql 5.7 默认安装了密码安全检查插件(validate_password),默认密码检查策略要求密码必须包含:大小写字母、数字和特殊符号,并且长度不能少于8位。
否则会提示 ERROR 1819 (HY000): Your password does not satisfy the current policy requirements 错误。查看 MySQL官网密码详细策略
测试环境可以调整密码的验证强度等级,设置 validate_password_policy 的全局参数为 LOW 即可,
输入设值语句 “ set global validate_password_policy=LOW; ” 进行设值。
允许远程访问
首先检查防火墙是否开启
firewall-cmd --state

开启3306端口
firewall-cmd --zone=public --add-port=3306/tcp --permanent   # 开放3306端口
firewall-cmd --reload   # 配置立即生效
用telnet验证是否连得通

修改允许root远程连接
mysql> use mysql; mysql>update user set host='%' where user='root';mysql> flush privileges;
更改my.cnf配置文件
vim /etc/my.cnf
[mysqld]
datadir=/data/mysql
socket=/tmp/mysql.sock
lc-messages-dir=/usr/share/mysql/english/
explicit_defaults_for_timestamp=true

#back_log值指在MySQL暂时停止回答新请求之前的短时间内多少个请求可以被存在堆栈中。和内核tcp_max_syn_backlog有关系。
back_log=2048
max_connections=10240
max_connect_errors=1000
connect-timeout=60
net_read_timeout=120
net_write_timeout=120
wait_timeout = 31536000
interactive_timeout = 31536000

max_allowed_packet=64M
#服务器缓存线程,如果新连接非常多,增大这个值可以改善性能。默认公式:8 + (max_connections / 100)
thread_cache_size=300
#线程打开表缓存数量,可以检查SHOW GLOBAL STATUS LIKE 'Opened_tables';
table_open_cache=5000

#用户可以创建的内存表(memory table)的大小.这个值用来计算内存表的最大行数值。
max_heap_table_size=512M
#控制内存临时表的最大值,超过限值后就往硬盘写,写的位置由变量 tmpdir 决定
tmp_table_size=2G

#随机读取数据缓冲区使用内存(MySQL的文档警告:“在Linux上,存在256KB和2MB的阈值,其中较大的值可能会显着减慢内存分配,因此您应考虑保持在其中一个值以下。” 避免将sort_buffer_size增加到2M以上,因为这会降低性能,从而降低收益。)
sort_buffer_size=1M
join_buffer_size=1M
#查询缓冲,MySQL将查询结果存放在缓冲区中,今后对于同样的SELECT语句(区分大小写),将直接从缓冲区中读取结果。
query_cache_size=1G
query_cache_type=1
query_cache_limit=128M

default_storage_engine=INNODB
#该参数对性能影响很大一般设置内存为系统内存的百分70-80。
innodb_buffer_pool_size=3G
innodb_data_file_path=ibdata1:10M:autoextend
#innodb_flush_log_at_trx_commit该参数对性能影响很大,如果不是特别对数据很重要的,设置为2。
#设置为0时,每秒写入一次日志并将其刷新到磁盘。未刷新日志的事务可能会在崩溃中丢失。
#默认设置1。每次事务提交时,日志都会写入并刷新到磁盘。
#设置为2时,在每次事务提交后写入日志,并每秒刷新一次到磁盘。未刷新日志的事务可能会在崩溃中丢失。
innodb_flush_log_at_trx_commit=2
innodb_log_buffer_size=32M
innodb_log_file_size=512M
innodb_log_files_in_group=3
innodb_io_capacity=3000
innodb_io_capacity_max=12000
innodb_max_dirty_pages_pct=90
innodb_lock_wait_timeout=120
#fdatasync模式:写数据时,write这一步并不需要真正写到磁盘才算完成(可能写入到操作系统buffer中就会返回完成),真正完成是flush操作,buffer交给操作系统去flush,并且文件的元数据信息也都需要更新到磁盘。
#O_DSYNC模式:写日志操作是在write这步完成,而数据文件的写入是在flush这步通过fsync完成
#O_DIRECT模式:数据文件的写入操作是直接从mysql innodb buffer到磁盘的,并不用通过操作系统的缓冲,而真正的完成也是在flush这步,日志还是要经过OS缓冲
innodb_flush_method=O_DIRECT


thread_stack=192K
long_query_time=1
sync_binlog=1
binlog_format=mixed
default-time-zone = '+8:00'
default-storage-engine=INNODB
lower_case_table_names=1
sql_mode=ERROR_FOR_DIVISION_BY_ZERO,NO_AUTO_CREATE_USER,NO_ENGINE_SUBSTITUTION
log_timestamps=SYSTEM

symbolic-links=0
log-error=/var/log/mysqld.log
pid-file=/var/run/mysqld/mysqld.pid
slow_query_log = 1
slow-query_log_file = /var/log/mysql-slow.log
long_query_time = 10

server-id=1
log_bin=/data/mysql/master01-bin.log
binlog-ignore-db=mysql
binlog-ignore-db=information_schema
binlog-ignore-db=performance_schema
binlog-ignore-db=sys
binlog_cache_size=32M
expire_logs_days=31
slave_skip_errors=1062


[client]
port = 3306
socket = /tmp/mysql.sock
重新启动服务
systemctl restart mysqld
会提示报错失败,查看报错原因
journalctl -xe
Mysql启动报错:InnoDB: Operating system error number 13 in a file operation的解决方法
解决方案参考:https://blog.csdn.net/qq_32077121/article/details/119800587
解决方案:
[root@localhost ~]# getenforce    //查看selinux状态
Enforcing
[root@localhost ~]# setenforce 0    //临时关闭selinux,重启后失效

[root@localhost ~]# getenforce
Permissive
[root@localhost ~]# systemctl start mysqld     //启动mysql服务成功
[root@localhost ~]# ss -antulp | grep :3306
tcp    LISTEN     0      80     [::]:3306               [::]:*                   users:(("mysqld",pid=74057,fd=17))
永久关闭selinux
[root@localhost ~]# cat /etc/selinux/config
# This file controls the state of SELinux on the system.
# SELINUX= can take one of these three values:
#     enforcing - SELinux security policy is enforced.
#     permissive - SELinux prints warnings instead of enforcing.
#     disabled - No SELinux policy is loaded.
SELINUX=enforcing
# SELINUXTYPE= can take one of three two values:
#     targeted - Targeted processes are protected,
#     minimum - Modification of targeted policy. Only selected processes are protected.
#     mls - Multi Level Security protection.
SELINUXTYPE=targeted
备份配置文件
[root@localhost ~]# cp -r /etc/selinux/config /etc/selinux/config.bak

[root@localhost ~]# sed -i 's/SELINUX=enforcing/\SELINUX=disabled/' /etc/selinux/config

[root@localhost ~]# cat /etc/selinux/config
# This file controls the state of SELinux on the system.
# SELINUX= can take one of these three values:
#     enforcing - SELinux security policy is enforced.
#     permissive - SELinux prints warnings instead of enforcing.
#     disabled - No SELinux policy is loaded.
SELINUX=disabled
# SELINUXTYPE= can take one of three two values:
#     targeted - Targeted processes are protected,
#     minimum - Modification of targeted policy. Only selected processes are protected.
#     mls - Multi Level Security protection.
SELINUXTYPE=targeted
重新启动服务,查看状态

一个问题:更改mycnf.cn 发现root 密码突然不能使用了,只好按忘记密码的方法去处理,有知道为什么可以告诉一下。
默认配置文件路径:
配置文件:/etc/my.cnf
日志文件:/var/log/mysqld.log
服务启动脚本:/usr/lib/systemd/system/mysqld.service
socket文件:/var/run/mysqld/mysqld.pid
Linux下mysql5.7忘记root密码的解决方法:https://blog.csdn.net/hdyebd/article/details/89153934

 浙公网安备 33010602011771号