Windows创建Task
1. Log on to the user account that you want to create this task to run for.
2. Open the Start Menu, then type taskschd.msc in the search box and press enter.
3. If prompted by UAC, click on Yes.
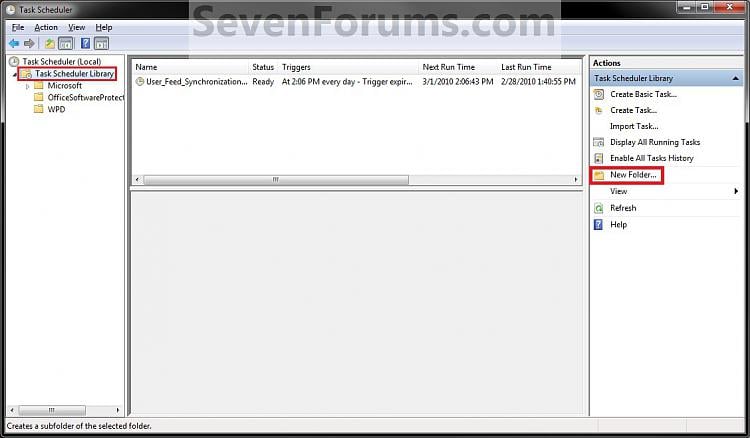
4. In the left pane of Task Scheduler, click on the Task Scheduler Library folder, then click on New Folder in the far right pane. (see screenshot below)
5. Type in a name (ex: program name "Core Temp") you want for the new task folder to make finding the task easier, then click on OK. (see screenshot below)
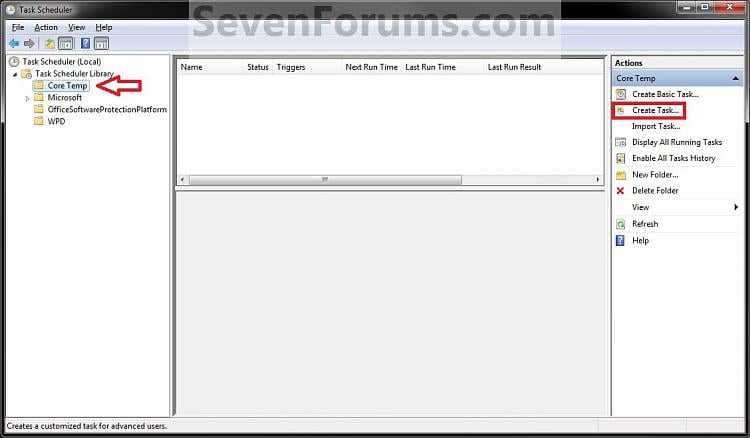
6. In the left pane of Task Scheduler, click on the new task folder (ex: Core Temp), and click on Create Task in the far right pane. (see screenshot below)
7. Under the General tab, type in a name for the task (ex: Program Name "Core Temp"). (see screenshot below)
8. Under the General tab,
- If Used in a Administrator User Account
- Check the Run with hightest Priveleges box. (see screenshot above)
- If Used in a Standard User Account
- Leave the Run with hightest Priveleges box unchecked. (see screenshot above)
9. Click on the Configure for drop down box to open it, and select Windows® 7, Windows Server™ 2008 R2. (see screenshot above and below)
NOTE: This is like compatibility mode. If the program does not support running in Windows 7 normally, then you can select the OS that is does support running in instead to have it run in compatibility mode as if it was running in that OS instead of Windows 7.
10. Do steps 11 and/or 12 below for when you would like to have this task run.
11. To Have the Task Run "At startup"
A) Click on the Triggers tab and New button. (see screenshot below)
B) In the Begin the task drop down menu list, select At startup. Next, make sure that Enabled is checked, and click on OK. (see screenshot below)C) Do step 12 as well. It is required for the "At startup" to work.
12. To Have the Task Run "At log on"
A) Under the Triggers tab, click on the New button. (see screenshot below)B) In the Begin the task drop down menu list, select At log on. Next, make sure that Enabled is checked, and click on OK. (see screenshot below)
13. Click on the Actions tab and New button. (see screenshot below)
14. In the Action drop down menu list, select Start a program, then click on the Browse button. (see screenshot below)
15. Navigate to and select the program's EXE file or shortcut to the EXE file, then click on Open. (see screenshot below)
NOTE: Remember that a standard user account cannot run a elevated program at startup or log on. See NOTE at top of tutorial for more information.
16. Click on OK. (see screenshot below)
17. Click on the Conditions tab, and uncheck the Stop if the computer switches to battery power box first, then uncheck the Start the task only if the computer is on AC power box. (see screenshots below)
NOTE: This step is mostly for laptops, so that you will be able to run the program when the laptop is running on battery power.
18. Click on the Settings tab, and check the If the task fails, restart every box. (see screenshot below)
19. Click on OK. (see screenshot above)
20. You can now close Task Scheduler. (see screenshot below)
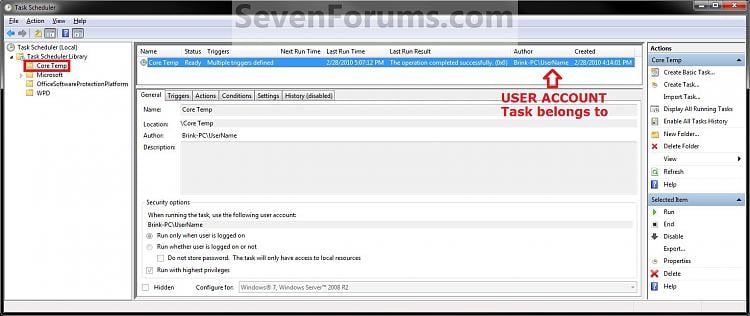
NOTE: If you look in the middle pane under the Author column for the task that you just created, you will be able to tell what user account the task is for.
21. Log off and log on this user account, or restart the computer to test you new task.
If you decide you would like to delete the task later, then you can right click on the task (step 8) in the middle pane and click on Delete and Yes. Next, you can delete the task folder (step 5) when empty the same way. (see screenshot above)


