

WinCE5.0 SMDK2410 BSP在GEC2410开发板上的移植(2)-基于Nand Flash的Eboot
有了NBoot进行复制引导,Eboot就能运行在RAM中了,WinCE5.0自带SMDK2410 BSP与GEC2410硬件配置很接近,只要进行少量的修改就能运行在GEC2410上了。
一、开发环境
编译器: Platform Builder 5.0
目标板: GEC2410 S3C2410A,NAND Flash:64M K9F1208,NOR Flash:2M SST39VF1601 SDRAM 64M,CS8900
二、开始移植
1.Clone一个SMDK2410的BSP,并改名为GEC2410
2.GEC2410\src\bootloader\eboot\下为Eboot的代码,打开main.c,只有LCD和Eboot配置信息两块代码需要修改,网卡用的都是CS8900A,不需要修改,如果网卡不一样需要修改网卡驱动,网卡驱动在\WINCE500\PUBLIC\COMMON\OAK\DRIVERS\ETHDBG下
3.LCD驱动
由于LCD和原BSP中的不一样,相关参数需要修改,到板子自带的eboot中找到相应参数的数值
 InitDisplay

 1 static void InitDisplay(void)
 2 {
 3     volatile S3C2410X_IOPORT_REG *s2410IOP = (S3C2410X_IOPORT_REG *)OALPAtoVA(S3C2410X_BASE_REG_PA_IOPORT, FALSE);
 4     volatile S3C2410X_LCD_REG    *s2410LCD = (S3C2410X_LCD_REG *)OALPAtoVA(S3C2410X_BASE_REG_PA_LCD, FALSE);
 5
 6     // Set up the LCD controller registers to display a power-on bitmap image.
 7     //
 8      s2410IOP->GPCUP     = 0xFFFFFFFF;
 9     s2410IOP->GPCCON    = 0xAAAA56A9;//0xAAAAAAAA
10
11     s2410IOP->GPDUP     = 0xFFFFFFFF;
12     s2410IOP->GPDCON    = 0xAAAAAAAA;
13
14     s2410LCD->LCDCON1   =  (5           <<  8) |       /* VCLK = HCLK / ((CLKVAL + 1) * 2) -> About 7 Mhz  */
15                            (0   <<  7)  |       /* 0 : Each Frame                                   */
16                            (3           <<  5) |       /* TFT LCD Pannel                                   */
17                            (12          <<  1) |       /* 16bpp Mode                                       */
18                            (0           <<  0) ;       /* Disable LCD Output                               */
19
20     s2410LCD->LCDCON2   =  (2        << 24) |   /* VBPD          :   2                              */
21                            (LCD_LINEVAL_TFT << 14) |   /* Vertical Size : 320 - 1                          */
22                            (2        <<  6) |   /* VFPD          :   2                              */
23                            (4        <<  0) ;   /* VSPW          :   4                              */
24
25     s2410LCD->LCDCON3   =  (8        << 19) |   /* HBPD          :   8                              */
26                            (LCD_HOZVAL_TFT  <<  8) |   /* HOZVAL_TFT    : 240 - 1                          */
27                            (8        <<  0) ;   /* HFPD          :   8                              */
28
29
30     s2410LCD->LCDCON4   =  (LCD_MVAL        <<  8) |   /* MVAL          :  13                              */
31                            (6        <<  0) ;   /* HSPW          :   6                              */
32
33     s2410LCD->LCDCON5   =  (0           << 12) |       /* BPP24BL       : LSB valid                        */
34                            (1           << 11) |       /* FRM565 MODE   : 5:6:5 Format                     */
35                            (0           << 10) |       /* INVVCLK       : VCLK Falling Edge                */
36                            (0           <<  9) |       /* INVVLINE      : Inverted Polarity                */
37                            (0           <<  8) |       /* INVVFRAME     : Inverted Polarity                */
38                            (0           <<  7) |       /* INVVD         : Normal                           */
39                            (0           <<  6) |       /* INVVDEN       : Normal                           */
40                            (0           <<  5) |       /* INVPWREN      : Normal                           */
41                            (0           <<  4) |       /* INVENDLINE    : Normal                           */
42                            (0           <<  3) |       /* PWREN         : Disable PWREN                    */
43                            (0           <<  2) |       /* ENLEND        : Disable LEND signal              */
44                            (0           <<  1) |       /* BSWP          : Swap Disable                     */
45                            (1           <<  0) ;       /* HWSWP         : Swap Enable                      */
46
47     s2410LCD->LCDSADDR1 = ((IMAGE_FRAMEBUFFER_DMA_BASE >> 22)     << 21) |
48                           ((M5D(IMAGE_FRAMEBUFFER_DMA_BASE >> 1)) <<  0);
49
50     s2410LCD->LCDSADDR2 = M5D((IMAGE_FRAMEBUFFER_DMA_BASE + (LCD_XSIZE_TFT * LCD_YSIZE_TFT * 2)) >> 1);
51
52     s2410LCD->LCDSADDR3 = (((LCD_XSIZE_TFT - LCD_XSIZE_TFT) / 1) << 11) | (LCD_XSIZE_TFT / 1);
53
54     s2410LCD->LCDINTMSK |=3; // MASK LCD Sub Interrupt
55     s2410LCD->LPCSEL   |= ~0x7;
56
57     s2410LCD->TPAL      = 0x0;
58     s2410LCD->LCDCON1  |= 1;
59
60     // Display a bitmap image on the LCD...
61     //
62     memcpy((void *)IMAGE_FRAMEBUFFER_UA_BASE, ScreenBitmap, LCD_ARRAY_SIZE_TFT_16BIT);
63
64 }
这样Eboot就可以显示一副图片了,要是想减少Eboot的尺寸,LCD这块也可不要
4.Eboot 配置信息
(1)函数ResetBootConfig中有Eboot配置的初始信息
 1 static void ResetBootConfig(PBOOT_CFG pBootCfg)
 2 {
 3     // Default eboot configuration values (leave the MAC address field alone)...
 4     //
 5     pBootCfg->Signature        = CONFIG_SIGNATURE;
 6     pBootCfg->VerMajor         = EBOOT_VERSION_MAJOR;
 7     pBootCfg->VerMinor         = EBOOT_VERSION_MINOR;
 8     pBootCfg->BootDelay        = CONFIG_AUTOBOOT_DEFAULT_COUNT;
 9     pBootCfg->ConfigFlags      = CONFIG_FLAGS_AUTOBOOT;//not use DHCP CONFIG_FLAGS_DHCP;
10     pBootCfg->IPAddr           = inet_addr("192.168.0.5");
11     pBootCfg->SubnetMask       = inet_addr("255.255.255.0");
12     pBootCfg->LoadDeviceOrder  = 0;
13
14     return;
15 }
(2)该信息保存在Flash中,由于Eboot目前保存在Nand Flash中,因此该信息也保存在Nand Flash中。
定义Eboot配置在Nand Flash中的位置大小,只需要一个Sector就可以了(512Bytes)
1 //EBOOT CONFIG IN NAND FLASH
2 #define EBOOT_CONFIG_BLOCK        19
3 #define EBOOT_CONFIG_SECTOR       19*32
4 #define EBOOT_CONFIG_SECTOR_SIZE  1
(3)原Eboot用的Nor Flash(AM29LV800),需要在OEMPlatformInit函数中注释掉AM29LV800_Init((UINT32)AMD_FLASH_START)的初始化函数
(4)实现ReadBootConfig和WriteBootConfig函数
我们用的NandFlash(K9F1208)的驱动已经有了,只需调用fmd下的flash读写函数即可。该库位于src\common\smartmedia\fmd\fmd.cpp
ReadBootConfig
 1 static BOOL ReadBootConfig(PBOOT_CFG pBootCfg)
 2 {
 3     BOOLEAN bResult = FALSE;
 4     char temp[512];//store EBOOT_CONFIG_SECTOR
 5     OALMSG(OAL_FUNC, (TEXT("+ReadBootConfig.\r\n")));
 6
 7     // Valid caller buffer?
 8     if (!pBootCfg)
 9     {
10         OALMSG(OAL_ERROR, (TEXT("ERROR: Bad caller buffer.\r\n")));
11         goto CleanUp;
12     }
13
14     // Read settings from flash...
15     //
16         if (!FMD_ReadSector(EBOOT_CONFIG_SECTOR, (PBYTE)temp, NULL, EBOOT_CONFIG_SECTOR_SIZE))
17     {
18         OALMSG(OAL_ERROR, (TEXT("ERROR: Flash read failed.\r\n")));
19         goto CleanUp;
20     }
21         memcpy(pBootCfg,(PBOOT_CFG)temp,sizeof(BOOT_CFG));
22
23     // Check configuration signature...
24     //
25     if (pBootCfg->Signature != CONFIG_SIGNATURE)
26     {
27         OALMSG(OAL_WARN, (TEXT("WARNING: Boot configuration signature invalid - choosing defaults...\r\n")));
28     ResetBootConfig(pBootCfg);
29         WriteBootConfig(pBootCfg);
30     }
31
32     bResult = TRUE;
33
34 CleanUp:
35
36     OALMSG(OAL_FUNC, (TEXT("-ReadBootConfig\r\n")));
37
38     return(bResult);
39 }
WriteBootConfig
 1 static BOOL WriteBootConfig(PBOOT_CFG pBootCfg)
 2 {
 3     BOOL bResult = FALSE;
 4
 5     OALMSG(OAL_FUNC, (TEXT("+WriteBootConfig.\r\n")));
 6
 7     if (!pBootCfg)
 8     {
 9         goto CleanUp;
10     }
11
12     // First, erase the eboot settings area in flash...
13     //
14     if (!FMD_EraseBlock(EBOOT_CONFIG_BLOCK))
15     {
16         OALMSG(OAL_ERROR, (TEXT("ERROR: WriteEbootConfig: Flash erase failed.\r\n")));
17         goto CleanUp;
18     }
19     // Write settings to flash...
20     //
21     if (!FMD_WriteSector(EBOOT_CONFIG_SECTOR, (PBYTE)pBootCfg, NULL,EBOOT_CONFIG_SECTOR_SIZE))
22     {
23         OALMSG(OAL_ERROR, (TEXT("ERROR: WriteEbootConfig: Flash write failed.\r\n")));
24         goto CleanUp;
25     }
26
27     bResult = TRUE;
28
29 CleanUp:
30     OALMSG(OAL_FUNC, (TEXT("-WriteBootConfig.\r\n")));
31     return(bResult);
32 }
5.Debug Serial
为了不与之后的内核中的串口驱动冲突,Eboot使用UART1 38400bps的串口输出
代码位于src\kernel\oal\debug.c
 1 #ifdef UART1_38400
 2     // GPH4 and GHP5 are UART1 Tx and Rx, respectively.
 3     //
 4     CLRREG32(&pIOPortReg->GPHCON, (3 << 8)|(3 << 10));
 5     SETREG32(&pIOPortReg->GPHCON, (2 << 8)|(2 << 10));
 6     // Disable pull-up on TXD1 and RXD1.
 7     //
 8     SETREG32(&pIOPortReg->GPHUP, (1 << 4)|(1 << 5));
 9     // UART1 (TXD1 & RXD1) used for debug serial.
10     //
11     g_pUARTReg = (S3C2410X_UART_REG *)OALPAtoVA(S3C2410X_BASE_REG_PA_UART1, FALSE);
12     // Configure the UART.
13     //
14     OUTREG32(&g_pUARTReg->UFCON,  BSP_UART1_UFCON);
15     OUTREG32(&g_pUARTReg->UMCON,  BSP_UART1_UMCON);
16     OUTREG32(&g_pUARTReg->ULCON,  BSP_UART1_ULCON);
17     OUTREG32(&g_pUARTReg->UCON,   BSP_UART1_UCON);
18     OUTREG32(&g_pUARTReg->UBRDIV, BSP_UART1_UBRDIV);
19 #endif
三、移植结果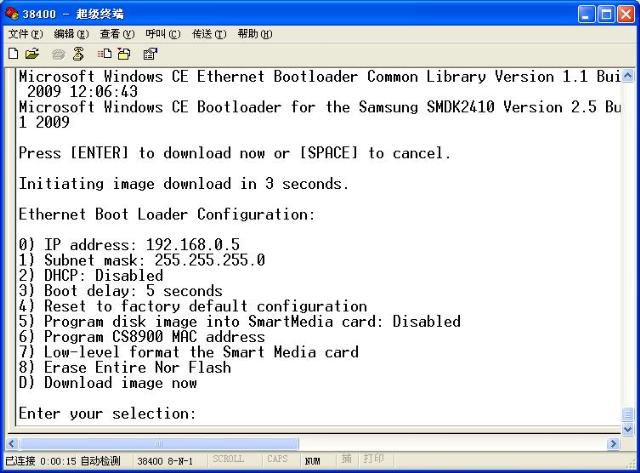

 浙公网安备 33010602011771号