sfmlearner剖析
下面是slam14讲公式5.7
Z\left(\begin{array}{l}{u} \\ {v} \\ {1}\end{array}\right)=\left(\begin{array}{ccc}{f_{x}} & {0} & {c_{x}} \\ {0} & {f_{y}} & {c_{y}} \\ {0} & {0} & {1}\end{array}\right)\left(\begin{array}{l}{X} \\ {Y} \\ {Z}\end{array}\right) \triangleq \boldsymbol{K P} 公式(0)
就是一个三维点投影到二维点的公式
可以写成:
depth*uv = K*XYZ \tag{1}
这里我 用uv代表图像坐标系里的二维点,XYZ代表三维的空间的点
然后还有一个公式5.8
Z \boldsymbol{P}_{u v}=Z\left[\begin{array}{l}{u} \\ {v} \\ {1}\end{array}\right]=\boldsymbol{K}\left(\boldsymbol{R} \boldsymbol{P}_{w}+\boldsymbol{t}\right)=\boldsymbol{K} \boldsymbol{T} \boldsymbol{P}_{w}
这个是考虑有一个变换之后的投影公式,可以写成:
depth*uv = K*T*XYZ \tag{2}
因为我们要估计的就是深度,所以不能简单的像slam14讲里头把深度Z或者depth省略掉。
slam14讲随意省略深度值Z的做法在深度估计里不太好。
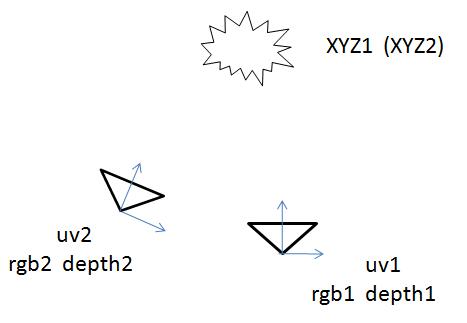
然后考虑下面这种情况:

两个相机观测 同一点云
相机1有坐标系1,相机2有坐标系2
在坐标系1下,观测到的点云的坐标为XYZ1
在坐标系2下,观测到的点云的坐标为XYZ2。
在相机1处观测到彩色图像rgb1和深度图像depth1,相机2处类似。
然后两个相机的点云有如下的转换关系:
depth1是标量,所以放在前面
结合公式3得到
XYZ_2 = \boldsymbol{T}_{21}*depth_1*K^{-1}*uv_1
再把上式代入公式5得到:
depth_2*uv_2 = K*\boldsymbol{T}_{21}*depth_1*K^{-1}*uv_1
下面是sfmlearner论文里头那个公式:
p_{s} \sim K \hat{T}_{t \rightarrow s} \hat{D}_{t}\left(p_{t}\right) K^{-1} p_{t}
比较上述两个公式,就知道论文里的公式是怎么来的了,
论文的公式把depth2给省略了,就像slam14讲里头一样。
ps:其实这里可以考虑双目相机的情况,在坐标系1和坐标系2处的两个相机的K不一样,
可以给予双目深度估计更大的灵活性,不需要做双目校正直接训练,
代价就是两个相机有各自的dispnet,参数量更大。灵活性和计算量不能兼得。
上面只是公式,下面开始研究代码
假如你在相机1处有一张彩色图像rgb和一张深度图像depth。
rgb图像是3通道的,长宽为h x w
depth图像是单通道的,每个像素代表深度值Z,长宽和rgb图像一样。
公式0的另一种形式如下:
u = fx*X/Z + cx
v = fy*Y/Z + cy
转换一下得到:
X = (u-cx)*Z/fx
Y = (v-cy)*Z/fy
uv是图像坐标系上的点,因此:
u 的范围为[0, w-1]
v 的范围为[0, h-1]
Z是深度,是depth上每一个像素所代表的值。
u,v,cx,cy,fx,fy,Z都已知,因此我们可以根据上述公式,利用彩色图像rgb和深度图像depth算
出三维坐标XYZ。其实这就是公式6的操作。
当然不应该用for循环去计算每个三维坐标,而应该用meshgrid和矩阵相乘来计算,具体实现如下:
 1 import numpy as np
 2 import cv2
 3
 4 color = cv2.imread('xxx') # 3 channel
 5 depth = cv2.imread('xxx') # 1 channel
 6
 7 # 这里假设图片长宽为 640 x 480
 8 h = 480
 9 w = 640
10
11 u, v = np.meshgrid(np.arange(0, w), np.arange(0, h))
12
13 depthScale = 1
14
15 Z = depth/depthScale
16 X = (u-cx)*Z/fx
17 Y = (v-cy)*Z/fy
18
19 X = X.reshape(307200, 1)
20 Y = Y.reshape(307200, 1)
21 Z = Z.reshape(307200, 1)
22
23 XYZ = np.hstack((X, Y, Z))
然后你就得到了一个点云的坐标数据
实现公式3的话,还要考虑齐次、非齐次的问题,就是多增加一行或者一列之类的问题。
在sfmlearner的pytorch代码中:
tgt_img相当于在坐标系1上,ref_img相当于在坐标系2上!!!
ref_img可以有很多张,ref_img的张数加上tgt_img就是sequence length
 1 视差网络 disp_net 生成4个尺度的视差图
 2 print("disp1 size:", disp1.size() ) # torch.Size([1, 1, 128, 416])
 3 print("disp2 size:", disp2.size() ) # torch.Size([1, 1, 64, 208])
 4 print("disp3 size:", disp3.size() ) # torch.Size([1, 1, 32, 104])
 5 print("disp4 size:", disp4.size() ) # torch.Size([1, 1, 16, 52])
 6
 7 然后将视差图转换成深度图:
 8 depth = [1/disp for disp in disparities] 视差图的倒数就是深度图
 9
10 对于pose_net
11 tgt_img = torch.rand([1, 3, 128, 416])
12 ref_imgs = [torch.rand([1, 3, 128, 416]), torch.rand([1, 3, 128, 416]) ]
13
14 explainability_mask, pose = pose_exp_net(tgt_img, ref_imgs)
15
16 print("pose size:", pose.size() ) # torch.Size([1, 2, 6])
tgt_img相当于相机1的图像,ref_img是相机2的图像。
考虑photometric_reconstruction_loss函数中计算的多个scale中的第一个scale,即128 x 416的尺寸:
然后执行了下面这个操作:
 1 for i, ref_img in enumerate(ref_imgs_scaled):
 2     # 遍历ref_imgs
 3     current_pose = pose[:, i]
 4
 5     ref_img_warped = \
 6     inverse_warp(ref_img,
 7                 depth[:,0],   #  torch.Size([1, 128, 416])
 8                 current_pose, #  torch.Size([1, 6])
 9                 intrinsics_scaled,
10                 rotation_mode,
11                 padding_mode)
12
传进去的 depth 和 current_pose
根据inverse_warp函数的说明,前面这个1是留给batchsize的
1 def set_id_grid(depth):
2     b, h, w = depth.size()
3     i_range = torch.arange(0, h).view(1, h, 1).expand(1,h,w).type_as(depth)  # [1, H, W]
4     j_range = torch.arange(0, w).view(1, 1, w).expand(1,h,w).type_as(depth)  # [1, H, W]
5     ones = torch.ones(1,h,w).type_as(depth)
6
7     pixel_coords = torch.stack((j_range, i_range, ones), dim=1)  # [1, 3, H, W]
8     return pixel_coords
1 current_pixel_coords = pixel_coords[:,:,:h,:w].expand(b,3,h,w).reshape(b, 3, -1)  # [B, 3, H*W]
2 cam_coords = (intrinsics_inv @ current_pixel_coords).reshape(b, 3, h, w)
3 return cam_coords * depth.unsqueeze(1)
注意里头的intrinsics_inv,所以上面的代码相当于
depth_1*K^{-1}*uv_1 = XYZ_1
所以pixel2cam是完成了二维反投影到三维的过程
然后是这么一句
proj_cam_to_src_pixel = intrinsics @ pose_mat # [B, 3, 4]
相当于K*T_{21}
K*T_{21}的另一个名字也叫做投影矩阵P
src_pixel_coords = cam2pixel(cam_coords,     # XYZ
                            proj_cam_to_src_pixel[:,:,:3],   # R
                            proj_cam_to_src_pixel[:,:,-1:],  # t
                            padding_mode)    # [B,H,W,2]
所以cam2pixel函数完成 XYZ1转换到XYZ2并投影到uv2的任务
inverse_warp的最后一句:
projected_img = F.grid_sample(img, src_pixel_coords, padding_mode=padding_mode)
以及执行完 inverse_warp后,在one_scale中的一句
diff = (tgt_img_scaled - ref_img_warped) * out_of_bound
inverse_warp函数只传进去了ref_img,即坐标系2的图像,然后最后就用tgt_img去减了ref_img_warped,
所以ref_img_warped其实是ref_img投影到tgt_img所在坐标系的图像,即坐标2的图像投影到坐标1。
考虑上面的公式,所以整个warp过程是:
找到和坐标系1上的每个像素对应的坐标系2上的图像的像素的值,然后计算差值。
如果没有落在整数坐标上,就用F.grid_sample计算出来。
基本上,sfmlearner的photometric_reconstruction_loss差不多就是slam里头直接法的光度差的计算过程。
上面差不多就是sfmlearner代码的难点了。
ssim之类的比较简单,不做解析。
============
所以,根据上述内容,如果想跑自己的数据集,在自己拍的视频上训练,
你需要
1,标定自己的相机,得到内参K
2,把你拍的视频分解的图片resize到128x416,在图片resize的时候,内参也要resize
如果对图片做了其他操作,内参也需要做对应的操作,在custom_tranform.py有相关代码。
其实就是个相机视锥的变化。
所以谷歌后来出的vid2depth算法在点云上做 ICP 就很容易理解了。。。


【推荐】编程新体验,更懂你的AI,立即体验豆包MarsCode编程助手
【推荐】凌霞软件回馈社区,博客园 & 1Panel & Halo 联合会员上线
【推荐】抖音旗下AI助手豆包,你的智能百科全书,全免费不限次数
【推荐】博客园社区专享云产品让利特惠,阿里云新客6.5折上折
【推荐】轻量又高性能的 SSH 工具 IShell:AI 加持,快人一步
· DeepSeek 解答了困扰我五年的技术问题
· 为什么说在企业级应用开发中,后端往往是效率杀手?
· 用 C# 插值字符串处理器写一个 sscanf
· Java 中堆内存和栈内存上的数据分布和特点
· 开发中对象命名的一点思考
· 为什么说在企业级应用开发中,后端往往是效率杀手?
· DeepSeek 解答了困扰我五年的技术问题。时代确实变了!
· 本地部署DeepSeek后,没有好看的交互界面怎么行!
· 趁着过年的时候手搓了一个低代码框架
· 推荐一个DeepSeek 大模型的免费 API 项目!兼容OpenAI接口!