Nginx 服务详解并使用 Tcpdump 和 Wireshark 进行抓包
1. 前言
1.1 简介
nginx 是一款高性能、轻量级的 web 服务和反向代理软件,具有以下优点:链接
- 稳定性高
- 系统资源消耗低
- 对 HTTP 并发连接的处理能力高(单台物理服务器可支持 30000~50000 个并发请求)
缺点:
- 动态处理差:nginx 处理静态文件好,耗费内存少,但是处理动态页面则很鸡肋,现在一般前端用 nginx 作为反向代理抗住压力,Apache 或 Tomcat 作为后端处理动态请求。
- rewrite 弱:虽然 nginx 支持 rewrite 功能,但没有 Apache 的 rewrite 功能强大。
功能:链接
- 正向代理:需要在客户端配置代理服务器进行指定网站访问。
- 反向代理:暴露的是代理服务器地址,隐藏了真实服务器 IP 地址。
- 负载均衡:增加服务器的数量,然后将请求分发到各个服务器上。
- 动静分离:为了加快网站的解析速度,可以把动态页面和静态页面由不同的服务器来解析,加快解析速度。降低原来单个服务器的压力。
- WEB 服务器:Nginx 本身也是一个静态资源的服务器,当只有静态资源的时候,就可以使用 Nginx 来做服务器。
1.2 HTTP 协议
0.9
0.9 协议是适用于各种数据信息的简洁快速协议,但是远不能满足日益发展的各种应用的需要。0.9 协议就是一个交换信息的无序协议,仅仅限于文字。由于无法进行内容的协商,在双发的握手和协议中,并有规定双发的内容是什么,也就是图片是无法显示和处理的。
1.0
到了 1.0 协议阶段,也就是在 1982 年,Tim Berners-Lee 提出了 HTTP/1.0。在此后的不断丰富和发展中,HTTP/1.0 成为最重要的面向事务的应用层协议。该协议对每一次请求/响应建立并拆除一次连接。其特点是简单、易于管理,所以它符合了大家的需要,得到了广泛的应用。
1.1
在 1.0 协议中,双方规定了连接方式和连接类型,这已经极大扩展了 HTTP 的领域,但对于互联网最重要的速度和效率,并没有太多的考虑。毕竟,作为协议的制定者,当时也没有想到 HTTP 会有那么快的普及速度。
2.0
HTTP2.0 的前身是 HTTP1.0 和 HTTP1.1。虽然之前仅仅只有两个版本,但这两个版本所包含的协议规范之庞大,足以让任何一个有经验的工程师为之头疼。网络协议新版本并不会马上取代旧版本。实际上,1.0 和 1.1 在之后很长的一段时间内一直并存,这是由于网络基础设施更新缓慢所决定的。
1.3 正向代理与反向代理
正向代理:
正向代理是一个位于客户端和目标服务器之间的代理服务器(中间服务器)。为了从原始服务器取得内容,客户端向代理服务器发送一个请求,并且指定目标服务器,之后代理向目标服务器转交并且将获得的内容返回给客户端。正向代理的情况下客户端必须要进行一些特别的设置才能使用。
反向代理:
反向代理正好相反。对于客户端来说,反向代理就好像目标服务器。并且客户端不需要进行任何设置。客户端向反向代理发送请求,接着反向代理判断请求走向何处,并将请求转交给客户端,使得这些内容就好似他自己一样,一次客户端并不会感知到反向代理后面的服务,也因此不需要客户端做任何设置,只需要把反向代理服务器当成真正的服务器就好了。
Nginx可以作为正向代理和反向代理使用。以下是正向代理和反向代理的区别:

正向代理:(VPN)
正向代理可以代表客户端向服务器发送请求,客户端通过正向代理服务器来获取网络资源。
客户端需要显式地配置代理服务器来访问互联网。
正向代理隐藏了客户端的真实IP地址,提供匿名性和安全性。
正向代理一般用于绕过防火墙或者访问受限制的网站。

反向代理:
反向代理可以代表服务器向客户端提供资源,客户端通过反向代理服务器来获取服务器的资源。
客户端无需知道真实的服务器地址,只需通过反向代理服务器访问资源。
反向代理可以实现负载均衡,将请求分发到多个服务器上,提高服务器的性能和可靠性。
反向代理可以缓存静态资源,提高响应速度,减轻服务器的负载。
反向代理可以增加安全性,隐藏真实的服务器IP地址,防止恶意攻击。
总结: 正向代理隐藏客户端的真实IP地址,以客户端为中心;反向代理隐藏服务器的真实IP地址,以服务器为中心。正向代理是客户端指定代理服务器访问互联网,反向代理是服务器决定通过代理服务器向客户端提供服务。
1.4 状态码
1xx:信息
| 消息 | 描述 |
|---|---|
| 100 Continue | 服务器仅接收到部分请求,但是一旦服务器并没有拒绝该请求,客户端应该继续发送其余的请求。 |
| 101 Switching Protocols | 服务器转换协议:服务器将遵从客户的请求转换到另外一种协议。 |
2xx:成功
| 消息 | 描述 |
|---|---|
| 200 OK | 请求成功(其后是对GET和POST请求的应答文档。) |
| 201 Created | 请求被创建完成,同时新的资源被创建。 |
| 202 Accepted | 供处理的请求已被接受,但是处理未完成。 |
| 203 Non-authoritative Information | 文档已经正常地返回,但一些应答头可能不正确,因为使用的是文档的拷贝。 |
| 204 No Content | 没有新文档。浏览器应该继续显示原来的文档。如果用户定期地刷新页面,而Servlet可以确定用户文档足够新,这个状态代码是很有用的。 |
| 205 Reset Content | 没有新文档。但浏览器应该重置它所显示的内容。用来强制浏览器清除表单输入内容。 |
| 206 Partial Content | 客户发送了一个带有Range头的GET请求,服务器完成了它。 |
3xx:重定向
| 消息 | 描述 |
|---|---|
| 300 Multiple Choices | 多重选择。链接列表。用户可以选择某链接到达目的地。最多允许五个地址。 |
| 301 Moved Permanently | 所请求的页面已经转移至新的url。 |
| 302 Found | 所请求的页面已经临时转移至新的url。 |
| 303 See Other | 所请求的页面可在别的url下被找到。 |
| 304 Not Modified | 未按预期修改文档。客户端有缓冲的文档并发出了一个条件性的请求(一般是提供If-Modified-Since头表示客户只想比指定日期更新的文档)。服务器告诉客户,原来缓冲的文档还可以继续使用。 |
| 305 Use Proxy | 客户请求的文档应该通过Location头所指明的代理服务器提取。 |
| 306 Unused | 此代码被用于前一版本。目前已不再使用,但是代码依然被保留。 |
| 307 Temporary Redirect | 被请求的页面已经临时移至新的url。 |
4xx:客户端错误
| 消息 | 描述 |
|---|---|
| 400 Bad Request | 服务器未能理解请求。 |
| 401 Unauthorized | 被请求的页面需要用户名和密码。 |
| 401.1 | 登录失败。 |
| 401.2 | 服务器配置导致登录失败。 |
| 401.3 | 由于ACL对资源的限制而未获得授权。 |
| 401.4 | 筛选器授权失败。 |
| 401.5 | ISAPI/CGI应用程序授权失败。 |
| 401.7 | 访问被Web服务器上的URL授权策略拒绝。这个错误代码为IIS 6.0所专用。 |
| 402 Payment Required | 此代码尚无法使用。 |
| 403 Forbidden | 对被请求页面的访问被禁止。 |
| 403.1 | 执行访问被禁止。 |
| 403.2 | 读访问被禁止。 |
| 403.3 | 写访问被禁止。 |
| 403.4 | 要求SSL。 |
| 403.5 | 要求SSL 128。 |
| 403.6 | IP地址被拒绝。 |
| 403.7 | 要求客户端证书。 |
| 403.8 | 站点访问被拒绝。 |
| 403.9 | 用户数过多。 |
| 403.10 | 配置无效。 |
| 403.11 | 密码更改。 |
| 403.12 | 拒绝访问映射表。 |
| 403.13 | 客户端证书被吊销。 |
| 403.14 | 拒绝目录列表。 |
| 403.15 | 超出客户端访问许可。 |
| 403.16 | 客户端证书不受信任或无效。 |
| 403.17 | 客户端证书已过期或尚未生效。 |
| 403.18 | 在当前的应用程序池中不能执行所请求的URL。这个错误代码为IIS 6.0所专用。 |
| 403.19 | 不能为这个应用程序池中的客户端执行CGI。这个错误代码为IIS 6.0所专用。 |
| 403.20 | Passport登录失败。这个错误代码为IIS 6.0所专用。 |
| 404 Not Found | 服务器无法找到被请求的页面。 |
| 404.0 | (无)–没有找到文件或目录。 |
| 404.1 | 无法在所请求的端口上访问Web站点。 |
| 404.2 | Web服务扩展锁定策略阻止本请求。 |
| 404.3 | MIME映射策略阻止本请求。 |
| 405 Method Not Allowed | 请求中指定的方法不被允许。 |
| 406 Not Acceptable | 服务器生成的响应无法被客户端所接受。 |
| 407 Proxy Authentication Required | 用户必须首先使用代理服务器进行验证,这样请求才会被处理。 |
| 408 Request Timeout | 请求超出了服务器的等待时间。 |
| 409 Conflict | 由于冲突,请求无法被完成。 |
| 410 Gone | 被请求的页面不可用。 |
| 411 Length Required | "Content-Length"未被定义。如果无此内容,服务器不会接受请求。 |
| 412 Precondition Failed | 请求中的前提条件被服务器评估为失败。 |
| 413 Request Entity Too Large | 由于所请求的实体的太大,服务器不会接受请求。 |
| 414 Request-url Too Long | 由于url太长,服务器不会接受请求。当post请求被转换为带有很长的查询信息的get请求时,就会发生这种情况。 |
| 415 Unsupported Media Type | 由于媒介类型不被支持,服务器不会接受请求。 |
| 416 Requested Range Not Satisfiable | 服务器不能满足客户在请求中指定的Range头。 |
| 417 Expectation Failed | 执行失败。 |
| 423 | 锁定的错误。 |
5xx:服务器错误
| 状态码 | describe | 描述 |
|---|---|---|
| 500 | Internal Server Error | 服务器内部错误,无法完成请求 |
| 501 | Not Implemented | 服务器不支持请求的功能,无法完成请求 |
| 502 | Bad Gateway | 作为网关或者代理工作的服务器尝试执行请求时,从远程服务器接收到了一个无效的响应 |
| 503 | Service Unavailable | 由于超载或系统维护,服务器暂时的无法处理客户端的请求。延时的长度可包含在服务器的Retry-After头信息中 |
| 504 | Gateway Time-out | 充当网关或代理的服务器,未及时从远端服务器获取请求 |
| 505 | HTTP Version not supported | 服务器不支持请求的HTTP协议的版本,无法完成处理 |
2. 安装
#!/bin/bash
iptables -F
yum -y install epel-release && yum clean all && yum makecache
yum -y install pcre-devel zlib-devel gcc gcc-c++ make wget
useradd -M -s /sbin/nologin nginx
wget http://nginx.org/download/nginx-1.23.1.tar.gz -P /opt
tar zxvf /opt/nginx-1.23.1.tar.gz -C /opt
cd /opt/nginx-1.23.1

./configure \
--prefix=/usr/local/nginx \
--user=nginx \
--group=nginx \
--with-http_stub_status_module \
--with-stream

cd /opt/nginx-1.23.1
make -j 4 && make install
ln -s /usr/local/nginx/sbin/nginx /usr/local/sbin/

cat > /usr/lib/systemd/system/nginx.service <<EOF
[Unit]
Description=nginx
After=network.target
[Service]
Type=forking
PIDFile =/usr/local/nginx/logs/nginx.pid
ExecStart=/usr/local/nginx/sbin/nginx
ExecrReload=/bin/kill -s HUP $MAINPID
ExecrStop=/bin/kill -s QUIT $MAINPID
PrivateTmp=true
[Install]
WantedBy=multi-user.target
EOF

chmod 754 /usr/lib/systemd/system/nginx.service
systemctl daemon-reload && systemctl start nginx.service && systemctl enable nginx.service

echo " "
pgrep "nginx" &> /dev/null
if [ $? -eq 0 ];then
        echo -e "\033[32mnginx服务运行正常,可 curl 查看\033[0m"
else
        echo -e "\033[31mnginx服务运行异常,请检查\033[0m"
fi
3. 配置文件
3.1 默认配置文件

[root@c7-1 ~]#cat /usr/local/nginx/conf/nginx.conf | grep -v "^$" | grep -v "#"
worker_processes  1;
events {
    worker_connections  1024;
}
http {
    include       mime.types;
    default_type  application/octet-stream;
    sendfile        on;
    keepalive_timeout  65;
    server {
        listen       80;
        server_name  localhost;
        location / {
            root   html;
            index  index.html index.htm;
        }
        error_page   500 502 503 504  /50x.html;
        location = /50x.html {
            root   html;
        }
    }
}
3.2 配置文件参数详述
[root@c7-1 ~]#cat /usr/local/nginx/conf/nginx.conf

# 用户和组,windows 下不指定,Linux 不写默认为 root
user  nginx nginx;
# 工作进程数目。根据硬件调整,通常等于 CPU 数量或者 2 倍于 CPU
worker_processes  8;

# 错误日志存放路径,全局错误日志定义类型 [ debug | info | notice | warn | error | crit ]
error_log  logs/error.log;
#error_log  logs/error.log  notice;
#error_log  logs/error.log  info;

# pid 进程标识符文件存放路径
pid        logs/nginx.pid;

#一个 nginx 进程打开的最多文件描述符数目,理论值应该是最多打开文件数(系统的值ulimit -n)与 nginx 进程数相除,但是 nginx 分配请求并不均匀,所以建议与 ulimit -n 的值保持一致。
worker_rlimit_nofile 65535;

events {
    use epoll;	# 使用多路复用模型,提高并发量
    worker_connections  65535;	# 每个进程允许的最多连接数
    keepalive_timeout 60;	# keepalive 超时时间
}

# 设定 http 服务器
http {
    include       mime.types;	#文件扩展名与文件类型映射表
    default_type  application/octet-stream;	#默认文件类型
	#charset utf-8; #默认编码
	server_names_hash_bucket_size 128; #服务器名字的hash表大小
    client_header_buffer_size 32k; 	   #上传文件大小限制
    large_client_header_buffers 4 64k; #设定请求缓
    client_max_body_size 8m; 		   #设定请求缓

    #log_format  main  '$remote_addr - $remote_user [$time_local] "$request" '
    #                  '$status $body_bytes_sent "$http_referer" '
    #                  '"$http_user_agent" "$http_x_forwarded_for"';

    #access_log  logs/access.log  main;

    #开启高效文件传输模式,sendfile指令指定nginx是否调用sendfile函数来输出文件,对于普通应用设为 on,如果用来进行下载等应用磁盘IO重负载应用,可设置为off,以平衡磁盘与网络I/O处理速度,降低系统的负载。注意:如果图片显示不正常把这个改成off。
    autoindex       on;  #开启目录列表访问,适合下载服务器,默认关闭
    sendfile        on;
    tcp_nopush 	    on;  #防止网络阻塞
	tcp_nodelay     on;  #防止网络阻塞

    #keepalive_timeout  0;
    keepalive_timeout  65;	#长连接超时时间,单位是秒

    #FastCGI 相关参数是为了改善网站的性能:减少资源占用,提高访问速度。下面参数看字面意思都能理解。
    fastcgi_connect_timeout 300;
    fastcgi_send_timeout 300;
    fastcgi_read_timeout 300;
    fastcgi_buffer_size 64k;
    fastcgi_buffers 4 64k;
    fastcgi_busy_buffers_size 128k;
    fastcgi_temp_file_write_size 128k;


	#gzip 模块设置
    gzip  on;	#开启 gzip 压缩输出
    gzip_min_length 1k;  #最小压缩文件大小
    gzip_buffers 4 16k;  #压缩缓冲区
    gzip_http_version 1.0; #压缩版本(默认1.1,前端如果是squid2.5请使用1.0)
    gzip_comp_level 2; 	   #压缩等级
    gzip_types text/plain application/x-javascript text/css application/xml;
    #压缩类型,默认就已经包含textml,所以下面就不用再写了,写上去也不会有问题,但是会有一个warn。
    gzip_vary on;
    #limit_zone crawler $binary_remote_addr 10m; #开启限制IP连接数的时候需要使用


    upstream blog.ha97.com {
    #upstream 的负载均衡,weight 是权重,可以根据机器配置定义权重。weigth 参数表示权值,权值越高被分配到的几率越大。
        server 192.168.80.121:80 weight=3;
        server 192.168.80.122:80 weight=2;
        server 192.168.80.123:80 weight=1;
    }

	# 虚拟主机的配置
    server {
        listen       80;	# nginx 服务的监听端口
        # 域名可以有多个,用空格隔开
        # server_name www.zc.com syhj.com;
        server_name  localhost;

        #charset koi8-r;	#网页字符集

        #access_log  logs/host.access.log  main;

        location / {
            root   html;	#网站根目录的位置 /usr/local/nginx/html
            index  index.html index.htm;	#默认首页文件名
        }

        #error_page  404              /404.html;

        # redirect server error pages to the static page /50x.html
        # 内部错误的反馈页面
        error_page   500 502 503 504  /50x.html;
        #错误页面配置
        location = /50x.html {
            root   html;
        }

        # proxy the PHP scripts to Apache listening on 127.0.0.1:80
        #
        #location ~ \.php$ {
        #    proxy_pass   http://127.0.0.1;
        #}

        # pass the PHP scripts to FastCGI server listening on 127.0.0.1:9000
        #
        #location ~ \.php$ {
        #    root           html;
        #    fastcgi_pass   127.0.0.1:9000;
        #    fastcgi_index  index.php;
        #    fastcgi_param  SCRIPT_FILENAME  /scripts$fastcgi_script_name;
        #    include        fastcgi_params;
        #}

        # deny access to .htaccess files, if Apache's document root
        # concurs with nginx's one
        #
        #location ~ /\.ht {
        #    deny  all;
        #}
    }


    # another virtual host using mix of IP-, name-, and port-based configuration
    #
    #server {
    #    listen       8000;
    #    listen       somename:8080;
    #    server_name  somename  alias  another.alias;

    #    location / {
    #        root   html;
    #        index  index.html index.htm;
    #    }
    #}


    # HTTPS server
    #
    #server {
    #    listen       443 ssl;
    #    server_name  localhost;

    #    ssl_certificate      cert.pem;
    #    ssl_certificate_key  cert.key;

    #    ssl_session_cache    shared:SSL:1m;
    #    ssl_session_timeout  5m;

    #    ssl_ciphers  HIGH:!aNULL:!MD5;
    #    ssl_prefer_server_ciphers  on;

    #    location / {
    #        root   html;
    #        index  index.html index.htm;
    #    }
    #}

}
3.3 log_format 详解
log_format 有一个默认的、无须设置的 combined 日志格式设置,相当于 Apache 的 combined 日志格式,log_format 指令设置的名称在配置文件中是不能重复的。其具体参数如下:
log_format combined '$remote_addr-$remote_user [$time_local]'
‘"$request"$status $body_bytes_sent’
 ‘"$http_referer" "$http_user_agent"’
假设将 Nginx 服务器作为 Web 服务器,位于负载均衡设备、Squid、Nginx 反向代理之后,不能获取到客户端的真实 IP 地址了。原因是经过反向代理后,由于在客户端和 Web 服务器之间增加了中间层,因此 Web 服务器无法直接拿到客户端的 IP。通过 $remote_addr 变量拿到的将是反向代理服务器的 IP 地址。
如何设置获取客户端真实 IP
但是,反向代理服务器在转发请求的 HTTP 头信息中,可以增加 X-Forwarded-For 信息,用以记录原有的客户端 IP 地址和原来客户端请求的服务器地址。WEB 服务器这时候要用 log_format 指令设置日志格式,让日志记录 X-Forearded-For 信息中的 IP 地址,即客户的真实 IP。例如创建一个名为 mylogformat 的日志格式,用 $http_x_forwarded_forlog_for 变量记录用户的 X_Forwarded-For IP 地址:
log_format mylogformat '$http_x_forwarded_for_$remote_user [$time_local]'
‘"$request"$status $body_bytes_sent’
 ‘"$http_referer" "$http_user_agent"’
log_format 默认值
log_format  main  '$remote_addr - $remote_user [$time_local] "$request" '
                  '$status $body_bytes_sent "$http_referer" '
                  '"$http_user_agent" "$http_x_forwarded_for"';
日志格式详细设定
| 参数 | 说明 | 示例 |
|---|---|---|
| $remote_addr | 客户端地址 | 211.28.65.253 |
| $remote_user | 客户端用户名称 | -- |
| $time_local | 访问时间和时区 | 18/Jul/2012:17:00:01 +0800 |
| $request | 请求的URI和HTTP协议 | "GET /article-10000.html HTTP/1.1" |
| $http_host | 请求地址,即浏览器中你输入的地址(IP或域名) | www.wang.com 192.168.100.100 |
| $status | HTTP请求状态 | 200 |
| $upstream_status | upstream状态 | 200 |
| $body_bytes_sent | 发送给客户端文件内容大小 | 1547 |
| $http_referer | url跳转来源 | https://www.baidu.com/ |
| $http_user_agent | 用户终端浏览器等信息 | "Mozilla/4.0 (compatible; MSIE 8.0; Windows NT 5.1; Trident/4.0; SV1; GTB7.0; .NET4.0C; |
| $ssl_protocol | SSL协议版本 | TLSv1 |
| $ssl_cipher | 交换数据中的算法 | RC4-SHA |
| $upstream_addr | 后台upstream的地址,即真正提供服务的主机地址 | 10.10.10.100:80 |
| $request_time | 整个请求的总时间 | 0.205 |
| $upstream_response_time | 请求过程中,upstream响应时间 | 0.002 |
3.4 生产配置
nginx 的 LB 代理层使用过的一个日志配置 log_format
log_format  main  '$remote_addr $remote_user [$time_local] "$request" '
                  '$status $body_bytes_sent "$http_referer" '
                  '$http_user_agent $http_x_forwarded_for $request_time $upstream_response_time $upstream_addr $upstream_status';
在 nginx.conf 文件或 vhosts/*.conf 文件中的 access_log 日志中指定级别为 main
access_log  logs/wiki_access.log main;
error_log   logs/wiki_error.log;
重启 nginx 服务后生效,查看日志:(可以从日志中看到代理到后端哪台机器上的哪个端口上,负载访问的状态值等)
[root@lb-ng01 logs]# tail -f /data/nginx/logs/wiki_access.log
........
110.156.114.121 - [11/Aug/2017:09:57:19 +0800] "GET /rest/mywork/latest/status/notification/count?_=1502416641768 HTTP/1.1" 200 67 "http://wiki.wang-inc.com/pages/viewpage.action?pageId=11174759" Mozilla/5.0 (Windows NT 10.0; WOW64) AppleWebKit/537.36 (KHTML, like Gecko) Chrome/60.0.3112.78 Safari/537.36 - 0.006 0.006 12.129.120.121:8090 200
112.116.25.18 - [11/Aug/2017:09:57:24 +0800] "POST /json/startheartbeatactivity.action HTTP/1.1" 200 234 "http://wiki.wang-inc.com/pages/resumedraft.action?draftId=12058756&draftShareId=014b0741-df00-4fdc-90ca-4bf934f914d1" Mozilla/5.0 (Windows NT 10.0; WOW64) AppleWebKit/537.36 (KHTML, like Gecko) Chrome/59.0.3071.115 Safari/537.36 - 0.023 0.023 12.129.120.121:8090 200
3.5 模拟访问 nginx
| IP | 角色 |
|---|---|
| 192.168.10.20 | Nginx |
| 192.168.10.30 | 客户端 |
192.168.10.30 访问 Nginx
[root@c7-2 ~]#curl 192.168.10.20:80
......

# nginx 查看日志
[root@c7-1 ~]#tail -f /usr/local/nginx/logs/access.log
192.168.10.30 - - [29/Jul/2022:09:47:30 +0800] "GET / HTTP/1.1" 200 615 "-" "curl/7.29.0"
4. 功能详述
4.1 正向代理
正向代理是一个位于客户端和目标服务器之间的代理服务器。当客户端需要获取目标服务器上的内容时,客户端向代理服务器(正向)发送一个请求,并且指定目标服务器地址,此时代理服务器(正向)向目标服务器转交并且将获得的内容返回给客户端。正向代理服务器代理的是客户端,替客户端请求目标服务。
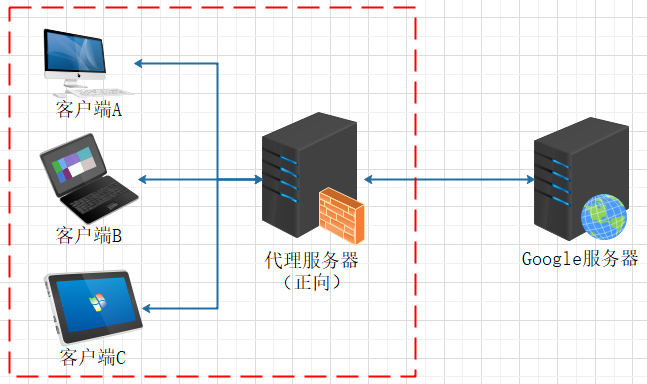
用户 A 无法访问 www.google.com,但是能访问服务器 B,而服务器 B 可以访问 www.google.com。于是用户 A 访问服务器 B,通过服务器 B 去访问 www.google.com,服务器 B 收到请求后,去访问 www.google.com,Google 把响应信息返回给服务器 B,服务器 B 再把响应信息返回给 A。这样,通过代理服务器 B,用户 A 就实现了访问 www.google.com。
正向代理最大的特点就是客户端非常明确的知道要访问的目标服务器地址,同时必须知道代理服务器的地址和端口,目标服务器只清楚请求来自哪个代理服务器,而不清楚来自哪个具体的客户端。正向代理模式屏蔽或者隐藏了真实客户端信息。
nginx 正向代理服务器配置
[root@localhost ~]# vim /usr/local/nginx-1.12.1/conf/nginx.conf
server {
    resolver 114.114.114.114;       #指定DNS服务器IP地址
    listen 80;
    location / {
        proxy_pass http://$host$request_uri;     #设定代理服务器的协议和地址
                proxy_set_header HOST $host;
                proxy_buffers 256 4k;
                proxy_max_temp_file_size 0k;
                proxy_connect_timeout 30;
                proxy_send_timeout 60;
                proxy_read_timeout 60;
                proxy_next_upstream error timeout invalid_header http_502;
    }
}
server {
    resolver 114.114.114.114;       #指定DNS服务器IP地址
    listen 443;
    location / {
       proxy_pass https://$host$request_uri;    #设定代理服务器的协议和地址
             proxy_buffers 256 4k;
             proxy_max_temp_file_size 0k;
       proxy_connect_timeout 30;
       proxy_send_timeout 60;
       proxy_read_timeout 60;
       proxy_next_upstream error timeout invalid_header http_502;
    }
}
[root@localhost ~]# /usr/local/nginx-1.12.1/sbin/nginx -s reload
客户端访问测试
[root@localhost ~]# curl  -I --proxy 192.168.10.10:80 www.baidu.com
HTTP/1.1 200 OK
Server: nginx/1.12.1
Date: Mon, 11 Jun 2018 15:37:47 GMT
Content-Type: text/html
Content-Length: 612
Last-Modified: Thu, 31 May 2018 09:28:16 GMT
Connection: keep-alive
ETag: "5b0fc030-264"
Accept-Ranges: bytes
https的访问测试
[root@localhost ~]# curl  -I --proxy 192.168.10.10:443 www.baidu.com
HTTP/1.1 200 OK
Server: nginx/1.12.1
Date: Mon, 11 Jun 2018 15:38:07 GMT
Content-Type: text/html
Content-Length: 277
Connection: keep-alive
Accept-Ranges: bytes
Cache-Control: private, no-cache, no-store, proxy-revalidate, no-transform
Etag: "575e1f5c-115"
Last-Modified: Mon, 13 Jun 2016 02:50:04 GMT
Pragma: no-cache
5、设置Linux客户端全局代理
[root@localhost ~]# vim /etc/profile
export http_proxy='192.168.10.10:80'
export http_proxy='192.168.10.10:443'
export ftp_proxy='192.168.10.10:80'
[root@localhost ~]# source /etc/profile
[root@localhost ~]# curl -I www.baidu.com:80
HTTP/1.1 200 OK
Server: nginx/1.12.1
Date: Mon, 11 Jun 2018 16:10:18 GMT
Content-Type: text/html
Content-Length: 277
Connection: keep-alive
Accept-Ranges: bytes
Cache-Control: private, no-cache, no-store, proxy-revalidate, no-transform
Etag: "575e1f5c-115"
Last-Modified: Mon, 13 Jun 2016 02:50:04 GMT
Pragma: no-cache
[root@localhost ~]# curl -I www.baidu.com:443
HTTP/1.1 200 OK
Server: nginx/1.12.1
Date: Mon, 11 Jun 2018 16:10:27 GMT
Content-Type: text/html
Content-Length: 277
Connection: keep-alive
Accept-Ranges: bytes
Cache-Control: private, no-cache, no-store, proxy-revalidate, no-transform
Etag: "575e1f59-115"
Last-Modified: Mon, 13 Jun 2016 02:50:01 GMT
Pragma: no-cache
4.2 反向代理
反向代理与正向代理正好相反。对于客户端来说,反向代理就好像目标服务器,并且客户端不需要进行任何设置。客户端向代理服务器(反向)发送请求,代理服务器(反向)判断并把请求最终转发到对应的真正服务,并将从真正服务器上获得的内容返回给客户端。此时,客户端并不会感知到代理服务器(反向)后面的真正服务,只需要把代理服务器(反向)当成真正的服务器即可。反向代理服务器代理的是服务端,替真正服务端接收客户端的请求。

假设用户 A 访问 http://www.demo.cn/sign.html,但 www.demo.cn 上并不存在 sign.html 页面,于是接收用户请求的这个代理服务器就偷偷从其他服务器上读取 sign.html,然后返回给用户,而用户并不知道 sign.html 页面究竟位于哪台机器上。
反向代理最大的特点就是客户端不需要知道真实的服务地址,仅需要知道代理服务器的地址和端口,客户端只清楚请求来自哪代理服务器,而不清楚来自哪个具体的真正服务器。反向代理模式隐藏了真正服务器的信息。
关键命令:proxy_pass;如将 localhost 的 80 端口转到 localhost 8080 端口
server {
   listen 80;
    server_name localhost;

    location / {
        proxy_pass http://localhost:8080;
        proxy_set_header Host $host:$server_port;
  }
}
4.3 负载均衡
负载均衡也是 Nginx 常用的一个功能,简单而言就是当有 2 台或 2 台以上服务器时,根据规则随机的将请求分发到指定的服务器上处理,负载均衡配置一般都需要同时配置反向代理,通过反向代理跳转到负载均衡。而 Nginx 目前支持自带 3 种负载均衡策略,还有 2 种常用的第三方策略。
权重 weight:必须实现 session 共享,否则导致用户 session 不同步,导致用户重新登陆。
upstream test {
        server localhost:8080 weight=9;  #请求的 90% 进入到 8080 服务器
        server localhost:8081 weight=1;  #请求的 10% 进入到 8081 服务器
    }
ip_hash:每个请求按访问 ip 的 hash 结果分配,这样每个访客固定访问一个后端服务器,可以解决 session 的问题。链接
upstream test {
        ip_hash;
        server localhost:8080;
        server localhost:8081;
    }
fair(第三方):按后端服务器的响应时间来分配请求,响应时间短的优先分配。
upstream test {
        fair;
        server localhost:8080;
        server localhost:8081;
}
url_hash(第三方):按 url 的 hash 结果来分配请求,使每个 url 定向到同一个后端服务器,后端服务器为缓存时比较有效。
upstream backend {
        hash $request_uri;
        hash_method crc32;
        server localhost:8080;
        server localhost:8081;
    }
默认:按照时间一次分配到不同的机器上。
upstream test {
        server localhost:8080;
        server localhost:8081;
    }
    server {
        listen       80;
        server_name  localhost;
        client_max_body_size 1024M;

        location / {
            proxy_pass http://test;
            proxy_set_header Host $host:$server_port;
        }
    }
4.4 动静分离
动静分离是让动态网站里的动态网页根据一定规则把不变的资源和经常变的资源区分开来,动静资源做好了拆分以后,我们就可以根据静态资源的特点将其做缓存操作,这就是网站静态化处理的核心思路。
upstream test{
       server localhost:8080;
       server localhost:8081;
    }

    server {
        listen       80;
        server_name  localhost;

        location / {
            root   E:/wwwroot;
            index  index.html;
        }

        # 所有静态请求都由nginx处理,存放目录为html
        location ~ .(gif|jpg|jpeg|png|bmp|swf|css|js)$ {
            root    E:/wwwroot;
        }

        # 所有动态请求都转发给tomcat处理
        location ~ .(do)$ {
            proxy_pass  http://test;
        }

        error_page   500 502 503 504  /50x.html;
        location = /50x.html {
            root   E:/wwwroot;
        }
    }
4.5 WEB 服务器
如下配置,访问 http://localhost 就会默认访问到 E://www/data 目录下面的 index.html,如果一个网站只是静态页面的话,那么就可以通过这种方式来实现部署。
关键命令:root,当只有静态资源的时候,就可以使用 Nginx 来做服务器。
server {
        listen       80;
        server_name  localhost;

        location / {
               root   E:/www/data;
               index  index.html;
           }
    }
5. Nginx 支持的算法
5.1 rr 轮询
他会根据你 upstream 中配的 server 地址,依次请求到对应的服务器中,第一次请求到 8080,第二次请求到 8081,第三次请求到 8080,以此类推。
 1    upstream OrdinaryPolling {
 2     server 127.0.0.1:8080;
 3     server 127.0.0.1:8081;
 4     }
 5     server {
 6         listen       80;
 7         server_name  localhost;
 8
 9         location / {
10             proxy_pass http://OrdinaryPolling;
11             index  index.html index.htm index.jsp;
12
13         }
14     }
5.2 wrr 加权轮询
假如说,上述其中一台 tomcat 配置更高,扛得住更强的并发,而另一台相对配置较低,那我们就可以采用加权的方式,让请求更多的打到配置更高的 tomcat 服务器上,配置如下:
 1     upstream OrdinaryPolling {
 2     server 127.0.0.1:8080 weight=5;
 3     server 127.0.0.1:8081 weight=2;
 4     }
 5     server {
 6         listen       80;
 7         server_name  localhost;
 8
 9         location / {
10             proxy_pass http://OrdinaryPolling;
11             index  index.html index.htm index.jsp;
12
13         }
14     }
5.3 ip_hash 源地址哈希
我们设想一个问题,用户在浏览一个网页时需要请求到不同的资源,每个资源前可能都会有拦截器用来让用户去登录,这时用户在访问其中一个资源时已经登陆了,这个 session 存储到了当前服务器里,但是用户请求其他资源,负载均衡给代理到其他服务器了,用户的 session 就获取不到了,用户还需要重新登录,十分影响用户体验,这种情况我们常用两种解决方案:
- 第一种方法是选择一个中间件,将登录信息保存在一个中间件上,这个中间件可以为 Redis 这样的数据库。那么第一次登录,我们将 session 信息保存在 Redis 中,跳转到第二个服务器时,我们可以先去 Redis 上查询是否有登录信息,如果有,就能直接进行登录之后的操作了,而不用进行重复登录。
- 第二种方法是根据客户端的 IP 地址划分,每次都将同一个 IP 地址发送的请求都分发到同一个 Tomcat 服务器,那么也不会存在 session 共享的问题,就是 ip_hash。
  upstream OrdinaryPolling {
 2     ip_hash;
 3     server 127.0.0.1:8080 weight=5;
 4     server 127.0.0.1:8081 weight=2;
 5     }
 6     server {
 7         listen       80;
 8         server_name  localhost;
 9
10         location / {
11             proxy_pass http://OrdinaryPolling;
12             index  index.html index.htm index.jsp;
13
14         }
15     }
注意:我们在 upstream 指令块中增加了 ip_hash 指令。该指令就是告诉 nginx 服务器,同一个 IP 地址客户端发送的请求都将分发到同一个 Tomcat 服务器进行处理。
5.4 least_conn 最少链接
优先将请求分配给连接最少的服务器,这样可以避免将请求发给压力较大的服务器。
http {
 upstream CashServers {
  least_conn;
  server CashServers1.com;
  server CashServers2.com;
  server CashServers3.com;
 }

 server {
  listen 80;

  location / {
   proxy_pass http://CashServers;
  }
 }
}
5.5 fair 智能调整调度 (第三方)
动态的根据后端服务器的请求处理到响应的时间进行均衡分配,响应时间短处理效率高的服务器分配到请求的概率高,响应时间长处理效率低的服务器分配到的请求少;结合了前两者的优点的一种调度算法。但是需要注意的是 Nginx 默认不支持 fair 算法,如果要使用这种调度算法,编译的时候请安装 upstream_fair 模块。
1      upstream OrdinaryPolling {
 2     server 127.0.0.1:8080 weight=5;
 3     server 127.0.0.1:8081 weight=2;
 4     fair;
 5     }
 6     server {
 7         listen       80;
 8         server_name  localhost;
 9
10         location / {
11             proxy_pass http://OrdinaryPolling;
12             index  index.html index.htm index.jsp;
13
14         }
15     }
5.6 url_hash 域名哈希 (第三方)
按照访问的域名的 hash 结果分配请求,每个请求的 url 会指向后端固定的某个服务器,可以在 Nginx 作为静态服务器的情况下提高缓存效率。同样要注意 Nginx 默认不支持这种调度算法,要使用的话需要安装 Nginx 的 hash 软件包。
1     upstream wordbackend {
2         server 127.0.0.1:8080;
3         server 127.0.0.1:8081;
4     }
5
6     upstream pptbackend {
7         server 127.0.0.1:8082;
8         server 127.0.0.1:8083;
9     }
10
11     server {
12         listen       80;
13         server_name  localhost;
14
15         location /word/ {
16             proxy_pass http://wordbackend;
17             index  index.html index.htm index.jsp;
18         }
19
20         location /ppt/ {
21             proxy_pass http://pptbackend;
22             index  index.html index.htm index.jsp;
24         }
25     }
6. Nginx Rewrite 和正则表达式
7. Nginx 优化与防盗链
8. curl 命令使用
8.1 说明
- 是一种命令行工具,能够向服务器发送网络接口请求(默认 GET),获得返回数据并进行提取。它的名字就是客户端(client)的 URL 工具的意思。
- 返回数据显示在标准输出(stdout)上面。
- 它的功能非常强大,命令行参数多达几十种。如果熟练的话,完全可以取代 Postman 这一类的图形界面工具。
8.2 常用参数
所有参数说明执行:curl --help
-a/--append                        上传文件时,附加到目标文件
--anyauth                            可以使用“任何”身份验证方法
--basic                                使用HTTP基本验证
-B/--use-ascii                      使用ASCII文本传输
-d/--data <data>                  HTTP POST方式传送数据
--data-ascii <data>            以ascii的方式post数据
--data-binary <data>          以二进制的方式post数据
--negotiate                          使用HTTP身份验证
--digest                        使用数字身份验证
--disable-eprt                  禁止使用EPRT或LPRT
--disable-epsv                  禁止使用EPSV
--egd-file <file>              为随机数据(SSL)设置EGD socket路径
--tcp-nodelay                  使用TCP_NODELAY选项
-E/--cert <cert[:passwd]>      客户端证书文件和密码 (SSL)
--cert-type <type>              证书文件类型 (DER/PEM/ENG) (SSL)
--key <key>                    私钥文件名 (SSL)
--key-type <type>              私钥文件类型 (DER/PEM/ENG) (SSL)
--pass  <pass>                  私钥密码 (SSL)
--engine <eng>                  加密引擎使用 (SSL). "--engine list" for list
--cacert <file>                CA证书 (SSL)
--capath <directory>            CA目   (made using c_rehash) to verify peer against (SSL)
--ciphers <list>                SSL密码
--compressed                    要求返回是压缩的形势 (using deflate or gzip)
--connect-timeout <seconds>    设置最大请求时间
--create-dirs                  建立本地目录的目录层次结构
--crlf                          上传是把LF转变成CRLF
--ftp-create-dirs              如果远程目录不存在,创建远程目录
--ftp-method [multicwd/nocwd/singlecwd]    控制CWD的使用
--ftp-pasv                      使用 PASV/EPSV 代替端口
--ftp-skip-pasv-ip              使用PASV的时候,忽略该IP地址
--ftp-ssl                      尝试用 SSL/TLS 来进行ftp数据传输
--ftp-ssl-reqd                  要求用 SSL/TLS 来进行ftp数据传输
-F/--form <name=content>        模拟http表单提交数据
-form-string <name=string>      模拟http表单提交数据
-g/--globoff                    禁用网址序列和范围使用{}和[]
-G/--get                        以get的方式来发送数据
-h/--help                      帮助
-H/--header <line>              自定义头信息传递给服务器
--ignore-content-length        忽略的HTTP头信息的长度
-i/--include                    输出时包括protocol头信息
-I/--head                      只显示文档信息
-j/--junk-session-cookies      读取文件时忽略session cookie
--interface <interface>        使用指定网络接口/地址
--krb4 <level>                  使用指定安全级别的krb4
-k/--insecure                  允许不使用证书到SSL站点
-K/--config                    指定的配置文件读取
-l/--list-only                  列出ftp目录下的文件名称
--limit-rate <rate>            设置传输速度
--local-port<NUM>              强制使用本地端口号
-m/--max-time <seconds>        设置最大传输时间
--max-redirs <num>              设置最大读取的目录数
--max-filesize <bytes>          设置最大下载的文件总量
-M/--manual                    显示全手动
-n/--netrc                      从netrc文件中读取用户名和密码
--netrc-optional                使用 .netrc 或者 URL来覆盖-n
--ntlm                          使用 HTTP NTLM 身份验证
-N/--no-buffer                  禁用缓冲输出
-p/--proxytunnel                使用HTTP代理
--proxy-anyauth                选择任一代理身份验证方法
--proxy-basic                  在代理上使用基本身份验证
--proxy-digest                  在代理上使用数字身份验证
--proxy-ntlm                    在代理上使用ntlm身份验证
-P/--ftp-port <address>        使用端口地址,而不是使用PASV
-Q/--quote <cmd>                文件传输前,发送命令到服务器
--range-file                    读取(SSL)的随机文件
-R/--remote-time                在本地生成文件时,保留远程文件时间
--retry <num>                  传输出现问题时,重试的次数
--retry-delay <seconds>        传输出现问题时,设置重试间隔时间
--retry-max-time <seconds>      传输出现问题时,设置最大重试时间
-S/--show-error                显示错误
--socks4 <host[:port]>          用socks4代理给定主机和端口
--socks5 <host[:port]>          用socks5代理给定主机和端口
-t/--telnet-option <OPT=val>    Telnet选项设置
--trace <file>                  对指定文件进行debug
--trace-ascii <file>            Like --跟踪但没有hex输出
--trace-time                    跟踪/详细输出时,添加时间戳
--url <URL>                    Spet URL to work with
-U/--proxy-user <user[:password]>  设置代理用户名和密码
-V/--version                    显示版本信息
-X/--request <command>          指定什么命令
-y/--speed-time                放弃限速所要的时间。默认为30
-Y/--speed-limit                停止传输速度的限制,速度时间'秒
-z/--time-cond                  传送时间设置
-0/--http1.0                    使用HTTP 1.0
-1/--tlsv1                      使用TLSv1(SSL)
-2/--sslv2                      使用SSLv2的(SSL)
-3/--sslv3                      使用的SSLv3(SSL)
--3p-quote                      like -Q for the source URL for 3rd party transfer
--3p-url                        使用url,进行第三方传送
--3p-user                      使用用户名和密码,进行第三方传送
-4/--ipv4                      使用IP4
-6/--ipv6                      使用IP6
8.3 使用
# 访问百度
curl www.baidu.com

# -o 将服务器的回应保存成文件,等同于 wget 命令
curl -o test.html www.baidu.com

# -O 保存网页中的文件,并将 URL 的最后部分当作文件名
curl -O http://49.232.8.65/shell/docker/docker.sh

# 发生 POST 请求
# 使用 -d 参数时,header 的 Content-Type 被自动赋值为 application/x-www-form-urlencoded,并且发送 POST 请求。-X POST 可省略
curl -d 'user=gongboyi&pwd=syhj' -X POST http://csdn.net/login

# 发送 json 请求
# 发送 json 请求还需要用到两个参数:-X 参数指定 HTTP 请求的方法,-H 参数指定 HTTP 请求的 header
curl -X POST -H "Content-Type: application/json; charset=UTF-8" -d '{"user":"syhj","pwd":"123456"}' http://www.csdn.net/login

# 显示 HTTP 响应头
# -i 参数显示服务端响应内容的同时,也显示 HTTP 响应头
# -I 只显示 HTTP 响应头
curl -i http://www.csdn.net
curl -I http://www.csdn.net

# 显示响应过程
# -v 显示的整个响应过程,我们可以看到底层到底发生了什么
# * 开头的行表示 curl 提供的额外信息,> 开头的行表示请求头,< 开头的行表示响应头
curl -v http://www.csdn.net

# -k 参数指定跳过 SSL 检测
curl -k https://www.example.com

# -s 不输出错误和进度信息
curl -s https://www.example.com

# 不显示任何输出
curl -s -o /dev/null https://google.com

# -u 参数用来设置服务器认证的用户名和密码
curl -u 'bob:12345' https://google.com/login
9. HTTP Request 类型
常用五种:get、post、put、delete、options
| Method | 说明 |
|---|---|
| GET | 请求指定的页面信息,并返回实体主体。 |
| HEAD | 类似于 get 请求,只不过返回的响应中没有具体的内容,用于获取报头 |
| POST | 向指定资源提交数据进行处理请求(例如提交表单或者上传文件)。数据被包含在请求体中。POST 请求可能会导致新的资源的建立和/或已有资源的修改。 |
| PUT | 从客户端向服务器传送的数据取代指定的文档的内容。 |
| DELETE | 请求服务器删除指定的页面。 |
| CONNECT | HTTP/1.1 协议中预留给能够将连接改为管道方式的代理服务器。 |
| OPTIONS | 允许客户端查看服务器的性能。 |
| TRACE | 回显服务器收到的请求,主要用于测试或诊断。 |
| PATCH | 实体中包含一个表,表中说明与该 URI 所表示的原内容的区别。 |
| MOVE | 请求服务器将指定的页面移至另一个网络地址。 |
| COPY | 请求服务器将指定的页面拷贝至另一个网络地址。 |
| LINK | 请求服务器建立链接关系。 |
| UNLINK | 断开链接关系。 |
| WRAPPED | 允许客户端发送经过封装的请求。 |
| LOCK | 允许用户锁定资源,比如可以再编辑某个资源时将其锁定,以防别人同时对其进行编辑。 |
| MKCOL | 允许用户创建资源 |
| Extension-mothed | 在不改动协议的前提下,可增加另外的方法。 |
GET 和 POST 区别
- 本质区别
POST:向服务器传送数据
GET:向服务器获取数据
- 请求参数形式
POST:附在正文中
GET:拼接在 URL 上,多个参数之间用 & 隔开,如果参数是中文值,则会转换成诸如 %ab%12 的加密 16 进制码
- 请求数据大小限制
POST:正文没有长度限制,表单所能处理的长度在 100k(不同协议不同浏览器不一样)
GET:URL 长度有限制,在 1024K 左右(不同协议不同浏览器不一样)
- 安全性
POST:相对 GET 安全,但是如果不使用 HTTPS,报文正文仍是明文,容易被人截获读取
GET:URL 上可见传输参数,所以安全性极低。一般用来传输一些公开的参数信息,解析也方便
- 浏览器后退,刷新是否重新请求
POST:是
GET:否
- 是否能被收藏为书签、是否被缓存、参数是否被保留浏览器历史
POST:否
GET:是
- 对数据类型的限制
POST:没有限制,也允许二进制数据
GET:只允许 ASCII 字符
- 编码类型
POST:application/x-www-form-urlencoded 或 multipart/form-data
GET:application/x-www-form-urlencoded
aplication/x-www-form-urlencoded 是浏览器默认的编码格式
10. tcpdump 进行抓包
tcpdump官网:http://www.tcpdump.org/
tcpdump 是 Linux 自带的抓包工具,可以详细看到计算机通信中详细报文内容,相当于是 wireshark 的命令行版本。dump 这个单词有垃圾堆,倒垃圾的意思,在计算机英语中的含义是转存。
安装
yum -y install tcpdump
参考:链接
抓取 https 协议包
[root@c7-1 ~]#tcpdump -n -i any port 80
tcpdump: verbose output suppressed, use -v or -vv for full protocol decode
listening on any, link-type LINUX_SLL (Linux cooked), capture size 262144 bytes
13:30:31.068361 IP 192.168.10.65.51238 > 192.168.10.20.http: Flags [S], seq 2461555369, win 29200, options [mss 1460,sackOK,TS val 187463682 ecr 0,nop,wscale 7], length 0
13:30:31.068450 IP 192.168.10.20.http > 192.168.10.65.51238: Flags [S.], seq 2980782160, ack 2461555370, win 28960, options [mss 1460,sackOK,TS val 124070688 ecr 187463682,nop,wscale 7], length 0
13:30:31.068722 IP 192.168.10.65.51238 > 192.168.10.20.http: Flags [.], ack 1, win 229, options [nop,nop,TS val 187463684 ecr 124070688], length 0
......
^C
20 packets captured
20 packets received by filter
0 packets dropped by kernel
抓取 https 协议包,指定写入到一个 cap 文件:cap 文件可用 wireshark 打开
-n 表示不要把 IP 地址解析成域名
-i 表示抓取哪块网卡的通信数据包
any 表示任意一块
port 是指定要抓取数据包的端口
DNS 服务工作在 53 端口上
#----------------------------------------------------------
tcpdump -n -i any port 80 -w ./nginx_20220731.cap
#----------------------------------------------------------
[root@c7-1 ~]#ls
nginx_20220731.cap
11. wireshark 抓包测试
11.1 说明
wireshark 是非常流行的网络封包分析软件,功能十分强大。可以截取各种网络封包,显示网络封包的详细信息。wireshark 是开源软件,可以放心使用。可以运行在 Windows 和 MacOS上。使用 wireshark 的人必须了解网络协议,否则就看不懂 wireshark 了。
为了安全考虑,wireshark 只能查看封包,而不能修改封包的内容,或者发送封包。wireshark 能获取 HTTP,也能获取 HTTPS,但是不能解密 HTTPS,所以 wireshark 看不懂 HTTPS 中的内容。如果是处理 HTTP,HTTPS 还是用 Fiddler,其他协议比如 TCP,UDP 就用 wireshark。
官网链接:https://www.wireshark.org/
11.2 使用
wireshark 是捕获机器上的某一块网卡的网络包,当你的机器上有多块网卡的时候,你需要选择一个网卡。

模拟向 nginx(端口 80)持续发出 Get 请求,使用 Wireshark 进行抓包:
while true ; do curl -I 192.168.10.20 && sleep 2 ; done
wireshark 抓包:我们虚拟机使用的是 vmnet8 网卡,就抓这个网卡的包

根据条件过滤:例如 ip.addr==192.168.10.20,ip.src == 192.168.10.65 or ip.dst == 192.168.10.20,tcp

但是这样的话会有其他虚拟机的信息干扰,我们可以用 tcpdump 保存的 cap 文件分析。


选择一条可以查看详细信息


12. HTTP2 与 GRPC 协议
3小时快速入门Java版gRPC系列(六)-使用 http2 协议
13. Nginx 配置 https
13.1 说明
在未使用 SSL 证书对服务器数据进行加密认证的情况下,用户的数据将会以明文的形式进行传输,这样一来使用抓包工具是可以获取到用户密码信息的,非常危险。而且也无法验证数据一致性和完整性,不能确保数据在传输过程中没被改变。所以网站如果有涉及用户账户等重要信息的情况下通常要配置使用 SSL 证书,实现 https 协议。
在生产环境中的 SSL 证书都需要通过第三方认证机构购买,分为专业版 OV 证书(浏览器地址栏上不显示企业名称)和高级版 EV(可以显示企业名称)证书,证书所保护的域名数不同也会影响价格(比如只对 www 认证和通配 * 认证,价格是不一样的),且不支持三级域名。测试中可以自己作为证书颁发机构来制作证书,浏览器会显示为红色,代表证书过期或者无效,如果是黄色的话代表网站有部分连接使用的仍然是 http 协议。
nginx 配置 HTTPS 前置条件:
- 服务器上已经安装 nginx 服务,已经具备 http 访问。
- nginx 服务器是否已经安装 ssl 模块的支持。
- 是否已经拥有 ssl 证书,如果没有可以去阿里云和腾讯云免费申请,或者使用 openssl 生成证书。
- 不管使用哪种方法,在拿到证书后对 Nginx 的配置都是一样的。
13.2 证书申请
13.2.1 阿里云证书申请

免费证书有一年时效期

配置访问
链接
13.2.2 使用 openssl 生成证书
(1) 准备环境
安装 openssl
rpm -qa openssl 2 openssl-1.0.1e-42.el7.x86_64
yum -y install openssl openssl-devel pcre-devel library
yum list installed | grep openssl
nginx 服务添加 ssl 模块
pkill -9 nginx
mv /usr/local/nginx/sbin/nginx /usr/local/nginx/sbin/nginx.bak
ll /usr/local/nginx/sbin/
cd /opt/nginx-1.23.1
./configure --prefix=/usr/local/nginx --user=nginx --group=nginx --with-http_stub_status_module  --with-http_ssl_module  --with-file-aio  --with-http_realip_module
make  # 不要 make install,会覆盖安装了
cp /opt/nginx-1.23.1/objs/nginx /usr/local/nginx/sbin/
ll /usr/local/nginx/sbin/
nginx -t
nginx -V
systemctl start nginx
systemctl status nginx
(2) 创建根证书 CA
生成 CA 私钥
[root@c7-1 ~]#mkdir zhengshu
[root@c7-1 ~]#cd zhengshu/
[root@c7-1 ~/zhengshu]#openssl genrsa -out local.key 2048
Generating RSA private key, 2048 bit long modulus
............................+++
..................................+++
e is 65537 (0x10001)
[root@c7-1 ~/zhengshu]#ls
local.key
生成 CA 证书请求
[root@c7-1 ~/zhengshu]#openssl req -new -key local.key -out local.csr
You are about to be asked to enter information that will be incorporated
into your certificate request.
What you are about to enter is what is called a Distinguished Name or a DN.
There are quite a few fields but you can leave some blank
For some fields there will be a default value,
If you enter '.', the field will be left blank.
-----
Country Name (2 letter code) [XX]:CN  #国家
State or Province Name (full name) []:JS  #省份
Locality Name (eg, city) [Default City]:NJ  #城市
Organization Name (eg, company) [Default Company Ltd]:  #公司名
Organizational Unit Name (eg, section) []:  #部门名
Common Name (eg, your name or your server's hostname) []:c7-1  #主机名
Email Address []:  #邮箱

Please enter the following 'extra' attributes
to be sent with your certificate request
A challenge password []:123456  #密码
An optional company name []:syhj  #姓名
[root@c7-1 ~/zhengshu]#ls
local.csr  local.key
req: 这是一个大命令,提供生成证书请求文件,验证证书,和创建根CA
-new: 表示新生成一个证书请求
-x509: 直接输出证书
-key: 生成证书请求时用到的私钥文件
-out:输出文件
生成 CA 根证书
[root@c7-1 ~/zhengshu]#openssl x509 -req -in local.csr -extensions v3_ca -signkey local.key -out local.crt
Signature ok
subject=/C=CN/ST=JS/L=NJ/O=Default Company Ltd/CN=c7-1
Getting Private key
[root@c7-1 ~/zhengshu]#ls
local.crt  local.csr  local.key
1.通过秘钥 生成证书请求文件
2.通过证书请求文件 生成最终的证书
-in 使用证书请求文件生成证书,-signkey 指定私钥
(3) 根据 CA 证书创建 server 端证书
生成 server 私匙
[root@c7-1 ~/zhengshu]#openssl genrsa -out my_server.key 2048
Generating RSA private key, 2048 bit long modulus
.................................................................................................................................................................................................................+++
.............+++
e is 65537 (0x10001)
[root@c7-1 ~/zhengshu]#ls
local.crt  local.csr  local.key  my_server.key
生成 server 证书请求
[root@c7-1 ~/zhengshu]#openssl x509 -req -in local.csr -extensions v3_ca -signkey local.key -out local.crt
Signature ok
subject=/C=CN/ST=JS/L=NJ/O=Default Company Ltd/CN=c7-1
Getting Private key
[root@c7-1 ~/zhengshu]#openssl genrsa -out my_server.key 2048
Generating RSA private key, 2048 bit long modulus
..............+++
....................................+++
[root@c7-1 ~/zhengshu]#openssl req -new -key my_server.key -out my_server.csr
You are about to be asked to enter information that will be incorporated
into your certificate request.
What you are about to enter is what is called a Distinguished Name or a DN.
There are quite a few fields but you can leave some blank
For some fields there will be a default value,
If you enter '.', the field will be left blank.
-----
Country Name (2 letter code) [XX]:CN
State or Province Name (full name) []:JS
Locality Name (eg, city) [Default City]:NJ
Organization Name (eg, company) [Default Company Ltd]:
Organizational Unit Name (eg, section) []:
Common Name (eg, your name or your server's hostname) []:c7-1
Email Address []:

Please enter the following 'extra' attributes
to be sent with your certificate request
A challenge password []:123456
An optional company name []:syhj
[root@c7-1 ~/zhengshu]#ls
local.crt  local.csr  local.key  my_server.csr  my_server.key
生成 server 证书
[root@c7-1 ~/zhengshu]#openssl x509 -days 365 -req -in my_server.csr -extensions v3_req -CAkey local.key -CA local.crt -CAcreateserial -out my_server.crt
Signature ok
subject=/C=CN/ST=JS/L=NJ/O=Default Company Ltd/CN=c7-1
Getting CA Private Key
[root@c7-1 ~/zhengshu]#ls
local.crt  local.csr  local.key  local.srl  my_server.crt  my_server.csr  my_server.key
13.3 配置 nginx 支持 SSL
[root@c7-1 ~]#vim /usr/local/nginx/conf/nginx.conf
......
http {
......
    server {
        listen       80;
        listen       443 default  ssl;  #监听433端口
                keepalive_timeout 100;  #开启 keepalive 激活 keepalive 长连接,减少客户端请求次数

                   ssl_certificate      /root/zhengshu/local.crt;   #server 端证书位置
                   ssl_certificate_key  /root/zhengshu/local.key;   #server 端私钥位置

                        ssl_session_cache    shared:SSL:10m;         # 缓存 session 会话
                        ssl_session_timeout  10m;                    # session 会话 10 分钟过期

                   ssl_ciphers  HIGH:!aNULL:!MD5;
                   ssl_prefer_server_ciphers  on;
        server_name  localhost;
        charset utf-8;
        location / {
            root   html;
            index  index.html index.htm;
        }
        error_page   500 502 503 504  /50x.html;
        location = /50x.html {
            root   html;
        }
    }
......
[root@c7-1 ~]#nginx -t
nginx: the configuration file /usr/local/nginx/conf/nginx.conf syntax is ok
nginx: configuration file /usr/local/nginx/conf/nginx.conf test is successful
[root@c7-1 ~]#nginx -s reload


需要注意的是https并不是强制的,如果https应用不提供证书,访问的时候会提示可忽略证书信息。


14. Nginx 配置 TCP 转发
重新编译
pkill -9 nginx
ps aux | grep nginx
mv /usr/local/nginx/sbin/nginx /usr/local/nginx/sbin/nginx.bak
ll /usr/local/nginx/sbin/
cd /opt/nginx-1.23.1
./configure --prefix=/usr/local/nginx --user=nginx --group=nginx --with-http_stub_status_module  --with-http_ssl_module  --with-file-aio  --with-http_realip_module  --with-stream  --with-stream_ssl_module
make  # 不要 make install,会覆盖安装了
cp /opt/nginx-1.23.1/objs/nginx /usr/local/nginx/sbin/
ll /usr/local/nginx/sbin/
nginx -t
nginx -V
systemctl start nginx
systemctl status nginx
配置 nginx.conf 实现 TCP 请求转发
worker_processes  1;

events {
    worker_connections  1024;
}

# 此为 TCP 转发请求
stream {
    # 后端指向 server 的 28017 端口 stream_mongo 组
    upstream stream_mongo {
         server 192.168.62.15:28017;
         server 192.168.62.37:28017;
    }

    # 后端指向 server 的 8090 端口 cns组
    upstream stream_mysql {
         server 192.168.62.15:3306;
         server 192.168.62.37:3306;
    }

    #server {
    #    listen                443 ssl;
    #    proxy_pass            stream_backend;
    #    # 指定key 和 crt 地址
    #    ssl_certificate       /etc/ssl/certs/my.crt;
    #    ssl_certificate_key   /etc/ssl/certs/my.key;
    #    ssl_protocols         SSLv3 TLSv1 TLSv1.1 TLSv1.2;
    #    ssl_ciphers           HIGH:!aNULL:!MD5;
    #    ssl_session_cache     shared:SSL:20m;
    #    ssl_session_timeout   4h;
    #    ssl_handshake_timeout 30s;
    #}

    server {
        # 本机监听端口 28017
        listen                28017;

        # 请求抛给 stream_mongo 组
        proxy_pass            stream_mongo;
    }
    server {
        # 本机监听端口 3306
        listen                3306;

        # 请求抛给 stream_mysql 组
        proxy_pass            stream_mysql;
    }
}

http {
    include       mime.types;
    default_type  application/octet-stream;

    #log_format  main  '$remote_addr - $remote_user [$time_local] "$request" '
    #                  '$status $body_bytes_sent "$http_referer" '
    #                  '"$http_user_agent" "$http_x_forwarded_for"';

    #access_log  logs/access.log  main;

    sendfile        on;
    #tcp_nopush     on;

    #keepalive_timeout  0;
    keepalive_timeout  65;

    #gzip  on;

    server {
        listen       80;
        server_name  localhost;

        #charset koi8-r;

        #access_log  logs/host.access.log  main;

        location / {
            root   html;
            index  index.html index.htm;
        }

        #error_page  404              /404.html;

        # redirect server error pages to the static page /50x.html
        #
        error_page   500 502 503 504  /50x.html;
        location = /50x.html {
            root   html;
        }

        # proxy the PHP scripts to Apache listening on 127.0.0.1:80
        #
        #location ~ \.php$ {
        #    proxy_pass   http://127.0.0.1;
        #}

        # pass the PHP scripts to FastCGI server listening on 127.0.0.1:9000
        #
        #location ~ \.php$ {
        #    root           html;
        #    fastcgi_pass   127.0.0.1:9000;
        #    fastcgi_index  index.php;
        #    fastcgi_param  SCRIPT_FILENAME  /scripts$fastcgi_script_name;
        #    include        fastcgi_params;
        #}

        # deny access to .htaccess files, if Apache's document root
        # concurs with nginx's one
        #
        #location ~ /\.ht {
        #    deny  all;
        #}
    }
}
15. Nginx 配置 UDP 转发
说明
使用 nginx 转发时,如果一个服务包含多个协议(如 http、websocket、udp),那么直接使用 http 模块就会变得非常复杂,这时我们引用 stream 模块进行配置。
重新编译
UDP 使用的也是 --with-stream 模块,stream 模块不属于 http 内部,所以配置内容需要和 http{} 平级,且编写在 events 模块之后。
配置 nginx.conf 实现 UDP 请求转发
......
    events {
        use epoll;
        worker_connections 1024;
    }

# TCP 转发:发送 TCP 数据到 3500 端口,3306 端口可以接收
    stream {
      server {
      listen 3500;
      proxy_pass 127.0.0.1:3306;
      # 也支持 socket
      # proxy_pass unix:/tmp/mysql.socket;
      }
    }

# UDP 转发:发送 UDP 数据到 3000 端口,3001 端口可以接收
    stream {
      server {
      listen 3000 udp;
      proxy_pass 127.0.0.1:3001;
      }
    }
......
一文带你了解 SLB、F5、Nginx 负载均衡
Linux curl 命令详解
curl 的用法指南
TCP/IP 三次挥手和四次握手讲解
Tcpdump + Wireshark 抓取 Nginx-https 协议数据
Wireshark 如何抓包
Nginx 的 UDP 转发配置


【推荐】编程新体验,更懂你的AI,立即体验豆包MarsCode编程助手
【推荐】凌霞软件回馈社区,博客园 & 1Panel & Halo 联合会员上线
【推荐】抖音旗下AI助手豆包,你的智能百科全书,全免费不限次数
【推荐】博客园社区专享云产品让利特惠,阿里云新客6.5折上折
【推荐】轻量又高性能的 SSH 工具 IShell:AI 加持,快人一步
· 一个费力不讨好的项目,让我损失了近一半的绩效!
· 清华大学推出第四讲使用 DeepSeek + DeepResearch 让科研像聊天一样简单!
· 实操Deepseek接入个人知识库
· CSnakes vs Python.NET:高效嵌入与灵活互通的跨语言方案对比
· Plotly.NET 一个为 .NET 打造的强大开源交互式图表库