基于 python3+nginx 的 Jupyter Notebook 服务端 ssl 访问
引言
Jupyter Notebook(原名 ipython)可是科学计算界的必备工具,友好的界面,方便的交互,支持 Markdown,集中的极客们想要的一切特点,同时又制作的如此优雅和精美,真是难能可贵的又好看又好用的工具。
官网
https://jupyter.org/
并行计算支持
Jupyter Notebook 支持并行计算,而且很全面,像 MPI,OpenMP 等,支持部署在集群上,具体可以参考:https://ipyparallel.readthedocs.io/en/latest/。
多语言支持
这里的语言不是英语、汉语,而是不同的编程语言,包括在科学界很流行的 julia、Matlab、C、C#、R、Perl 等,超多支持,具体可以看这个表:https://github.com/jupyter/jupyter/wiki/Jupyter-kernels。
桌面端的环境搭建
按照官网的说法,极其推荐 Anaconda,有需求的可以直接到 Anaconda 官网 ( https://www.anaconda.com/download/ ) 下载可用的安装包,支持 win、Linux、MacOS,真是除了手机都支持 O(∩_∩)O~。
Jupyter 服务器搭建
网上关于 Jupyter 服务器的搭建,官方给出了很好的多用户服务端 Jupyterhub,但我的需求就是在 VPS 搭建好一个 Jupyter 服务网页,完全自己用,所以搭建 Jupyterhub 有些浪费资源,转而去寻找简单的 Jupyter 服务搭建方案,这一点官网也写好文档给我们用了,但文档是用英文写的,看的不舒服,这里只把要点写出来,供参考。
英文文档地址在此:http://jupyter-notebook.readthedocs.io/en/latest/public_server.html,英文好的小伙伴可以直接去实施。
1. 安装 Jupyter Notebook
下载 minicanda,并安装(miniconda 就是一个精简版的 Anaconda。当然,有兴趣的也可去直接安装 Anaconda,Anaconda 已经包含了完整的 jupyter 和 ipython 包,不需要额外再安装)。
Miniconda 下载地址:https://conda.io/miniconda.html。
Anaconda下载地址:https://www.anaconda.com/download/。
对于 python3,就要对应下载 Miniconda3,相似的是对于 python2,就要下载 Miniconda2。
wget https://repo.continuum.io/miniconda/Miniconda3-latest-Linux-x86_64.sh
然后,安装 Miniconda。
sh Miniconda3-latest-Linux-x86_64.sh
Miniconda 包含了一个完整的 python3 版本,如果加入系统的环境变量( ~/.bashrc 中加入 export 语句,详情可以谷歌 bashrc ),那么系统默认的 python 就是刚刚安装的 miniconda 中的 python,这样做的好处是,直接在系统中使用 pip 安装需要的包之后,在网页上的 jupyter 也有了相应的包,很是方便。
之后就可以使用 conda 的包管理系统,安装需要的包。
conda install ipython
conda install jupyter
对于 python3,需要安装 jupyter 这个包,如果是 Python2,需要安装 ipython-notebook 的包。
至此,jupyter 的安装已经完成。
2. 配置 Jupyter Notebook
下面的命令会在 ~/.jupyter 自动创建一个配置文件 jupyter_notebook_config.py。
$ jupyter notebook --generate-config
Writing default config to: /home/shenweiyan/.jupyter/jupyter_notebook_config.py
可以配置的项目有很多,有时间的话,可以仔细阅读配置文件中的注释,写的很清楚。
这里要强调的是创建密码的方法,总不想让自己的 jupyter 服务器被其他人使用吧。执行下面语句:
$ python -c "import IPython;print(IPython.lib.passwd())"
Enter password:
Verify password:
sha1:bda74221176f:ae266f5xxxxxxxxxxxxxxxxxxxxxxxx1
然后将得到的 sha1 复制到配置文件 jupyter_notebook_config.py 中的相应位置:
c.NotebookApp.password = 'sha1:bda74221176f:ae266f5xxxxxxxxxxxxxxxxxxxxxxxx1'
配置文件中,还有几处要修改:
c.NotebookApp.ip = '127.0.0.1'
c.NotebookApp.allow_origin = '*'
c.NotebookApp.open_browser = False
c.NotebookApp.port = 8888
如此这般之后,配置完成咯!
3. 运行
执行命令:
$ jupyter notebook
就可以看到 jupyter notebook 执行的日志信息:

这是尚不能打开网页,因为是配置在 127.0.0.1 上的,只有本机可以访问。
4. 域名解析
配置 nginx 前需要把你已经申请的域名跟 Jupyter Notebook 的服务器 ip 进行绑定解析。
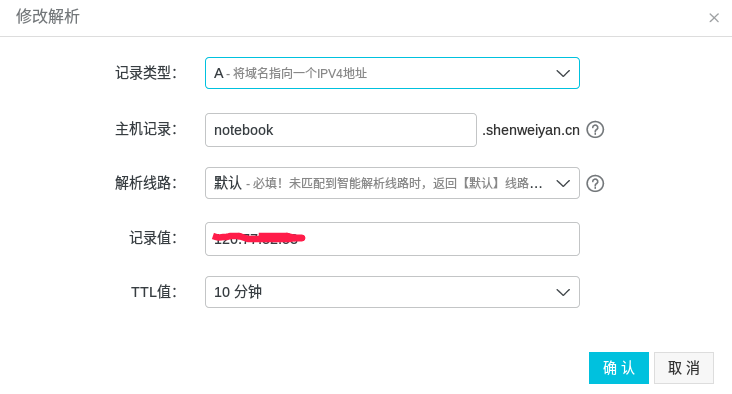
打开阿里云域名管理,增加 A 记录解析:(记录值填写 Jupyter 服务器的公网 IP)
5. 配置nginx
nginx 是一个高效的服务器,著名的 LNMP 中的 N,相信很多在 VPS 搭建过网站的小伙伴一定不陌生。
这里假设你已经安装好了 nginx,如果不会安装可以自行百度。
nginx 创建一个虚拟主机 vhost,然后配置文件参考下面:
upstream notebook {
server localhost:8888;
}
server {
listen 80;
server_name xxx.xxxx.com;
rewrite ^/(.*) https://xxx.xxxx.com/$1 permanent;
}
server{
listen 443 ssl;
index index.html index.htm index.php default.html default.htm default.php;
server_name xxx.xxxx.com;
root /home/wwwroot/xxx.xxxx.com;
ssl_certificate /etc/letsencrypt/live/xxx.xxxx.com/fullchain.pem;
ssl_certificate_key /etc/letsencrypt/live/xxx.xxxx.com/privkey.key;
ssl_ciphers "EECDH CHACHA20:EECDH CHACHA20-draft:EECDH AES128:RSA AES128:EECDH AES256:RSA AES256:EECDH 3DES:RSA 3DES:!MD5";
ssl_protocols TLSv1 TLSv1.1 TLSv1.2;
ssl_prefer_server_ciphers on;
ssl_session_cache shared:SSL:10m;
location / {
proxy_pass http://notebook;
proxy_set_header Host $host;
}
location ~ /api/kernels/ {
proxy_pass http://notebook;
proxy_set_header Host $host;
# websocket support
proxy_http_version 1.1;
proxy_set_header Upgrade "websocket";
proxy_set_header Connection "Upgrade";
proxy_read_timeout 86400;
}
location ~ /terminals/ {
proxy_pass http://notebook;
proxy_set_header Host $host;
# websocket support
proxy_http_version 1.1;
proxy_set_header Upgrade "websocket";
proxy_set_header Connection "Upgrade";
proxy_read_timeout 86400;
}
}
其中 fullchain.pem 与 privkey.key 是你的网址的 SSL 证书,如果没有,可以参考 Letsencrypt 免费证书。
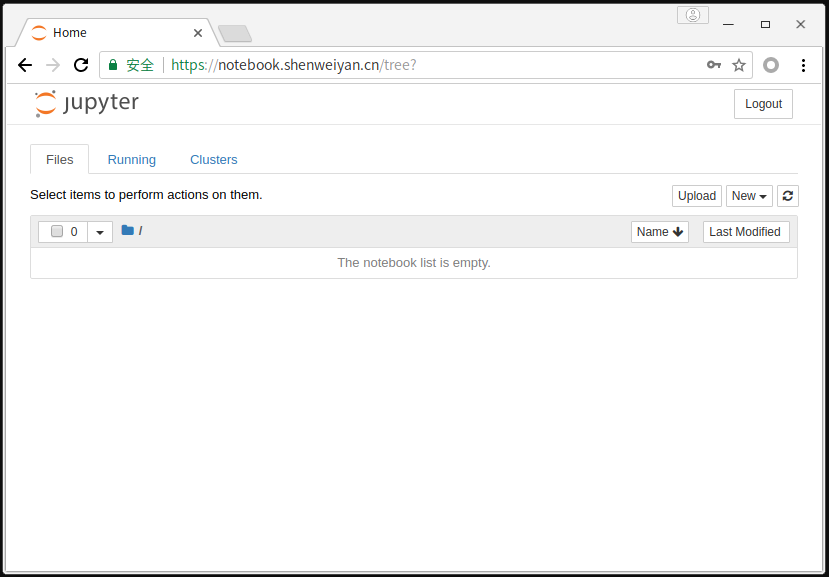
至此,大功告成,打开你的网址 xxx.xxx.com 是不是可以看到熟悉的 jupyter 了呢?如有疑问,欢迎留言讨论。O(∩_∩)O~
·end·
—如果喜欢,快分享给你的朋友们吧—
我们一起愉快的玩耍吧
本文分享自微信公众号 - 生信科技爱好者(bioitee)。
如有侵权,请联系 support@oschina.cn 删除。
本文参与“OSC源创计划”,欢迎正在阅读的你也加入,一起分享。
