vue--百度地图点覆盖和区域划分
项目中接到一个这样的需求,需要展示公司所有员工在本市的住址分布情况,需要展示员工信息,需要展示本市疫情中风险地区并用红色覆盖,弹框展示信息,以及快速定位该区域。
em。。。很紧急,领导要看。
来吧,二话不说打开百度地图api来研究,官方地址:http://lbsyun.baidu.com/
打开api文档的时候,瞬间被泼冷水,公司网络不能使用,拦截掉了吗?不服气的我立马申请了密钥,创建了项目,写了个例子,果不其然,拦截了。这里没有研究怎么解决,毕竟公司大部分用的内网。时间紧急,放弃。。。

捣腾半天,发现百度地图api有专门供vue使用的,可以百度搜vue-baidu-map,中文文档地址:https://dafrok.github.io/vue-baidu-map/#/zh/other/boundary。
写了个小demo,发现还是有上面的问题。切到外网,就可以了,啊。。。咋整
突然想起以前写的一个百度地图覆盖物的小笔记,哈,还可以这样,不管了,先把功能整出来,上干货(这里就不使用vue-baidu-map了,下次有需求再写写)
index.html文件中引用,密钥ak就不贴出来了,可以自己申请:http://lbsyun.baidu.com/apiconsole/key#/home
<script src="http://api.map.baidu.com/api?v=3.0&ak=xxx"></script>
index.vue文件
<template>
    <div class="home">
        <div class="title">
            <p>中风险地区:</p>
            <Row v-for="(item,index) in contentArray" :key="index">
                <Col class="ground"><span @click="goTake(index)">{{index+1}}、{{item}}</span></Col>
            </Row>
        </div>
        <div style="position:absolute;top:0;left:0;z-index:998;width:100%;height:100%;border:#ccc solid 1px;font-size:12px" id="map"></div>
    </div>
</template>
initMap() {
    let map = new BMap.Map('map');
    let _this = this;
    _this.map = map;

    let point = new BMap.Point(121.48053886017651, 31.235929042252014) // 创建点坐标
    map.centerAndZoom(point, 12) // 初始化地图,设置中心点坐标和地图级别
    map.enableScrollWheelZoom(true) //开启鼠标滚轮缩放

    map.addControl(new BMap.NavigationControl()) //添加默认缩放平移控件
    map.addControl(new BMap.ScaleControl({anchor: BMAP_ANCHOR_BOTTOM_LEFT})) //向地图中添加比例尺控件
    map.addControl(new BMap.OverviewMapControl())
    map.addControl(new BMap.MapTypeControl())
    //map.setMapStyle({ style: 'midnight' }) //地图风格
}
重点来了,如何在地图上创建点覆盖和区域划分覆盖,达到显示员工信息分布和中风险地区显示的目的。
首先点覆盖,公司整了份在线excel文档,里面有所有员工信息,那么如何把所有信息都展示在地图上呢,后台很忙,没空把这些数据导入数据库,再整个接口给我,所以自己想办法呗,不就是转成json数据嘛。。。百度搜索excel在线转json,地址:http://www.jsonla.com/excel2json/,顺便还格式化了一下,美滋滋
init() {
    this.custArr = require('../../../../static/json/person.json');
//             this.$axios.get(URL).then((res) => {
    //    this.custArr = res.data
       this.initMap();
       this.getPoints();
    // })
},
json放在了static文件中,这里没有用axios,直接用的require,使用相对路径是为了打包后路径依然正确。相信用过这种获取文件方式的人都遇到过打包后路径不对的问题,这里不做考究。
var myGeo = new BMap.Geocoder();

this.custArr.forEach((item,index) => {
    if(!item.address) return
    myGeo.getPoint(item.address, function(point){
        if (point) {
            let address = new BMap.Point(point.lng, point.lat);//创建坐标点
                // console.log(item.name,item.address,address)

            let opts = {
                width:250,
                height: 100,
                title: ''
            };
            let label = new BMap.Label(item.name,{offset:new BMap.Size(25,5)})
            label.setStyle({
                color: 'blue',
                borderRadius: '3px',
                borderColor: 'blue',
                padding: '0 3px',
                fontFamily: '微软雅黑'
            });
            let content = '<div>';
                content += '<p style="height:20px;line-height:20px;">二级部门:' + item.department + '</p>';
                content += '<p style="height:20px;line-height:20px;">姓名:' + item.name + '</p>';
                content += '<p style="height:20px;line-height:20px;">手机号:' + item.phone + '</p>';
                content += '<p style="height:20px;line-height:20px;overflow: hidden;text-overflow: ellipsis;white-space: nowrap;" title="'+item.address+'">住址:' + item.address + '</p>';
                content += '<p style="height:20px;line-height:20px;">小区名:' + item.village + '</p>';
            let infoWindows = new BMap.InfoWindow(content,opts);
            _this.addMarker(address,label,infoWindows);
        }
    },'中国');
})

if(this.boundariesArr.length != 0){
    setTimeout(function () {
        _this.getBoundary(map);
    }, 2000);
}
addMarker (points,label,infoWindows) {
    let greenIcon = new BMap.Icon(require("./images/greenIcon.png"), new BMap.Size(26, 26));
    let markers = new BMap.Marker(points, {icon: greenIcon});
    this.map.addOverlay(markers);
    markers.setLabel(label);
    markers.addEventListener("click",function (event) {
        this.map.openInfoWindow(infoWindows,points);//参数:窗口、点  根据点击的点出现对应的窗口
    });
},
getBoundary(map) {
    let polygons = [];

    let colors = ["#b95817", "#fff492", "#fff492"];

    let pointArray = [];
    this.boundariesArr.forEach(item => {
        var ply = new BMap.Polygon(item, { strokeWeight: 2, strokeColor: "#ff0000" }); //建立多边形覆盖物
        ply.setFillColor(colors[0])   //设置多边形的填充颜色
        ply.setFillOpacity(0.35);

        // ply.enableEditing();  //范围可编辑
        polygons.push(ply);  //加入多边形数组,以之后获取多边形边界点集

        map.addOverlay(ply);  //添加覆盖物
        pointArray = pointArray.concat(ply.getPath());
    })
    // console.log(pointArray,123);
    // map.setViewport(pointArray);    //调整视野
    this.addlabel(map);
},
这里创建点覆盖,和区域覆盖贴了部分代码,大部分都是官网api就能看到。
最重要的问题来了,区域覆盖,如何获取行政区域区级以下边界的点集,查了很多资料,大部分也没有说出个所以然来,其实很简单,百度地图自己就带有这样的功能。
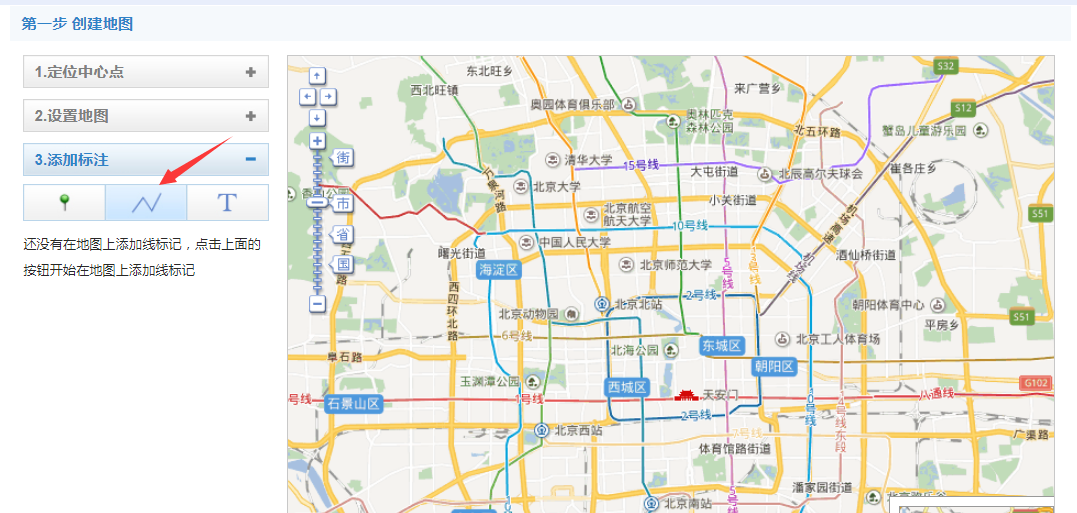
先上个地址:http://api.map.baidu.com/lbsapi/creatmap/, 一看是不是就明悟了一些

这里是可以自己标注范围的,只要切换至你想要的省市,在地图上找到你要的区域,标注好。获取代码,你可以找到标注线数组集合,改下格式就能用了
getPoints() {
    let _this = this;
    _this.boundariesArr = ["121.761489,31.147357;121.762207,31.145394;121.76713,31.146785;121.766375,31.148485;121.761525,31.147357;121.761489,31.147357","121.583571,31.110795;121.587757,31.111769;121.588799,31.10809;121.588781,31.107054;121.588386,31.105848;121.584883,31.105848;121.583589,31.11078;121.583571,31.110795","121.746989,31.179173;121.748642,31.1763;121.754391,31.17837;121.759494,31.179049;121.758883,31.181799;121.753134,31.18115;121.746989,31.179142","121.631745,31.195153;121.630792,31.190148;121.631152,31.189809;121.636919,31.192095;121.63505,31.195755;121.631691,31.195153"];
    _this.initMap();
},
这是我找标注的四组数据,接下来添加覆盖区就可以了
addlabel(map) {
    let pointArray = [
      new BMap.Point(121.764498, 31.147079),  //浦东新区祝桥镇航城七路450弄小区
      new BMap.Point(121.5857, 31.108059),  //周浦镇明天华城小区
      new BMap.Point(121.748229, 31.178362),  //浦东新区祝桥镇新生小区
      new BMap.Point(121.633712, 31.191616),  //张江镇顺和路126弄小区
    ];
    let optsArray = [{}, {}, {}, {}, {}, {}, {}, {}, {}, {}];
    let labelArray = [];
    for (let i = 0; i < pointArray.length; i++) {
        optsArray[i].position = pointArray[i];
        labelArray[i] = new BMap.Label(this.contentArray[i], optsArray[i]);
        labelArray[i].setStyle({
            color: "red",
            fontSize: "12px",
            height: "20px",
            borderRadius: '3px',
            lineHeight: "20px",
            fontFamily: "微软雅黑"
        });
        map.addOverlay(labelArray[i]);
    }
},


