s3fs+sersync实现数据备份
一、s3fs配置
参考链接:
https://github.com/s3fs-fuse/s3fs-fuse/wiki/Installation-Notes
https://amazonaws-china.com/cn/blogs/china/s3fs-amazon-ec2-linux/
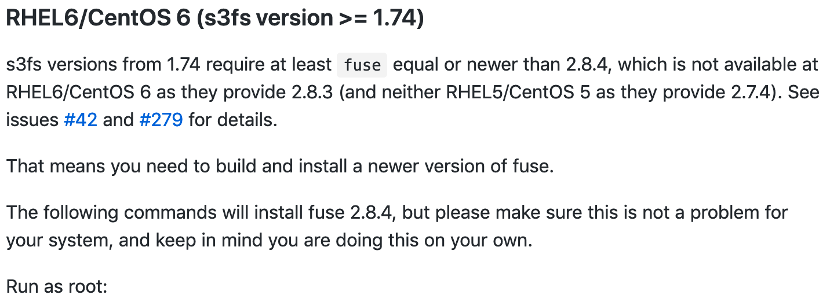
1. 操作系统环境截图


2. 安装s3fs
此处选择CentOS6,其他操作系统请参考文首链接

#yum install -y gcc libstdc++-devel gcc-c++ curl-devel libxml2-devel mailcap git automake make wget
#yum install -y openssl-devel
#wget https://github.com/libfuse/libfuse/releases/download/fuse_2_9_4/fuse-2.8.4.tar.gz
#tar zxvf fuse-2.8.4.tar.gz
#cd fuse-2.8.4/ && ./configure && make && make install
#echo -e '\\n/usr/local/lib' >> /etc/ld.so.conf
#ldconfig

#yum install -y fuse-libs

#git clone https://github.com/s3fs-fuse/s3fs-fuse
#cd s3fs-fuse/
#./autogen.sh
#export PKG_CONFIG_PATH=/usr/local/lib/pkgconfig
#./configure --prefix=/usr --with-openssl
#make
#make install
3. IAM User配置秘钥
注:IAM User需要有S3编程访问权限
#echo ACCESS_KEY_ID:SECRET_ACCESS_KEY > /etc/passwd-s3fs
#chmod 600 /etc/passwd-s3fs
4. 挂载存储桶
#s3fs s3fsbkt /s3fs-bucket/ -o passwd_file=/etc/passwd-s3fs -o url=http://s3.cn-northwest-1.amazonaws.com.cn -o endpoint=cn-northwest-1


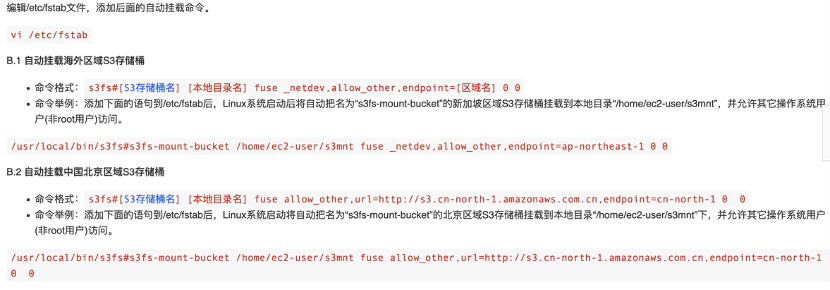
5. 配置开机自动挂载
#vi /etc/fstab
s3fs#s3fsbkt /s3fs-bucket fuse allow_other,url=http://s3.cn-northwest-1.amazonaws.com.cn,endpoint=cn-northwest-1 0 0
#mount -a

二、sersync+rsync配置
参考链接:
https://www.cnblogs.com/f-ck-need-u/p/7220009.html#auto_id_8
https://www.cnblogs.com/f-ck-need-u/p/7220193.html
https://code.google.com/archive/p/sersync/
1. 安装sersync
# wget https://storage.googleapis.com/google-code-archive-downloads/v2/code.google.com/sersync/sersync2.5.4_64bit_binary_stable_final.tar.gz
# tar zxvf sersync2.5.4_64bit_binary_stable_final.tar.gz
# cp -a GNU-Linux-x86 /usr/local/sersync
# echo "PATH=$PATH:/usr/local/sersync" > /etc/profile.d/sersync.sh
# source /etc/profile.d/sersync.sh

2. 配置rsyncd.conf
vi /etc/rsyncd.conf
uid=root
gid=root
max connections=1000
use chroot=no
log file=/var/log/rsyncd.log
pid file=/var/run/rsyncd.pid
lock file=/var/run/rsync.lock
[zfspool_backup]
path=/zfspool_backup_s3
ignore eerors=yes
read only=false
hosts allow=*
3. 启动rsync
rsync –daemon

写入开机自启动
vim /etc/rc.local
/usr/bin/rsync –daemon
4. 配置/usr/local/sersync/confxml.xml
<?xml version="1.0" encoding="ISO-8859-1"?>
<head version="2.5">
<host hostip="localhost" port="8008"></host>
<debug start="false"/>
<fileSystem xfs="false"/>
<filter start="false">
<exclude expression="(.*)\.svn"></exclude>
<exclude expression="(.*)\.gz"></exclude>
<exclude expression="^info/*"></exclude>
<exclude expression="^static/*"></exclude>
</filter>
<inotify>
<delete start="true"/>
<createFolder start="true"/>
<createFile start="false"/>
<closeWrite start="true"/>
<moveFrom start="true"/>
<moveTo start="true"/>
<attrib start="false"/>
<modify start="false"/>
</inotify>
<sersync>
<localpath watch="/zfspool">
<remote ip="127.0.0.1" name="zfspool_backup"/>
<!--<remote ip="192.168.8.39" name="tongbu"/>-->
<!--<remote ip="192.168.8.40" name="tongbu"/>-->
</localpath>
<rsync>
<commonParams params="-az"/>
<auth start="false" users="root" passwordfile="/etc/rsync.pas"/>
<userDefinedPort start="false" port="874"/><!-- port=874 -->
<timeout start="false" time="100"/><!-- timeout=100 -->
<ssh start="false"/>
</rsync>
<failLog path="/tmp/rsync_fail_log.sh" timeToExecute="60"/><!--default every 60mins execute once-->
<crontab start="false" schedule="480"><!--600mins-->
<crontabfilter start="false">
<exclude expression="*.php"></exclude>
<exclude expression="info/*"></exclude>
</crontabfilter>
</crontab>
<plugin start="false" name="command"/>
</sersync>
<plugin name="command">
<param prefix="/bin/sh" suffix="" ignoreError="true"/> <!--prefix /opt/tongbu/mmm.sh suffix-->
<filter start="false">
<include expression="(.*)\.php"/>
<include expression="(.*)\.sh"/>
</filter>
</plugin>
<plugin name="socket">
<localpath watch="/opt/tongbu">
<deshost ip="192.168.138.20" port="8009"/>
</localpath>
</plugin>
<plugin name="refreshCDN">
<localpath watch="/data0/htdocs/cms.xoyo.com/site/">
<cdninfo domainname="ccms.chinacache.com" port="80" username="xxxx" passwd="xxxx"/>
<sendurl base="http://pic.xoyo.com/cms"/>
<regexurl regex="false" match="cms.xoyo.com/site([/a-zA-Z0-9]*).xoyo.com/images"/>
</localpath>
</plugin>
</head>
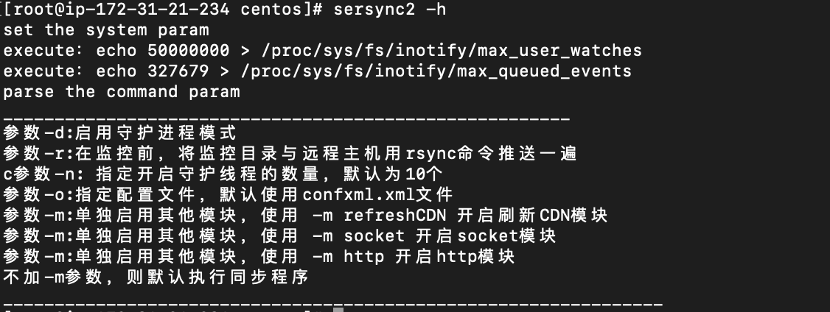
5. 启动sersync
/usr/local/sersync/sesync2 -r -d -n 1000 -o /usr/local/sersync/confxml.xml
——本文作者:赵毅鹏,沈磊

