
Linux | 03系统管理 (网络| 软件| 进程| 内存与磁盘)
系统:Centos7
1. 网络管理
配置IP地址
IP地址是计算机在互联网中唯一的地址编码,每台计算机如果需要接入网络和其他计算机进行数据通信,就必须配置唯一的公网IP地址
配置IP地址2中方法:1)setup工具; 2) vim /etc/sysconfig/network-scripts/ifcfg-eth0
重启网络服务:service network restart
复制镜像有可能需要重置UUID(唯一识别符)
vim /etc/sysconfig/network-scripts/ifcfg-eth0 #删除MAC地址行
rm -rf /etc/udev/rules.d/70-persistent-net.rules #删除MAC地址和UUID绑定文件
reboot #重启linux
- 网络状态查看
- 网络配置
- 路由命令
- 网络故障排除
- 网络服务管理
- 常用网络配置文件
网络状态
网络状态查看工具
net-tools VS iproute
①. net-tools
- ifconfig
- route
- netstat
② iproute2
- ip
- ss
网络状态查看命令
ifconfig
- eth0 第一块网卡(网络接口)
- 你的第一个网络接口可能叫做下面的名字
eno1 板载网卡
ens33 PCI-E网卡
enp0s3 无法获取物理信息的PCI-E网卡
CentOS 7 使用了一致性网络设备命名,以上都不匹配则使用eth0
网络接口命令修改
- 网卡命名规则受biosdevname和net.ifnames两个参数影响
- 编辑/etc/default/grub/ ,增加 biosdevname=0 net.ifnames=0
- 更新grub
- #grub2-mkconfig -o /boot/grub2/grub.cfg
- 重启
- #reboot
| biosdevname | net.ifnames | 网卡名 | |
| 默认 | 0 | 1 | ens33 |
| 组合1 | 1 | 0 | em1 |
| 组合2 | 0 | 0 | eth0 |
root用户直接: ifconfig
普遍用户可:/sbin/ifconfig
每个机器的网卡不一样,需要把网卡都变成 eth0 这种形式,方便管理;

$ ifconfig

#ens33网卡
ens33: flags=4163<UP,BROADCAST,RUNNING,MULTICAST>  mtu 1500
        inet 192.168.1.101 #为ip  netmask 255.255.255.0  #子网掩码  broadcast 192.168.1.255
        inet6 fe80::4e8c:8756:346a:774b  prefixlen 64  scopeid 0x20<link>
        ether 00:0c:29:28:b3:db #网卡的mark地址   txqueuelen 1000  (Ethernet)
        RX packets 45  bytes 4533 (4.4 KiB)
        RX errors 0  dropped 0  overruns 0  frame 0
        TX packets 63  bytes 9567 (9.3 KiB)
        TX errors 0  dropped 0 overruns 0  carrier 0  collisions 0  #RX 和TX是发送和 接收数据包的 个数

#lo网卡,是本地环回,它的ip地址永远都是127.0.0.1,作为测试主机ip端口号使用
lo: flags=73<UP,LOOPBACK,RUNNING>  mtu 65536
        inet 127.0.0.1  netmask 255.0.0.0
        inet6 ::1  prefixlen 128  scopeid 0x10<host>
        loop  txqueuelen 1000  (Local Loopback)
        RX packets 72  bytes 8088 (7.8 KiB)
        RX errors 0  dropped 0  overruns 0  frame 0
        TX packets 72  bytes 8088 (7.8 KiB)
        TX errors 0  dropped 0 overruns 0  carrier 0  collisions 0

#是linux做虚拟化虚拟出的网关
virbr0: flags=4099<UP,BROADCAST,MULTICAST>  mtu 1500
        inet 192.168.122.1  netmask 255.255.255.0  broadcast 192.168.122.255
        ether 52:54:00:9b:bb:8e  txqueuelen 1000  (Ethernet)
        RX packets 0  bytes 0 (0.0 B)
        RX errors 0  dropped 0  overruns 0  frame 0
        TX packets 0  bytes 0 (0.0 B)
        TX errors 0  dropped 0 overruns 0  carrier 0  collisions 0
把网卡 变成 eth0
$ sudo vim /etc/default/grub

GRUB_TIMEOUT=5
GRUB_DISTRIBUTOR="$(sed 's, release .*$,,g' /etc/system-release)"
GRUB_DEFAULT=saved
GRUB_DISABLE_SUBMENU=true
GRUB_TERMINAL_OUTPUT="console"
GRUB_CMDLINE_LINUX="rd.lvm.lv=centos/root rd.lvm.lv=centos/swap rhgb quiet"  #在这行需要增加配置项 biosdevname=0 net.ifnames=0
GRUB_DISABLE_RECOVERY="true"
~
修改后如下
GRUB_CMDLINE_LINUX="rd.lvm.lv=centos/root rd.lvm.lv=centos/swap rhgb quiet biosdevname=0 net.ifnames=0"
系统启动时读取的文件修改如下:
#转换为系统读取的文件
[root@hadoop101 ~]# grub2-mkconfig -o /boot/grub2/grub.cfg
Generating grub configuration file ...
Found linux image: /boot/vmlinuz-3.10.0-862.el7.x86_64
Found initrd image: /boot/initramfs-3.10.0-862.el7.x86_64.img
Found linux image: /boot/vmlinuz-0-rescue-5af1adb756b54f609e58101439269bd4
Found initrd image: /boot/initramfs-0-rescue-5af1adb756b54f609e58101439269bd4.img
done
重启网卡生效
# reboot
# ifconfig eth0
查看网络情况
查看网卡物理连接情况:
mii-tool eth0
查看网关命令:
route -n
使用 -n 参数不解析主机名
[kris@hadoop101 ~]$ mii-tool
No interface specified
usage: mii-tool [-VvRrwl] [-A media,... | -F media] [-p addr] <interface ...>
       -V, --version               display version information
       -v, --verbose               more verbose output
       -R, --reset                 reset MII to poweron state
       -r, --restart               restart autonegotiation
       -w, --watch                 monitor for link status changes
       -l, --log                   with -w, write events to syslog
       -A, --advertise=media,...   advertise only specified media
       -F, --force=media           force specified media technology
       -p, --phy=addr              set PHY (MII address) to report
media: 1000baseTx-HD, 1000baseTx-FD,
       100baseT4, 100baseTx-FD, 100baseTx-HD,
       10baseT-FD, 10baseT-HD,
       (to advertise both HD and FD) 1000baseTx, 100baseTx, 10baseT
[kris@hadoop101 ~]$ mii-tool eth0  #虚拟机下不支持,网络服务器上可以
SIOCGMIIPHY on 'eth0' failed: Operation not permitted
[kris@hadoop101 ~]$
[kris@hadoop101 ~]$
[kris@hadoop101 ~]$ route
Kernel IP routing table
Destination     Gateway         Genmask         Flags Metric Ref    Use Iface
default         gateway         0.0.0.0         UG    100    0        0 eth0
192.168.1.0     0.0.0.0         255.255.255.0   U     100    0        0 eth0
192.168.122.0   0.0.0.0         255.255.255.0   U     0      0        0 virbr0

[kris@hadoop101 ~]$ route -n
Kernel IP routing table
Destination     Gateway         Genmask         Flags Metric Ref    Use Iface
0.0.0.0         192.168.1.1     0.0.0.0         UG    100    0        0 eth0
192.168.1.0     0.0.0.0         255.255.255.0   U     100    0        0 eth0
192.168.122.0   0.0.0.0         255.255.255.0   U     0      0        0 virbr0
网络配置命令
- ifconfig<接口> <IP地址> [netmask 子网掩码]
- # ifconfig etho 192.168.10.101 netmask 255.255.255.0
- ifup <接口> (启动还原默认网卡)如:ifup eth0
- ifdown <接口>
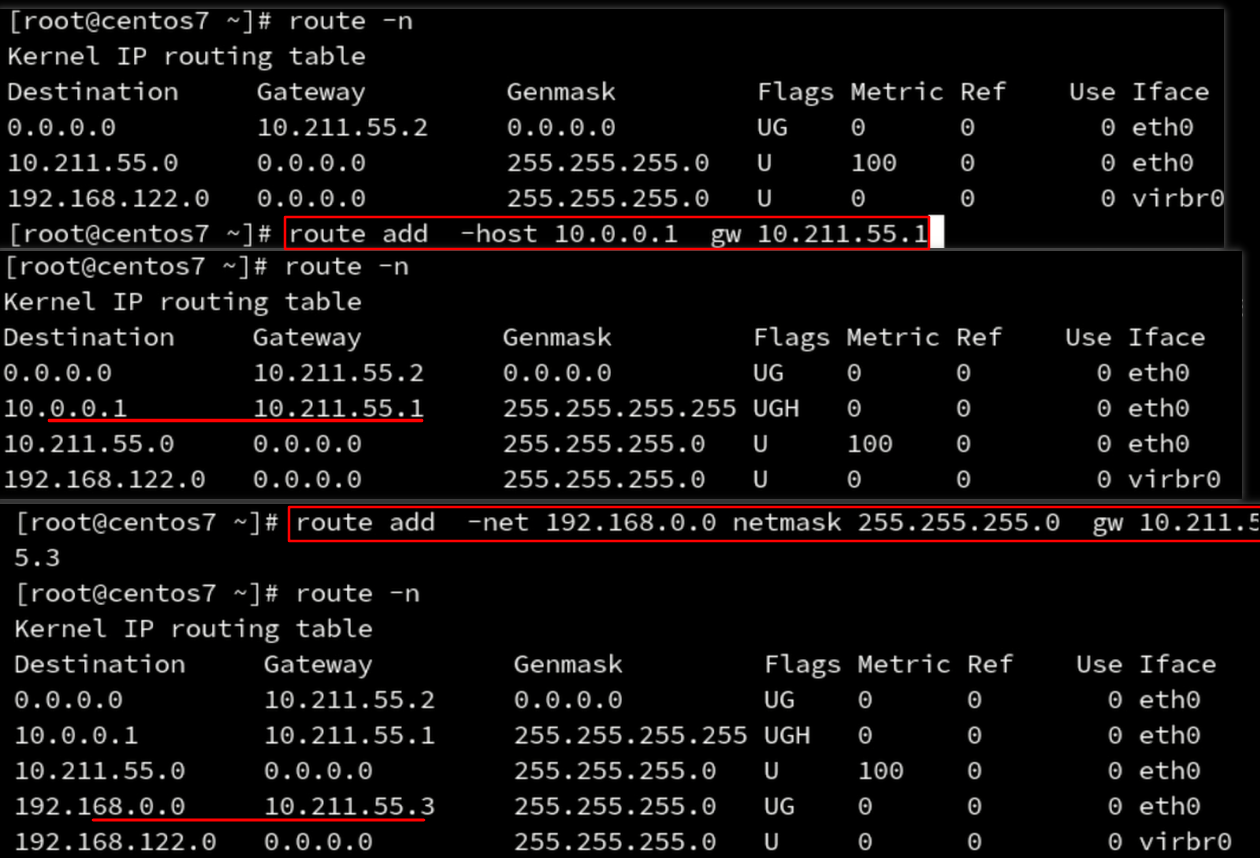
添加网关
- route add default gw <网关ip> (先删后加)
- route del default gw 192.168.10.2 先删除网关再添加 route add default gw 192.168.10.3
- route add -host <指定ip> gw <网关ip>
- route add -net <指定网段> netmask <子网掩码> gw <网关ip>
网络命令集合:ip命令
- ip addr ls
- ifconfig
- ip link set dev eth0 up
- ifup eth0
- ip addr add 10.0.0.1/24 dev eth1
- ifconfig eth1 10.0.0.1 netmask 255.255.255.0
- ip route add 10.0.0.1/24 via 192.168.0.1
- route add -net 10.0.0.0 netmask 255.255.255.0 gw 192.168.0.1
网络故障排除
网络故障排除命令
- ping
- traceroute
- mtr
- nslookup
- telnet
- tcpdump
- netstat
- ss
ping命令
主要通过ICMP协议进行网络探测,测试网络中主机的通信情况。
ping [选项] IP
选项:
-b 后面加入广播地址,用于对整个网段进行探测(知道整个网络中有多少个主机是可以和我们通信,而不是一个一个IP地址地进行探测)
-c 次数 用于指定ping的次数
-s字节 指定探测包的大小
如 ping -b -c 3 192.168.103.255
netstat
netstat [选项]
选项:
- -a 列出所有网络状态,包含socket程序
- -c 秒数 指定每隔几秒刷新一次网络状态
- -n 使用ip地址和端口号显示,不使用域名与服务名
- -p 显示PID和程序名
- -t 显示使用TCP协议端口的连接状况
- -u 显示使用UDP协议端口的连接状况
- -l 仅显示监听状态的连接
- -r 显示路由表
例如:查看本机开启的端口
netstat -tuln # -l只能看到监听状态的连接,而不能看到已经建立连接状态的连接
$ netstat -tuln
Active Internet connections (only servers)
Proto Recv-Q Send-Q Local Address           Foreign Address         State
#协议  接收队列  发生队列 本机的IP地址及端口号  远程主机的IP地址及端口号  状态
tcp        0      0 0.0.0.0:2181            0.0.0.0:*               LISTEN
tcp        0      0 0.0.0.0:9095            0.0.0.0:*               LISTEN
tcp        0      0 192.168.100.63:9000     0.0.0.0:*               LISTEN
tcp        0      0 0.0.0.0:9994            0.0.0.0:*               LISTEN
....
udp        0      0 0.0.0.0:68              0.0.0.0:*
udp        0      0 127.0.0.1:323           0.0.0.0:*
udp        0      0 0.0.0.0:7191            0.0.0.0:*
udp6       0      0 ::1:323                 :::*
udp6       0      0 :::7191                 :::*
Proto: 网络连接的协议, 一般就是TCP协议或者UDP协议。
Recv-Q: 表示接收到的数据,已经在本地的缓冲中,但是还没有被进程取走。
Send-Q: 表示从本机发送,对方还没收到的数据,依然在本地的缓冲中,一般是不具备ACK标志的数据包。
LocalAddress: 本机的IP地址和端口号
ForeignAddress: 远程主机的IP地址和端口号
State: 状态。常见的状态主要有:
-LISTEN: 监听状态,只有TCP协议需要监听,而UDP协议不需要监听。
-ESTABLISHEN: 已经建立连接的状态。如果使用-l选项,则看不到已经建立连接的状态。
-SYN_SENT: SYN发起包,就是主动发送连接的数据包
-SYN_RECV: 接收到主动连接的数据包。
-FIN_WAIT1: 正在中断的连接。
-FIN_WAIT2: 已经中断的连接,但是正在等待对方主机进行确认。
-TIME_WAIT: 连接已经中断,但是套接字依然在网络中等待结束。
-CLOSED: 套接字没有被使用。
这些状态中常用的就是LISTEN和ESTABLISHED状态,一种代表正在监听,另一种代表已经建立连接。
查看本机有哪些程序开启的端口
-p 看到哪个程序占用了端口,且可以知道这个程序的PID
netstat -tulnp
Active Internet connections (only servers)
Proto Recv-Q Send-Q Local Address           Foreign Address         State       PID/Program name
#比之前的命令多了一个 -p选项,结果多了"PID/程序名",可以知道是哪个程序占用了端口
tcp        0      0 0.0.0.0:3306            0.0.0.0:*               LISTEN      2359/mysqlld
tcp        0      0 0.0.0.0:11211           0.0.0.0:*               LISTEN      1563/memcached
$ netstat -an
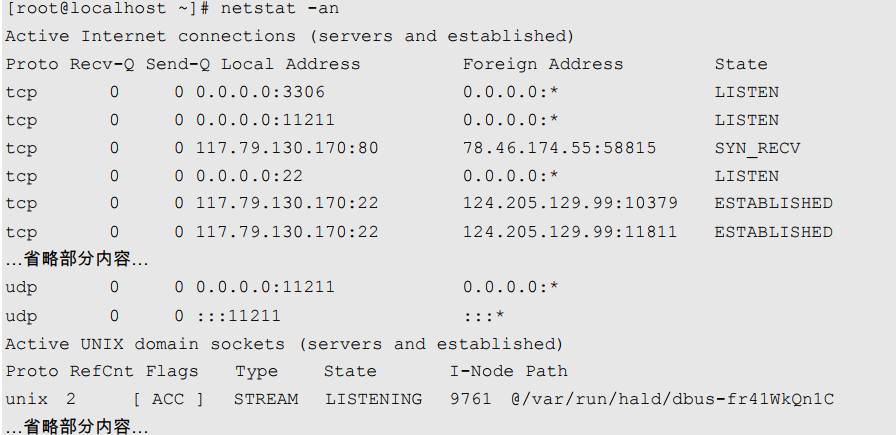
从"Active UNIX domain sockets "开始,之后的内容就是Socket程序产生的连接,之前的内容都是网络服务产生的连接。
-an选项的输出看到各种网络连接状态。 之前的 -tuln 选项只能看到监听状况。
[root@Linux100 ~]# ifconfig etho
[root@Linux100 ~]# ifconfig ens33
ens33: flags=4163<UP,BROADCAST,RUNNING,MULTICAST>  mtu 1500
        inet 192.168.10.100  netmask 255.255.255.0  broadcast 192.168.10.255
        inet6 fe80::9a69:d316:fe22:10ef  prefixlen 64  scopeid 0x20<link>
        ether 00:0c:29:87:0d:d1  txqueuelen 1000  (Ethernet)
        RX packets 20445  bytes 1413763 (1.3 MiB)
        RX errors 0  dropped 0  overruns 0  frame 0
        TX packets 3875  bytes 453334 (442.7 KiB)
        TX errors 0  dropped 0 overruns 0  carrier 0  collisions 0

[root@Linux100 ~]# route -n
Kernel IP routing table
Destination     Gateway         Genmask         Flags Metric Ref    Use Iface
0.0.0.0         192.168.10.2    0.0.0.0         UG    100    0        0 ens33
192.168.10.0    0.0.0.0         255.255.255.0   U     100    0        0 ens33
192.168.122.0   0.0.0.0         255.255.255.0   U     0      0        0 virbr0
[root@Linux100 ~]# ping www.baidu.com
PING www.a.shifen.com (110.242.68.3) 56(84) bytes of data.
64 bytes from 110.242.68.3 (110.242.68.3): icmp_seq=1 ttl=128 time=12.8 ms
64 bytes from 110.242.68.3 (110.242.68.3): icmp_seq=2 ttl=128 time=13.4 ms
64 bytes from 110.242.68.3 (110.242.68.3): icmp_seq=3 ttl=128 time=17.8 ms
^C
--- www.a.shifen.com ping statistics ---
3 packets transmitted, 3 received, 0% packet loss, time 2020ms
rtt min/avg/max/mdev = 12.812/14.697/17.815/2.222 ms
[root@Linux100 ~]# traceroute -w 1 www.baidu.com
traceroute to www.baidu.com (110.242.68.3), 30 hops max, 60 byte packets
 1  gateway (192.168.10.2)  0.142 ms  0.081 ms  0.082 ms
 2  * * *
 3  * * *
...
20  * * *
21  * * *
22  * * *
23  *^C
[root@Linux100 ~]# mtr
[root@Linux100 ~]# nslookup www.baidu.com
Server:        192.168.10.2
Address:    192.168.10.2#53

Non-authoritative answer:
www.baidu.com    canonical name = www.a.shifen.com.
Name:    www.a.shifen.com
Address: 110.242.68.4
Name:    www.a.shifen.com
Address: 110.242.68.3

[root@Linux100 ~]# telnet
bash: telnet: 未找到命令...
[root@Linux100 ~]# yum install telnet -y
[root@Linux100 ~]# telnet www.baidu.com 80
Trying 110.242.68.4...
Connected to www.baidu.com.
Escape character is '^]'.
^C
Connection closed by foreign host.
[root@Linux100 ~]# tcpdump -i any -n port 80
tcpdump: verbose output suppressed, use -v or -vv for full protocol decode
listening on any, link-type LINUX_SLL (Linux cooked), capture size 262144 bytes
^C
0 packets captured
0 packets received by filter
0 packets dropped by kernel
[root@Linux100 ~]# tcpdump -i any -n host 10.0.0.1
tcpdump: verbose output suppressed, use -v or -vv for full protocol decode
listening on any, link-type LINUX_SLL (Linux cooked), capture size 262144 bytes
^C
[root@Linux100 ~]#
[root@Linux100 ~]#
[root@Linux100 ~]# tcpdump -i any -n host 10.0.0.1 and port 80
tcpdump: verbose output suppressed, use -v or -vv for full protocol decode
listening on any, link-type LINUX_SLL (Linux cooked), capture size 262144 bytes
[root@Linux100 ~]# tcpdump -i any -n host 10.0.0.1 and port 80 -w ./filename
tcpdump: listening on any, link-type LINUX_SLL (Linux cooked), capture size 262144 bytes

^C0 packets captured
0 packets received by filter
0 packets dropped by kernel
[root@Linux100 ~]#
[root@Linux100 ~]#
[root@Linux100 ~]# netstat -ntpl
Active Internet connections (only servers)
Proto Recv-Q Send-Q Local Address           Foreign Address         State       PID/Program name
tcp        0      0 0.0.0.0:111             0.0.0.0:*               LISTEN      728/rpcbind
tcp        0      0 192.168.122.1:53        0.0.0.0:*               LISTEN      1463/dnsmasq
tcp        0      0 0.0.0.0:22              0.0.0.0:*               LISTEN      1156/sshd
tcp        0      0 127.0.0.1:631           0.0.0.0:*               LISTEN      1160/cupsd
tcp        0      0 127.0.0.1:25            0.0.0.0:*               LISTEN      1348/master
tcp6       0      0 :::111                  :::*                    LISTEN      728/rpcbind
tcp6       0      0 :::22                   :::*                    LISTEN      1156/sshd
tcp6       0      0 ::1:631                 :::*                    LISTEN      1160/cupsd
tcp6       0      0 ::1:25                  :::*                    LISTEN      1348/master
[root@Linux100 ~]# ss
Netid  State      Recv-Q Send-Q           Local Address:Port                            Peer Address:Port
u_str  ESTAB      0      0        @/tmp/dbus-FE6VqzwsMv 31926                                      * 31925
...
[root@Linux100 ~]#
[root@Linux100 ~]# ss -ntpl
State      Recv-Q Send-Q                Local Address:Port                               Peer Address:Port
LISTEN     0      128                               *:111                                           *:*                   users:(("rpcbind",pid=728,fd=8))
LISTEN     0      5                     192.168.122.1:53                                            *:*                   users:(("dnsmasq",pid=1463,fd=6))
网络管理和配置文件
网络服务管理
网络服务管理程序分为两种,分别为SysV和 systemd (sentos7)
- service network start| stop | restart
- chkconfig -list network
- systemctl list-unit-files NetworkManager.service
- systemctl start| stop| restart| NetworkManager
- systemctl enable| disable NetworkManager
网络配置文件
- ifcfg-eth0
- /etc/hosts
[root@Linux100 ~]# service network status
已配置设备:
lo ens33
当前活跃设备:
lo ens33 virbr0
[root@Linux100 ~]# service network restart
Restarting network (via systemctl):                        [  确定  ]
[root@Linux100 ~]# systemctl list-unit-files NetworkManager.service   #network 和 NetworkManager 两套工具都可以进行管理网络
UNIT FILE              STATE
NetworkManager.service enabled

1 unit files listed.
[root@Linux100 ~]# chkconfig --list network
注:该输出结果只显示 SysV 服务,并不包含
原生 systemd 服务。SysV 配置数据
可能被原生 systemd 配置覆盖。
      要列出 systemd 服务,请执行 'systemctl list-unit-files'。
      查看在具体 target 启用的服务请执行
      'systemctl list-dependencies [target]'。
network         0:关 1:关 2:开 3:开 4:开 5:开 6:关
# 关闭 network 服务
[root@Linux100 ~]# chkconfig --level 2345 network off
[root@Linux100 ~]# chkconfig --list network
注:该输出结果只显示 SysV 服务,并不包含
原生 systemd 服务。SysV 配置数据
可能被原生 systemd 配置覆盖。

      要列出 systemd 服务,请执行 'systemctl list-unit-files'。
      查看在具体 target 启用的服务请执行
      'systemctl list-dependencies [target]'。
network         0:关 1:关 2:关 3:关 4:关 5:关 6:关
[root@Linux100 ~]# chkconfig --level 2345 network on


[root@Linux100 ~]# systemctl disable NetworkManager
Removed symlink /etc/systemd/system/multi-user.target.wants/NetworkManager.service.
Removed symlink /etc/systemd/system/dbus-org.freedesktop.NetworkManager.service.
Removed symlink /etc/systemd/system/dbus-org.freedesktop.nm-dispatcher.service.
[root@Linux100 ~]# systemctl enable NetworkManager
Created symlink from /etc/systemd/system/dbus-org.freedesktop.NetworkManager.service to /usr/lib/systemd/system/NetworkManager.service.
Created symlink from /etc/systemd/system/multi-user.target.wants/NetworkManager.service to /usr/lib/systemd/system/NetworkManager.service.
Created symlink from /etc/systemd/system/dbus-org.freedesktop.nm-dispatcher.service to /usr/lib/systemd/system/NetworkManager-dispatcher.service.

#网卡的配置文件
[root@Linux100 ~]# cd /etc/sysconfig/network-scripts/
[root@Linux100 network-scripts]# ls ifcfg-*  #一块网卡对应多个设备
ifcfg-ens33  ifcfg-lo
[root@Linux100 network-scripts]# pwd
/etc/sysconfig/network-scripts

[root@Linux100 network-scripts]# vim ifcfg-eth0
TYPE="Ethernet"
PROXY_METHOD="none"
BROWSER_ONLY="no"
BOOTPROTO="hpcp"  #hpcp是动态分配的ip地址
DEFROUTE="yes"
IPV4_FAILURE_FATAL="no"
IPV6INIT="yes"
IPV6_AUTOCONF="yes"
IPV6_DEFROUTE="yes"
IPV6_FAILURE_FATAL="no"
IPV6_ADDR_GEN_MODE="stable-privacy"
NAME="eth0"
UUID="270e3562-15ad-417c-8d7d-3b21318341f0"
DEVICE="eth0" #eth0网卡
ONBOOT="yes"  #开机时这块网卡是否被启用

#将上述修改为静态分配ip


[root@Linux100 ~]# systemctl disable NetworkManager
Removed symlink /etc/systemd/system/multi-user.target.wants/NetworkManager.service.
Removed symlink /etc/systemd/system/dbus-org.freedesktop.NetworkManager.service.
Removed symlink /etc/systemd/system/dbus-org.freedesktop.nm-dispatcher.service.
[root@Linux100 ~]# systemctl enable NetworkManager
Created symlink from /etc/systemd/system/dbus-org.freedesktop.NetworkManager.service to /usr/lib/systemd/system/NetworkManager.service.
Created symlink from /etc/systemd/system/multi-user.target.wants/NetworkManager.service to /usr/lib/systemd/system/NetworkManager.service.
Created symlink from /etc/systemd/system/dbus-org.freedesktop.nm-dispatcher.service to /usr/lib/systemd/system/NetworkManager-dispatcher.service.
[root@Linux100 ~]#
[root@Linux100 ~]# cd /etc/sysconfig/network-scripts/
[root@Linux100 network-scripts]# ls ifcfg-*
ifcfg-ens33  ifcfg-lo
[root@Linux100 network-scripts]# pwd
/etc/sysconfig/network-scripts
[root@Linux100 network-scripts]# vim ifcfg-ens33
[root@Linux100 network-scripts]# vim ifcfg-lo
[root@Linux100 network-scripts]# service network restart
Restarting network (via systemctl):                        [  确定  ]
[root@Linux100 network-scripts]# systemctl restart NetworkManager.service
[root@Linux100 network-scripts]# ifconfig ens33
ens33: flags=4163<UP,BROADCAST,RUNNING,MULTICAST>  mtu 1500
        inet 192.168.10.100  netmask 255.255.255.0  broadcast 192.168.10.255
        inet6 fe80::9a69:d316:fe22:10ef  prefixlen 64  scopeid 0x20<link>
        ether 00:0c:29:87:0d:d1  txqueuelen 1000  (Ethernet)
        RX packets 40558  bytes 21003917 (20.0 MiB)
        RX errors 0  dropped 0  overruns 0  frame 0
        TX packets 10369  bytes 1009387 (985.7 KiB)
        TX errors 0  dropped 0 overruns 0  carrier 0  collisions 0

[root@Linux100 network-scripts]# route -n
Kernel IP routing table
Destination     Gateway         Genmask         Flags Metric Ref    Use Iface
0.0.0.0         192.168.10.2    0.0.0.0         UG    100    0        0 ens33
192.168.10.0    0.0.0.0         255.255.255.0   U     100    0        0 ens33
192.168.122.0   0.0.0.0         255.255.255.0   U     0      0        0 virbr0
[root@Linux100 network-scripts]# nslookup
> server
Default server: 192.168.10.2
Address: 192.168.10.2#53
> exit

[root@Linux100 network-scripts]# hostname
Linux100
# 设置主机名
[root@Linux100 network-scripts]# hostname set-hostname xxx

#主机名和ip地址的对应关系
[root@Linux100 network-scripts]# vim /etc/hosts
2. 软件安装
软件包管理器
包管理器是方便软件安装、卸载,解决软件依赖关系的重要工具
- CentOS、RedHat 使用yum包管理器,软件安装包格式为rpm
- Debian、Ubuntu使用apt包管理器,软件安装包格式为deb
rpm包和rpm命令
RedHat软件包管理工具,类似windows里面的setup.exe
是Linux这系列操作系统里面的打包安装工具
rmp包格式
- vim-common-7.4.10-5.el7.x86_64.rpm
- 软件名称 软件版本 系统版本 平台
rpm命令常用参数
- -q 查询软件包
- -i 安装软件包
- -e 卸载软件包
//查询
[root@kris ~]# rpm -qa | grep firefox
firefox-60.4.0-1.el6.centos.x86_64
[root@kris ~]#
//卸载要先进入安装镜像的目录
[root@kris ~]# cd /mnt/cdrom/Packages
[root@kris Packages]# rpm -e firefox    //-e是卸载
//安装;-i=install安装,-v=verbose显示详细信息, -h=hash进度条
[root@kris Packages]# pwd
/mnt/cdrom/Packages
[root@kris Packages]# rpm -ivh firefox-45.0.1-1.el6.centos.x86_64.rpm
[root@Linux100 ~]# ls /dev/sr0  -l
brw-rw----+ 1 root cdrom 11, 0 10月  5 08:56 /dev/sr0
[root@Linux100 ~]# dd if=/dev/sr0 of=/xxx/xx.iso

[root@Linux100 rpms]# ls /dev/sr0  -l
brw-rw----+ 1 root cdrom 11, 0 10月  5 08:56 /dev/sr0
[root@Linux100 rpms]# mount /dev/sr0 /mnt/
mount: /dev/sr0 写保护,将以只读方式挂载
mount: /dev/sr0 已经挂载或 /mnt 忙
       /dev/sr0 已经挂载到 /mnt 上
[root@Linux100 rpms]# cd /mnt/
[root@Linux100 mnt]# ls
CentOS_BuildTag  EFI  EULA  GPL  images  isolinux  LiveOS  Packages  repodata  RPM-GPG-KEY-CentOS-7  RPM-GPG-KEY-CentOS-Testing-7  TRANS.TBL
[root@Linux100 mnt]# cd Packages/
[root@Linux100 Packages]# ls vim*
vim-common-7.4.160-4.el7.x86_64.rpm  vim-enhanced-7.4.160-4.el7.x86_64.rpm  vim-filesystem-7.4.160-4.el7.x86_64.rpm  vim-minimal-7.4.160-4.el7.x86_64.rpm  vim-X11-7.4.160-4.el7.x86_64.rpm
[root@Linux100 Packages]#

[root@Linux100 Packages]# mkdir /root/rpms
[root@Linux100 Packages]# cp vim-common-7.4.160-4.el7.x86_64.rpm vim-enhanced-7.4.160-4.el7.x86_64.rpm /root/rpms/
[root@Linux100 Packages]# cd /root/rpms/
#查看所有软件包
[root@Linux100 rpms]# rpm -qa | more

[root@Linux100 rpms]# rpm -q vim-common
vim-common-7.4.160-4.el7.x86_64
[root@Linux100 rpms]# rpm -i vim-enhanced-7.4.160-4.el7.x86_64.rpm
    软件包 vim-enhanced-2:7.4.160-4.el7.x86_64 已经安装
[root@Linux100 rpms]# rpm -e vim-enhanced

[root@Linux100 rpms]# rpm -i vim-enhanced-7.4.160-4.el7.x86_64.rpm
yum仓库
yum包管理器
- rpm包的问题
- 需要自己解决依赖关系
- 软件包来源不可靠
- CentOS yum源
- 国内镜像
常用选项
- install安装软件包
- remove卸载软件包
- list | grouplist 查看软件包
- update升级软件包
yum配置文件
基于RPM包管理,能够从指定的服务器自动下载RPM包并且安装,可以自动处理依赖性关系,并且一次安装所有依赖的软件包,无须繁琐地一次次下载、安装。
类似java中的maven工具;
修改网络YUM源

方式一:
修改关联的网络YUM源为国内镜像的网站,比如网易163。
前期文件准备
(1)前提条件linux系统必须可以联网
(2)在Linux环境中访问该网络地址:http://mirrors.163.com/.help/centos.html,在使用说明中点击CentOS6->再点击保存,如图所示
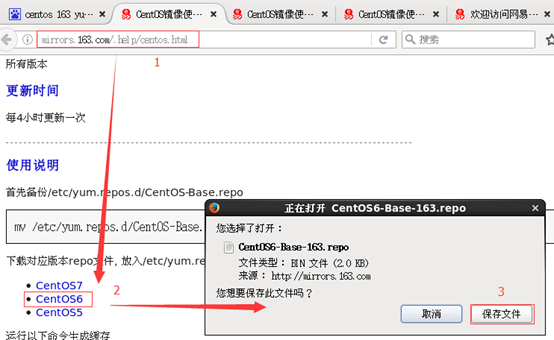
在打开的终端中输入如下命令,就可以找到文件的保存位置。
 [kris@hadoop101 下载]$ pwd
  /home/kris/下载

替换本地yum文件
(1)把下载的文件移动到/etc/yum.repos.d/目录
    [root@hadoop101 下载]# mv CentOS6-Base-163.repo /etc/yum.repos.d/
(2)进入到/etc/yum.repos.d/目录
    [root@hadoop101 yum.repos.d]# pwd
      /etc/yum.repos.d
(3)用CentOS6-Base-163.repo替换CentOS-Base.repo
    [root@hadoop101 yum.repos.d]# mv CentOS6-Base-163.repo  CentOS-Base.repo

安装
(1)[root@hadoop101 yum.repos.d]#yum clean all
(2)[root@hadoop101 yum.repos.d]#yum makecache

    yum makecache就是把服务器的包信息下载到本地电脑缓存起来

测试
[root@hadoop101 yum.repos.d]#yum list | grep firefox
[root@hadoop101 ~]#yum -y install firefox.x86_64
方式二:
wget -O /etc/yum.repos.d/CentOS-Base.repo http://mirrors.aliyun.com/repo/Centos-7.repo
[root@Linux100 rpms]# mv /etc/yum.repos.d/CentOS-Base.repo /etc/yum.repos.d/CentOS-Ease.repo.backup
[root@Linux100 rpms]#  wget -O /etc/yum.repos.d/CentOS-Base.repo  http://mirrors.aliyun.com/repo/Centos-7.repo
--2022-10-05 22:07:55--  http://mirrors.aliyun.com/repo/Centos-7.repo
正在解析主机 mirrors.aliyun.com (mirrors.aliyun.com)... 119.188.121.241, 119.188.121.243, 119.188.121.242, ...
正在连接 mirrors.aliyun.com (mirrors.aliyun.com)|119.188.121.241|:80... 已连接。
已发出 HTTP 请求,正在等待回应... 200 OK
长度:2523 (2.5K) [application/octet-stream]
正在保存至: “/etc/yum.repos.d/CentOS-Base.repo”

100%[================================================================================>] 2,523       --.-K/s 用时 0s

2022-10-05 22:07:55 (569 MB/s) - 已保存 “/etc/yum.repos.d/CentOS-Base.repo” [2523/2523])

[root@Linux100 rpms]# vim /etc/yum.repos.d/CentOS-Base.repo
[root@Linux100 rpms]# yum makecache
已加载插件:fastestmirror, langpacks
Loading mirror speeds from cached hostfile
 * base: mirrors.aliyun.com
 * extras: mirrors.aliyun.com
 * updates: mirrors.aliyun.com
base                                                                                               | 3.6 kB  00:00:00
extras                                                                                             | 2.9 kB  00:00:00
updates                                                                                            | 2.9 kB  00:00:00
(1/4): extras/7/x86_64/filelists_db                                                                | 276 kB  00:00:00
(2/4): updates/7/x86_64/filelists_db                                                               | 9.6 MB  00:00:07
extras/7/x86_64/other_db       FAILED
http://mirrors.aliyuncs.com/centos/7/extras/x86_64/repodata/78c0e5530bc46d128e18eca9ff16b2d0651efdb33434408f8ff1db4d14f1bb99-other.sqlite.bz2: [Errno 14] curl#7 - "Failed connect to mirrors.aliyuncs.com:80; Connection refused"
正在尝试其它镜像。
updates/7/x86_64/other_db      FAILED
http://mirrors.aliyuncs.com/centos/7/updates/x86_64/repodata/c77d9bfcf9560303a8a0ed85a471b8f37de3a1108682d611b81e3a65695966ba-other.sqlite.bz2: [Errno 14] curl#7 - "Failed connect to mirrors.aliyuncs.com:80; Connection refused"
正在尝试其它镜像。
(3/4): extras/7/x86_64/other_db                                                                    | 149 kB  00:00:00
(4/4): updates/7/x86_64/other_db                                                                   | 1.2 MB  00:00:00
元数据缓存已建立
[root@Linux100 rpms]# yum update
源代码编译安装
其他方式安装
二进制安装
源代码编译安装
- wget https://openresty.org/download/openresty-1.15.8.1.tar.gz
- tar -zxf openresty-VERSION.tar.gz
- cd openresty-VERSION/
- ./configure --prefix=/usr/local/openresty
- make -j2
- make install
yum install gcc gcc-c++

yum install pcre-devel
yum install openssl-devel -y

gmake -j2
内核升级
rpm格式内核
- 查看内核版本
- uname -r
- 升级内核版本
- yum install kernel-3.10.0
- 升级已安装的其他软件包和补丁
- yum update
源代码编译安装内核
- 安装依赖包
- yum install gcc gcc-c++ make ncurse-devel openssl-devel elfutils-libelf-devel
- 下载并解压缩内核
- https://www.kernel.org
- tar xvf linux-5.1..10.tar.xz -C /usr/src/kernels
- 配置内核编译参数
- cd /usr/src/kernels/linux-5.1.10/
- make menuconfig | allyesconfig | allnoconfig
- 使用当前系统内核配置
- cp /boot/config-kernelversion.platform /usr/src/kernels/linux-5.1.10/ .config
- 查看CPU
- lscpu
- 编译
- make -j2 all
- 安装内核
- make modules_install
- make install
grub配置文件
- grub是什么
- grub配置文件
- /etc/default/grub
- /etc/grub.d/
- /boot/grub2/grub.cfg
- grub2-mkconfig -o /boot/grub2/grub.cfg
- 使用单用户进入系统(忘记root密码)
3. 进程管理
进程管理
- 进程的概念与进程查看
- 进程的控制命令
- 进程的通信方式 - 信号
- 守护进程和系统日志
- 服务管理工具 systemCtl
- SELinux简介
进程的概念
- 进程 - 运行中的程序,从程序开始运行到终止的整个生命周期是可管理的
- C程序的启动是从main函数开始的
- int main(int agrc,char*argv[])
- 终止的方式并不唯一,分为正常终止和异常终止
- 正常终止也分为从main返回、调用exit等方式
- 异常终止分为调用abort、接收信号等
进程的查看命令
- PS
- pstree
- top
- 结论:
- 进程也是树形结构
- 进程和权限有着密不可分的关系
nohup和&后台运行,进程查看及终止
1.nohup
用途:不挂断地运行命令。
语法:nohup Command [ Arg … ] [ & ]
  无论是否将 nohup 命令的输出重定向到终端,输出都将附加到当前目录的 nohup.out 文件中。
  如果当前目录的 nohup.out 文件不可写,输出重定向到 $HOME/nohup.out 文件中。
  如果没有文件能创建或打开以用于追加,那么 Command 参数指定的命令不可调用。
退出状态:该命令返回下列出口值:
  126 可以查找但不能调用 Command 参数指定的命令。
  127 nohup 命令发生错误或不能查找由 Command 参数指定的命令。
  否则,nohup 命令的退出状态是 Command 参数指定命令的退出状态。
2.&
用途:在后台运行
一般两个一起用
nohup command &


查看运行的后台进程
(1)jobs -l
jobs命令只看当前终端生效的,关闭终端后,在另一个终端jobs已经无法看到后台跑得程序了,此时利用ps(进程查看命令)
(2)ps -ef
  ps -aux|grep chat.js
 a:显示所有程序
 u:以用户为主的格式来显示
 x:显示所有程序,不以终端机来区分

注:
  用ps -def | grep查找进程很方便,最后一行总是会grep自己
  用grep -v参数可以将grep命令排除掉

ps -aux|grep chat.js| grep -v grep
  再用awk提取一下进程ID
ps -aux|grep chat.js| grep -v grep | awk '{print $2}'


如果某个进程起不来,可能是某个端口被占用
查看使用某端口的进程
netstat -ap|grep 8090
查看到进程id之后,使用netstat命令查看其占用的端口
netstat -nap|grep 7779

使用kill杀掉进城后再启动
kill -9  进程号
如果想查看进程的CPU占用率和内存占用率,可以使用 ps -aux ; ps -aux | grep clickhouse-server
如果想查看进程的父进程ID可以使用 ps -ef ;
[root@hadoop myredis]# ps -ef | grep redis    //查看父子进程之间的关系;
root       5713   3334  0 18:16 pts/0    00:00:00 grep redis
[root@hadoop myredis]# redis-cli
Could not connect to Redis at 127.0.0.1:6379: Connection refused
Could not connect to Redis at 127.0.0.1:6379: Connection refused
not connected>
[root@hadoop myredis]# redis-server redis.conf
[root@hadoop myredis]# ps -ef | grep redis
UID      PID  PPID C STIME TTY    TIME  CMD
root       5716      1  0 18:17 ?        00:00:00 redis-server *:6379
root       5720   3334  0 18:17 pts/0    00:00:00 grep redis
[root@hadoop myredis]# redis-cli
127.0.0.1:6379>
UID:用户ID; PID:进程ID; PPID:父进程ID
C:CPU用于计算执行优先级的因子。数值越大,表明进程是CPU密集型运算,执行优先级会降低;数值越小,表明进程是I/O密集型运算,执行优先级会提高
STIME:进程启动的时间; TTY:完整的终端名称; TIME:CPU时间; CMD:启动进程所用的命令和参数
[kris@hadoop101 ~]$ ps -ef | grep flume| grep grep
kris      13942   2926  0 00:13 pts/0    00:00:00 grep flume
-v取反,过滤掉grep的 -v, --invert-match        select non-matching lines
xargs作为kill的参数
xargs kill -9
[root@Linux100 ~]# ps
   PID TTY          TIME CMD
  1979 pts/0    00:00:00 su
  1986 pts/0    00:00:00 bash
  2334 pts/0    00:00:00 ps
[root@Linux100 ~]# ps -e | more
   PID TTY          TIME CMD
     1 ?        00:00:01 systemd
     2 ?        00:00:00 kthreadd
     4 ?        00:00:00 kworker/0:0H
     6 ?        00:00:00 ksoftirqd/0
     7 ?        00:00:00 migration/0
     8 ?        00:00:00 rcu_bh
     9 ?        00:00:00 rcu_sched
    10 ?        00:00:00 lru-add-drain
    11 ?        00:00:00 watchdog/0
    12 ?        00:00:00 watchdog/1
    13 ?        00:00:00 migration/1
    14 ?        00:00:00 ksoftirqd/1
    16 ?        00:00:00 kworker/1:0H
    17 ?        00:00:00 watchdog/2
[root@Linux100 ~]#
[root@Linux100 ~]# ps -ef | more
UID         PID   PPID  C STIME TTY          TIME CMD
root          1      0  0 20:21 ?        00:00:01 /usr/lib/systemd/systemd --switched-root --system --deserialize 22
root          2      0  0 20:21 ?        00:00:00 [kthreadd]
root          4      2  0 20:21 ?        00:00:00 [kworker/0:0H]
root          6      2  0 20:21 ?        00:00:00 [ksoftirqd/0]
root          7      2  0 20:21 ?        00:00:00 [migration/0]
root          8      2  0 20:21 ?        00:00:00 [rcu_bh]
root          9      2  0 20:21 ?        00:00:00 [rcu_sched]
root         10      2  0 20:21 ?        00:00:00 [lru-add-drain]
root         11      2  0 20:21 ?        00:00:00 [watchdog/0]
root         12      2  0 20:21 ?        00:00:00 [watchdog/1]
root         13      2  0 20:21 ?        00:00:00 [migration/1]
root         14      2  0 20:21 ?        00:00:00 [ksoftirqd/1]
root         16      2  0 20:21 ?        00:00:00 [kworker/1:0H]
root         17      2  0 20:21 ?        00:00:00 [watchdog/2]
[root@Linux100 ~]# ps -eLf | more
UID         PID   PPID    LWP  C NLWP STIME TTY          TIME CMD
root          1      0      1  0    1 20:21 ?        00:00:01 /usr/lib/systemd/systemd --switched-root --system --deserial
ize 22
root          2      0      2  0    1 20:21 ?        00:00:00 [kthreadd]
root          4      2      4  0    1 20:21 ?        00:00:00 [kworker/0:0H]
root          6      2      6  0    1 20:21 ?        00:00:00 [ksoftirqd/0]
root          7      2      7  0    1 20:21 ?        00:00:00 [migration/0]
root          8      2      8  0    1 20:21 ?        00:00:00 [rcu_bh]
root          9      2      9  0    1 20:21 ?        00:00:00 [rcu_sched]
root         10      2     10  0    1 20:21 ?        00:00:00 [lru-add-drain]
root         11      2     11  0    1 20:21 ?        00:00:00 [watchdog/0]
root         12      2     12  0    1 20:21 ?        00:00:00 [watchdog/1]
root         13      2     13  0    1 20:21 ?        00:00:00 [migration/1]
root         14      2     14  0    1 20:21 ?        00:00:00 [ksoftirqd/1]
root         16      2     16  0    1 20:21 ?        00:00:00 [kworker/1:0H]
[root@Linux100 ~]#
[root@Linux100 ~]# pstree | more
systemd-+-ModemManager---2*[{ModemManager}]
        |-NetworkManager---2*[{NetworkManager}]
        |-VGAuthService
        |-2*[abrt-watch-log]
        |-abrtd
        |-accounts-daemon---2*[{accounts-daemon}]
        |-alsactl
        |-at-spi-bus-laun-+-dbus-daemon---{dbus-daemon}
        |                 `-3*[{at-spi-bus-laun}]
        |-at-spi2-registr---2*[{at-spi2-registr}]
        |-atd
        |-auditd-+-audispd-+-sedispatch
        |        |         `-{audispd}
        |        `-{auditd}
        |-avahi-daemon---avahi-daemon
        |-bluetoothd
[root@Linux100 ~]#
[root@Linux100 ~]# top
top - 21:02:41 up 41 min,  1 user,  load average: 0.01, 0.03, 0.05
Tasks: 192 total,   1 running, 191 sleeping,   0 stopped,   0 zombie
%Cpu(s):  0.0 us,  0.0 sy,  0.0 ni,100.0 id,  0.0 wa,  0.0 hi,  0.0 si,  0.0 st
KiB Mem :  4026120 total,  3150248 free,   517312 used,   358560 buff/cache
KiB Swap:  4194300 total,  4194300 free,        0 used.  3269284 avail Mem

   PID USER      PR  NI    VIRT    RES    SHR S  %CPU %MEM     TIME+ COMMAND
  2375 root      20   0       0      0      0 S   0.5  0.0   0:00.04 kworker/2:1
     1 root      20   0  193908   6968   4192 S   0.0  0.2   0:01.89 systemd
     2 root      20   0       0      0      0 S   0.0  0.0   0:00.02 kthreadd
     4 root       0 -20       0      0      0 S   0.0  0.0   0:00.00 kworker/0:0H
     6 root      20   0       0      0      0 S   0.0  0.0   0:00.02 ksoftirqd/0
     7 root      rt   0       0      0      0 S   0.0  0.0   0:00.06 migration/0
     8 root      20   0       0      0      0 S   0.0  0.0   0:00.00 rcu_bh
     9 root      20   0       0      0      0 S   0.0  0.0   0:00.37 rcu_sched
    10 root       0 -20       0      0      0 S   0.0  0.0   0:00.00 lru-add-drain
进程的优先级调整
- 调整优先级
- nice范围从 -20到19, 值越小优先级越高, 抢占资源就越多
- renice 重新设置优先级
- 进程的作业控制
- Jobs
- &符号
[root@Linux100 ~]# vim aaa.sh
#!/bin/bash
echo $$
while :
do
  :
done

[root@Linux100 ~]# chmod u+x aaa.sh
[root@Linux100 ~]#
[root@Linux100 ~]# ls -l aaa.sh
-rwxr--r--. 1 root root 42 10月  6 21:45 aaa.sh
[root@Linux100 ~]# id
uid=0(root) gid=0(root) 组=0(root) 环境=unconfined_u:unconfined_r:unconfined_t:s0-s0:c0.c1023
[root@Linux100 ~]#
[root@Linux100 ~]# ./aaa.sh
53900
^C
[root@Linux100 ~]# nice -n 10 ./aaa.sh
54036
^C
[root@Linux100 ~]# ./aaa.sh &
[1] 54146
[root@Linux100 ~]# 54146

[root@Linux100 ~]# jobs
[1]+  运行中               ./aaa.sh &
[root@Linux100 ~]# fg 1
./aaa.sh
^C
[root@Linux100 ~]#
[root@Linux100 ~]# ./aaa.sh
54155
^Z
[1]+  已停止               ./aaa.sh
[root@Linux100 ~]# jobs
[1]+  已停止               ./aaa.sh
[root@Linux100 ~]# fg 1
./aaa.sh

^Z
[1]+  已停止               ./aaa.sh
[root@Linux100 ~]# bg 1
[1]+ ./aaa.sh &
[root@Linux100 ~]# jobs
[1]+  运行中               ./aaa.sh &
[root@Linux100 ~]# kill -9 54155
[root@Linux100 ~]# jobs
[1]+  已杀死               ./aaa.sh


[root@Linux100 ~]# top -p 53900
top - 21:49:49 up  1:28,  2 users,  load average: 0.74, 0.26, 0.12
Tasks:   1 total,   1 running,   0 sleeping,   0 stopped,   0 zombie
%Cpu(s): 25.0 us,  0.0 sy,  0.0 ni, 75.0 id,  0.0 wa,  0.0 hi,  0.0 si,  0.0 st
KiB Mem :  4026120 total,  2994124 free,   573600 used,   458396 buff/cache
KiB Swap:  4194300 total,  4194300 free,        0 used.  3199168 avail Mem

   PID USER      PR  NI    VIRT    RES    SHR S  %CPU %MEM     TIME+ COMMAND
 53900 root      20   0  113284   1204   1020 R 100.0  0.0   1:23.54 aaa.sh


[root@Linux100 ~]# top -p 54036
top - 21:51:54 up  1:30,  3 users,  load average: 0.52, 0.37, 0.18
Tasks:   0 total,   0 running,   0 sleeping,   0 stopped,   0 zombie
%Cpu(s):  0.1 us,  0.2 sy,  0.0 ni, 99.6 id,  0.1 wa,  0.0 hi,  0.0 si,  0.0 st
KiB Mem :  4026120 total,  2988324 free,   579324 used,   458472 buff/cache
KiB Swap:  4194300 total,  4194300 free,        0 used.  3193400 avail Mem

   PID USER      PR  NI    VIRT    RES    SHR S  %CPU %MEM     TIME+ COMMAND


[root@Linux100 ~]# top -p 54155
top - 21:54:32 up  1:32,  3 users,  load average: 0.53, 0.37, 0.21
Tasks:   1 total,   1 running,   0 sleeping,   0 stopped,   0 zombie
%Cpu(s): 25.0 us,  0.1 sy,  0.0 ni, 74.9 id,  0.0 wa,  0.0 hi,  0.0 si,  0.0 st
KiB Mem :  4026120 total,  2990484 free,   577172 used,   458464 buff/cache
KiB Swap:  4194300 total,  4194300 free,        0 used.  3195560 avail Mem

   PID USER      PR  NI    VIRT    RES    SHR S  %CPU %MEM     TIME+ COMMAND
 54155 root      20   0  113284   1204   1020 R 100.0  0.0   0:43.55 aaa.sh

[root@Linux100 ~]# renice -n 15 54036
54036 (进程 ID) 旧优先级为 10,新优先级为 15
进程间通信
- 信号是进程间通信方式之一,典型用法是:终端用户输入中断命令,通过信号机制停止一个程序的运行。
- 使用信号的常用快捷和命令
- kill -l
- SIGINT 通知前台进程组终止进程 ctrl+c
- SIGKILL 立即结束程序,不能被阻塞和处理kill -9 pid
守护进程
- 使用nohup与&符号配合运行一个命令
- nohup命令使进程忽略hangup(挂起)信号
- 守护进程(daemon)和一般进程有什么差别昵?
- 使用screen 命令
- screen进入screen环境
- ctrl+a d 退出(detached)screen环境
- screen -ls 查看screen的会话
- screen -r sessionid 恢复会话
[root@Linux100 ~]# nohup tail -f /var/log/messages &
[1] 54348
[root@Linux100 ~]# nohup: 忽略输入并把输出追加到"nohup.out"

[root@Linux100 ~]# exit
登出
[blake@Linux100 ~]$


[root@Linux100 ~]# ps -ef
UID         PID   PPID  C STIME TTY          TIME CMD
root          1      0  0 20:21 ?        00:00:02 /usr/lib/systemd/systemd --switched-root --system --deserialize 22
...
root      54323   1986  0 22:05 pts/0    00:00:00 tail -f /var/log/messages
root      54324  53961  0 22:05 pts/1    00:00:00 ps -ef

[root@Linux100 ~]# ps -ef | grep tail
root      54323   1986  0 22:05 pts/0    00:00:00 tail -f /var/log/messages
root      54327  53961  0 22:05 pts/1    00:00:00 grep --color=auto tail


[root@Linux100 ~]# ps -ef | grep tail
root      54346  53961  0 22:07 pts/1    00:00:00 grep --color=auto tail
[root@Linux100 ~]# ps -ef | grep tail
root      54348   1986  0 22:07 pts/0    00:00:00 tail -f /var/log/messages
root      54350  53961  0 22:07 pts/1    00:00:00 grep --color=auto tail
[root@Linux100 ~]# ps -ef | grep tail
root      54348      1  0 22:07 pts/0    00:00:00 tail -f /var/log/messages
root      54360  53961  0 22:08 pts/1    00:00:00 grep --color=auto tail
[root@Linux100 ~]#
[root@Linux100 ~]# cd /proc/54348
[root@Linux100 54348]# ls
attr        cmdline          environ  io         mem         ns             pagemap      sched      stack    task
autogroup   comm             exe      limits     mountinfo   numa_maps      patch_state  schedstat  stat     timers
auxv        coredump_filter  fd       loginuid   mounts      oom_adj        personality  sessionid  statm    uid_map
cgroup      cpuset           fdinfo   map_files  mountstats  oom_score      projid_map   setgroups  status   wchan
clear_refs  cwd              gid_map  maps       net         oom_score_adj  root         smaps      syscall
[root@Linux100 54348]# ls -l cwd/
总用量 124
-rwxr--r--. 1 root    root     149 9月  29 23:43 10.sh
...
-rw-------. 1 root    root    1639 10月  6 22:10 nohup.out
-rw-r--r--. 1 root    root     676 10月  2 17:33 result.awk
drwxr-xr-x. 2 root    root      94 10月  5 21:35 rpms

[root@Linux100 54348]# ls -l fd
总用量 0
l-wx------. 1 root root 64 10月  6 22:11 0 -> /dev/null
l-wx------. 1 root root 64 10月  6 22:11 1 -> /root/nohup.out
l-wx------. 1 root root 64 10月  6 22:07 2 -> /root/nohup.out
lr-x------. 1 root root 64 10月  6 22:11 3 -> /var/log/messages
lr-x------. 1 root root 64 10月  6 22:11 4 -> anon_inode:inotify
[root@Linux100 54348]#
[root@Linux100 54348]# ps -ef | grep sshd
root       1209      1  0 20:21 ?        00:00:00 /usr/sbin/sshd -D
root       1927   1209  0 20:23 ?        00:00:00 sshd: blake [priv]
blake      1932   1927  0 20:23 ?        00:00:00 sshd: blake@pts/0
root      53901   1209  0 21:48 ?        00:00:00 sshd: blake [priv]
blake     53905  53901  0 21:48 ?        00:00:00 sshd: blake@pts/1
root      54038   1209  0 21:50 ?        00:00:00 sshd: blake [priv]
blake     54042  54038  0 21:50 ?        00:00:00 sshd: blake@pts/2
root      54420  53961  0 22:12 pts/1    00:00:00 grep --color=auto sshd
[root@Linux100 54348]# cd /proc/1209
[root@Linux100 1209]# ls -l cwd
lrwxrwxrwx. 1 root root 0 10月  6 22:12 cwd -> /
[root@Linux100 1209]# ls -l fd
总用量 0
lr-x------. 1 root root 64 10月  6 20:21 0 -> /dev/null
lrwx------. 1 root root 64 10月  6 20:21 1 -> socket:[26036]
lrwx------. 1 root root 64 10月  6 20:21 2 -> socket:[26036]
lrwx------. 1 root root 64 10月  6 20:21 3 -> socket:[27284]
lrwx------. 1 root root 64 10月  6 20:21 4 -> socket:[27286]
screen
[root@Linux100 ~]# screen -ls
There is a screen on:
        54627.pts-2.Linux100    (Attached)
1 Socket in /var/run/screen/S-root.

[root@Linux100 ~]# screen -r 54627
服务管理工具systemctl
- 服务(提供常见功能的守护进程)集中管理工具
- servlce
- systemctl
服务管理工具systemctl
systemctl常见操作
- systemctl start|stop|restart|reload | enable |disable 服务名称
- 软件包安装的服务单元 /usr/lib/systemd/system/
[root@Linux100 ~]# cd /etc/init.d/
[root@Linux100 init.d]# vim network
[root@Linux100 init.d]# cd /usr/lib/systemd/
[root@Linux100 systemd]# cd /usr/lib/systemd/system
[root@Linux100 system]# vim sshd.service
[root@Linux100 system]# chkconfig --list

注:该输出结果只显示 SysV 服务,并不包含
原生 systemd 服务。SysV 配置数据
可能被原生 systemd 配置覆盖。

      要列出 systemd 服务,请执行 'systemctl list-unit-files'。
      查看在具体 target 启用的服务请执行
      'systemctl list-dependencies [target]'。

netconsole         0:关    1:关    2:关    3:关    4:关    5:关    6:关
network            0:关    1:关    2:开    3:开    4:开    5:开    6:关
[root@Linux100 system]#
[root@Linux100 system]#
[root@Linux100 system]# ls sshd.service
sshd.service
[root@Linux100 system]# systemctl status sshd.service
● sshd.service - OpenSSH server daemon
   Loaded: loaded (/usr/lib/systemd/system/sshd.service; enabled; vendor preset: enabled)
   Active: active (running) since 四 2022-10-06 20:21:50 CST; 2h 14min ago
     Docs: man:sshd(8)
           man:sshd_config(5)
 Main PID: 1209 (sshd)
    Tasks: 1
   CGroup: /system.slice/sshd.service
           └─1209 /usr/sbin/sshd -D

10月 06 20:21:50 Linux100 systemd[1]: Starting OpenSSH server daemon...
10月 06 20:21:50 Linux100 sshd[1209]: Server listening on 0.0.0.0 port 22.
10月 06 20:21:50 Linux100 sshd[1209]: Server listening on :: port 22.
10月 06 20:21:50 Linux100 systemd[1]: Started OpenSSH server daemon.
10月 06 20:23:14 Linux100 sshd[1927]: Address 192.168.10.1 maps to localhost, but this does not map back to the ...TEMPT!
10月 06 20:23:14 Linux100 sshd[1927]: Accepted password for blake from 192.168.10.1 port 4368 ssh2
10月 06 21:48:34 Linux100 sshd[53901]: Address 192.168.10.1 maps to localhost, but this does not map back to the...TEMPT!
10月 06 21:48:34 Linux100 sshd[53901]: Accepted password for blake from 192.168.10.1 port 5517 ssh2
10月 06 21:50:48 Linux100 sshd[54038]: Address 192.168.10.1 maps to localhost, but this does not map back to the...TEMPT!
10月 06 21:50:48 Linux100 sshd[54038]: Accepted password for blake from 192.168.10.1 port 5548 ssh2
Hint: Some lines were ellipsized, use -l to show in full.
[root@Linux100 system]#
SELinux简介
- MAC(强制访问控制)与DAC(自主访问控制)
- 查看SELinux的命令
- getenforce
- /usr/sbin/sestatus
- ps -Z and ls -Z and id -Z
- 关闭SELinux
- setenforce0
- /etc/selinux/sysconfig
[root@Linux100 ~]# vim /etc/selinux/config
# This file controls the state of SELinux on the system.
# SELINUX= can take one of these three values:
#     enforcing - SELinux security policy is enforced.

# This file controls the state of SELinux on the system.
# SELINUX= can take one of these three values:
#     enforcing - SELinux security policy is enforced.
#     permissive - SELinux prints warnings instead of enforcing.
#     disabled - No SELinux policy is loaded.
SELINUX=enforcing
# SELINUXTYPE= can take one of three two values:
#     targeted - Targeted processes are protected,
#     minimum - Modification of targeted policy. Only selected processes are protected.
#     mls - Multi Level Security protection.
SELINUXTYPE=targeted


[root@Linux100 ~]# setenforce 0
[root@Linux100 ~]# ps -Z
LABEL                              PID TTY          TIME CMD
unconfined_u:unconfined_r:unconfined_t:s0-s0:c0.c1023 54628 pts/3 00:00:00 bash
unconfined_u:unconfined_r:unconfined_t:s0-s0:c0.c1023 55179 pts/3 00:00:00 ps
[root@Linux100 ~]# id -Z
unconfined_u:unconfined_r:unconfined_t:s0-s0:c0.c1023

[root@Linux100 ~]#
[root@Linux100 ~]# ls -Z
-rwxr--r--. root    root    unconfined_u:object_r:admin_home_t:s0 10.sh
...
drwxr-xr-x. root    root    unconfined_u:object_r:admin_home_t:s0 rpms
drwxrwxrwx. blake   group1  unconfined_u:object_r:admin_home_t:s0 test
4. 内存与磁盘管理
top 查看系统健康状态(内存-top)
[kris@hadoop100 ~]$ top -d 3  //指定top命令每隔几秒更新。默认是3秒在top命令的交互模式当中可以执行的命令:
[kris@hadoop100 ~]$ top -i  //使top不显示任何闲置或者僵死进程
[kris@hadoop100 ~]$ top -p 25723   //通过指定监控进程ID来仅仅监控某个进程的状态

可以按P(-p是以CPU使用率排序,默认就是此项 )、M(以内存的使用率排序)、N(以PID排序)对查询出的进程结果进行排序。 top -m ;top -n;
q    退出top
一、 查看内存信息
cat /proc/meminfo
MemTotal:       65806676 kB
MemFree:         1809744 kB
MemAvailable:   37895652 kB
Buffers:          347000 kB
Cached:         34101156 kB
SwapCached:            0 kB
Active:         44469596 kB
Inactive:       16590476 kB
Active(anon):   26665316 kB
Inactive(anon):     2444 kB
Active(file):   17804280 kB
Inactive(file): 16588032 kB
...

free -g
              total        used        free      shared  buff/cache   available
Mem:             62          25           1           0          35          36
Swap:             0           0           0
//总内存为 62G


二、CPU
# 总核数 = 物理CPU个数 * 每个物理CPU的核数
# 总逻辑CPU数 = 物理CPU个数 * 每个物理CPU的核数 * 超线程数

# 查看物理CPU个数
cat /proc/cpuinfo| grep "physical id"| sort| uniq| wc -l
1
# 查看每个物理CPU中core的个数(即核数)
cat /proc/cpuinfo| grep "cpu cores"| uniq
cpu cores    : 8

# 查看逻辑CPU的个数
cat /proc/cpuinfo| grep "processor"| wc -l
16

lscpu

Architecture:          x86_64
CPU op-mode(s):        32-bit, 64-bit
Byte Order:            Little Endian
CPU(s):                16         //总逻辑CPU数:物理CPU个数 * 每个物理CPU的核数*超线程数
On-line CPU(s) list:   0-15
Thread(s) per core:    2          //超线程数
Core(s) per socket:    8          //超线程数
Socket(s):             1          //物理CPU个数
NUMA node(s):          1
Vendor ID:             GenuineIntel
CPU family:            6
Model:                 85
Model name:            Intel(R) Xeon(R) Platinum 8163 CPU @ 2.50GHz
Stepping:              4
CPU MHz:               2499.990
BogoMIPS:              4999.98


# 查看CPU信息(型号)
cat /proc/cpuinfo | grep name | cut -f2 -d: | uniq -c
     16  Intel(R) Xeon(R) Platinum 8163 CPU @ 2.50GHz
磁盘空间使用情况
df 命令
df -ahT
 -a 显示特殊文件系统,这些文件系统几乎都保存在内存中。如/proc, 因为是挂载在内存中,所以占用量都是0
 -h 单位不再只是KB,而是换算成习惯单位
 -T 多出了文件系统类型一列


du命令
du [选项] [目录或文件名]
选项:
 -a 显示每个子文件的磁盘占用量。默认只统计子目录的磁盘占用量
 -h 使用习惯单位显示磁盘占用量,如KB, MB或GB
 -s 统计总占用量,而不列出子目录和子文件的占用量

du与df的区别:du用于统计文件大小的,统计的文件大小是准确的;
              df是用于统计空间大小的,统计的剩余空是准确的。
查看磁盘信息
方法一:
fdisk -l 可以看到系统上的磁盘(包括U盘)的分区以及大小相关信息。

方法二:直接查看
cat /proc/partitions
major minor  #blocks  name
 253        0   83886080 vda
 253        1   83882373 vda1
 253       16  314572800 vdb
 253       17  314571776 vdb1

lsblk
NAME   MAJ:MIN RM  SIZE RO TYPE MOUNTPOINT
vda    253:0    0   80G  0 disk
└─vda1 253:1    0   80G  0 part /
vdb    253:16   0  300G  0 disk
└─vdb1 253:17   0  300G  0 part /home/hopson/apps


df -h
Filesystem      Size  Used Avail Use% Mounted on
/dev/vda1        79G   23G   54G  30% /
devtmpfs         32G     0   32G   0% /dev
tmpfs            32G     0   32G   0% /dev/shm
tmpfs            32G  876K   32G   1% /run
tmpfs            32G     0   32G   0% /sys/fs/cgroup
/dev/vdb1       296G  174G  107G  62% /home/hopson/apps
tmpfs           6.3G     0  6.3G   0% /run/user/1000
cm_processes     32G   52M   32G   1% /home/hopson/apps/usr/webserver/cm-5.16.1/run/cloudera-scm-agent/process
tmpfs           6.3G     0  6.3G   0% /run/user/1002
tmpfs           6.3G     0  6.3G   0% /run/user/1001
df 查看磁盘空间使用情况
[kris@hadoop100 ~]$ df -h
Filesystem      Size  Used Avail Use% Mounted on
/dev/sda3        47G  3.0G   42G   7% /
tmpfs           2.0G   72K  2.0G   1% /dev/shm
/dev/sda1       190M   39M  142M  22% /boot
查看磁盘IO读写情况:iotop(需要安装一下:yum install iotop)
iotop -o(直接查看输出比较高的磁盘读写程序)
iostat I/O 和 CPU 监视工具
iostat 用于监控统计系统输入输出设备和 CPU 的使用情况。它的特点是汇报磁盘活动统计情况,同时也会汇报出 CPU 使用情况。同 vmstat 一样,iostat 也有一个弱点,就是它不能对某个进程进行深入分析,仅对系统的整体情况进行分析。
iostat [参数] [间隔时间] [报告次数]
  间隔时间:每次报告的间隔时间(秒)
  报告次数:显示报告的次数

CPU属性值:
%user    CPU 处在用户模式下的时间百分比
%nice    CPU 处在带 NICE 值的用户模式下的时间百分比
%system    CPU 处在系统模式下的时间百分比
%iowait    CPU 等待输入输出完成时间的百分比
%steal    管理程序维护另一个虚拟处理器时,虚拟 CPU 的无意识等待时间百分比
%idle    CPU 空闲时间百分比
- 内存和磁盘使用率查看
- ext4文件系统
- 磁盘配额的使用
- 磁盘的分区与挂载
- 交换分区(虚拟内存)的查看与创建
- 软件RAID的使用
- 逻辑卷管理
- 系统综合状态查看
内存使用率查看
- 常用命令介绍
- free
- top
[root@Linux100 system]# free
              total        used        free      shared  buff/cache   available
Mem:        4026120      580864     2782400       14836      662856     3190876
Swap:       4194300           0     4194300
[root@Linux100 system]# free -m
              total        used        free      shared  buff/cache   available
Mem:           3931         567        2717          14         647        3116
Swap:          4095           0        4095
[root@Linux100 system]# free -g
              total        used        free      shared  buff/cache   available
Mem:              3           0           2           0           0           3
Swap:             3           0           3
[root@Linux100 system]# top
top - 22:57:40 up  2:35,  3 users,  load average: 0.00, 0.01, 0.05
Tasks: 203 total,   1 running, 202 sleeping,   0 stopped,   0 zombie
%Cpu(s):  0.0 us,  0.0 sy,  0.0 ni,100.0 id,  0.0 wa,  0.0 hi,  0.0 si,  0.0 st
KiB Mem :  4026120 total,  2781852 free,   581392 used,   662876 buff/cache
KiB Swap:  4194300 total,  4194300 free,        0 used.  3190348 avail Mem

   PID USER      PR  NI    VIRT    RES    SHR S  %CPU %MEM     TIME+ COMMAND
   751 root      20   0  295564   5288   4040 S   0.3  0.1   0:09.39 vmtoolsd
  1208 root      20   0  583956  21844   6716 S   0.3  0.5   0:01.18 tuned
  1671 gdm       20   0 3416804 135140  60604 S   0.3  3.4   0:05.62 gnome-shell
 55303 root      20   0  162100   2312   1588 R   0.3  0.1   0:00.03 top
     1 root      20   0  194048   7160   4220 S   0.0  0.2   0:02.45 systemd
     2 root      20   0       0      0      0 S   0.0  0.0   0:00.03 kthreadd
     4 root       0 -20       0      0      0 S   0.0  0.0   0:00.00 kworker/0:0H
     6 root      20   0       0      0      0 S   0.0  0.0   0:00.08 ksoftirqd/0
     7 root      rt   0       0      0      0 S   0.0  0.0   0:00.06 migration/0
[root@Linux100 system]#
磁盘分区和文件大小查看
[root@Linux100 system]# fdisk -l

磁盘 /dev/sda:53.7 GB, 53687091200 字节,104857600 个扇区
Units = 扇区 of 1 * 512 = 512 bytes
扇区大小(逻辑/物理):512 字节 / 512 字节
I/O 大小(最小/最佳):512 字节 / 512 字节
磁盘标签类型:dos
磁盘标识符:0x0009e590

   设备 Boot      Start         End      Blocks   Id  System
/dev/sda1   *        2048     2099199     1048576   83  Linux
/dev/sda2         2099200   104857599    51379200   8e  Linux LVM

磁盘 /dev/mapper/centos-root:48.3 GB, 48314187776 字节,94363648 个扇区
Units = 扇区 of 1 * 512 = 512 bytes
扇区大小(逻辑/物理):512 字节 / 512 字节
I/O 大小(最小/最佳):512 字节 / 512 字节


磁盘 /dev/mapper/centos-swap:4294 MB, 4294967296 字节,8388608 个扇区
Units = 扇区 of 1 * 512 = 512 bytes
扇区大小(逻辑/物理):512 字节 / 512 字节
I/O 大小(最小/最佳):512 字节 / 512 字节

[root@Linux100 system]# ls -l /dev/sd?
brw-rw----. 1 root disk 8, 0 10月  6 20:21 /dev/sda
[root@Linux100 system]# ls -l /dev/sd??
brw-rw----. 1 root disk 8, 1 10月  6 20:21 /dev/sda1
brw-rw----. 1 root disk 8, 2 10月  6 20:21 /dev/sda2
[root@Linux100 system]# fdisk -l

磁盘 /dev/sda:53.7 GB, 53687091200 字节,104857600 个扇区
Units = 扇区 of 1 * 512 = 512 bytes
扇区大小(逻辑/物理):512 字节 / 512 字节
I/O 大小(最小/最佳):512 字节 / 512 字节
磁盘标签类型:dos
磁盘标识符:0x0009e590

   设备 Boot      Start         End      Blocks   Id  System
/dev/sda1   *        2048     2099199     1048576   83  Linux
/dev/sda2         2099200   104857599    51379200   8e  Linux LVM

磁盘 /dev/mapper/centos-root:48.3 GB, 48314187776 字节,94363648 个扇区
Units = 扇区 of 1 * 512 = 512 bytes
扇区大小(逻辑/物理):512 字节 / 512 字节
I/O 大小(最小/最佳):512 字节 / 512 字节


磁盘 /dev/mapper/centos-swap:4294 MB, 4294967296 字节,8388608 个扇区
Units = 扇区 of 1 * 512 = 512 bytes
扇区大小(逻辑/物理):512 字节 / 512 字节
I/O 大小(最小/最佳):512 字节 / 512 字节

[root@Linux100 system]#
[root@Linux100 system]# parted -l
Model: VMware, VMware Virtual S (scsi)
Disk /dev/sda: 53.7GB
Sector size (logical/physical): 512B/512B
Partition Table: msdos
Disk Flags:

Number  Start   End     Size    Type     File system  标志
 1      1049kB  1075MB  1074MB  primary  xfs          启动
 2      1075MB  53.7GB  52.6GB  primary               lvm


Model: Linux device-mapper (linear) (dm)
Disk /dev/mapper/centos-swap: 4295MB
Sector size (logical/physical): 512B/512B
Partition Table: loop
Disk Flags:

Number  Start  End     Size    File system     标志
 1      0.00B  4295MB  4295MB  linux-swap(v1)


Model: Linux device-mapper (linear) (dm)
Disk /dev/mapper/centos-root: 48.3GB
Sector size (logical/physical): 512B/512B
Partition Table: loop
Disk Flags:

Number  Start  End     Size    File system  标志
 1      0.00B  48.3GB  48.3GB  xfs


警告: 无法以读写方式打开 /dev/sr0 (只读文件系统)。/dev/sr0 已按照只读方式打开。
Model: NECVMWar VMware IDE CDR10 (scsi)
Disk /dev/sr0: 4470MB
Sector size (logical/physical): 2048B/2048B
Partition Table: msdos
Disk Flags:

Number  Start   End     Size    Type     File system  标志
 2      4850kB  41.7MB  36.8MB  primary


[root@Linux100 system]#
[root@Linux100 system]#
[root@Linux100 system]# df -h
文件系统                 容量  已用  可用 已用% 挂载点
devtmpfs                 2.0G     0  2.0G    0% /dev
tmpfs                    2.0G     0  2.0G    0% /dev/shm
tmpfs                    2.0G   13M  2.0G    1% /run
tmpfs                    2.0G     0  2.0G    0% /sys/fs/cgroup
/dev/mapper/centos-root   45G  4.6G   41G   11% /
/dev/sda1               1014M  206M  809M   21% /boot
tmpfs                    394M   12K  394M    1% /run/user/42
tmpfs                    394M     0  394M    0% /run/user/1000
[root@Linux100 system]# ls -lh /etc/passwd
-rw-r--r--. 1 root root 2.5K 10月  5 22:56 /etc/passwd
[root@Linux100 system]# du /etc/passwd
4    /etc/passwd
[root@Linux100 system]# cd
[root@Linux100 ~]# dd if=/dev/zero  bs=4M count=10 of=bfile
记录了10+0 的读入
记录了10+0 的写出
41943040字节(42 MB)已复制,0.0143618 秒,2.9 GB/秒
[root@Linux100 ~]# ls -lh afile
ls: 无法访问afile: 没有那个文件或目录
[root@Linux100 ~]# ls -lh bfile
-rw-r--r--. 1 root root 40M 10月  6 23:20 bfile
[root@Linux100 ~]# du -h bfile
40M    bfile
[root@Linux100 ~]# dd if=/dev/zero  bs=4M count=10 seek=20  of=bfile
记录了10+0 的读入
记录了10+0 的写出
41943040字节(42 MB)已复制,0.0944265 秒,444 MB/秒
[root@Linux100 ~]# ls -lh bfile
-rw-r--r--. 1 root root 120M 10月  6 23:21 bfile
[root@Linux100 ~]# du -h bfile
104M    bfile
常见文件系统
Linux支持多种文件系统,常见的有
- ext4
- xfs
- NTFS(需安装额外软件)
文件系统
ext4文件系统基本结构比较复杂
- 超级块
- 超级块副本
- i节点(inode)
- 数据块(datablock)
[root@Linux100 ~]# touch afile
[root@Linux100 ~]# ls -li afile
68408681 -rw-r--r--. 1 root root 0 10月  7 09:16 afile
[root@Linux100 ~]# du -h afile
0    afile
[root@Linux100 ~]# echo 123 >> afile

[root@Linux100 ~]# ls -li afile
68408681 -rw-r--r--. 1 root root 4 10月  7 09:16 afile
[root@Linux100 ~]# du -h afile
4.0K    afile
[root@Linux100 ~]#
[root@Linux100 ~]# cp afile afile2
[root@Linux100 ~]# ls -li afile*
68408681 -rw-r--r--. 1 root root 4 10月  7 09:16 afile
68408686 -rw-r--r--. 1 root root 4 10月  7 09:17 afile2
[root@Linux100 ~]# pwd
/root
[root@Linux100 ~]# mv afile2 afile3
[root@Linux100 ~]# ls -li afile*
68408681 -rw-r--r--. 1 root root 4 10月  7 09:16 afile
68408686 -rw-r--r--. 1 root root 4 10月  7 09:17 afile3
[root@Linux100 ~]#
[root@Linux100 ~]# vim afile4
[root@Linux100 ~]# ls -li afile4
67364622 -rw-r--r--. 1 root root 5 10月  7 09:20 afile4
[root@Linux100 ~]# vim afile4
[root@Linux100 ~]# ls -li afile4
67364626 -rw-r--r--. 1 root root 8 10月  7 09:20 afile4
[root@Linux100 ~]#
[root@Linux100 ~]# rm afile4
rm:是否删除普通文件 "afile4"?y
[root@Linux100 ~]#
[root@Linux100 ~]# ls -l afile
-rw-r--r--. 1 root root 4 10月  7 09:16 afile

[root@Linux100 ~]#
[root@Linux100 ~]# ls -l -i afile
68408681 -rw-r--r--. 1 root root 4 10月  7 09:16 afile
[root@Linux100 ~]# ln afile bbfile
[root@Linux100 ~]# ls -l -i afile
68408681 -rw-r--r--. 2 root root 4 10月  7 09:16 afile
[root@Linux100 ~]# ls -l -i afile bbfile
68408681 -rw-r--r--. 2 root root 4 10月  7 09:16 afile
68408681 -rw-r--r--. 2 root root 4 10月  7 09:16 bbfile
[root@Linux100 ~]# rm bbfile
rm:是否删除普通文件 "bbfile"?y
[root@Linux100 ~]# ls -l -i afile bbfile
ls: 无法访问bbfile: 没有那个文件或目录
68408681 -rw-r--r--. 1 root root 4 10月  7 09:16 afile
[root@Linux100 ~]#
[root@Linux100 ~]#
[root@Linux100 ~]# ls -li afile
68408681 -rw-r--r--. 1 root root 4 10月  7 09:16 afile
[root@Linux100 ~]# ln -s afile aafile
[root@Linux100 ~]#
[root@Linux100 ~]# ls -li afile aafile
67364624 lrwxrwxrwx. 1 root root 5 10月  7 09:25 aafile -> afile
68408681 -rw-r--r--. 1 root root 4 10月  7 09:16 afile
[root@Linux100 ~]#
[root@Linux100 ~]#
[root@Linux100 ~]# getfacl afile
# file: afile
# owner: root
# group: root
user::rw-
group::r--
other::r--

[root@Linux100 ~]# setfacl -m u:blake:r afile
[root@Linux100 ~]# ls -l afile
-rw-r--r--+ 1 root root 4 10月  7 09:16 afile
[root@Linux100 ~]# getfacl afile
# file: afile
# owner: root
# group: root
user::rw-
user:blake:r--
group::r--
mask::r--
other::r--

[root@Linux100 ~]# setfacl -m u:user1:rw afile
[root@Linux100 ~]# getfacl afile
# file: afile
# owner: root
# group: root
user::rw-
user:blake:r--
user:user1:rw-
group::r--
mask::rw-
other::r--

[root@Linux100 ~]# setfacl -m g:group1:r afile
[root@Linux100 ~]# getfacl afile
# file: afile
# owner: root
# group: root
user::rw-
user:blake:r--
user:user1:rw-
group::r--
group:group1:r--
mask::rw-
other::r--
磁盘分区与挂载
- 常用命令
- fdisk
- mkfs
- parted
- mount
- 常见配置文件
- /etc/fstab
用户磁盘配额
- ×fs文件系统的用户磁盘配额quota
- mkfs.xfs /dev/sdbl
- mkdir /mnt/diskl
- mount -o uquota,gquota /dev/sdbl /mnt/diskl
- chmod 1777 /mnt/diskl
- xfs_quota -× -c 'report -ugibh' /mnt/diskl
- xfs_quota -× -c 'limit -u isoft=5 ihard=10 user1' /mnt/diskl
交换分区
- 增加交换分区的大小
- mkswap
- swapon
- 使用文件制作交换分区
- dd if=/dev/zero bs=4M count=1024 of=/swapfile
RAID与软件RAID技术
- RAID的常见级别及含义
- RAID 0 striping条带方式,提高单盘吞吐率
- RAID 1 mirroring镜像方式,提咼可靠性
- RAID5有奇偶校验
- RAID10是RAID 1 与RAID 0 的结合
- 软件RAID的使用
逻辑卷管理
- 逻辑卷和文件系统的关系
- 为Linux创建逻辑卷
- 动态扩容逻辑卷
系统综合状态查询
- 使用sar命令查看系统综合状态
- 使用第三方命令查看网络流量
- yum install epel-release
- yum install iftop
- iftop -P
[root@Linux100 ~]# sar -u 2 10
Linux 3.10.0-1160.76.1.el7.x86_64 (Linux100)     2022年10月07日     _x86_64_    (4 CPU)

10时59分12秒     CPU     %user     %nice   %system   %iowait    %steal     %idle
10时59分14秒     all      0.12      0.00      0.00      0.00      0.00     99.88
10时59分16秒     all      0.00      0.00      0.12      0.00      0.00     99.88
10时59分18秒     all      0.00      0.00      0.00      0.00      0.00    100.00
^C
10时59分19秒     all      0.00      0.00      0.00      0.00      0.00    100.00
平均时间:     all      0.03      0.00      0.03      0.00      0.00     99.93
[root@Linux100 ~]#
[root@Linux100 ~]# sar -r 2 10
Linux 3.10.0-1160.76.1.el7.x86_64 (Linux100)     2022年10月07日     _x86_64_    (4 CPU)

10时59分37秒 kbmemfree kbmemused  %memused kbbuffers  kbcached  kbcommit   %commit  kbactive   kbinact   kbdirty
10时59分39秒   3169580    856548     21.27      1080    320832   2246640     27.33    317468    274628         0
10时59分41秒   3169580    856548     21.27      1080    320832   2246640     27.33    317468    274628         0
^C

10时59分43秒   3169580    856548     21.27      1080    320832   2246640     27.33    317468    274628         0
平均时间:   3169580    856548     21.27      1080    320832   2246640     27.33    317468    274628         0
[root@Linux100 ~]#
[root@Linux100 ~]#
[root@Linux100 ~]# sar -b 2 10
Linux 3.10.0-1160.76.1.el7.x86_64 (Linux100)     2022年10月07日     _x86_64_    (4 CPU)

10时59分49秒       tps      rtps      wtps   bread/s   bwrtn/s
10时59分51秒      0.00      0.00      0.00      0.00      0.00
10时59分53秒      0.00      0.00      0.00      0.00      0.00
^C
10时59分54秒      0.00      0.00      0.00      0.00      0.00
平均时间:      0.00      0.00      0.00      0.00      0.00
[root@Linux100 ~]# sar -d 2 10
Linux 3.10.0-1160.76.1.el7.x86_64 (Linux100)     2022年10月07日     _x86_64_    (4 CPU)

11时00分04秒       DEV       tps  rd_sec/s  wr_sec/s  avgrq-sz  avgqu-sz     await     svctm     %util
11时00分06秒    dev8-0      0.00      0.00      0.00      0.00      0.00      0.00      0.00      0.00
11时00分06秒   dev11-0      0.00      0.00      0.00      0.00      0.00      0.00      0.00      0.00
11时00分06秒  dev253-0      0.00      0.00      0.00      0.00      0.00      0.00      0.00      0.00
11时00分06秒  dev253-1      0.00      0.00      0.00      0.00      0.00      0.00      0.00      0.00

11时00分06秒       DEV       tps  rd_sec/s  wr_sec/s  avgrq-sz  avgqu-sz     await     svctm     %util
11时00分08秒    dev8-0      0.00      0.00      0.00      0.00      0.00      0.00      0.00      0.00
11时00分08秒   dev11-0      0.00      0.00      0.00      0.00      0.00      0.00      0.00      0.00
11时00分08秒  dev253-0      0.00      0.00      0.00      0.00      0.00      0.00      0.00      0.00
11时00分08秒  dev253-1      0.00      0.00      0.00      0.00      0.00      0.00      0.00      0.00
^C


11时00分08秒       DEV       tps  rd_sec/s  wr_sec/s  avgrq-sz  avgqu-sz     await     svctm     %util
11时00分10秒    dev8-0      0.00      0.00      0.00      0.00      0.00      0.00      0.00      0.00
11时00分10秒   dev11-0      0.00      0.00      0.00      0.00      0.00      0.00      0.00      0.00
11时00分10秒  dev253-0      0.00      0.00      0.00      0.00      0.00      0.00      0.00      0.00
11时00分10秒  dev253-1      0.00      0.00      0.00      0.00      0.00      0.00      0.00      0.00

平均时间:       DEV       tps  rd_sec/s  wr_sec/s  avgrq-sz  avgqu-sz     await     svctm     %util
平均时间:    dev8-0      0.00      0.00      0.00      0.00      0.00      0.00      0.00      0.00
平均时间:   dev11-0      0.00      0.00      0.00      0.00      0.00      0.00      0.00      0.00
平均时间:  dev253-0      0.00      0.00      0.00      0.00      0.00      0.00      0.00      0.00
平均时间:  dev253-1      0.00      0.00      0.00      0.00      0.00      0.00      0.00      0.00
[root@Linux100 ~]#
[root@Linux100 ~]#
[root@Linux100 ~]# sar -q 2 10
Linux 3.10.0-1160.76.1.el7.x86_64 (Linux100)     2022年10月07日     _x86_64_    (4 CPU)

11时00分13秒   runq-sz  plist-sz   ldavg-1   ldavg-5  ldavg-15   blocked
11时00分15秒         0       350      0.00      0.04      0.05         0
11时00分17秒         0       350      0.00      0.04      0.05         0
11时00分19秒         0       350      0.00      0.04      0.05         0
11时00分21秒         1       350      0.00      0.04      0.05         0
^C
11时00分22秒         0       350      0.00      0.04      0.05         0
平均时间:         0       350      0.00      0.04      0.05         0
[root@Linux100 ~]#
[root@Linux100 ~]#
[root@Linux100 ~]# iftop -P


【推荐】国内首个AI IDE,深度理解中文开发场景,立即下载体验Trae
【推荐】编程新体验,更懂你的AI,立即体验豆包MarsCode编程助手
【推荐】抖音旗下AI助手豆包,你的智能百科全书,全免费不限次数
【推荐】轻量又高性能的 SSH 工具 IShell:AI 加持,快人一步
· winform 绘制太阳,地球,月球 运作规律
· 震惊!C++程序真的从main开始吗?99%的程序员都答错了
· 【硬核科普】Trae如何「偷看」你的代码?零基础破解AI编程运行原理
· AI与.NET技术实操系列(五):向量存储与相似性搜索在 .NET 中的实现
· 超详细:普通电脑也行Windows部署deepseek R1训练数据并当服务器共享给他人